Real Time Quad Panner
This chapter requires QLab 5.3 or later with at least an audio license installed.
In QLab 5.3 there was a significant upgrade to QLab’s audio capabilities. The change log for this version noted:
FIXED: Audio discontinuities when editing audio levels or trim on a running cue.
This was a rather modest description of a major improvement to QLab audio which opened up a whole host of possibilities for real-time control of audio.
Here’s a comparison of QLab 5.2.4 and QLab 5.3 which demonstrates the difference. It’s a screen recording of an Audio cue playing a sine wave while the cue’s levels are adjusted using OSC messages.
In earlier versions of QLab, manual level changes while audio was running could result in small glitches. When levels were adjusted using OSC messages, these glitches were more frequent and the did not visibly update when receiving sequential OSC messages. QLab was not designed for live level edits during a performance. The only mechanism to change the volume which guaranteed the avoidance of glitches was running a Fade cue to adjust the volume.
In QLab 5.3, levels can be adjusted without any glitching and visual feedback is immediate, even when adjusting levels via OSC messages.
This chapter explores making good use of this new real-time control capability to construct some quad panners, both manual and automated. The end result will be four quad pan controls in TouchOSC using xy pad objects, which can be used on touch screens for manual amplitude panning or animated using Network cues.
Here it is in action:
Note: All the screen recordings in this chapter show a workspace with are four outputs that represent speaker systems named Left, Right, Left Surround, and Right Surround. Because many viewers of the screen recordings will only have stereo reproduction available, the audio in these recordings is encoded as two-track binaural audio which will give a reasonable simulation of four-track surround sound when listening on headphones. The downloadable examples are set up for playback on four-channel loudspeaker systems.
This demo shows four Audio cues playing mono files to four quad panners. Each of the four panners is fed audio from a single cue output. To pan each single cue output across four device outputs, the quad panners send OSC messages to QLab to adjust the patch routing of the audio output patch.
We first see each sound being manually panned, then we see the panner being automated using Network cues.
Quad Pan 1, the green one, receives sound from the DRUM cue and is controlled by a 2D fade with a flattened figure-eight path.
Quad Pan 2, the red one, receives sound from the HELI cue and is controlled by a 2D fade with a true figure-eight path.
Quad Pan 3, the blue one, receives sound from the CLAP cue and is controlled by a 2D fade with a scribbled path.
Quad Pan 4, the yellow one, receives sound from the AGOGO cue and is controlled by a 2D fade with a “ploughing pattern” path.
As well as explaining how this works, this chapter also examines how this project developed through several different versions. This allows a greater range of techniques to be explored and shows how testing and revising QLab workspaces can help you arrive at the optimum solution to a design problem.
TouchOSC
This chapter uses TouchOSC, an app from Hexler Industries for creating modular control surfaces which transmit MIDI and OSC to hardware or other software. TouchOSC is the successor to an earlier app, now called TouchOSC Mk1, which is still available for use on older iOS devices. This chapter uses the newer version which is simply called TouchOSC. It runs on just about any platform including Mac, Linux, Windows, iOS and iPadOS, Android, Raspberry Pi, etc. It has very advanced options for creating sophisticated control surfaces without scripting but also allows the use of Lua scripts to extend its functionality.
Converting controller XY values to decibel values
The quad panners in TouchOSC produce two-part coordinate values or “XY” values, which are two floating point numbers representing the X-axis position and Y-axis position of the control. We will need to those XY values and convert them to decibel values for four audio outputs in QLab.
All the examples in this chapter use these formulae:
Slider 1 - Left Front:
(1 - ((1 - x) * y) ^ 0.1) * -70
Slider 2 - Right Front:
(1 - (x * y) ^ 0.1) * -70
Slider 3 - Left Surround:
(1 - ((1 - x) * (1 - y)) ^ 0.1) * -70
Slider 4 - Right Surround:
(1 - (x * (1 - y)) ^ 0.1) * -70
These are relatively simple and result in good level consistency for all positions of the panner. Advanced users may be able to improve or refine these formulae.
Example 1: An automated quad panner built entirely in QLab
As a starting point, we will look at a quad panner which uses a Network cue as its controller. The 2D path that the Network cue follows will effect a quad pan by controlling four cue outputs of an Audio cue.
Here it is in action:
The pan path is drawn in the 2D fade of a Network cue. You can drag an image file to the background of the drawing area, which makes it easy to trace circles, figure-eights, etc. You can’t do any calculations within a Network cue, so we’ll use a Script cue to the conversions described above. The Network cue is programmed to adjust the translation of a disarmed Text cue, numbered VAR, with this message:
/cue/VAR/translation #x# #y#
Cue VAR also does another job for us; its name is set to the cue number of the Audio cue we want to control.
The Script cue reads the x and y values from cue VAR’s translation, and applies the formulae above to derive the decibel values for the four outputs, and then adjusts the levels for the Audio cue whose cue number is stored in VAR’s name.
Here’s the script:
--convert xy values to 4 slider levels
set p to 0.1 --exponential for power curve
set d to 0.05 --delay between fader updates
tell application id "com.figure53.QLab.5" to tell front workspace
	set theAudioCue to (first cue whose q number is (q list name of cue "VAR" as text))
	start theAudioCue
	set the selected to theAudioCue
	delay 0.1
	repeat
		set x to translation x of cue "VAR"
		set y to translation y of cue "VAR"
		setLevel theAudioCue row 0 column 1 db (1 - ((1 - x) * y) ^ p) * -70
		setLevel theAudioCue row 0 column 2 db (1 - (x * y) ^ p) * -70
		setLevel theAudioCue row 0 column 4 db (1 - (x * (1 - y)) ^ p) * -70
		setLevel theAudioCue row 0 column 3 db (1 - ((1 - x) * (1 - y)) ^ p) * -70
		delay d
	end repeat
end tell
The performance of this script is reasonable for most program material, although if you change the target Audio cue to the one targeting a sine wave (by changing the name of cue VAR to “SINE”,) some discontinuity can clearly be heard. Control is also limited to the 2D path of a Network cue, which makes manual control difficult.
Example 2: Manual control of a quad panner
To enable manual control we will use an external xy pad. We’ll start with a simple control surface created in TouchOSC Mk1. Here it is in action:
Here we have TouchOSC Mk1 running on an iPhone with a single xy pad as its only control.
TouchOSC Mk1 has no calculation abilities, so we use the same approach as the previous example, using a “dummy” Text cue to receive X and Y values and store the target cue number.
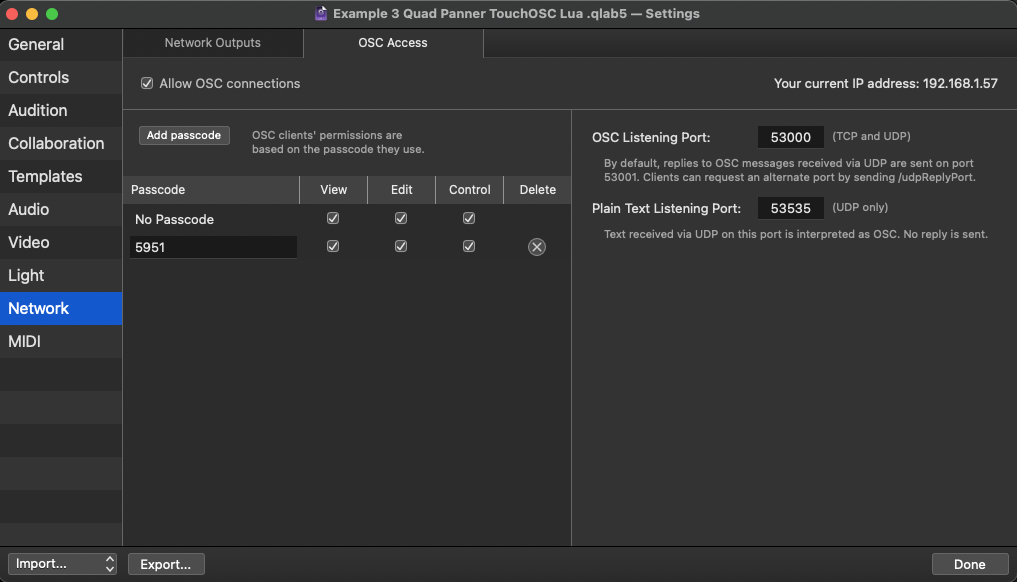
Since TouchOSC Mk1 has no way to send QLab a passcode for OSC access, we’ll need to set the workspace to allow incoming OSC messages without a passcode. In Workspace Settings → Network → OSC Access, check the boxes for View, Edit, and Control in the No Passcode row.
This set up gives excellent manual control of the pan, and the audio performance is better than in example 1.
How to set up TouchOSC Mk1 for this example
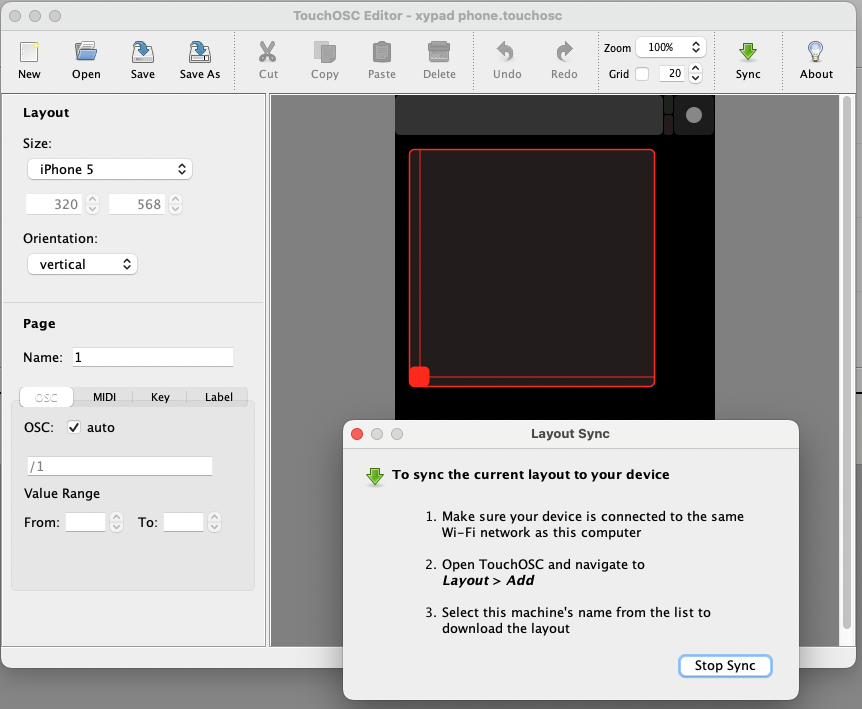
Included in the example download is a file named xypad phone.touchosc. To install this file on an iPhone, iPad, or iPod Touch, you’ll need to open it on a Mac in the TouchOSC Editor app and press the Sync button.
On the iPhone, iPad, or iPod Touch, open TouchOSC. You can be sure you’re using the Mk1 version by looking at the icon; Mk1 has the letters OSC in its icon whereas the newer Mk2 version has an image of several shapes.
Tap the dot at the top right of the screen to enter edit mode.
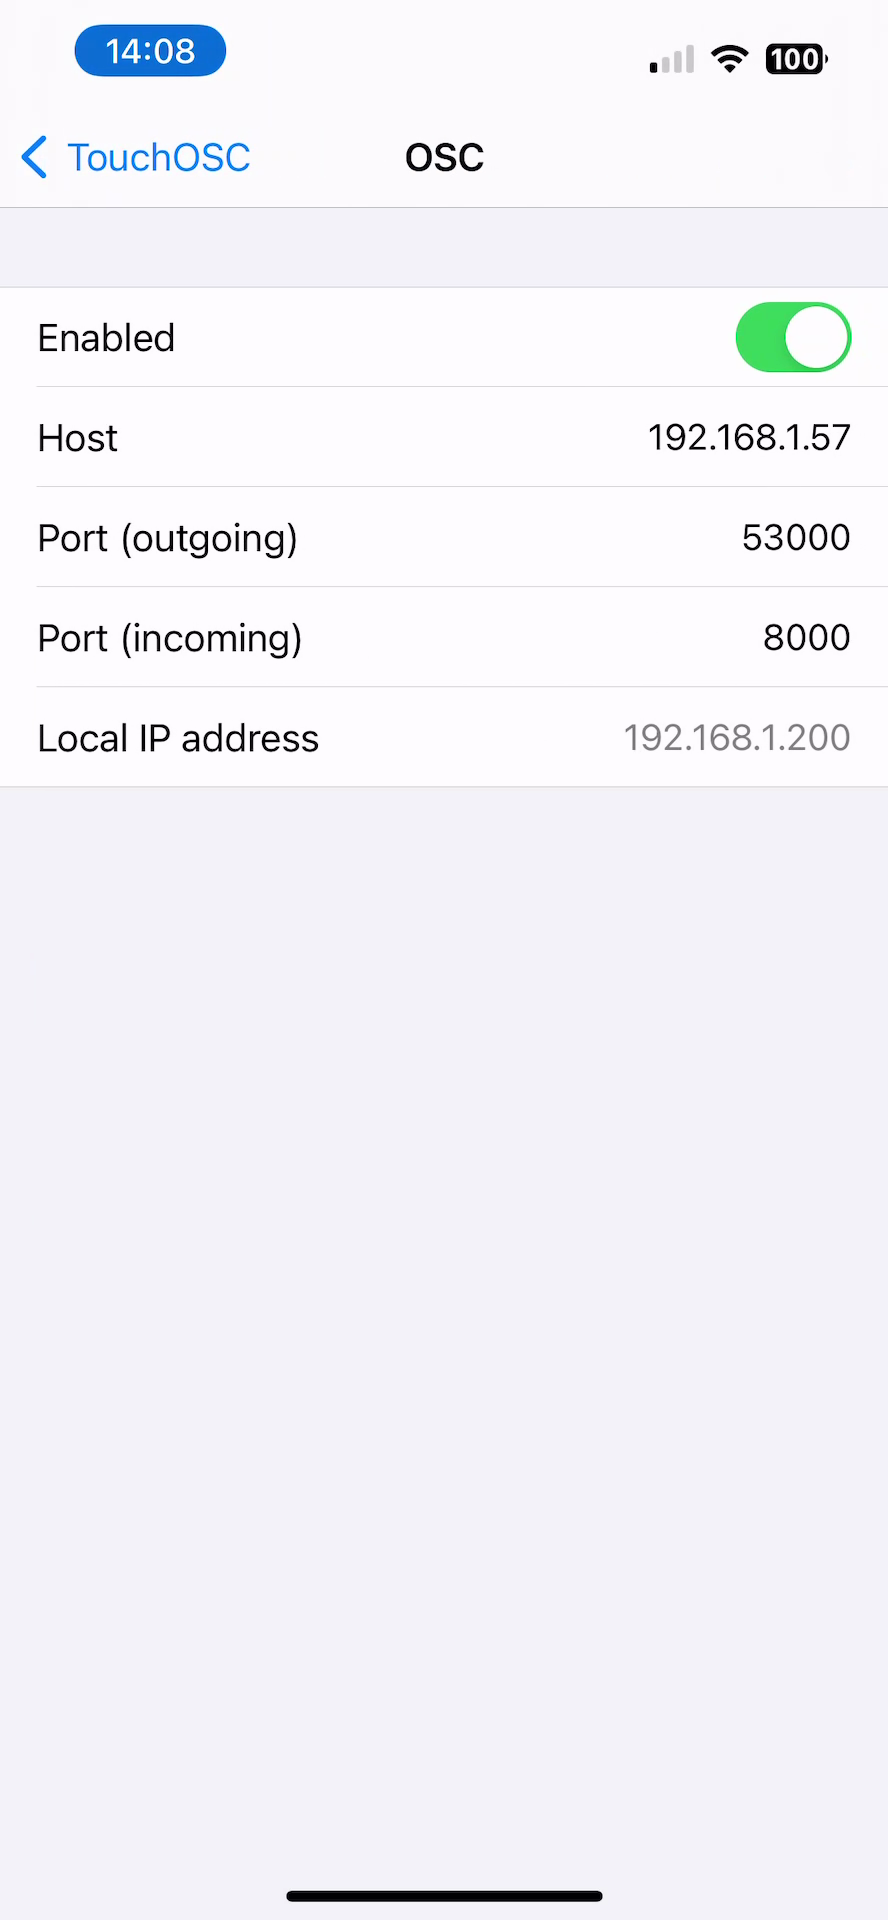
Under Connections tap OSC, and set it up like this:
- Enabled: on
- Host: enter the IP address of the Mac running QLab
- Port (outgoing): 53000
- Post (incoming): doesn’t matter
Return to the edit screen, tap Layout, and then tap Add at the top of the layouts list.
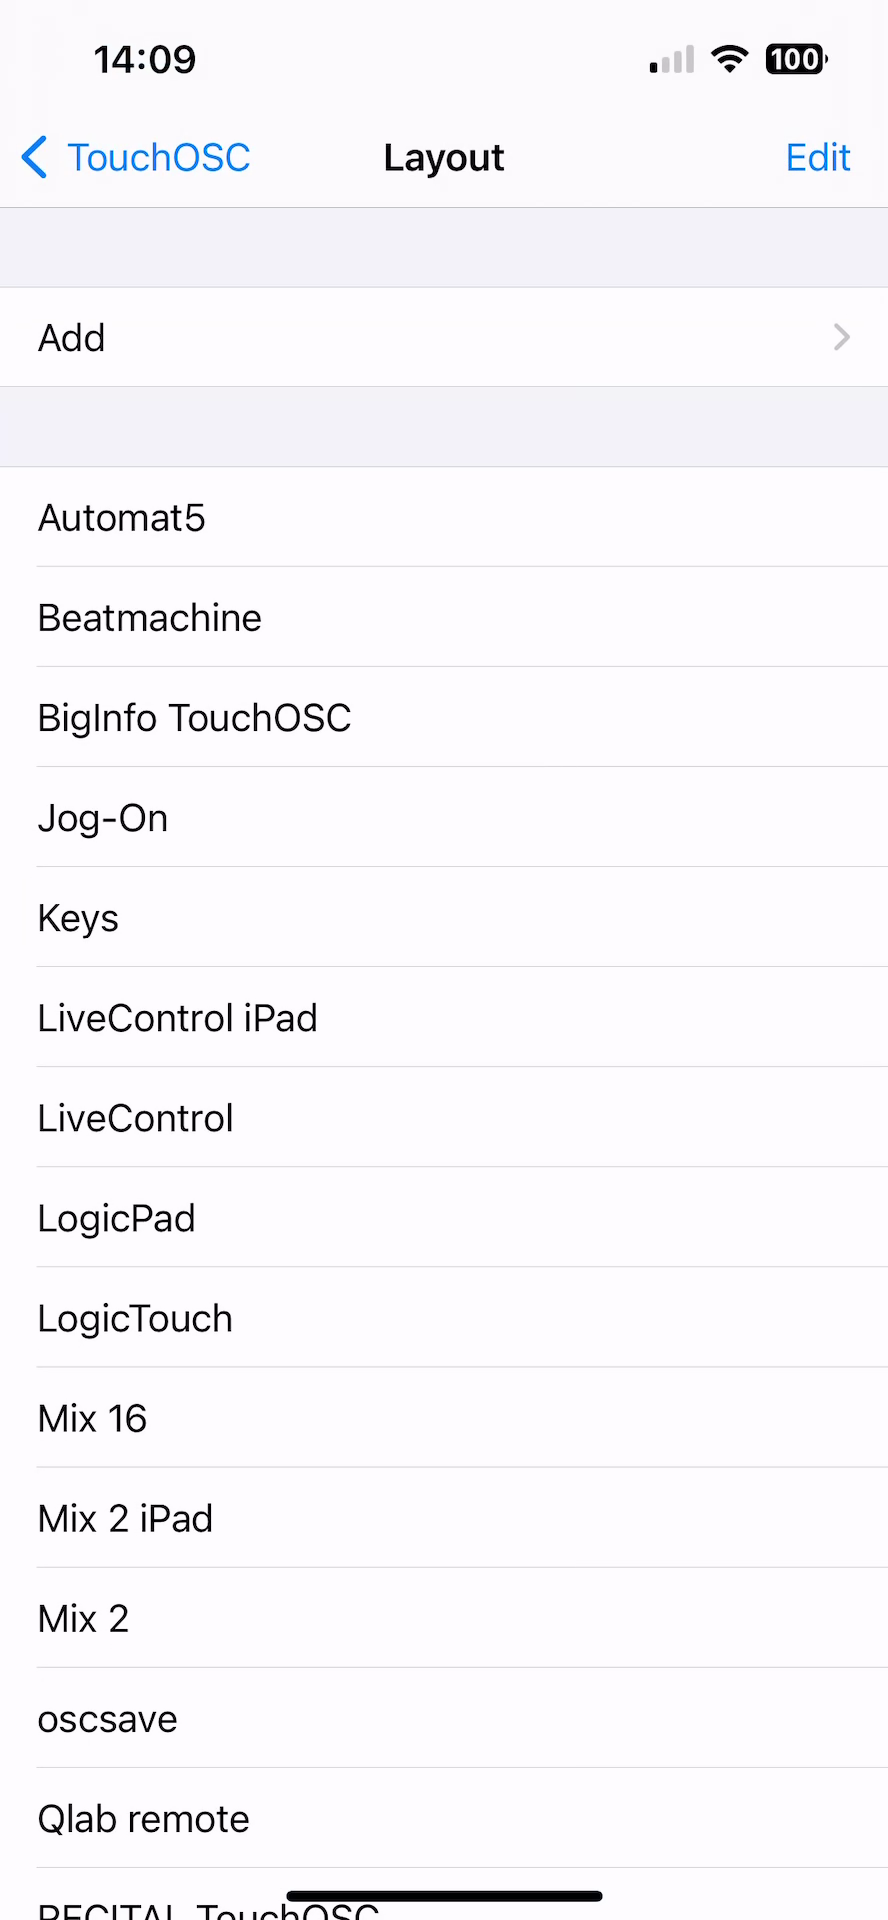
If the iPhone, iPad, or iPod Touch is on the same network as your Mac, you should see the Mac listed under Found Hosts.
Select your Mac, and the file will be synced to your phone from the Mac.
Find the file in the list and click on it.
Press Done and you should have the xy pad operational on your device.
Example 3: Control of a quad panner with external calculation
The next step is to offload the XY-to-decibel calculations to an external program, instead of having AppleScript perform these calculations 20 times per second in a Script cue. We’ll do this by running TouchOSC (the new version) and making use of its Lua scripting capability.
Lua is a simple programming language ideal for scripting objects. In TouchOSC, each control object can have its own script and there are extensive facilities for scripts to pass information to each other.
Here’s this version in action:
In TouchOSC, there a “label” object holds the cue number of the Audio cue we want the panner to control. If the label is set to “selected”, the panner will control the currently selected cue. The label is set from QLab by sending an OSC message with a text argument to TouchOSC on port 8000.
Unlike TouchOSC Mk1, the new TouchOSC does not need an external editor. The editor is built into TouchOSC itself, and TouchOSC now runs on many different platforms. In this example, to keep it simple, we’ll just run TouchOSC on the same Mac that we’re using to run QLab.
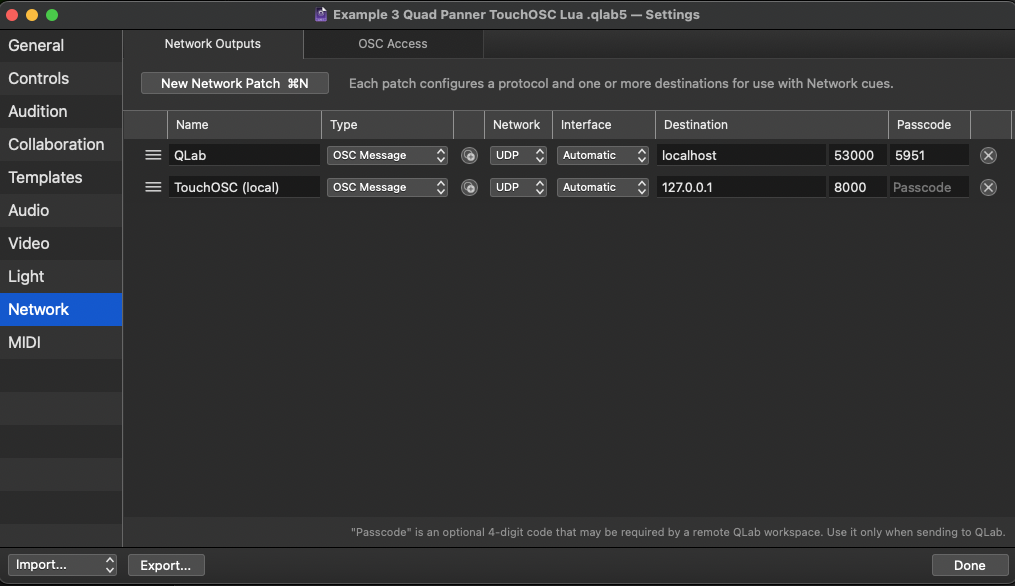
To send OSC messages from QLab to TouchOSC, we need to set up a network patch. In Workspace Settings → Network → Network Outputs, make a new patch, name it “TouchOSC (local)” and set its destination IP to 127.0.0.1 with port 8000. Then visit OSC Access and allow full OSC access without a passcode, just as we did in the earlier example.
In TouchOSC, enter editor mode if necessary (by clicking the dot in the top right of the window), and clicking the chain link icon. Then, choose OSC from the list on the left. Since we’re running TouchOSC on the same computer as QLab, set Connection 1 like this:
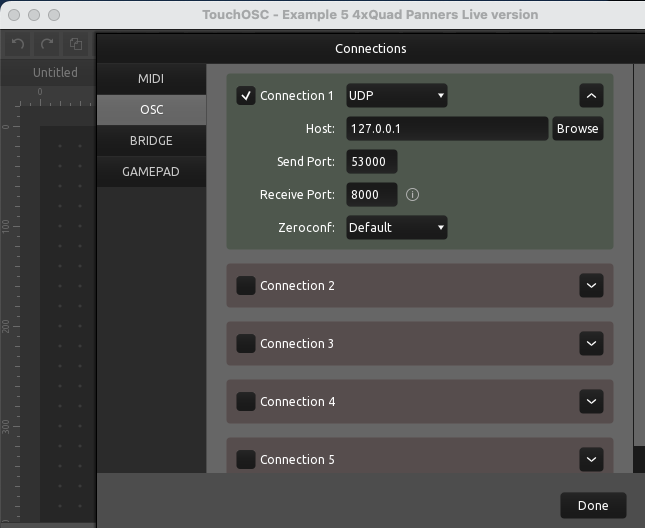
Then click Done.
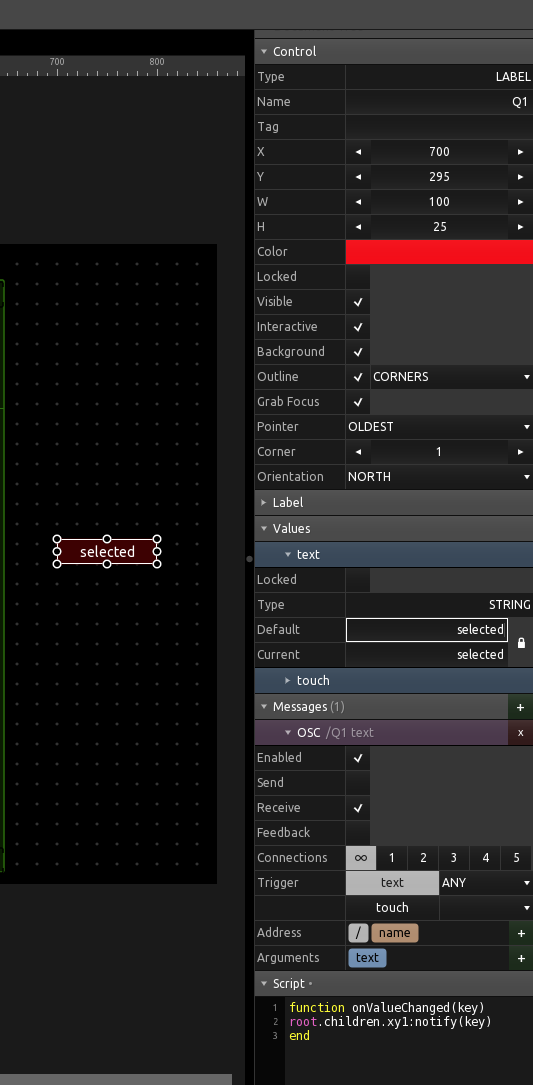
In the main canvas area of TouchOSC, right-click and create a Label object. In the Control section of the object editor, name the object “Q1” and set the other parameters as shown:
You can now change the text of the label by sending this OSC message from a Network cue in QLab to the “TouchOSC (local)” patch:
/Q1 {text}
So, sending /Q1 selected would set the label to “selected”. Sending /Q1 SINE would set the label to “SINE”.
The TouchOSC Label object also needs a short Lua script. In the Script section of the object editor, enter the following:
function onValueChanged(key)
root.children.xy1:notify(key)
end
This sends a notify message to the xy pad object (which we’re about to create) whenever its text is changed.
The XY object is created and set up similarly. Right-click in the control area and create an XY object. Name it “xy1”, then go to the Messages section of the object editor and click the ”+” button to add an OSC message to the object. Set the parameters of the OSC message like this:
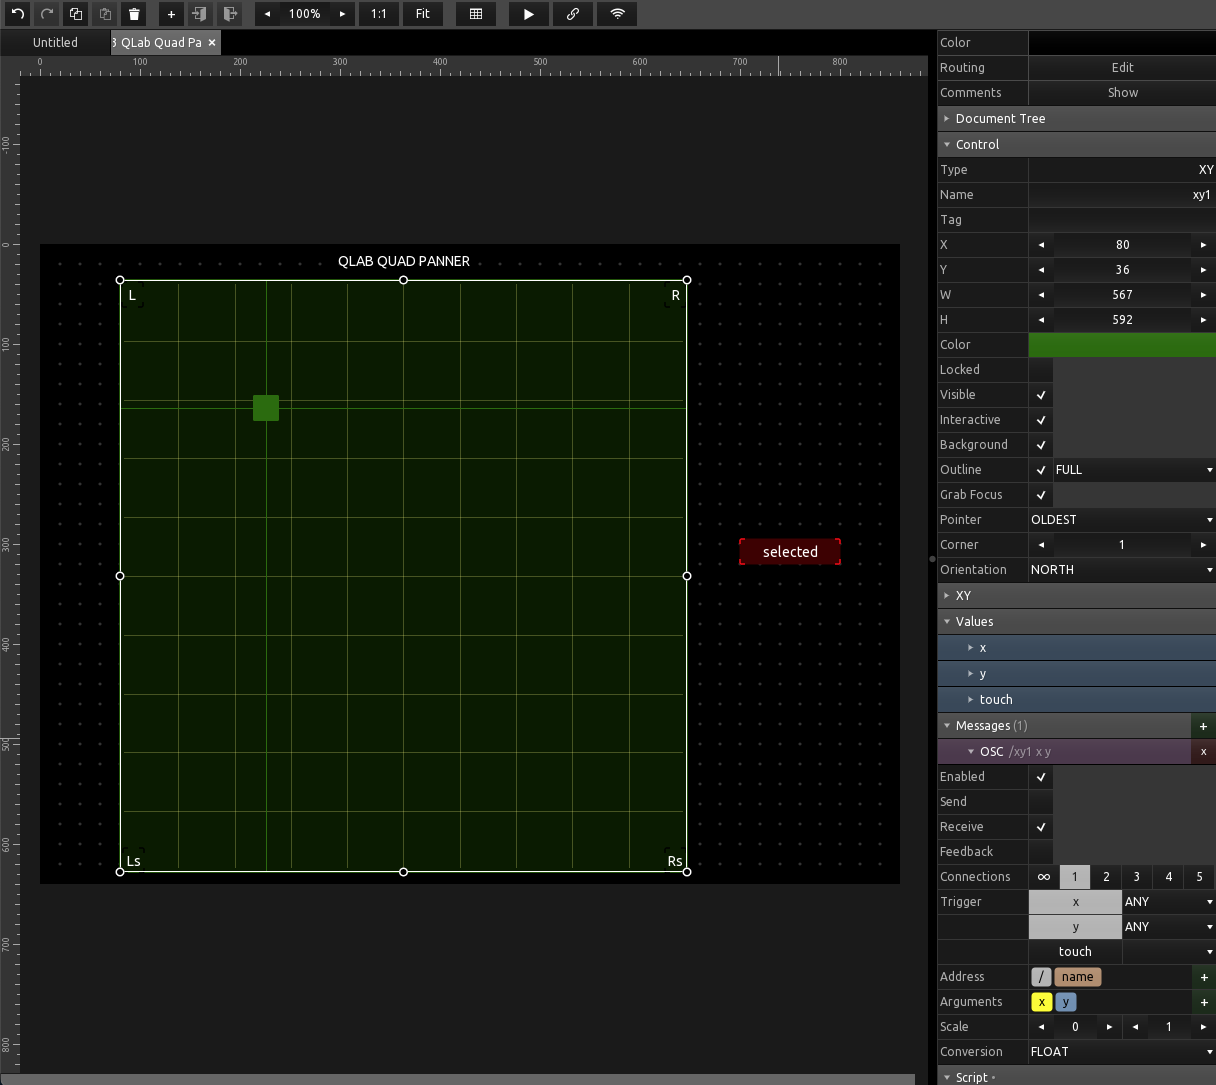
Because TouchOSC is set up to receive OSC data, we can remote-control this XY object with a Network cue in QLab by sending the OSC message:
/xy1 #x# #y#
to our “TouchOSC (local)” network patch.
The XY object also needs a script, which is slightly more complex than our last one:
local function makeMessage()
	local q1 = root.children.Q1
	theOSC1 =  "/cue/"..tostring (q1.values.text).."/sliderLevel/1"
	theOSC2 =  "/cue/"..tostring (q1.values.text).."/sliderLevel/2"
	theOSC3 =  "/cue/"..tostring (q1.values.text).."/sliderLevel/4"
	theOSC4 =  "/cue/"..tostring (q1.values.text).."/sliderLevel/3"
end

makeMessage()

function onReceiveNotify(key)
	makeMessage()
end

function onValueChanged(x)
	sendOSC(theOSC1,(1 - ((1 - self.values.x) * self.values.y) ^ 0.1) * -70, { true })
	sendOSC(theOSC2 ,(1 - (self.values.x * self.values.y) ^ 0.1) * -70, { true })
	sendOSC(theOSC3,(1 - (self.values.x * (1 - self.values.y)) ^ 0.1) * -70, { true })
	sendOSC(theOSC4,(1 - ((1 - self.values.x) * (1 - self.values.y)) ^ 0.1) * -70, { true })
end
First, we create a local function called makemessage which creates the complete OSC addresses required for each of the four sliders by inserting the label text as the cue number into the relevant part of the OSC address. This function is run when TouchOSC is first opened.
The second function in the script, onReceiveNotify, runs makeMessage whenever a notification is received from the Label object.
The third function in the script, onValueChangeD, runs whenever the value of the XY object is changed. It uses the same formulae we have used previously. self.values.x gets the current X coordinate from the object, and self.values.y gets the current Y coordinate.
Over in the QLab workspace, there are some additions to the cue list to enhance ease of use.
The first cue is a Script cue that opens the TouchOSC file. Normally, TouchOSC files open in editor mode, which is not necessary after we’ve done the initial setup. This script automatically switches out of the editor as soon as the controller opens.
--open a TouchOSC layout in kiosk mode.
tell application id "com.figure53.QLab.5" to tell front workspace to set workspacePath to path
tell application "System Events" to set sharedPath to ((path of container of file workspacePath) & "QLab Quad Panner.tosc") as alias
tell application "TouchOSC"
	if application "TouchOSC" is not running then
		ignoring application responses
			activate
			delay 1
			open sharedPath
			repeat while application "TouchOSC" is not running
				delay 0.1
			end repeat
		end ignoring
		delay 0.5
		activate
		tell application "System Events" to keystroke "e" using command down
	end if
end tell
You may get an error message saying that osascript is not permitted to send keystrokes. If you do, you’ll need to give QLab accessibility access in System Preferences → Security & Privacy → Accessibility.
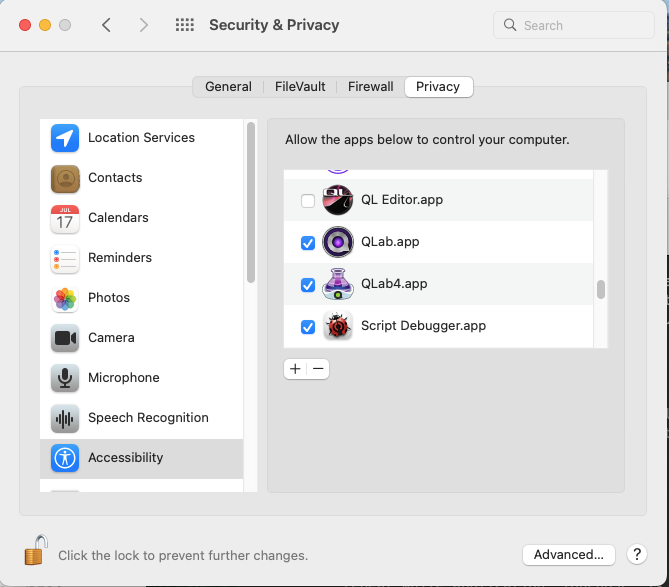
In recent versions of macOS, you’ll find that permission switch in System Settings → Privacy & Security → Accessibility.
A Group cue set to start first and go to next cue contains the Network Cues which change the text of the Label object in TouchOSC and therefore the Audio cue that the controller will act upon. This means the Audio cue to be controlled can be changed by moving the corresponding Network cue to the top of the Group.
There are eight Network cues which provide example paths for the panner. These are also grouped in a Start First Group, allowing you to choose the one you want by moving the one you want to the top of the Group.
The path is looped by use of a Start cue. This cue is inside a Timeline Group with a Script cue that changes the pre-wait of the Start cue to match the duration of the Network cue currently in use. The script for that cue looks like this:
tell front workspace to set the pre wait of cue "xy1s" to the duration of (first cue of cue "xy1p")Transferring the calculations and OSC routing outside QLab results in another major improvement in the audio quality. QLab now only has to play the audio and send OSC messages to TouchOSC.
Example 4: Four quad panners
Making use of this performance improvement, the next example contains four quad panners, each of which can control a different Audio cue.
The QLab workspace and the corresponding TouchOSC layout for this example are effectively the same as those in the previous example, with everything duplicated three more times and appropriately labeled and routed.
For demonstration purposes, the label text of each xy pad in TouchOSC can be changed to any of the Audio cues in the example via a Cart containing Network cues.
In an actual show with many Audio cues, it is more likely that the label text would be changed by specific Network cues in the main cue list e.g.:
/Q3 123.01
which would set panner number 3 in TouchOSC to control cue “123.01” in QLab.
Here it is in action:
From this, we can conclude that the improvements made in example 3 allow very good performance even with four simultaneous pans. In fact it performs well enough that it seems like it could probably be increased on a fast Mac to even more panners, right?
In a further test, however, it was found this isn’t the case. After running the four-panner example continuously for a long while, QLab’s processing of the OSC messages begin to slow, eventually displaying a beachball cursor. QLab does not crash, and recovers when the stream of OSC is paused.
This version of the panner may therefore only be suitable for stretches of time measured in minutes rather than hours. Thus, the solution cannot be said to be universally reliable.
Example 5: Four quad panners controlling live levels of the patch matrix
It may be the case that the reason QLab eventually runs out of steam with the OSC traffic generated is that the OSC is not using a live method but is actually updating the actual levels of the sliders in the Audio Cues.
To solve the OSC message backlog problem, this fifth example uses OSC messages from TouchOSC which update live levels in QLab. Changing live levels does not change the stored values in cues, which means changing them does not cause the workspace to have unsaved changes and does not create an entry in QLab’s undo history. These differences result in a considerably lighter workload for QLab.
Currently, the only live OSC method for adjusting audio levels is:
/settings/audio/patch/{name}/level/{inChannel}/{outChannel}/live {decibel}
(and a variation using patchID instead of patch name)
This message controls the live levels of an audio output patch, found in Workspace Settings → Audio → Patch Routing.
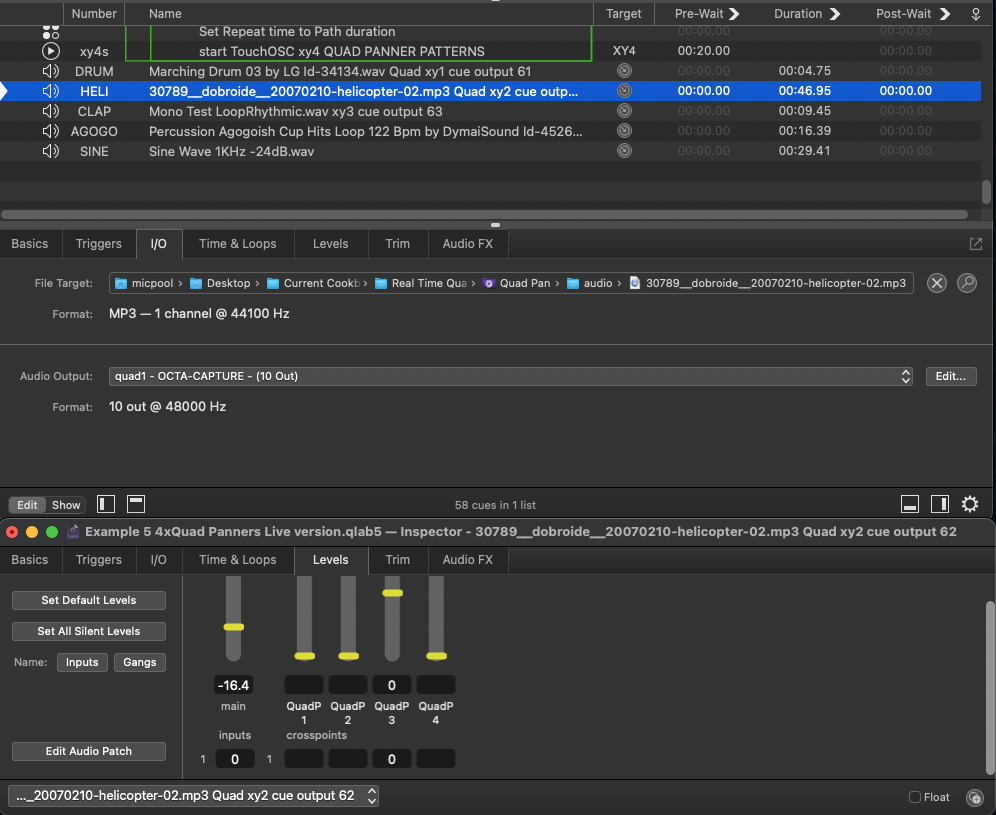
This example uses a new audio output patch called “quad1” in which each cue output represents one of the four quad panners. The routing of that cue output is controlled the corresponding panner in TouchOSC.
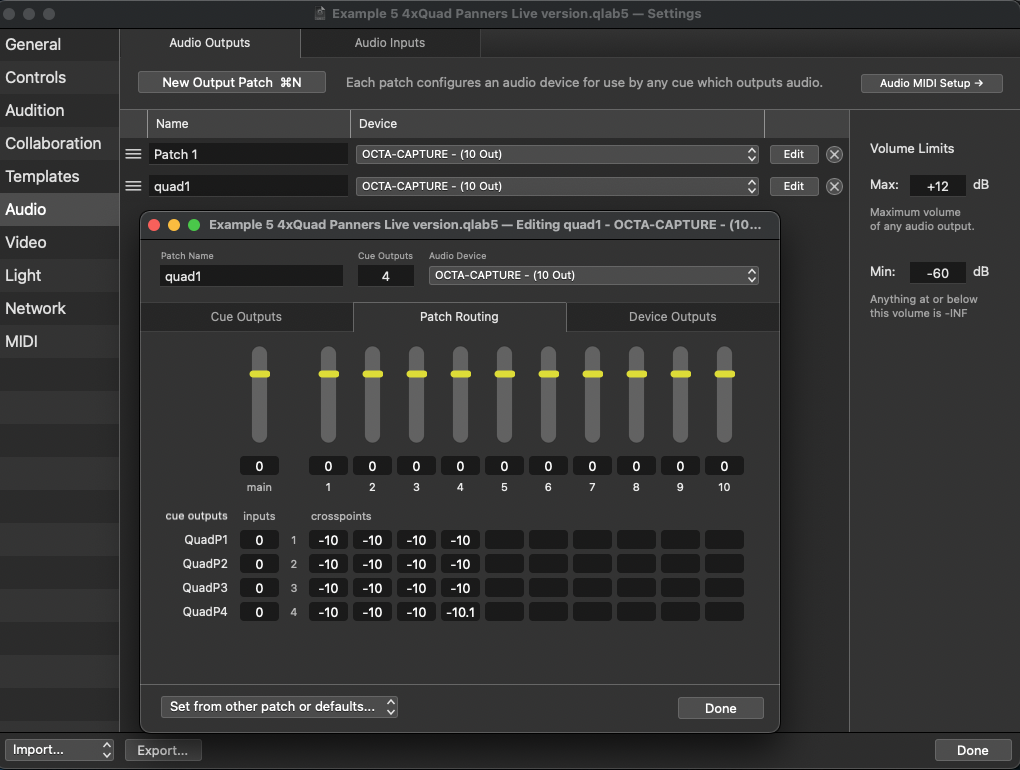
If we want cue “HELI” to be under the control of panner number 3 in TouchOSC, we would assign it to use audio output patch “quad1” and route it to cue output 3.
This setup passes a 24-hour test for continuous operation with flawless audio performance and makes it easy to route any Audio cue to a Quad Panner for manual or automated control without any extra Network cues.
Although the other techniques in the previous four examples may be useful in certain specific situations, this final example can be used with confidence in almost any situation. It achieves this reliability by eliminating AppleScript, restricting QLab to generating small amounts of outgoing OSC to drive TouchOSC, and limiting incoming OSC to live messages only.
TouchOSC by Hexler
Chapter image © Raimond Spekking / CC BY-SA 4.0 via Wikimedia Commons