Cross Platform Remote Control
This chapter looks at remote control of QLab using different operating systems on a range of devices. It opens up the possibilities of creating control panels on cheap tablets costing less than $50.
In addition to QLab, it uses Open Stage Control which is a free bi-directional OSC control surface desktop server. It’s an Electron app, but can also be run “headlessly” using Node v6 or later.
What this means is that once you have it up and running, you can log in to the Open Stage Control server from a Chrome web browser on any device that supports it. Currently, this includes Windows 7 or later, macOS 10.10 or later, Linux v2.24 or later, iOS 10 or later, and Android Jelly Bean or later. You can also connect using Mobile Safari on iOS 9.3 or later.
It’s software that is very much in development. While it is generally very stable, but you should test it thoroughly before using it in a performance-critical situation. The developer, Jean-Emmanuel is very responsive. In fact, this cookbook chapter relies on a feature that did not exist and that Jean-Emmanuel built as a custom module within a day of it being requested.
Example Project
This chapter is going to use an almost identical QLab workspace to that used in the Lemur 2 chapter. Just like that chapter, this project uses OSC to synchronize a fader bank with the sliders in the selected cue in QLab. It also displays the cue number and name of the selected cue.
Here’s it is in action, best viewed full screen:
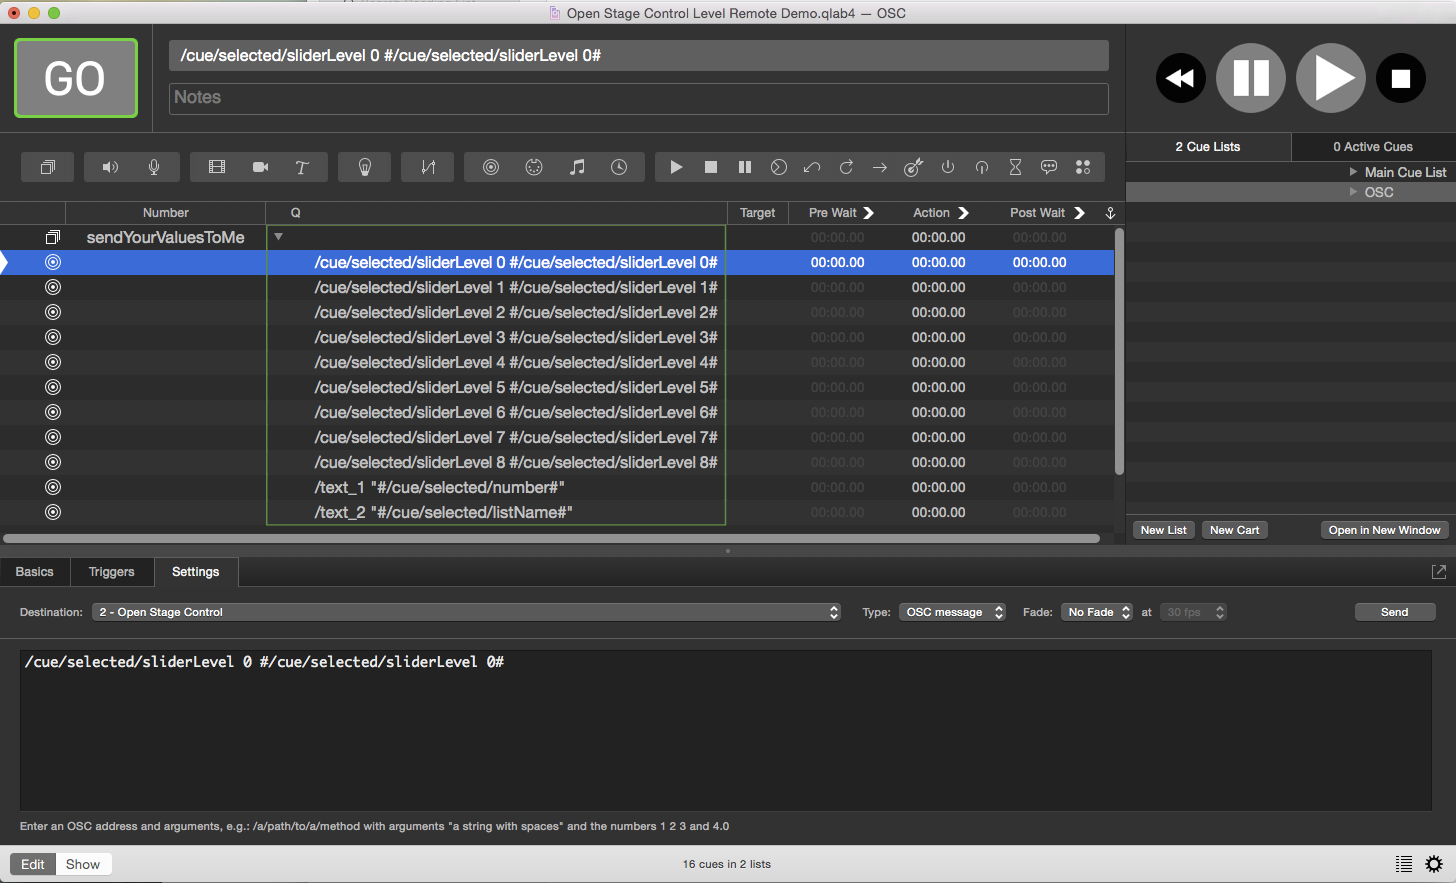
Here is the QLab workspace we are going to control.
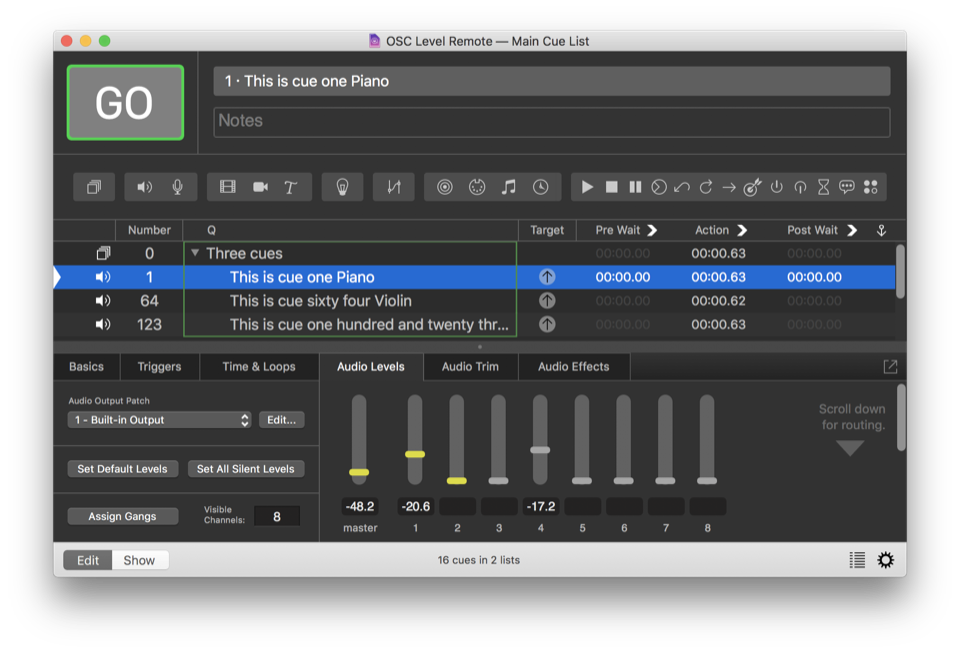
The main cue list contains three cues in a Group cue set to “start all children simultaneously” and a second cue list that contains all the utility cues which enable the clever integration with the Open Stage Control server.
Each of the Audio cues is an eight-channel WAV file containing repeated notes played on a single instrument. Each of eight notes of the C major scale, C-C, are on separate tracks.
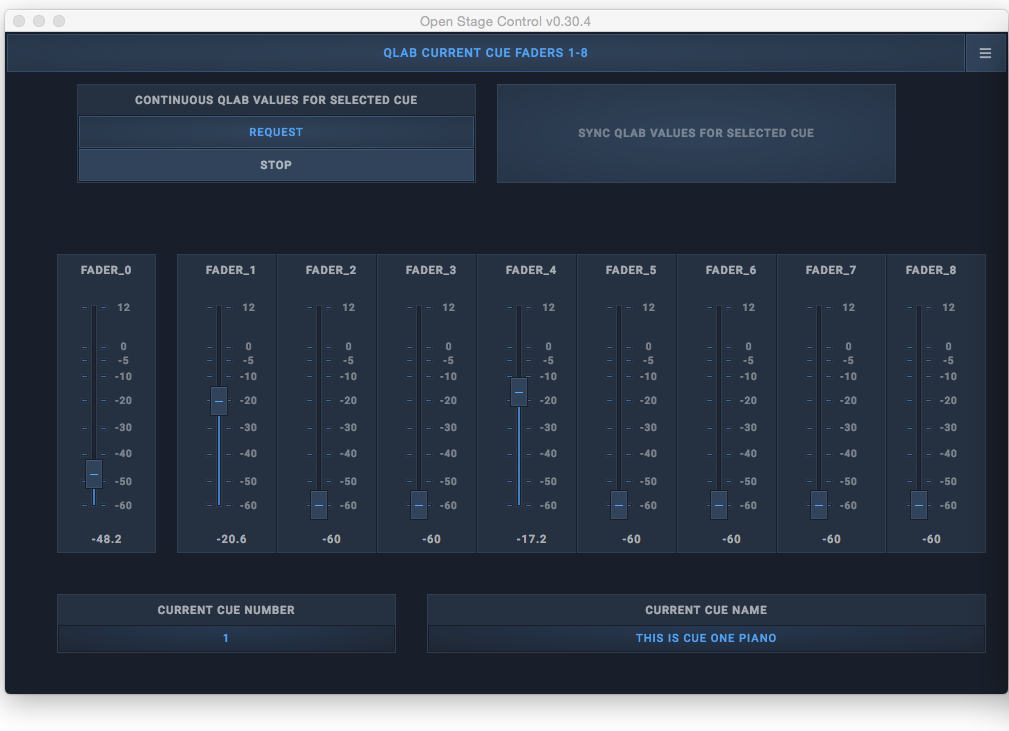
Here’s the Open Stage Control panel running in its own GUI:
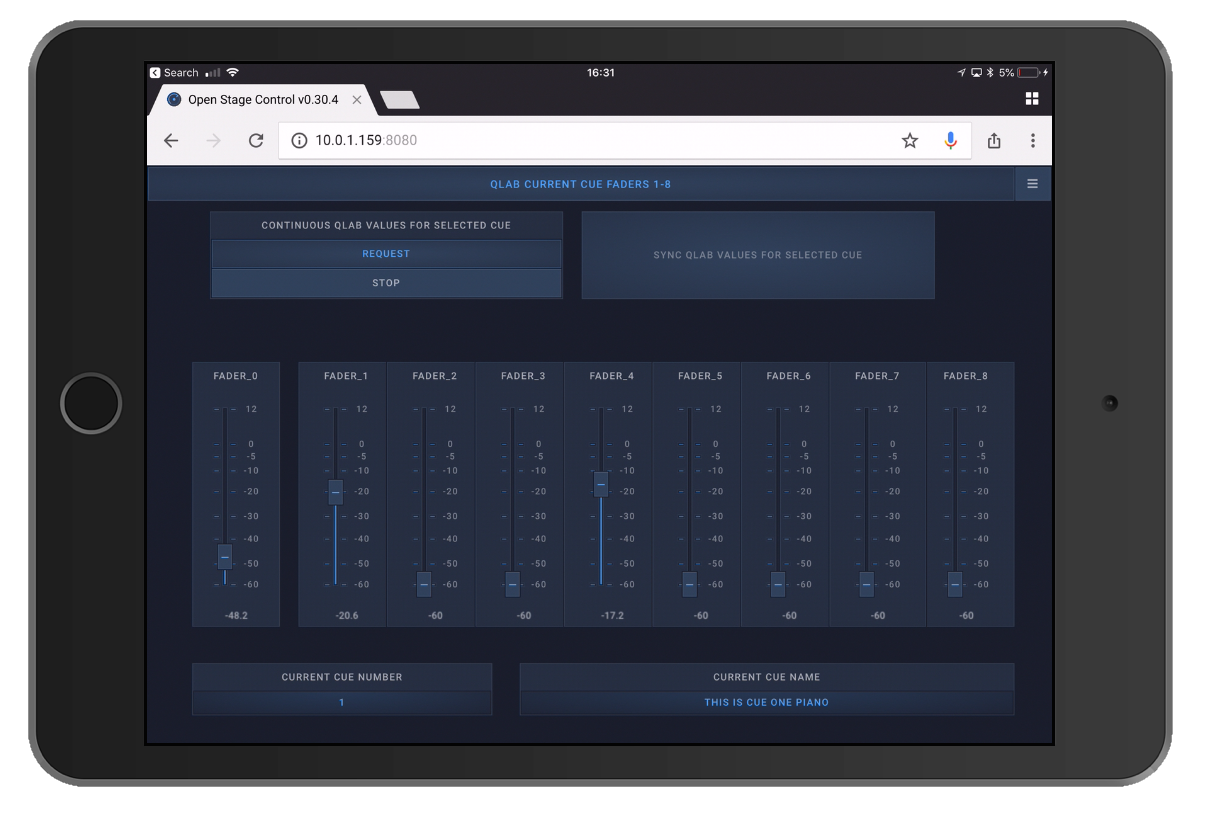
And here it is in the Chrome browser on an iPad:
And in Chrome on a Windows PC:
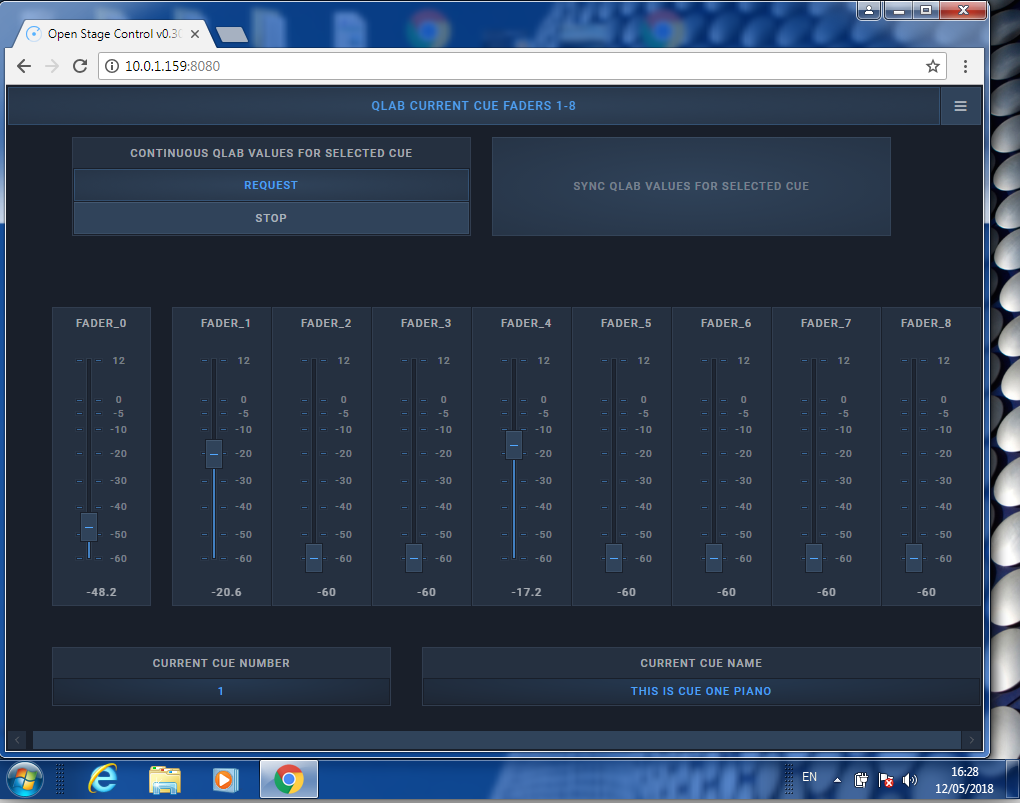
You can have many clients connected to the server simultaneously, and it’s possible to run the server without a visible interface on the host Mac.
Setting Up Open Stage Control
When you launch the Open Stage Control app, you’re greeted with the pre-launch window. There’s a lot going on in this window, so have a look before we dive in:
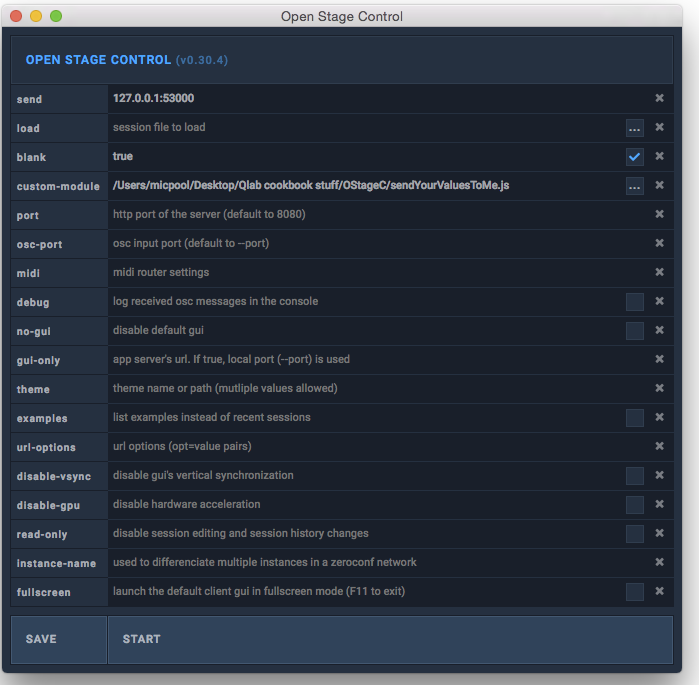
In the “send” field, type 127.0.0.1:53000.
127.0.0.1 is a special IP address meaning “localhost,” which is the computer
that you’re using. 53000 is the port number that QLab uses to listen for
incoming OSC messages. All we’re doing here is telling Open Stage Control that
it’s going to be sending OSC messages to QLab running on the same computer as
Open Stage Control is running on.
If we were opening a file, we would select it using the button with dots to the right of the “load” field.
Instead of loading a preexisting file, we are going to create a new one by ticking the checkbox to the right of the “blank” field.
This project requires a custom module which is included in the download found at the end of the chapter. The file is named sendYourValuesToMe.js. Choose this file by clicking the […] button to the right of the “custom-module” field.
Skip the rest of the fields and click START. You’ll then see Open Stage Control’s main window:
If the control panel on the right isn’t visible, click the three-horizontal-lines menu button at the top right. Make sure Editor is switched on.
Select the TAB_1 object in the Editor. In the Style section of the menu change the label from “auto” to “QLab Current Cue Faders 1-8”.
Faders
Right-click in the gridded canvas area on the left and add a fader object by selecting + Add widget → Sliders → fader.

Now we’ll set up all the parameters for that fader, which will allow it to control the master level of the selected cue in QLab. Select the fader to adjust its parameters in the editor.
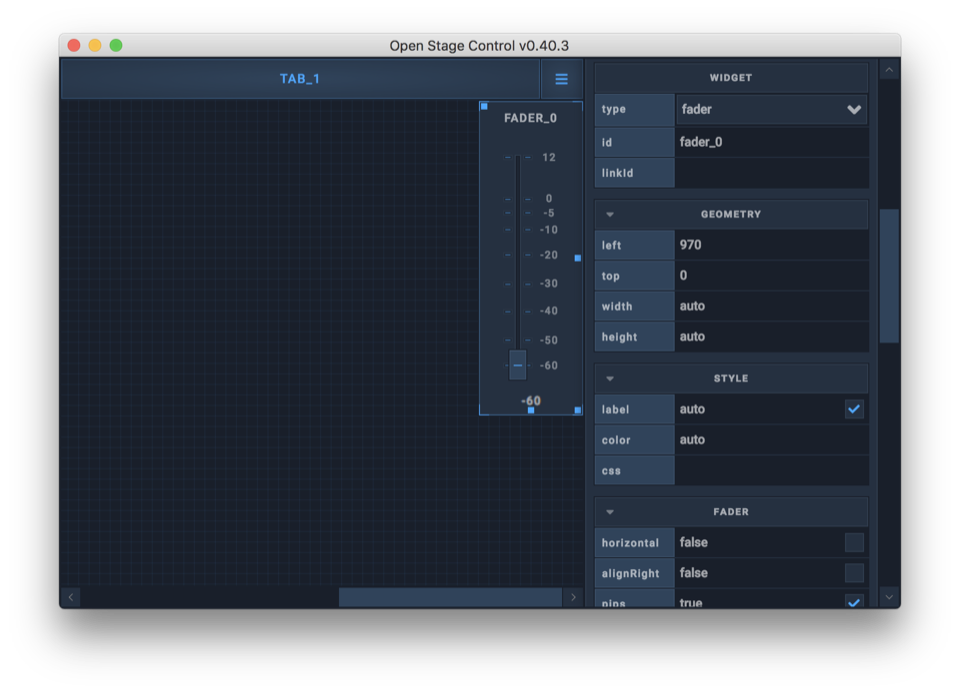
Change the widget id to “fader_0” to match the slider numbering in QLab.
The Geometry section controls the position and size of the fader in the canvas.
Leave the Style section alone, or adjust it to taste.
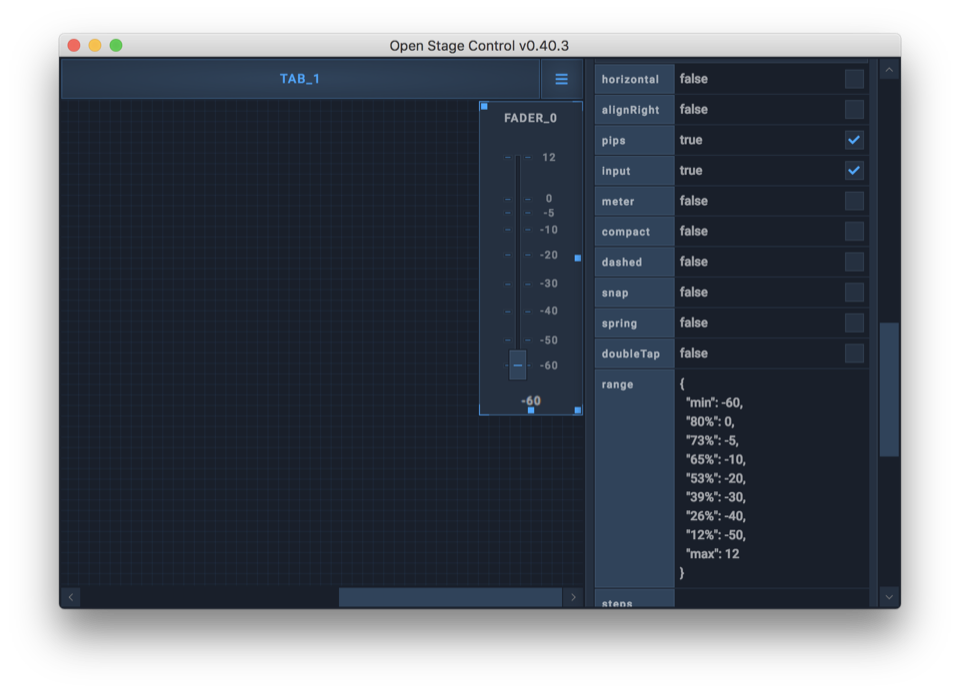
In the Fader section, check the boxes marked pips (to display the legend in the fader) and input (to permit external control of the fader.)
In the range field type the following. Be advised that editing text in Open Stage Control can be a little fiddly. Copy/pasting from this page will likely not work; you probably need to type it out yourself:
{
  "min": -60,
  "80%": 0,
  "73%": -5,
  "65%": -10,
  "53%": -20,
  "39%": -30,
  "26%": -40,
  "12%": -50,
  "max": 12
}
This sets the maximum and minimum values for the fader, and also the position and labels of the subdivision pips on the legend.
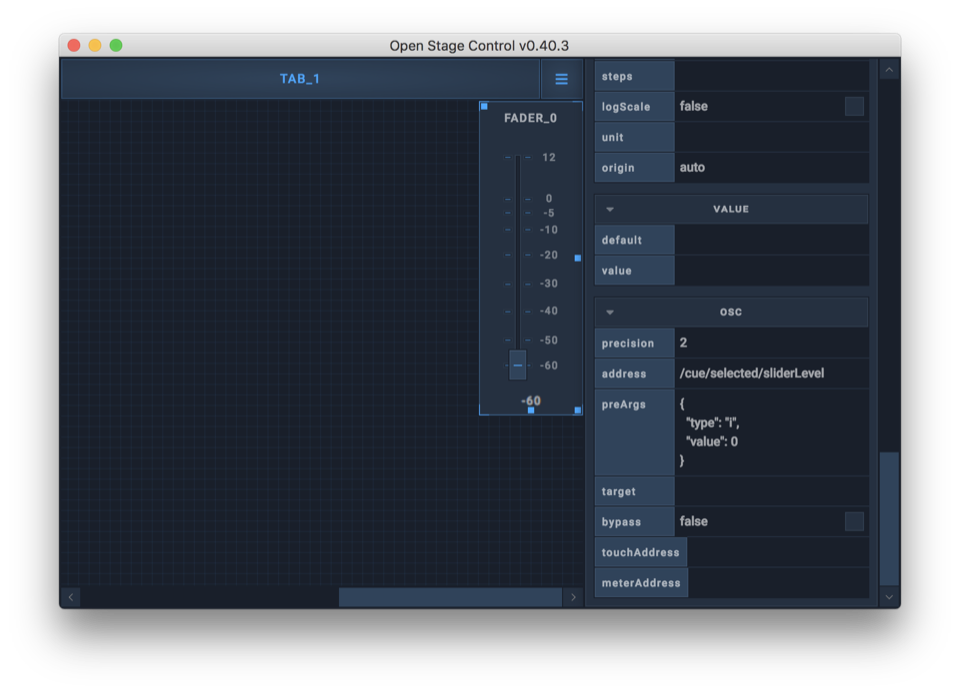
Leave the rest of the Fader section and the following Value section alone.
In the OSC section, set precision to 2, set address to
/cue/selected/sliderLevel, and set preArg to {"type": "i", "value": 0}.
This configures the OSC message sent by the fader to:
/cue/selected/sliderLevel 0 [the fader level]
Copy the fader by right-clicking on it and selecting Copy, then right-click again in a blank area of the canvas and select Paste → ID + 1. Paste another seven times, and you’ll have nine faders total: the master plus faders 1 through 8.
For each of the pasted faders, the only adjustment you need to make is to change
preArg to the fader number. So, for “fader3”, set _preArg to
{"type": "i", "value": 3}.
Test these controls by opening QLab, selecting an Audio cue, and adjust the sliders in Open Sound Control. The corresponding sliders in QLab should follow.
Other Controls
We’ll now add some other controls in Open Sound Control. They won’t do anything at first, but we’ll create corresponding cues in QLab later to enable them.
Create two text objects by right-clicking in the canvas and selecting + Add
Widget → Plots → text. Label one of them “Current Cue Number” and the
other “Current Cue Name”. Set the address of Current Cue Number to /text_1 and
the address of Current Cue Name to /text_2.
Create a pushbutton objects by right-clicking in the canvas and selecting + Add
Widget → Buttons → push. Label the button “SYNC QLab Values for
Selected Cue” and set its OSC address to: /cue/sendYourValuesToMe/start.
Create a switch object by right-clicking in the canvas and selecting + Add Widget → Buttons → switch. Label the switch “Continuous QLab Values for Selected Cue”. Set its values to:
{
  "Request": 1,
  "STOP": 0
}
This creates two switch positions with corresponding values of 1 and 0. Set
the switch’s address to
/cue/sendYourValuesToMe/start
This switch hooks into the custom module we loaded (sendYourValuesToMe.js) because that module is watching for any action using that OSC address.
Here is the JavaScript from that file:
(function() {
  // Do whatever you want, initialize some variables, declare some functions, ...
  var heartbeatEnabled = false,
    heartbeat = setInterval(() => {
      if (heartbeatEnabled) {
        sendOsc({
          address: "/cue/sendYourValuesToMe/start",
          host: "127.0.0.1",
          port: 53000
        });
      }
    }, 250);

  return {
    init: function() {
      // this will be executed once when the osc server starts
      heartbeatEnabled = true;
    },
    oscInFilter: function(data) {
      // Filter incoming osc messages

      var { address, args, host, port } = data;

      if (address === "/cue/sendYourValuesToMe/start" && args[0]) {
        heartbeatEnabled = !!args[0].value;
      }

      //return data if you want the message to be processed
      return { address, args, host, port };
    }
  };
})();
An in-depth analysis of the JavaScript syntax is beyond the scope of this chapter, but the basic idea is this: if the switch is set to “Request”, Open Stage Control will send the OSC message
/cue/sendYourValuesToMe/startto QLab four times per second.
Save and Restart
Save the project using the Save button in the edit pane. Name the project (the example uses the name “OpSC Faders.json”) and close Open Stage Control. Then, re-open Open Stage Control.
In the launcher window, click the […] button next to the load field and select the file you just saved.
Click the […] button next to the custom-module field and select the “sendYourValuesTpMe.js” file.
Make sure the blank checkbox is not checked.
Click START.
Setting Up the QLab Workspace
We need to get QLab to regularly report the slider levels, cue number, and name of the currently selected cue so that Open Stage Control can follow along.
First, go to Workspace Settings → Network to set up a network destination
patch which will allow QLab to send OSC messages to Open Stage Control. Set
Name to “Open Stage Control”, type to “address”, Network to “Automatic”,
Destination to localhost, port to 8080 (Open Stage Control’s default
receive port), and leave Passcode blank.

In QLab, create a new cue list and name it “OSC”. In that list, create a Group
cue set to “start all children simultaneously” and number it
sendYourValuesToMe.
Create a Network cue, set its destination to the “Open Stage Control” patch, and set it to send the OSC message:
/cue/selected/sliderLevel 0 #/cue/selected/sliderLevel 0#
This uses an OSC query (the part between the hash marks) to get the current
level of slider 0 (master) of the currently selected cue, and send that as the
second argument of an OSC message beginning with /cue/selected/sliderLevel 0.
That message will set the level of the fader in Open Stage Control with the
corresponding address, “Fader0” in this case, to the level of the slider in the
selected cue.
Copy and paste the cue eight times to create Network cues for the other eight faders in Open Stage Control, editing the OSC message appropriately. So, for Fader1:
/cue/selected/sliderLevel 1 #/cue/selected/sliderLevel 1#
And so on.
Next, create two more Network cues for sending the cue number and name of the selected cue to Open Stage Control. The first will set the cue number using this OSC message:
text_1 "#/cue/selected/number#"
The second will set the cue name using this message:
text_2 "#/cue/selected/number#"
Note the quote marks around the OSC queries. This allows spaces in the result of the query to be sent to Open Stage Control. If you omit them, then only the first word of the cue name or number is sent.
This Group cue is triggered by Open Stage Control, thanks to the JavaScript custom module, as long as the sync switch button is set to “Request”.
Chapter Bonus Project
A great feature of Open Stage Control is its ability to use variables within the address portion of an OSC message. This means, for instance, that you can use an array of 100 numbered push buttons and start a QLab cue by pressing the relevant button on the remote.
Here it is in action:
How it works
The array of buttons is a single “multipush” object in Open Stage Control. The Size of the matrix is set in the editor in the matrix field. You can set the start number of the matrix as you like, so you could have several tabs, each with a grid of, say, 16 larger buttons, with tab 1 starting at cue 1, and tab 2 starting at cue 17.
The spacing field sets the space around each button. Setting the norelease field to “true” means only one message will be sent per push.
A text string in the split field will be used to define the widgets’
addresses, replacing dollar signs ($) with their respective index i.e the
number of the button pushed. e.g /cue/3/start