Controlling Procedural and Physical Modeling Plug-Ins
Physical modeling is a process of simulating the actual physical properties of a sound-making object or environment. It has been used primarily for the electronic synthesis of musical instruments, as an alternative to sampling all the notes of an instrument’s range, with various dynamics and articulations. With physical modeling, the characteristics of a musical instrument are distilled into mathematical formulae which can be manipulated to produce an amazing range of sound. For a guitar, the shape of the body, the type of strings, any fingering position, and even the simulated amplifier and simulated microphone can all be derived from the model and controlled inside the DAW, without needing to have preemptively sampled all these variations.
Up through the first decade of the 21st century, recorded sound effects for the theater have mostly been derived from recordings of actual animals, minerals, or vegetables. In response to the needs of the computer gaming industry, however, physical modeling techniques have now been applied to sound effects generation, allowing the generation of atmospheric, Foley, and spot effects on demand, and without the needs for sampling. These sound generation engines are now being made available as standard audio plugins for DAWs.
This is a new frontier in theatrical sound effects design, and one we may all need to explore and gain proficiency in.
Most of these plugins have been designed for use in video games, television, video, and film post-production workflows. The controls have very fine resolution and are designed to be used in timeline based DAWs with automation recording capabilities.
This chapter looks at how we can best use these plugins in a non-timeline based system like QLab. The main example uses Turbine by BOOM Library. This plugin models a variety of jet engines, flying in a simulation of a real-world environment. It is available as a 7-day free trial to see if it is useful in your workflow.
These plugins are categorized as music devices, rather than audio effects, and therefore are not directly available inside QLab. They must be hosted within another program that can work alongside QLab, and be controlled via MIDI or OSC.
These examples use Plogue Bidule.
Plogue Bidule can operate as an AU plugin and be used within QLab as an audio effect. This opens the door to some very advanced techniques which are discussed in the AU Instruments in QLab chapter of the cookbook.
However, in this chapter, we will use Plogue Bidule as a standalone program for two reasons:
- The standalone is available as a free trial, often with months available before it expires.
- Turbine, like many modeling plugins, offers multichannel audio output. Since QLab only supports a maximum of two-channel plugins on cue outputs, using Plogue Bidule inside QLab would prevent us from taking advantage of the multichannel output available.
There is no problem with running the standalone version of Plogue Bidule at the same time as QLab, and both programs can share the same outputs on the same audio interface without any problem.
Here’s a short demo, best viewed full screen of the sorts of things that can be achieved:
Warning: This is quite a large video file (about 150 MB). A very loud jet engine passes in the second half of the video. Watch your levels; keep you hand on the volume knob.
What’s Going On Here
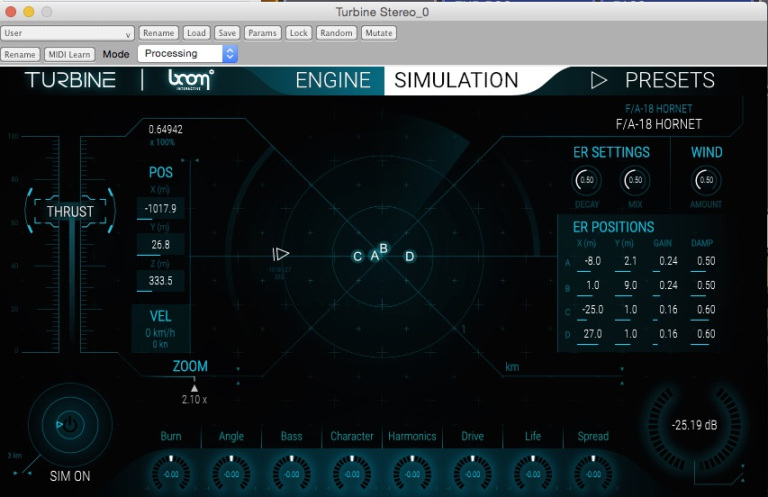
TURBINE, hosted within Plogue Bidule, is generating the sound of the engine in the Engine tab, and moving that sound around a binaural panning space in the Simulation tab. In the first half of the video, QLab is sending MIDI messages to Plogue Bidule to adjust the various parameters of the Engine tab. In the second half, QLab is recording pan positions in the Simulation tab, then recalling those positions while modulating the Engine tab. The end result is a simulation of a jet engine aircraft passing by as it accelerates.
A Question of Control
A common way of controlling parameters in plugins is with MIDI control change messages. These are generally 7-bit controllers with 128 steps between minimum and maximum. That’s not many more steps than there are keys on a full-size piano. You may be able to predict what will happen when we try to control something that has a much wider frequency range than a piano:
We can clearly hear the almost semitone steps as the controller moves from one value to the next. Clearly, 7-bit control isn’t going to work for most of the parameters of this plugin. We’ll need an order of magnitude more resolution in order to make this sound smooth, so need to find a way to use a 14-bit controller.
The most common MIDI 14-bit controller is the pitch bend control, which has over 16,000 steps (-8192 to +8191). We’ll only use the upper half of this range, 0 - 8191, which should give plenty of control. There are two things which stand in our way: first, TURBINE does not directly listen to pitch bend messages, only control change message, so we need an intermediary to grab the pitch bend messages from QLab and translate them to TURBINE. The second obstacle is that there is only one pitch bend control in a MIDI channel, and we want to control multiple parameters of TURBINE. So, we’ll need to use multiple MIDI channels and have Plogue Bidule help route the correct message to each parameter.
The method for carrying MIDI between programs on a computer is called the IAC bus. IAC stands for inter-application communication, and bus is just a metaphor. To configure the IAS bus on your Mac, open Applications → Utilities → Audio MIDI Setup and choose Show MIDI Studio from the Window menu. Then, double click on the IAC Driver tile.
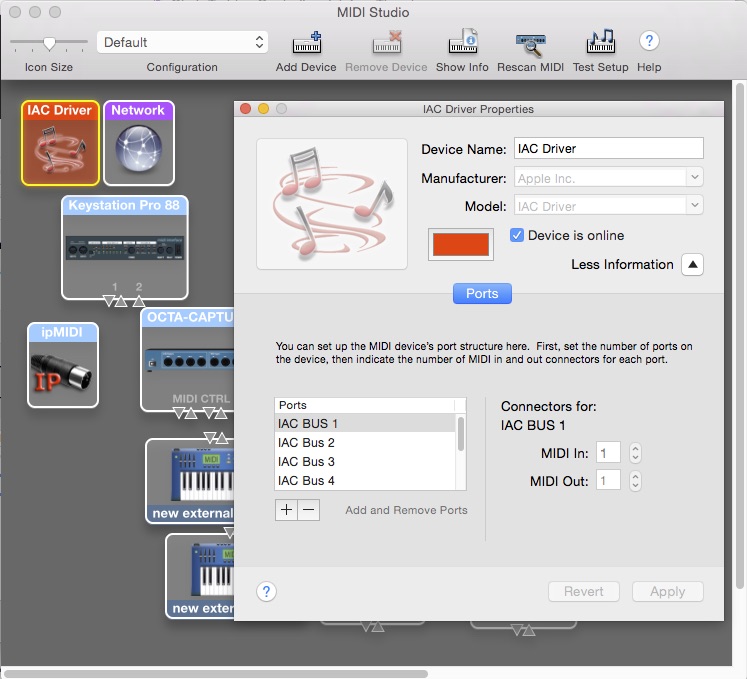
Ensure that the Device is online box is checked, and use the + button in the lower left to add as many ports as you need. Each IAC port will give you sixteen pitch bend controllers; one on each MIDI channel. Our example only needs a single port.
The IAC bus appears to QLab like any other MIDI device. To use it as a output for MIDI Cues, visit Workspace Settings → MIDI and assign MIDI Patch 1 to IAC BUS 1.
We are now going to work within Plogue Bidule. Bidule is a visual object-based programming environment, similar to Quartz Composer, PD, and Max, where you use building blocks with input and output ports that can be interconnected to form more complex processing units. In Bidule, each object is called, confusingly, a bidule which a French word for “thingy” or “gadget.” Because that has so much potential for confusion, we will simply refer to them as “objects.”
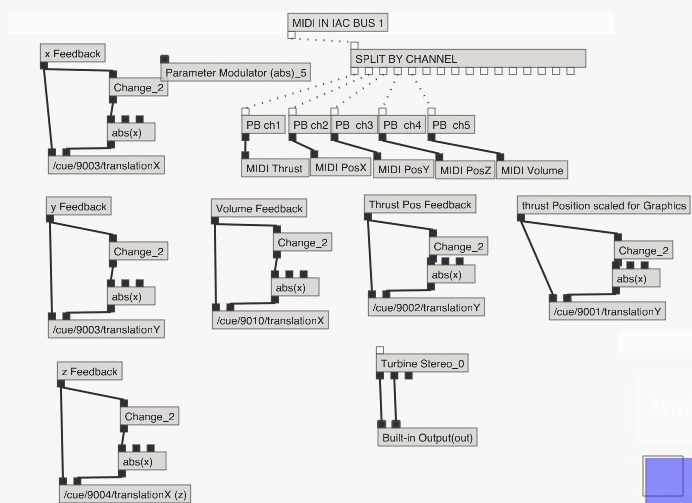
The object at the bottom center, named Turbine Stereo_0, is the TURBINE object which we’ll be controlling from QLab, and which will be generating the audio.
The first thing we’re going to do is extract pitch bend messages from the incoming MIDI stream.
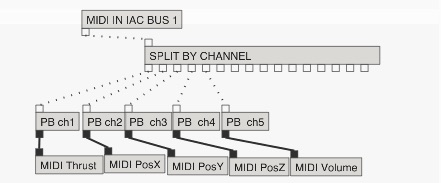
At the top of that screen shot is a MIDI Device object, configured to listen to IAC BUS 1.
Next, a MIDI splitter object named SPLIT BY CHANNEL routes MIDI data according to channel. There are sixteen ports on the bottom of the object; messages on channel 1 pass through the first port, channel 2 through the second, and so on.
Next, Pitch Bend extractors filter the MIDI data passing through them, allowing only pitch bend messages to pass through. They’re connected to Parameter Modulator objects, which are set to convert the incoming integer values, which are in a range of 0 - 8191, to floats (floating point numbers, a.k.a. numbers with decimals) between 0.0 and 1.0, which is the range and type of number that TURBINE is expecting.
Next, we open the Parameters window by clicking the button at the top of the main Bidule window. Here we can select a source parameter on the left, such as the data coming from the MIDI Thrust modulator, and hook it up to a target parameter on the right, such as the “Thrust” parameter within the Turbine Stereo_0 object.
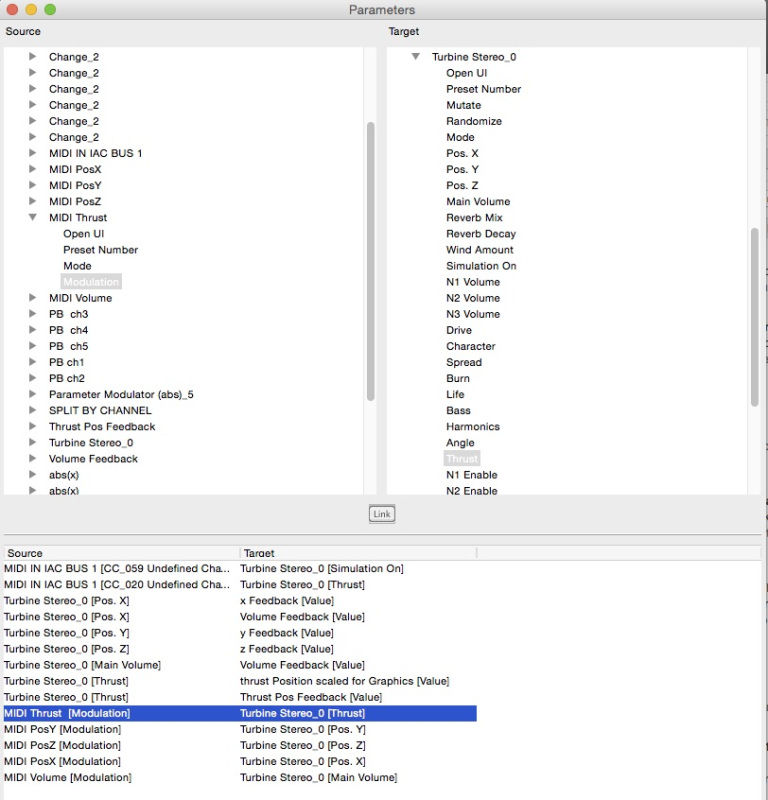
We can repeat these steps to connect the pitch bend controllers on the other MIDI channels to other parameters inside TURBINE.
The result of all this patching and routing is dramatically smoother control of TURBINE:
Turbine Parameter Feedback
When QLab is controlling its own internal parameters, like the level of an Audio cue or the scale of a Video cue, it is trivial for it to find the current value of those parameters and adjust them accordingly. This is why a Fade cue can interrupt another Fade cue and take over seamlessly.
This video shows several audio fades, up and down, each started before the previous fade has completed:
When sending MIDI or OSC messages out to the world, however, QLab does not know what device is receiving this data or what it’s doing with it. So QLab specifies the beginning and end points of a fade within a single cue. Here’s what happens in Turbine when we execute cues at arbitrary times.
The first time the thrust parameter is increased it goes to its maximum level. The second fade starts at maximum and fades down. Since the ending point of the first fade and the starting point of the second fade are the same, the action between them is seamless. In the second example, however, the down fade is triggered before the up face has completed. Since each cue contains the start and the end point as absolute fixed values, there is a discontinuity and the thrust fader jumps.
If QLab is controlling parameters in an external program it has no way of knowing the current level of the control, particularly since QLab might not be the only thing controlling that level. For instance, we might start the engine noise during a scene change and ramp it to a certain level using QLab, and then an actor might take over control with practical props wired to produce MIDI or OSC data to control the plugin. In the middle of the scene, perhaps the character is shot and the plane needs to accelerate into a dramatic nose dive under the control of QLab.
In order to take over seamlessly, QLab needs to know the current value of all the relevant plugin parameters and set the start point of any MIDI or OSC fades at the current parameter values of the external plugin.
In order to do this, we’re going to use Bidule to inform QLab of the current value of all the relevant TURBINE parameters every time they change. We’ll then program QLab to store these values somewhere so that at the moment that a MIDI fade is executed, QLab can insert the correct starting value for that fade.
The Bidule feedback reporter
For each control that we want to monitor, we’ll use something similar to this group of Bidule objects:

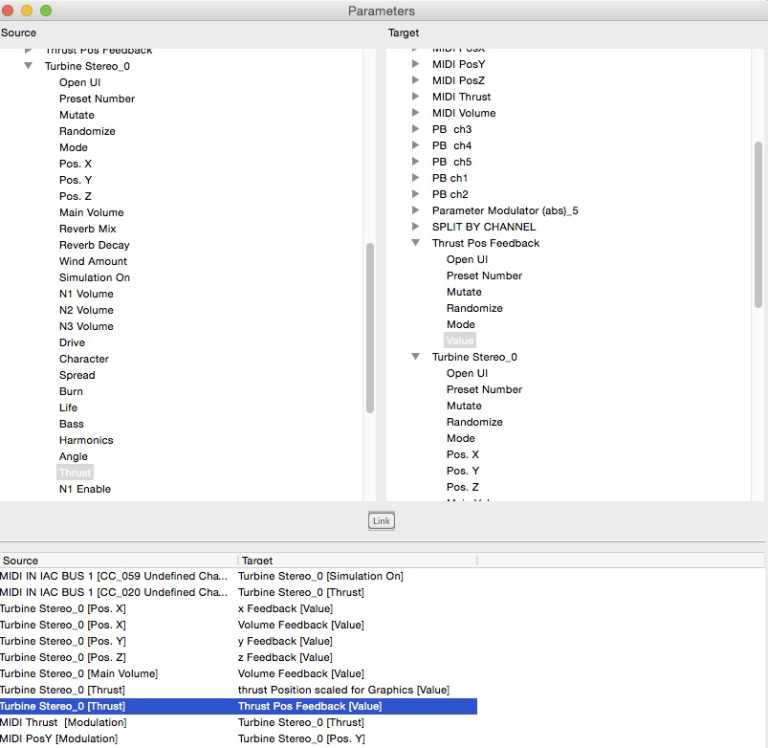
Using the Parameters window again, we connect a variable called “Thrust” to the “Thrust Pos Feedback Value” parameter from TURBINE.
That variable is connected to an OSC creator object which adds the value to an OSC message:
/cue/9002/translationY
The OSC creator object sends that message to QLab, using the “Thrust” value as
an argument, so that we can use cue 9002 to store the value.
Because the OSC creator object only sends its message when triggered, we also
connect the output of the variable object to a change object which sends a
positive output trigger every time the value of the variable rises (+1) or a
negative trigger every time the value falls (-1). Since we don’t care about the
direction of the change in this case, we follow this with a function object
that does a little math: abs (x). This passes the absolute value of the
incoming value, so we get a trigger any time the level changes at all.
We pass this trigger to the OSC creator object, and the message, complete with level, is sent.
Storing and using feedback in QLab
Cue 9002 lives in a cue list in QLab that’s created to store variables being
fed back from the external plugin.
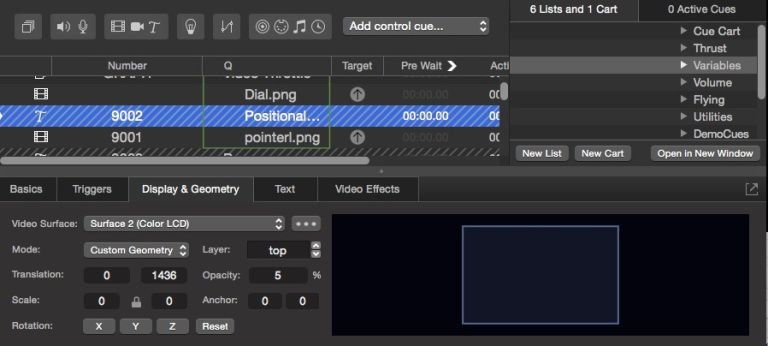
As you can see, cue 9002 is a disarmed Text cue. Text cues are ideal for
storing variables because they don’t require a target and have lots of
parameters that can store variables. In this case, the value 1436 has been
stored in translation Y as the current value of the TURBINE thrust slider.
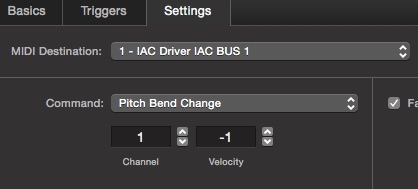
When we want to use this value as the starting point of a MIDI fade, we use this cue structure:
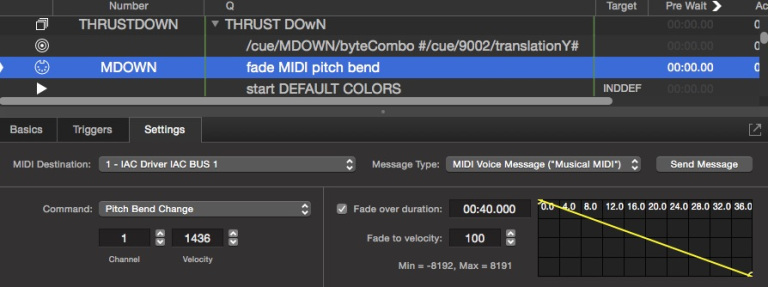
A Group cue set to “start all children simultaneously” contains a Network cue
which queries the translationY value of cue 9002 and sets the starting value
of cue MDOWN to that value. Cue MDOWN is then triggered, moving the thrust
slider from its current position to the value specified in the ‘fade to’ field
of the cue. (Ignore the fact that these values are labeled velocity, they are
pitch bend values.)
If we repeat this program structure for every MIDI fade we program, we will have a set of Group cues that can be triggered in an arbitrary order, with seamless transitions from one to another.
Adding some visible flair
There is an almost identical Bidule structure which sends the same ” Thrust”
value to the translation Y value of cue 9001, but this time the value is
scaled to move an image of a fader shown in the Audition Window.
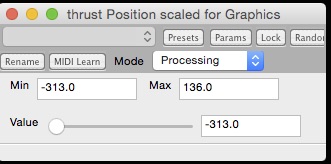
Cue 9001 is not a dummy cue, but an actual Video cue targeting a graphic of a
fader handle. This visual feedback is unnecessary, but enjoyable and useful.
Controlling More Parameters
So far, we’ve only been working with the thrust slider, but the same techniques can be modified to control as many parameters as required. In the image above, we are controlling TURBINE’s thrust, master volume, and the 3-dimensional position of the aircraft in the simulation system. The x/y/z position of the aircraft is controlled by pitch bend data on MIDI channels 2, 3, and 4, and the values for these positions in TURBINE are being sent back to QLab in OSC messages every time the position of the aircraft changes.
Just like with thrust, QLab both controls the parameters and monitors their position so that it can seamlessly fade from the current values. All the information from TURBINE is stored in disarmed Text cues:
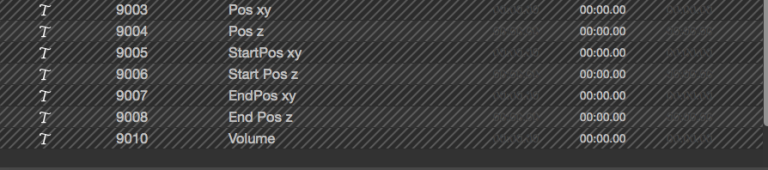
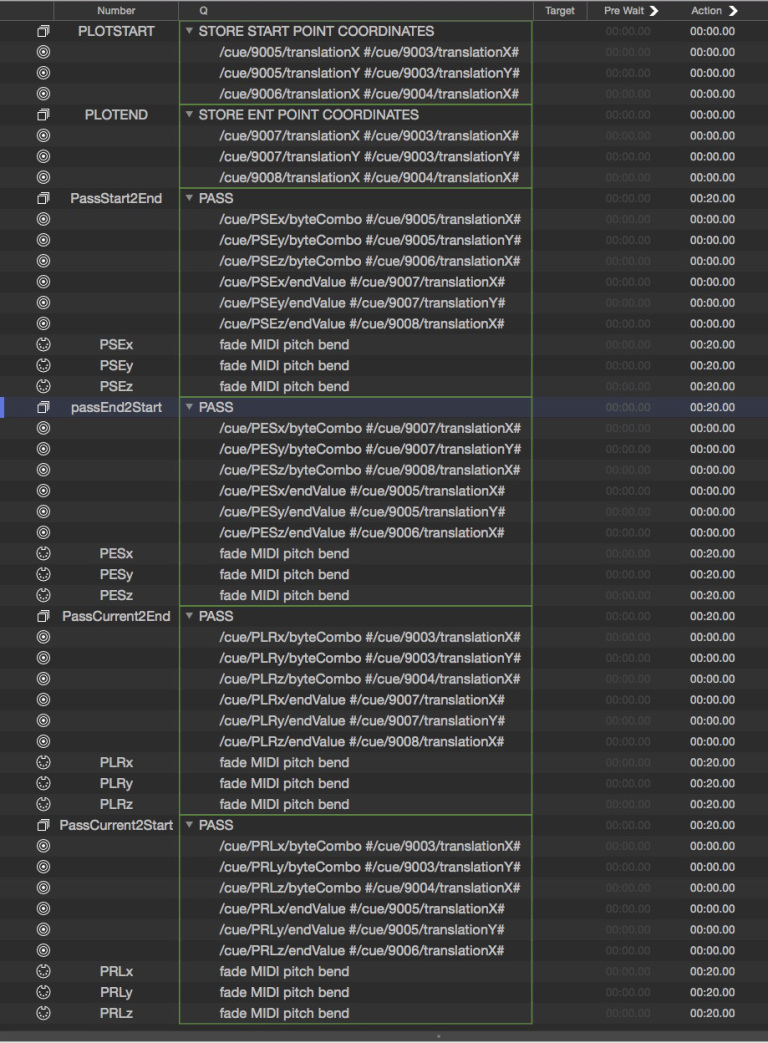
In the example QLab workspace, there are cue structures that store pairs of starting and ending points for the aircraft. This effectively creates a waypoint-based method of flying the aircraft around in the simulator. The programming could easily be expanded to store any number of waypoints and move through them sequentially.
Adding a Control System
With the large number of cues in the workspace scattered across many cue lists, it can be useful to consolidate control of into a series of Start cues that can be clearly labeled. If your airplane moves predictably, the Start cues can keep your main cue list tidy and readable. If your show requires more flexibility, a cue cart can be a nice alternative. Here’s the control cart for the example workspace:
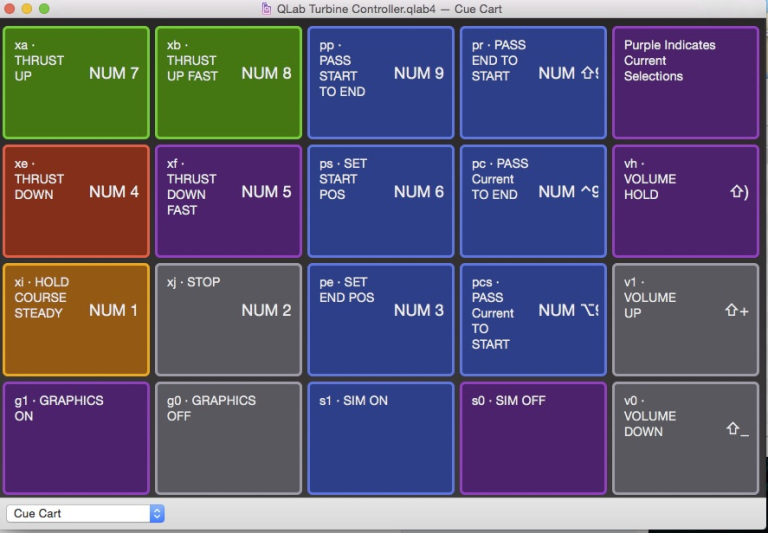
The cues all have hotkeys which are clearly visible. The cue’s numbers are arranged so that logical groups of cues can be addressed with wildcards in OSC addresses. So, for instance, all the thrust pass controls can be set back to their default color using:
/cue/p*/colorName blue
The cart can be used in conjunction with the cue sequence recorder in QLab’s Tools menu to built pre-recorded flight sequences:
Although this chapter barely scratches the surface of what can be achieved with these new sound design tools, we have covered a broad range of techniques which can be modified for use with other physical modeling and procedural plugins. They can also be used to provide OSC control and feedback to any effects plugin that doesn’t have that facility.
You’ll need both TURBINE and Plogue Bidule (full version or standalone) installed before launching the QLab workspace.
Turbine © BOOM Library - Rohrbach, Langer, Sillescu GbR.
Plogue™, Bidule™, names, and logos are trademarks of Plogue Art et Technologie, Inc.