Bars and Beats
When synchronizing cues to a piece of music, it would certainly be desirable for a cue to be triggered by referring to a bar and beat number instead of manually calculating a pre-wait time. Even if you have relatively high patience for calculating timings, they can really only be calculated easily if the music maintains a regular tempo and doesn’t include time signature changes. Once your music has tempo changes or irregular time signatures, the process becomes extremely time consuming.
This chapter describes a complete workflow to enable the triggering of cues on musical bars and beats. The examples and screen shots use Apple’s Logic and Cycling 74’s Max to process and create the necessary files, but it can easily be done with another DAW in place of Logic and Pure Data or Vuo in place of Max.
Example 1: 127 Bar Proof of Concept
The first method we will examine uses MIDI notes to keep track of the bar and beat number. It allows QLab cues to be set to start on bars and beats by setting their MIDI trigger to Note On and setting the note number and velocity to the desired bar number and beat number. The example workspace displays text and images in sequence for a fictitious brand activation presentation.
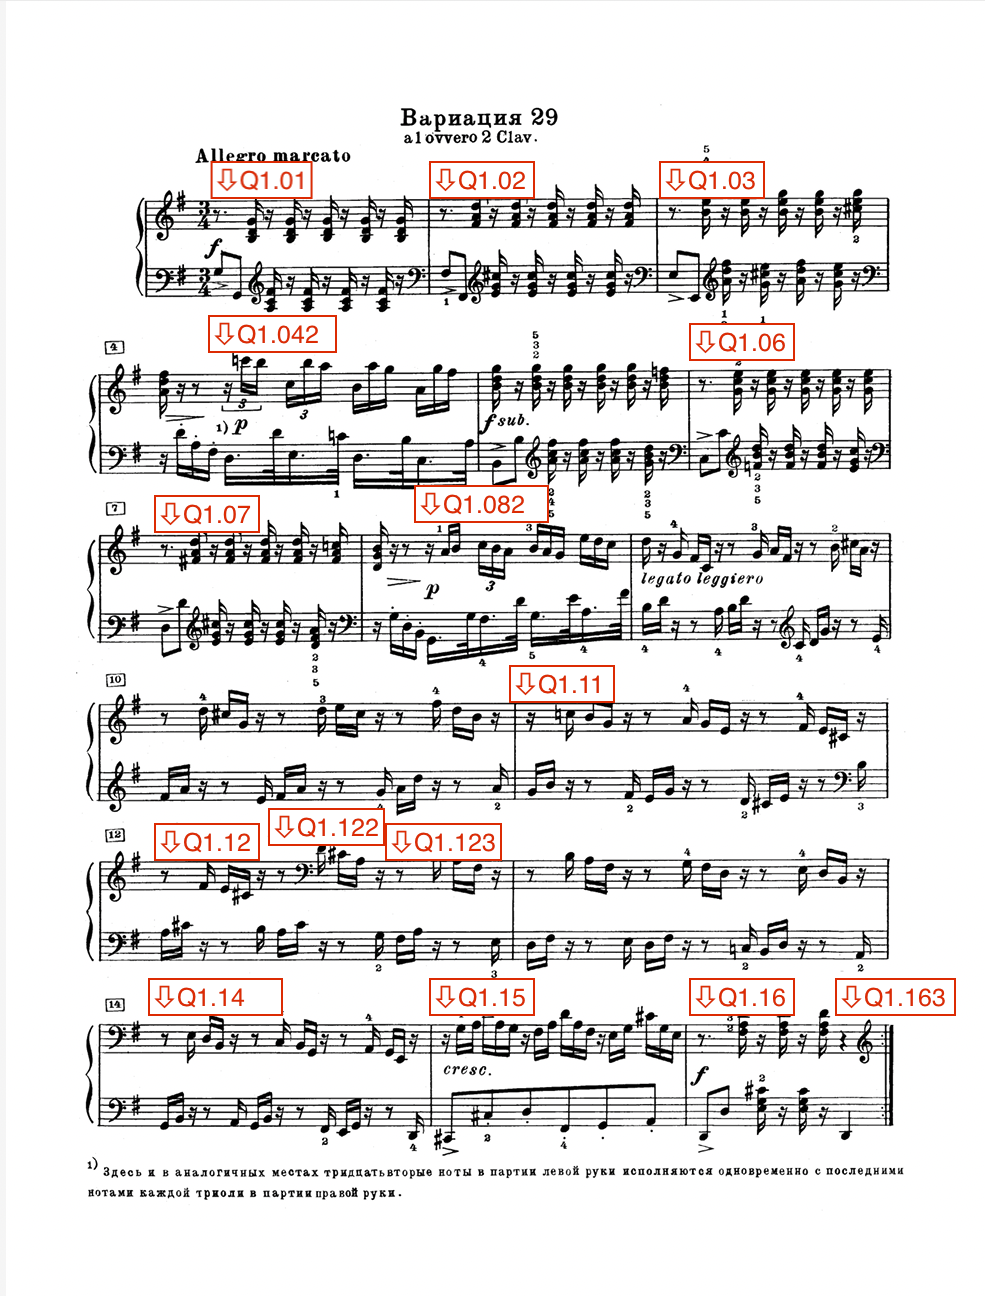
Here’s the score showing the bar and beat cue point positions. This score is included as a pdf in the download.
Here is the workspace in action:
How It Works
Cue 1 is a Timeline Group containing an Audio cue that plays a recording of Goldberg Variation 29 by J.S. Bach alongside a MIDI File cue that plays a standard MIDI file containing a unique note and velocity combination for each musical beat.
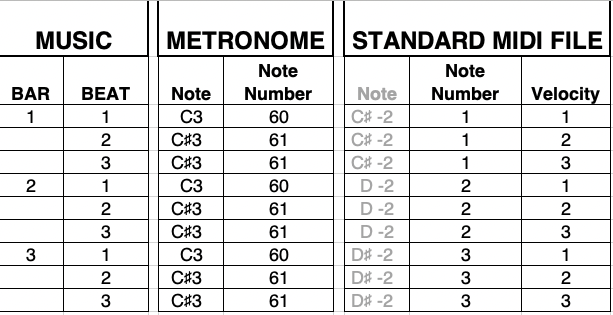
The note number represents the current bar number being played, and the note velocity represents the beat number with that bar. The music in the example is in 3/4 time (three quarter notes, or crochets as they say in the UK, to the bar), so a bar contains three notes representing the bar and beat number. Here are the MIDI notes for the first three bars:
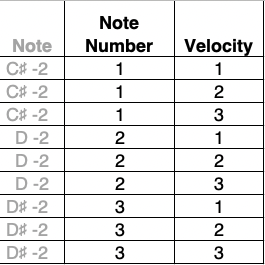
Since every beat of the music has a unique MIDI note/velocity combination, a cue can be started on any bar and beat by entering the appropriate note and velocity in cue’s MIDI trigger.
In the example workspace, triggered cues are all Timeline Group cues manually named for the bar and beat that they’re “listening” for. This makes it easy to keep track of things, and to start multiple cues on the same beat. You can set any number of cues to use the same MIDI trigger, of course, but it’s much easier to just set the trigger on the Group.
Here is the Triggers tab for Cue 1.042, which is set to start on bar 4, beat 2;
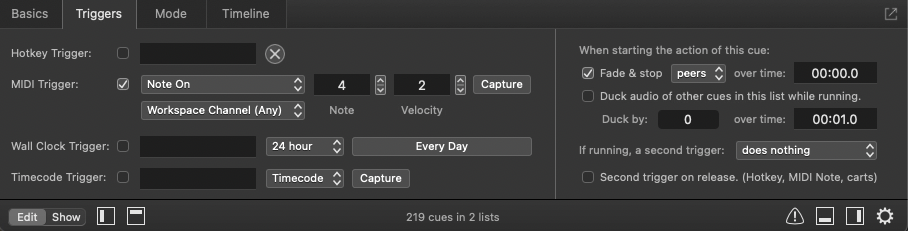
On the right side of the tab, you will also see that the cue is set to Fade and Stop Peers in time 0. This means that when the cue starts, any other cues at the same hierarchical level in the cue list that are currently playing will be immediately stopped.
In addition to the stage for the display of the audience-facing cues, this workspace has a second stage routed to a Syphon output which is used to view the current bar and beat number.
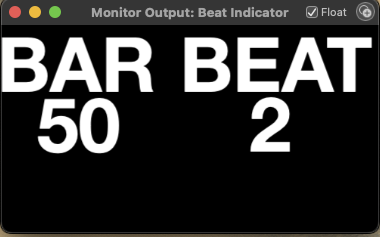
The window can be viewed by clicking the Monitor button in Workspace Settings → Video → Video Outputs.
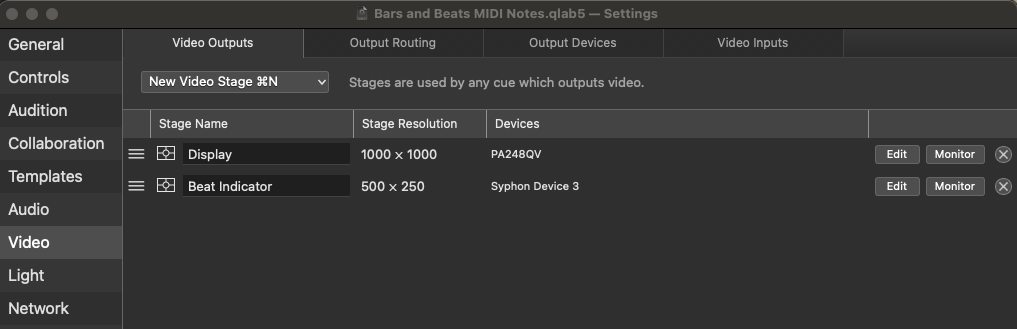
The window displays Text cues contained in a separate cue list named BARS BEAT.
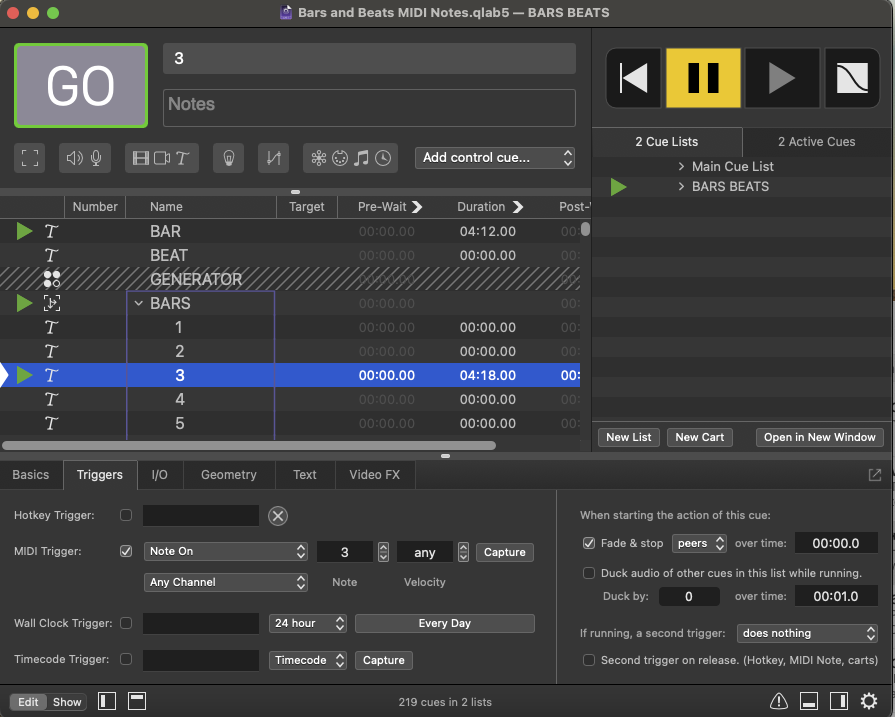
In this screenshot, there are two Text cues for the header titles, “BAR” and “BEAT”, and a Start First Group cue containing 127 Text cues, one for each possible bar number (1 - 127). The Group itself is never started; it is only used to combine all the Text cues containing the bar numbers in a hierarchical group so they can be set to fade and stop peers.
The Triggers tab for each Text cue is set to trigger on a note number at any velocity. In the screen shot, you can see the Text cue that displays the number 3. This cue is triggered by any MIDI note with a note number of 3, regardless of velocity. So, in the example workspace, the number 3 will be displayed for each of the 3 notes in bar 3. These cues are all set to fade and stop peers over 0 seconds so only one beat number is ever displayed.
There is another Timeline Group cue for the beats containing 32 Text cues which display the numbers 1-32. This means it would be possible for this workspace to handle bars containing up to 32 beats, e.g. a time signature of 32/16. Since this example is in 3/4 time, it only uses the first three Text cues in the Group.
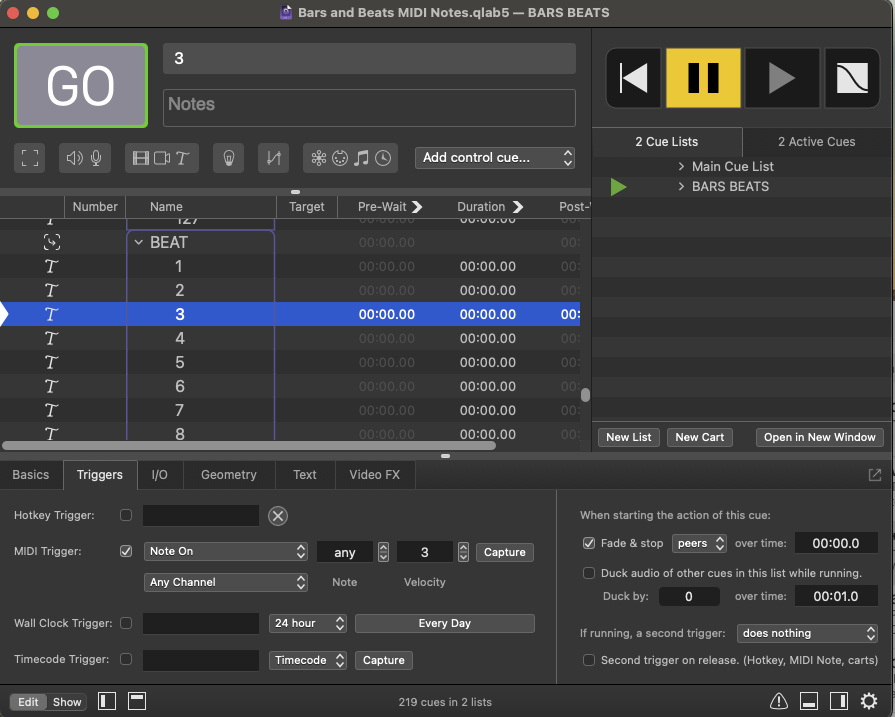
In this screenshot, in the Triggers tab for beat 3, the note is set to any and the velocity is set to 3, so this cue will trigger once per bar on the third beat of the bar.
Generating the MIDI file
The ability of this workspace to start cues precisely on specific musical beats is entirely dependent on the production of an accurate MIDI file containing all the unique MIDI note/velocity combinations representing each beat at exactly the correct time within the file, regardless of the number of beats in any particular bar or how much the tempo of the music fluctuates from note to note and form bar to bar. The MIDI file is generated in real-time from the metronome and tempo map in Logic (or whatever DAW you are using.) The metronome is set to output two MIDI notes, one for the first beat of each bar and a second one for all the other notes in each bar.
Let’s look at how the metronome output from Logic is set up. We will send (and receive back) MIDI data using two IAC buses. It is very important that these are named and numbered correctly. In the Audio MIDI Settings app, found in the Utilities folder inside the Applications folder on every Mac, select Show MIDI Studio from the Window menu and then double-click the IAC icon.
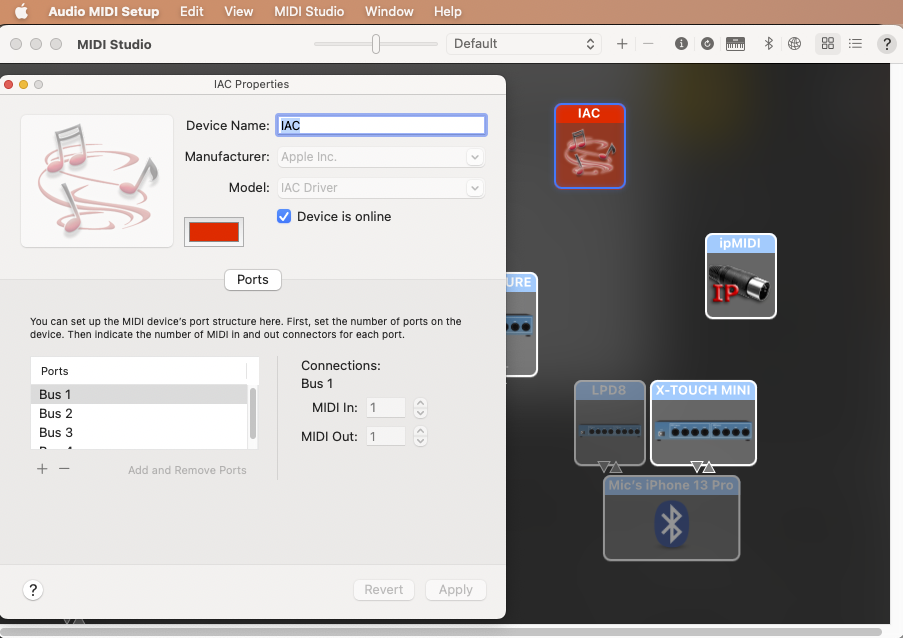
Make sure the device name is IAC and the ports are named Bus 1 and Bus 2, including the spaces, and that the device is online.
The example Logic file in the downloads is named Bars and Beats Notes Logic.logicx
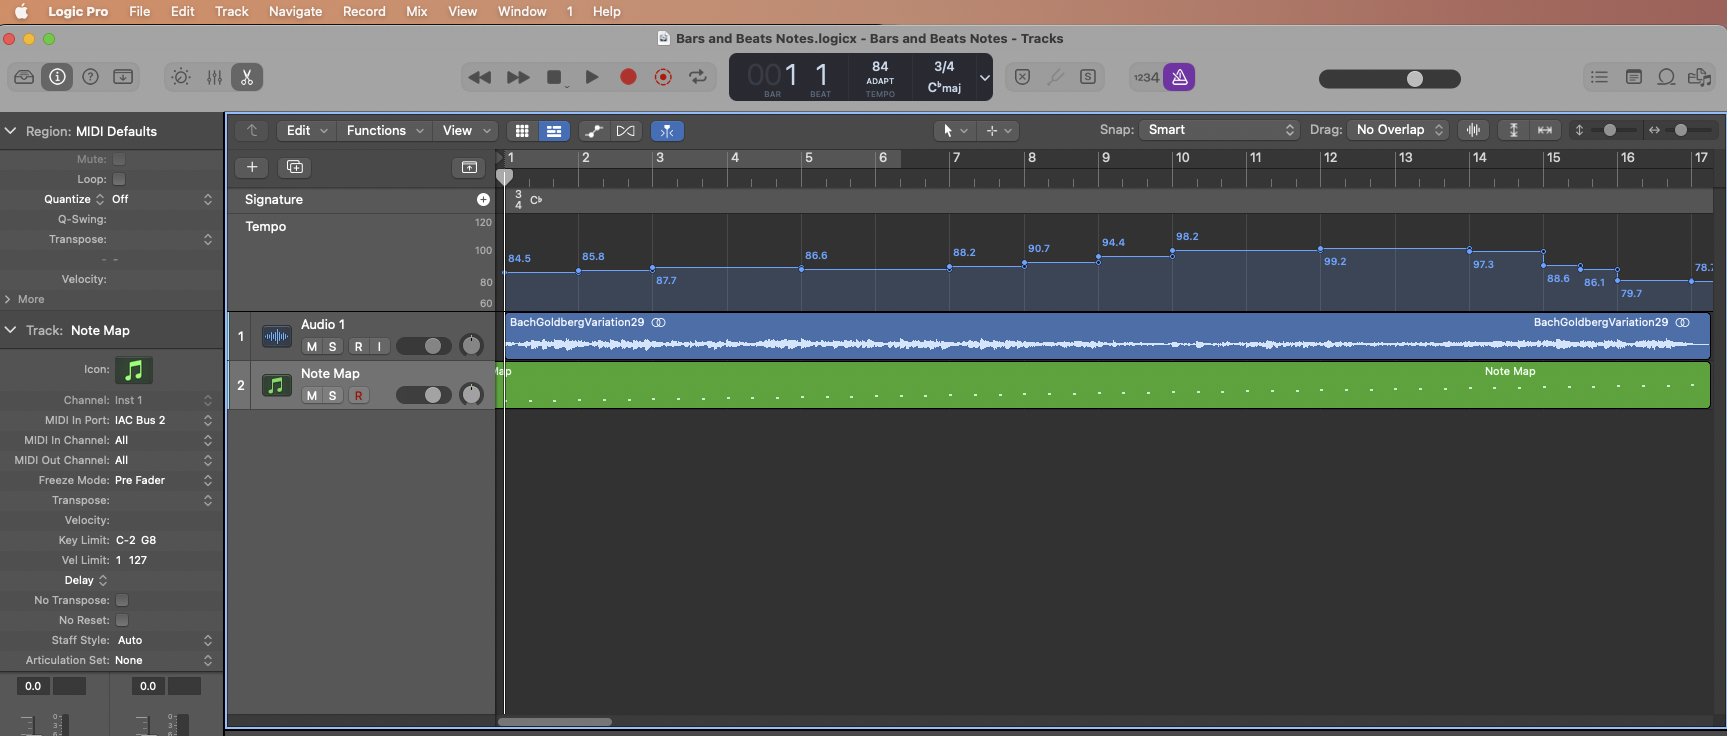
The rulers at the top of the screenshot show the time signature and a graph of the fluctuating tempos.
Beneath these are the audio track and an empty MIDI track ready to record from MIDI In Port IAC Bus 2.
At the very top is a purple metronome button. Check that the button to the left of this is switched off to disable any count-in. Right-click the metronome button and select Metronome Settings. These should be set as follows:
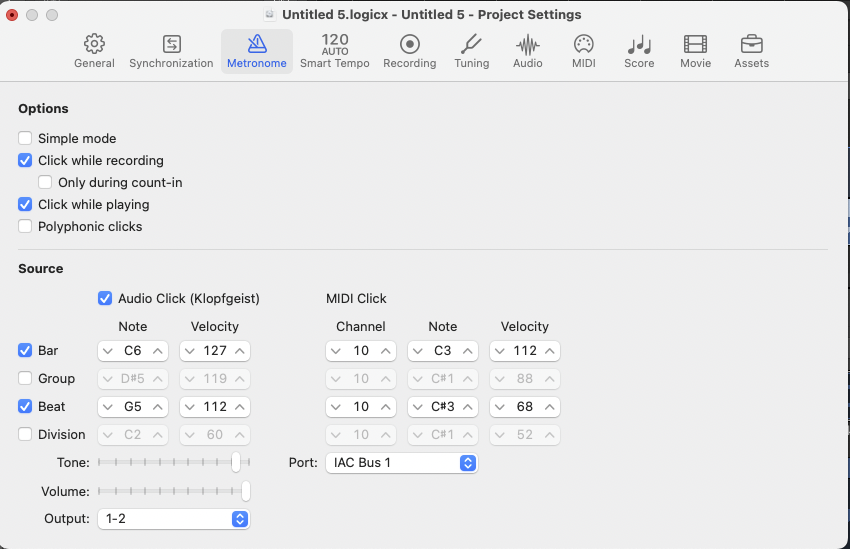
Check the boxes labeled Click While Recording and Click While Playing.
Disable Polyphonic Clicks so that there is only a single note at the beginning of each bar.
Enable the bar and beat sources. You can set the audio click as you prefer. The MIDI click must be set to C3 for the bar and C♯3 for the beat. The Port must be set to IAC Bus 1.
In order to change these two notes into unique MIDI notes for each bar and unique velocities for each beat within a bar, we need to use an intermediate piece of software programmed to count the metronome beats as they happen and convert them to the required values. The metronome in the example Logic Pro project is set to output MIDI note C3 for the first beat in each bar and C♯3 for all subsequent beats. What the counting program needs to do is to increment a counter for the bar number, as well as resetting a second counter for the beats to 1, every time a C3 note is received. When a C♯3 is received for subsequent beats, the second counter is incremented. The program uses these counter values to make and send a new MIDI note with the unique combination of note and velocity values at the same time position as the received metronome click.
Here are the first three bars showing the required conversion:
Max
To do this MIDI message conversion we are using Max. Max is a visual programming environment for music and multimedia with a long history stretching back to the 1980s, currently developed and maintained by San Francisco-based software company Cycling ‘74. The conversion can be adapted to be performed by other similar programs like Pure Data and Vuo. If you don’t have a license for Max, you can use the trial version to open the .maxpat files included in the downloads. Even an expired trial can open files; only edited is disabled. For users who just want to use this workflow but don’t want to get too involved with Max programming, the downloads also contain the converter compiled as an application, which can be used standalone. The standalone app for this example is called Bars and Beats notes.app and the Max patch to use with Max is called Bars and Beats notes.maxpat.
Here is the Max patch:
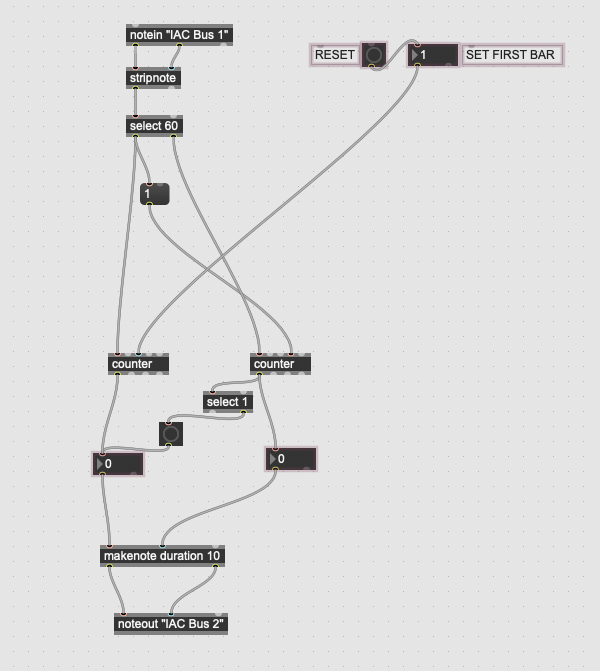
The Max patch consists of several objects with inlet and output ports to receive and send data. Generally, an object only sends data when data (or a bang, which is essentially just a trigger) is received on its hot port, which is the leftmost inlet.
Central to the operation of this patch are the two counters. The counter on the left is for the bars, and the one on the right is for beats. The counter for the first bar can be set to any positive integer using the number object labelled set first bar and reset to that number with the button labelled reset, which sends a bang to the current number when pressed. The number object connects to the set counter on next clock inlet on the bar counter.
The metronome MIDI messages from Logic Pro are received from IAC Bus 1 using the notein object at the top of the patch.
The two outlets of this object are note and velocity, which connect to the stripnote object. This removes the note-off messages. The note numbers are passed from this object to the select object, which compares the note to 60 (C3). If the note is 60 (C3), which the metronome sends on the first beat of every bar, a bang is sent from the select object’s left outlet to the bar counter’s inlet which increments it. A bang is also sent to a number object which holds the value 1, which connects to the beat counter’s set counter immediately inlet, resetting the counter to 1 and sending this value immediately out of the output port.
If the note is not 60, i.e., it is 61 (C♯3), then a bang is sent from the select object’s right outlet, which increments the beat counter.
When the counters are incremented, they send their values to number objects and from there to the makenote object. When the beat counter sends a value that is not 1 (controlled by the select 1 object), it also sends a bang to the bar number object, which stores the last number sent by the bar counter. This means that every time a note is received by the patch, the current bar number is sent to the note inlet of the makenote object and the beat number to its velocity inlet. This note is then sent to the noteout object, which sends the MIDI note to IAC Bus 2.
ß In this screen recording, you can see the metronome sending its MIDI notes to the Max patch via IAC Bus 1, and the Max patch processing the notes and sending the new notes back to be recorded by the MIDI track in Logic Pro via IAC Bus 2. The MIDI file is exported by right-clicking it and selecting Export as MIDI file:
Generally, music recordings will fall into two main types with regard to tempo mapping. The first is where the music is sequenced within the DAW or recorded by a musician playing to a click track, so the tempos and the positions of the bars and beats are accurately recorded as part of that process. The second is where the music has been recorded freely by a musician, with no tempo guide or metronome, and the adding of all the tempo information is done after the recording has been made. This is obviously considerably more difficult. This example workspace contains a music recording which has been recorded with no tempo guide, and is a good demonstration of how an accurate tempo map can be quickly derived from an existing recording. Logic Pro X is particularly well-equipped for this work as it has very advanced tempo analysis functions.
This tutorial section is a step by step guide to the tempo mapping of the piano recording.
- Open the audio file in Logic Pro.
- Display the ruler using the Show/Hide Global Tracks button.
- Double-click the audio region and select Smart Tempo in the waveform window.
- Click the Analyze button. The analysis information will be written to the audio file at this point without asking you!
- In the Edit menu, select Apply Region Tempo to Project Tempo.
- Deselect the Align Downbeat option (see note below) and click Apply.
Play to confirm the tempo mapping is correct.
Further details of how to have Logic Pro’s Smart Tempo analyze recordings and create a tempo map automatically, using hints to refine the analysis and adding time signature changes, can be found on Apple’s website here.
A Warning About Sequence Bar Numbers. Most DAWs will allow a starting bar number of 0 or a negative bar number. This is often used for a note leading to a downbeat on the first beat of a bar or for count-ins, etc. While useful within the DAW environment, negative bar numbers cannot easily be exported to standard MIDI files or used in QLab, where audio file time 0 will always be bar 1. Sometimes Logic Pro automatically arranges the workspace to start at a bar number less than 1. If this happens, you should move any audio and MIDI regions together with the tempo track to start at bar 1 and check that everything is still synced and that the bar lines are in the correct place, then delete all the time before bar 1.
Example 2: 12799 Bars
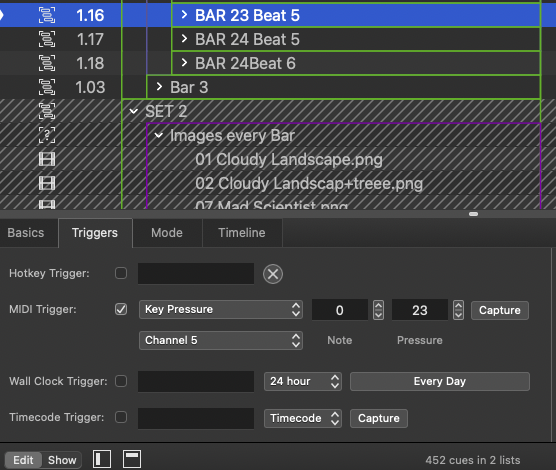
Example 1 has a major limitation: because the Note Value in a MIDI Trigger cannot exceed 127, only 127 bars can be encoded into the MIDI file used for the bar and beats map. The example is still worth studying because it was simple and clear, and understanding how it works gives a solid foundation for looking at this more practical workspace that can accommodate 12799 bars with up to 16 beats per bar. To accomplish this, we’ll use the Key Pressure parameter for MIDI triggers. Key pressure is also known as Polyphonic Aftertouch in many other programs, including Logic Pro. We’ll use the pressure for the tens and ones place of the bar Number (0-99), the note number for the ten thousands, thousands, and hundreds place of the bar number (0-127), and the MIDI channel for the beat (1-16).
Here’s the MIDI trigger for bar 23, beat 5:
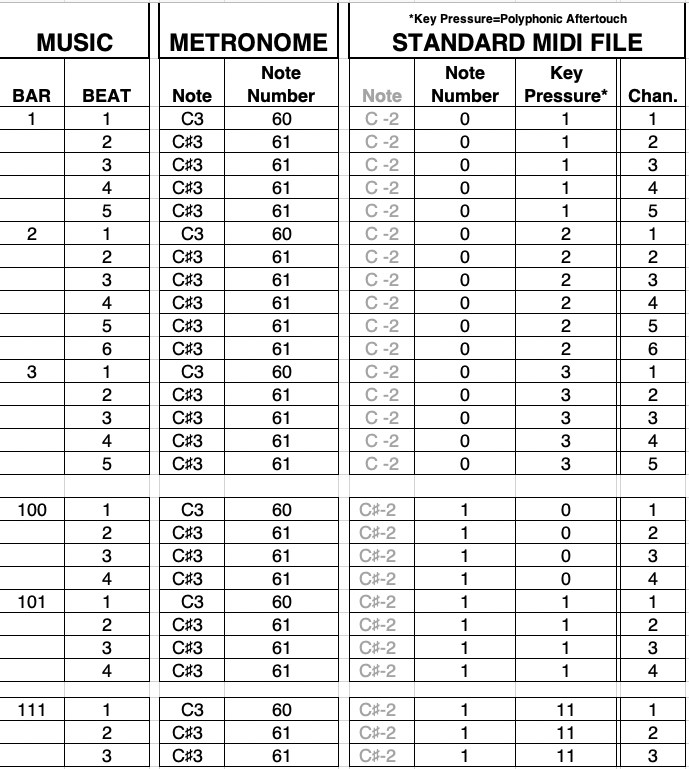
Here’s a table showing the data translation for some bars in this example: bars 1-3, Bars 100-101, and Bar 111:
We use Key Pressure for two reasons. First, we cannot use Note On messages with a zero value for velocity because that will be interpreted by most programs as a Note Off. Second, Note On messages are commonly used in QLab for all sorts of purposes, including workspace control with hardware controllers. MIDI key pressure is rarely used for triggers in QLab, so this approach lets us keep bar-and-beat triggering entirely separate from any of the several more common uses of MIDI in QLab. Of course, care must be taken that there are no other sources of Key Pressure messages connected to QLab and no playback of MIDI files other than the bar and beats files that contain Key Pressure data.
Here’s example 2 in action:
This example uses a much longer piece of music, the first three movements of Pictures at an Exhibition by Mussorgsky; Promenade 1, Gnomus, and Promenade 2, which contain many time signature and tempo changes. The audio recording is derived from a MIDI file sequenced from (public domain) sheet music. Since the Logic Pro session contains the music in MIDI form, rather than as an audio recording, it is possible to view (and screen record) a scrolling musical score. This is very useful for spotting cue points in the music.
When using MIDI sequences as the basis for the audio for a project, the score produced by Logic Pro will often be different from a sheet music version. One reason for discrepancies is when the sheet music contains repeats. In the sheet music, these will be indicated with special bar lines, which indicate the section to be repeated by playing the printed section between the repeat marks a second time, but in the MIDI part will exist as separate new bars in the score, which will offset the numbering of subsequent bars. Additional bars may also be utilized where long notes with pauses appear in the score, which may be sequenced by inserting an extra bar for the additional note duration. Sometimes, a time signature change may be missed in the preparation of the sequenced score, which will cause further discrepancies between the sheet music and the score in Logic Pro. Because of these discrepancies, score in Logic should be considered the definitive reference for bar numbers and beats. The MIDI sequence in this example contains many of these sequencing discrepancies (as well as some questionable piano playing) and some musically incorrect tempos. Although not a great performance to listen to, it’s an ideal test to show how accurately all the tempo changes and time signatures are tracked!
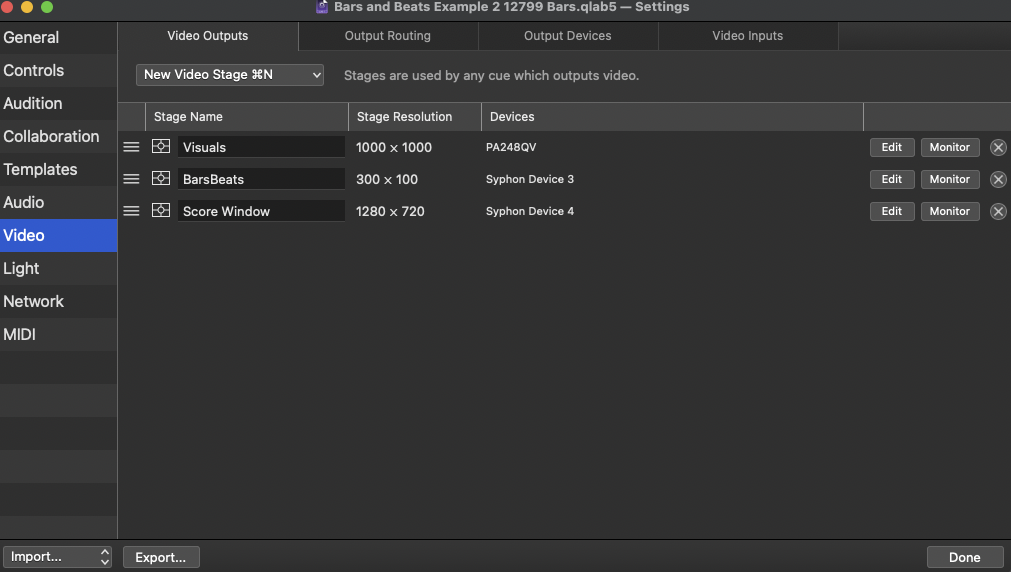
This example uses one video stage to display the audience-facing visuals and two additional stages, routed to Syphon outputs, intended to be viewed in their monitor windows. You can open these by clicking on the Monitor buttons found in Workspace Settings → Video → Video Outputs. One of these is the bar and beats window, as in example 1. The second is a score viewer, which allows a screen recording of the score to be viewed as the music plays in its own window.
In the screen recording, you can see these windows side by side with the cue list.
At the top of the cue list, cue 1 is a Timeline Group cue containing an Audio cue that plays the music, a MIDI File cue which plays the MIDI file with the bars and beats key pressure data, an Audio cue with a click track, and a Video cue which plays the screen recording of the scrolling musical score. There are also three sets of Arm and Disarm cues in Timeline Groups, which select which cues are armed for each of the three movements in the piece.
Movement 1, Promenade, is programmed almost identically to example 1, with Timeline Groups containing Video and Text cues triggered on bars and beats.
When Movement 2, Gnomus, begins, the screen is black for a few phrases and then snaps into action as the corresponding cues, “Set 2”, are armed. The visuals for this section are automated using MIDI triggers and effectively execute hundreds of cues precisely to the beat with absolutely minimal programming!
Set 2 consists of two Start Random Groups:
The Group named “Images Every Bar” contains 13 Video cues, each with a color control video effect. The Group’s MIDI trigger is set to Note any, Poly Pressure any, on MIDI channel 1, which means a random image is triggered every bar.
The Group named “Color Every Beat” contains four Timeline Groups, each of which contains a separate Fade cue for the 13 Video cues in the first Random Group. These Fade cues change the hue value of the color control video effect. The fades in the first of the four Timeline Group cues fade the hue parameter to 0°, which causes the target Video cue to display with its original color. The other three Timeline Groups have Fade cues which shift the hue to -180°, 90°, -90°, dramatically changing the color of the images on every beat.
For Movement 3, Promenade 2, “Set 3” is armed and “Set 2” is disarmed. The programming for movement 3 is similar to movement 1, but with one addition: a Start Random Group cue named “Beat6 Overlay Lightning”, which contains four Video cues displaying lightning forks. These cues have their blend mode set to lighten. The MIDI trigger of the Group cue is set to Note any, Key Pressure any, Midi channel 6, which means it is triggered on the 6th beat of any bars that contains a 6th beat i.e. the bars with a time signature of 6/4. Every time the Group is started, a random lightning fork is overlaid on the current image.
Generating the MIDI file for example 2
A different Max patch is used to generate the MIDI file for this example, TempoMapMaker Poly Aftertouch.maxpat. This patch also provided as a standalone app called Bars and Beats Poly Aftertouch.app.
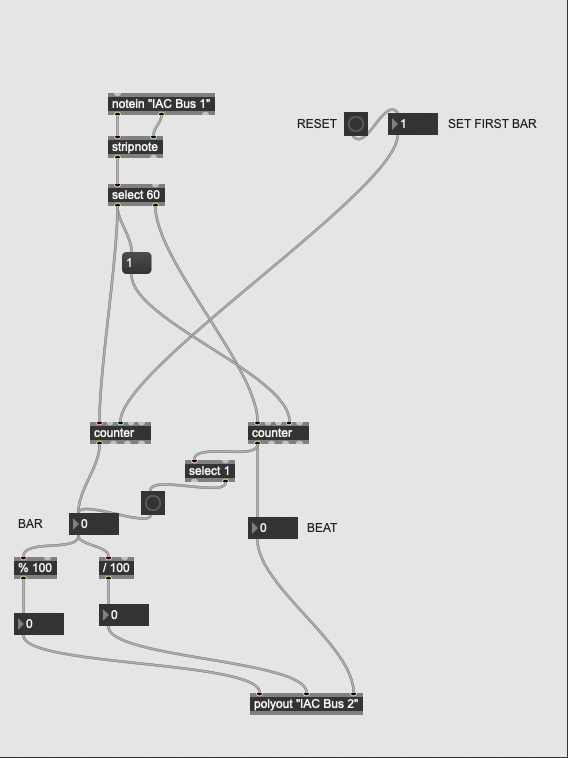
This patch is identical to the example patch 1 from the top through to the bar and beat number objects.
The metronome MIDI messages from Logic Pro are received from IAC Bus 1 using the notein object at the top of the patch.
The two outlets of this object are note and velocity, which connect to the stripnote object. This removes the note-off messages. The note numbers are passed from this object to the select object, which compares the note to 60 (C3). If the note is 60 (C3), which the metronome sends on the first beat of every bar, a bang is sent from the select object’s left outlet to the bar counter’s inlet which increments it. A bang is also sent to a number object which holds the value 1, which connects to the beat counter’s set counter immediately inlet, resetting the counter to 1 and sending this value immediately out of the output port.
If the note is not 60, i.e., it is 61 (C♯3), then a bang is sent from the select object’s right outlet, which increments the beat counter.
When the counters are incremented, they send their values to number objects. When the beat counter sends a value that is not 1 (controlled by the select 1 object), it also sends a bang to the bar number object, which stores the last number sent by the bar counter. This means that every time a note is received by the patch, the current bar number is sent from both the bar and beat number objects.
The bar number object sends its output to a math object which divides it by 100 and sends the integer result to the key number inlet of the polyout object. This will be used for the hundreds place of the bar value in QLab.
The bar number object also sends to another math object, which calculates the remainder of dividing it by 100 and sends that value to the key pressure inlet of the polyout object. This will be used for the tens and ones places of the bar value in QLab.
The beat number object sends its value to the channel inlet of the polyout object. This will be used for the beat value in QLab.
Although it looks like all the messages in a Max patch transmit instantaneously together, in fact they are ordered sequentially from right to left. This is particularly important with the polyout object in this patch; it will receive the beat number at its channel inlet, then the divided-by-100 value at its note inlet, and then the remainder value at its key pressure inlet. The key pressure inlet, being the leftmost inlet, is the hot input, so when data is received here, the entire MIDI message is assembled and sent to IAC Bus 2 for recording in Logic.
The next step is to output a standard MIDI file containing the newly-created unique MIDI messages. The process for doing this is as follows:
- Reset the Max Patch to the bar Number required for the first bar. (Usually 1.)
- Ensure that the empty MIDI track in Logic Pro is set up to receive from Max on IAC Bus 2 and is record-enabled.
- Ensure Logic Pro’s playhead is at Bar 1.
- Click Record.
Further Development
While the real time MIDI file generation methods described in this chapter are useful for many purposes, the workflow could be made faster by writing a program to do the necessary MIDI message translations. Logic and most other DAWs have the ability to bounce a metronome track in faster than real time, so by creating a program to manipulate MIDI data directly in a MIDI file, you could significantly accellerate the whole process.
Another use for directly reading the data in the MIDI files could be to create a script which asks the user for bar and beat numbers, and then calculates the appropriate load time for any Timeline Group that contains a bar/beat map.
Goldberg Variation No. 29 by J.S. Bach performed by Kimiko Ishizaka, CC0. The Open Goldberg Variations is a non-profit project that created a high quality studio recording of Johann Sebastian Bach’s Goldberg Variations and placed it directly into the public domain.
Marked up score from https://imslp.org/wiki/Goldberg-Variationen,BWV_988(Bach,_Johann_Sebastian), public domain.
“Pictures at an Exhibition” by Modest Mussorgsky. MIDI File generated from https://imslp.org/wiki/Pictures_at_an_Exhibition_(Mussorgsky,_Modest), public domain.
All images in example workspaces generated using Adobe Photoshop’s generative fill.
Lightning video by Christian Sommer.
All text in example workspace generated by chatGPT 4.0
Chapter image by Mic Pool.