Audio Trigger
While complex audio triggering may require drum trigger hardware specifically designed for the task, productions which just require a few cues to be triggered by audio, e.g. a microphone on a lightweight prop door triggering an audio cue of a heavy oak cathedral door, can be managed entirely in QLab. This project uses an OSC query to monitor a microphone level; when a threshold is exceeded, an Audio cue is started. The screenshots and demo videos were made in QLab 5, but the QLab 4 and QLab 5 downloadable examples are virtually identical.
Here it is in action:
There is a single Timeline Group cue, numbered “TRIG”, which contains all the cues that enable the triggering to be controlled. This group contains:
- A Mic cue. Contact microphones work best for most uses, as they will pick up less of the triggered effect. Conventional microphones can also be used, although since they are more likely to pick up the triggered effect, the re-trigger time will have to be set slightly longer than the duration of the Audio cue that is triggered, otherwise the Audio cue will trigger itself repeatedly.
- Memo cues used for storage of measured values.
- A Network cue to capture the current RMS level of the microphone and store it in the post-wait time of a Memo cue.
- A Script cue to control the whole process.
Cue “TRIG” is in a separate cue list named “TRIGGERS” together with the cues to be triggered.
In the main cue list are a series of Timeline Group cues. Each of these Group cues contains:
- Three Network cues which send information to the cues in the “TRIG” cue to select which cue will be played, the threshold level which will trigger this cue, and the time before the cue can be triggered again (the re-trigger time.)
- A Start cue which starts cue “TRIG”, arming the effect.
In the demo video, the “Door Slam” Timeline Group is played. This tells cue “TRIG” that we want to play the cue numbered “DOOR” when the threshold exceeds 1 and not to allow re-triggering for 0.5 seconds. It then starts cue “TRIG”, the surface with the contact microphone is hit, and the door slam is triggered.
The Group numbered “GLASS” works in the same way.
The Taiko Drum and each set of footstep samples in the TRIGGERS list are contained in Group cues set to Start Random mode. For the drum, this means that consecutive triggers can overlap. For the footsteps, this provides variation for each footstep. The footstep cues might be triggered by a contact microphone placed on or under the stage or a pair of miniature microphones connected to a wireless microphone transmitter and run down each leg of the performer to their shoes.
How It Works
The Timeline Group numbered “TRIG” has its If running, a second trigger… parameter set to hard stops & restarts

This allows all the parameters of the trigger, including the audio that will be triggered, to be changed without explicitly stopping and starting the Group using Start and Stop cues. In the demo, the footstep surfaces are changed on the fly utilizing this fact.
We do not need to hear the output of the Mic cue, as it is only used for triggering, but we do need it to drive a cue output at full volume so that its level can be measured. To enable this, but keep it inaudible to the audience, we route it to a cue output (output 10 in the demo workspace) and route that output to a device output at an extremely low level. This is done by going to Workspace Settings →Audio → Audio Output and clicking the Edit button for the audio output patch in use. In the Patch Routing tab we set the crosspoint which connects cue output 10 to a device output at -59 dB. This means it will meter fully at the cue but be attenuated in the routing matrix to be practically inaudible. Other cue outputs can route to this same device output at normal levels, of course, which means you don’t need to waste this device output for only this use. Alternately, if you have an unused device output you can route your cue output there.

The Memo cue numbered “SAMPLE” stores the cue number of the cue to be triggered as its name.
Cue “OSC” is a Network cue with a long duration, set to repeat at 30 fps. It sends this OSC message:
/cue/LEVEL/postWait #/cue/MIC/liveAverageLevel/10 0 100#
The portion of the message bounded by hashmarks is an OSC query; when the message is sent, the query is replaced by the value that the query returns.
This message sets the post-wait time of the Memo cue numbered “LEVEL” to the measured audio level of cue output 10 of the cue numbered “MIC”. The scaling of the measurement is set by the two arguments in the OSC query; in this case, a number between 0 and 100.
The bulk of the work is done by the Script cue which contains this script:
tell application id "com.figure53.QLab.5" to tell front workspace
  set theThreshold to post wait of cue "THRESH"
  set theRetriggerDelay to post wait of cue "RETRIG"
  set the post wait of cue "LEVEL" to 0
  set theCueToTrigger to cue (q list name of cue "SAMPLE" as text)
  load (theCueToTrigger)
  repeat
    set theLevel to post wait of cue "LEVEL"
    if theLevel > theThreshold then
      start theCueToTrigger
      delay theRetriggerDelay
      load (theCueToTrigger)
    end if
    delay 0.1 --10fps delay for main loop
  end repeat
end tell
The script begins by assigning the values stored in the Memo cues to variables
theThreshold is the audio level that, when exceeded, will trigger the appointed cue.
theRetriggerDelay will need to be set to a time long enough to ensure that the triggered audio does not re-trigger itself. This may need to be the length of the triggered cue plus a safety margin if the triggered cue is very loud. For quieter sounds or sounds that decay quickly, the time can be shorter. One of the limitations of the OSC query technique used in this workspace is that it can only use an RMS averaging of the microphone level and not an instantaneous peak. The averaging takes place over a period of time, which means that the re-trigger time can not be set much below 0.5 seconds without the audio triggering itself repeatedly.
theCueToTrigger is the cue that will be triggered when the microphone’s audio level exceeds the threshold.
The repeat loop is set to repeat ten times per second by virtue of the 0.1 delay at the end of the block. This tempo strikes compromise between minimizing triggering latency and preventing the script hogging the computer’s resources. The loop monitors the level the OSC cue is storing in the post-wait of cue “LEVEL”. When this level is greater than the threshold, the script starts the cue which matches the cue number stored in the name of cue “SAMPLE”. It then waits for the re-trigger time to elapse before doing anything else. After this wait, it loads the cue again.
Hint: If the cue to be triggered is a Start Random Group, you will see which cue will play next as it will be the only child cue that is loaded.
In the main cue list, every time we want to use the microphone triggering system, we insert a Timeline Group cue containing three Network cues and a Start cue:

- A Network cue which sets the name of cue “SAMPLE” to the cue number of the cue we want to trigger.
- A Network cue which sets the post-wait time of cue “THRESH” to the audio threshold we want to use to trigger the cue.
- A Network cue which sets the post-wait time of cue “RETRIG” to the length of time we want to delay before the cue can be re-triggered.
- A Start cue targeting cue “TRIG”.
When we have finished with the microphone trigger, a Stop cue is used to stop cue “TRIG”, disarming the system.
A Note About Latency
To get the fastest triggering we need to have the lowest latency possible. As receiving the output from a microphone requires very little processing power, it’s possible to set a very low buffer size in QLab preferences which will reduce the latency to a matter of milliseconds. However, if the same audio interface is being used for more demanding tasks, it may need a higher buffer size for those tasks to sound good.
The best way around this is to use a separate audio interface for the trigger microphones. This means you don’t need to worry about its audible performance, since nothing the audience hears will pass through it. This also means that since you won’t connect any outputs to the device, you don’t need to set the routing crosspoint to -59, as nothing will be connected to the output anyway.
Here is the Hardware tab in QLab Preferences on the system used in the demonstration video:
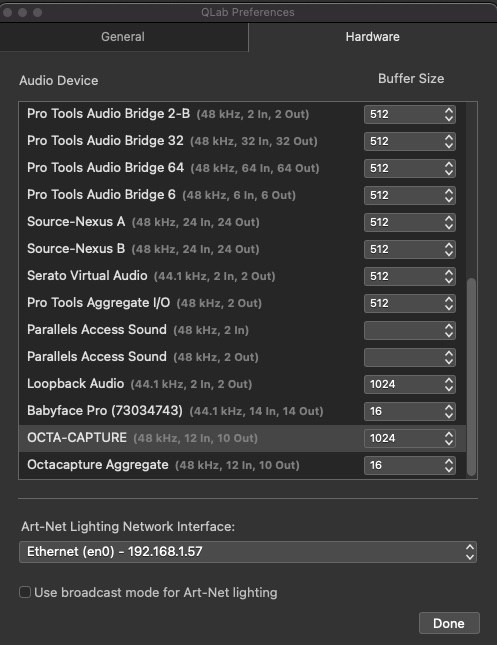
The Octa-Capture is the main QLab output audio device, and as there may be other cues that are resource heavy, its buffer size is set to a very generous 1024.
The Babyface Pro is used for the trigger microphone and nothing else. Its buffer size is set to 16, which is as low as possible.
There is a method of producing a virtual copy of an audio device using Audio MIDI Setup, but this only creates the illusion of usefulness since the buffer size of a hardware device can only be set to one value at a time, and all audio which passes through the device must be subject to this buffer size. Using aggregate audio devices in this way is not recommended.
All sound effects included in the example download from freesound.org. Attributions where required in the cue names.
Chapter image by Mic Pool, all rights reserved.