Automatic Ambient Audio Adjustment
This example examines automatically setting sound levels in response to the ambient level of an audience. The example as written is not likely to work perfectly in every scenario; if you want to use it in a live production, should be prepared to refine it to suit your precise needs before relying upon it in front of a real audience.
Here it is in action:
In the video, a recording of an audience (cue AUD) is played through the
speakers to simulate audience walla
before a show.
When cue 1 is triggered, before the announcement plays, a measurement is taken
from a microphone and the measured level is used to set the master playback
level of cue ANN.
Setup
For the purposes of this demo, we will be using an audio interface with speakers connected to outputs 1 and 2, and a microphone connected to input 1. We will assume no use of Mic cues for any other purpose. It is possible to use this technique while still using Mic cues for other things, but omitting that possibility makes the example clearer.
The point of the microphone is to measure the noise level in the room, so its physical placement is likely to cause serious feedback if we were to bring it up in the speakers. However, we do need it to meter at full level in the cue so that we can get useful level information. So, we will take advantage of the fact that Mic cues use separate device routing from Audio cues to eliminate the possibility of an ear-splitting error.
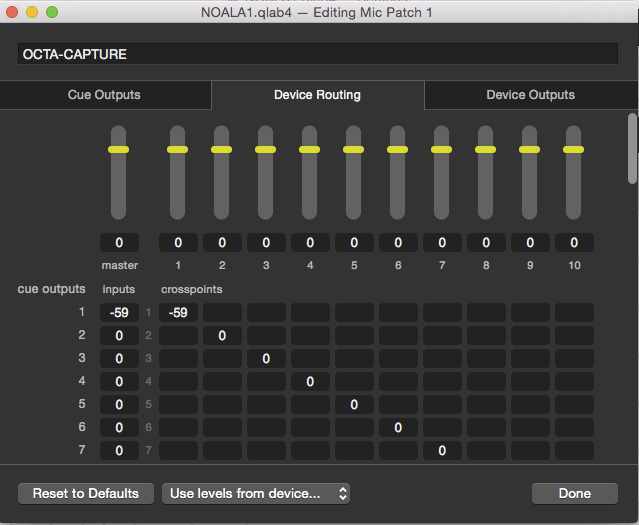
Go to Workspace Settings → Audio and set Mic Patch 1 to use your audio
interface. Then click Edit Patch 1 to bring up the audio patch editor for Mic
Patch 1. Then click on the Device Routing tab, and set the input for channel 1
to -59 and the crosspoint from input 1 to output 1 to -59.
Now return to the cue list and start cue AUD. Set a level that corresponds to
a medium level of audience chat in the theater.
With the audience simulation audio running, preview cue SPLMIC (by selecting
the cue and pressing “V” on the keyboard) and adjust the mic input gain on your
interface to give a medium level on the meter of cue output 1.
In general, it’s wise to start with the mic gain at minimum, just in case you don’t have the correct settings in the mic device output routing, and bring the gain up slowly. If there is any feedback press ESC immediately.
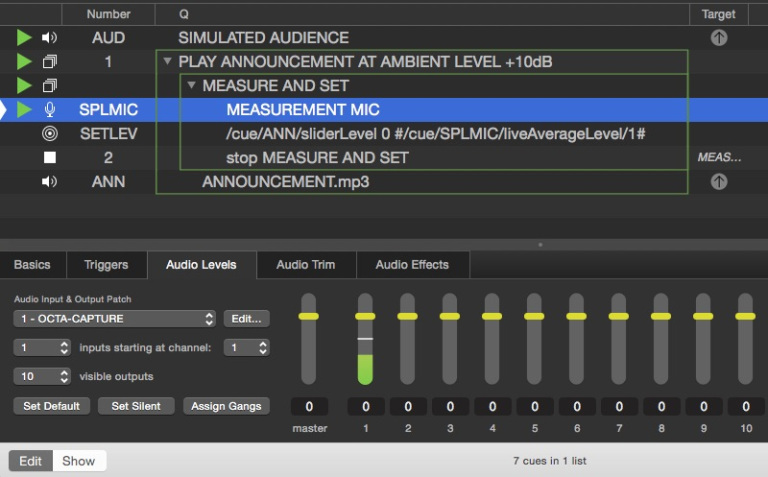
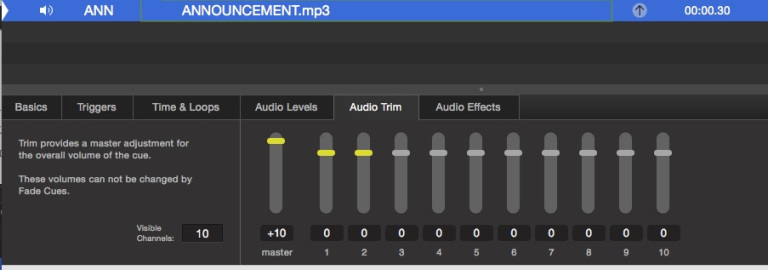
Now trigger the cue SETLEV, and then play cue ANN. In cue ANN, go to the
Audio Trim tab and adjust the master level until the announcement it can be
heard clearly over the audience ambiance. If your announcement is recorded at
around -20 dB RMS, you will probably want a level around +10dB.
Press ESC to panic the workspace and fade all audio.
Play the audience simulation cue again and change it’s level (using the audio levels master in the cue) to that of a quiet audience.
Play cue 1 and this time, the announcement should automatically play at a
lower level.
Repeat with different simulated audience levels and tweak the trim on the announcement cue to give a good result at all levels. Remember, the audience tends to quiet down a little when they register that an announcement is being made.
How It Works
Once you have got all the patch and settings sorted, there just a single Network cue that does all the work.

This cue sends the following OSC message to localhost:
/cue/ANN/sliderLevel 0 #/cue/SPLMIC/liveAverageLevel/1#
The part of the message between the hash marks (or
octothorpes as they were first
called) is an OSC query. This reads the level of cue output 1 of cue SPLMIC
and returns that level as the result of the query. That value then replaces the
text between the hashes when the OSC message is transmitted. So, if the level of
cue output 1 of cue SPLMIC happens to be -22.4 at the moment that the Network
cue runs, the OSC message becomes:
/cue/ANN/sliderLevel 0 -22.4
That message sets the master slider (slider 0) of cue ANN to the returned
level, in this case -22.4 db.
The level we added in the Audio Trim tab is the amount of boost above the ambient level that we want the announcement to have.
Refinements
Now that we have a working system, we can make several improvements to its functionality.
The main problem in this simple version is that we are sampling the audience level at a single moment. If someone happened to cough loudly close to the measurement microphone at the precise moment that the measurement was taken, then the announcement level might be set considerably higher than necessary.
In order to address this, we need to get as many level readings as possible in the time available and average them. You could also use multiple microphones and mix them in the Mic cue to average out the level across the venue, although that solution requires more labor to set up and more money if you don’t already own the microphones. We’ll focus on the mathematical solution here.
The updated workspace is quite similar to what we’ve already built. What we need to add is a method for recording a lot of data, and then performing a calculation on it.
First, we will give the Network cue a duration. Five seconds is a good window to measure for an announcement, so we set the duration of the Network cue to 5 seconds by editing the Action column in the cue list. Don’t forget to also add 5 the pre-wait of any cues which follow the Network cue.
Network cues with a duration send their OSC message repeatedly. Starting with QLab 4.2, you can manually set the frame rate for this repetition in the Settings tab of the inspector. Navigate there and set the “fps” drop-down to 30 fps. 30 frames per second for five seconds will give us 150 measurements, assuming our Mac is fast enough. If the Mac is not fast enough, we might not get quite a full 30 frames, but for this kind of operation that’s not a problem.
Now, because OSC queries do not allow math to be performed on the query within a cue, we need to store all the levels that we record somewhere. In this example, we’ll use the notes field of the Network cue itself.
You can do a lot more string manipulation in OSC queries than is immediately obvious. In this case, we’re converting the result of a query from a number to text by enclosing the query in quotes. You can also, within these quotes, make multiple queries. So, our OSC message now reads:
/cue/SETLEV/notes "#/cue/SETLEV/notes##/cue/SPLMIC/liveAverageLevel/1 0 1#:"
Which sets the notes field of cue “SPL” to it’s existing contents plus the new contents plus ”:“. This complex set of text will be used to feed a Script cue which will calculate the average level.
In our previous example, we were directly reading a logarithmic value in dB from the level of the microphone and applying that value directly to a level control. Since we are now averaging multiple levels, we to convert our reading to a linear value, average those values, and then convert the result back to a logarithmic dB value. The reason for this is that calculating the arithmetic mean of logarithmic values is not straightforward.
If you look at the /liveAverageLevel query in the OSC message above, you will
see that there are two additional parameters after the channel number; in this
case 0 and 1. These numbers instruct QLab to re-scale the level to a linear
scale between 0 (for silence) and 1 (for the loudest possible level returned by
liveAverageLevel.)
Audio level meters in QLab cues work as follows: when the meter is at the point where the fader handle rests at 0 dB, that is 0 dBFS RMS on that cue output channel. That is the maximum level that can be returned by liveAverageLevel. So, if you have an Audio cue
TONEthat’s playing a sine wave tone at 0 dB, and you query its level using/cue/TONE/liveAverageLevel/1 0 100, the query will return a level of100. As you increase the level of the Audio cue, the metering will turn red and extend into the area above a fader at 0dB. The OSC query, however, has already “maxed out” and will continue to return a level of100.
We need to empty the notes field before we start measuring so that we don’t have old data in there, which we do with a Network cue that sends this message to localhost:
/cue/SETLEV/notes ""
Next, we’ll need a Script cue to do the calculations on the data we store in the notes field and set the level of the announcement (or music) accordingly.
The revised workspace looks like this:
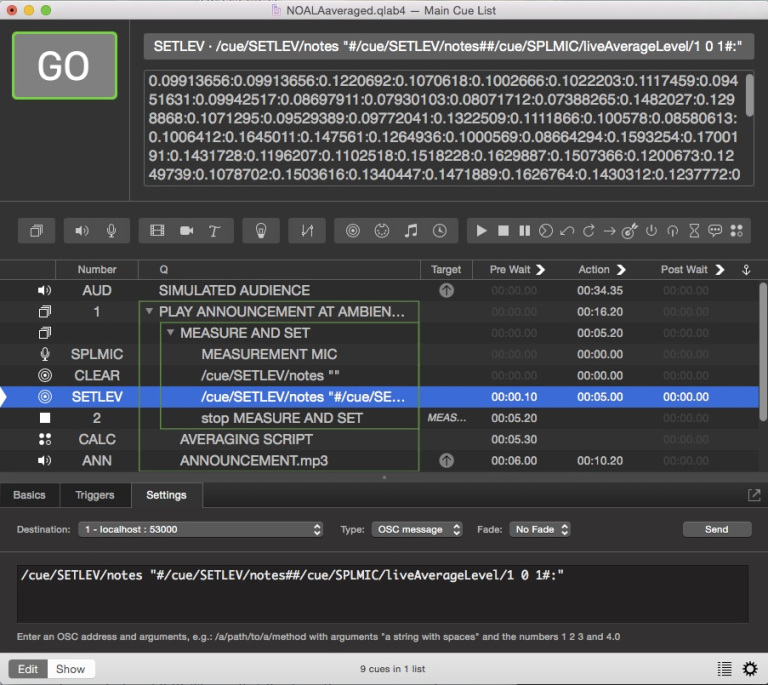
This workspace listens to the microphone and samples its output level about a
hundred and fifty times in 5 seconds. It then converts an average of those 150
values to a dB value that can be used to set a fader on cue ANN prior to it
being played.
If you can place the measurement mic somewhere that the audio playback itself does not make a significant difference the measured sound level in the room, you could run the measurement cue continuously and have it update the fader level of the playing cue every 10 seconds. To do this, you would probably want to update a fade cue so that the level change happened over a few seconds.
Here’s the script that performs the calculation:
set setlevelcue to “ANN” --cue to set master level of
tell application id “com.figure53.QLab.4” to tell front workspace
  set thevalues to notes of cue “SETLEV” as text
  set olddelimiter to AppleScript’s text item delimiters
  set AppleScript’s text item delimiters to “:”
  set thecount to (count of text items of thevalues) – 1
  set theaccumulator to 0.0
  repeat with n from 1 to thecount
    set theaccumulator to theaccumulator + (text item n of thevalues as number)
  end repeat
  set theaccumulator to theaccumulator / thecount
  set thelog to my log10(theaccumulator)
  set thedecibel to 20 * (thelog)
  -- insert any extra math to modify level setting (min. max etc) here
  cue setlevelcue setLevel row 0 column 0 db thedecibel
  set AppleScript’s text item delimiters to olddelimiter
end tell

on log10(thenumber)
  set natural_log to (do shell script (“echo ‘l(” & (thenumber as string) & “)’ | bc -l”)) as real
  set natural_log_of_10 to (do shell script (“echo ‘l(10)’ | bc -l”)) as real
  set common_log to natural_log / natural_log_of_10
  return common_log
end log10
At the top of the script, we set a variable called setlevelcue to the cue
number of the cue whose master level we’re going to change.
Next, we set a variable called thevalues to the contents of the notes field of
the Network cue. That drinks in all the levels we recorded.
We change the text delimiters to ”:” so that each recorded result becomes a separate text item. Here’s a good, brief explanation of AppleScript text delimiters.
thecount is set to the number of records, then we add up all the records and
divide the result by thecount to get an average level.
We then need to calculate 20*(log10(the average level).
AppleScript is somewhat deficient in the math department and has no built in log functions, so we have to use a shell script to do this calculation at the system level. This is the function at the bottom of the script.
We now have a usable level which is used to set the master slider level of the cue number set at the top of the script.
Further Development
At this stage, you will probably want to modify these workspaces and scripts to produce a system that works for you and your typical setups.
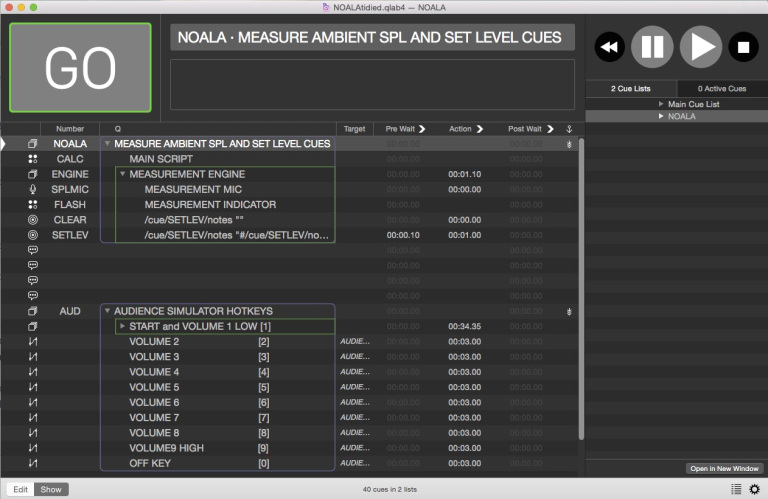
Here’s a tidied up version of this tutorial workspace in action:
All the cues that do the measuring and set the levels have been moved to a separate cue list. That list can be used every time we want to set a level automatically.
In our main cue list, we put the script cue NOALA into a Group cue set to
“start first child and go to next cue” together with the cue whose level we want
to set according to measurements.
We set the sampling time for the measurement in the post-wait of the NOALA cue
(without an auto-follow or auto-continue).
The audience simulator is also moved to the second cue list, and has gained some hotkey controls: Keys 1 through 9 set the audience level from very quiet to very loud, and key 0 stops the simulator.
In the demo video, the audience simulation is started. Cue 1 is triggered,
which starts a five second measurement process after which the level of the
Audio cue is set and the cue plays.
During the measurement process, the name of the cue that is being set changes to a flashing pattern.
Cue 2 fades the music down to an inaudible level after which a two second
measurement is taken. This sets the level of an announcement which is then
played.
At the end of the announcement, a one second measurement is taken and the opening music of the show fades in, starting at a level that is dependent on the ambient noise and ending at an absolute level.
The final cue fades out and stops the opening music.
How It Works
In a separate cue list, we have all the cues necessary to measure the ambient level and set the level of cues and play them.
In the main list, every time we want to set a cue’s level using measurement, we put that cue in a Group cue set to “fire first child and go to next cue” along with a copy of the NOALA script cue. The NOALA script looks like this:
tell application id “com.figure53.QLab.4” to tell front workspace
  set mycue to last item of (active cues as list)
  set notes of cue “CALC” to uniqueID of cue after mycue
  set duration of cue “SETLEV” to post wait of mycue
  start cue “NOALA”
end tell
Every time it is run, it finds out the unique cue id of the cue below it and
stores it in the notes field of cue CALC.
It also finds its own post-wait time, and uses that to set the duration of the
cue SETLEV. This is the only thing that needs to be manually changed in each
copy of the NOALA cue; everything else is identical.
Finally, the script starts cue NOALA which is the Group cue that runs the
measurement routine.
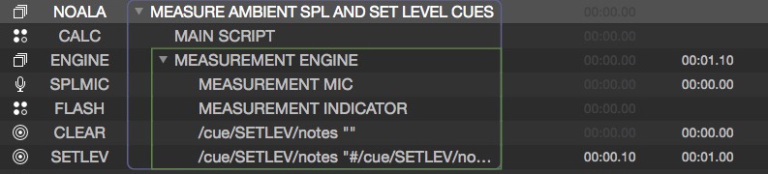
In this Group cue we have the main script, cue CALC, which looks like this:
tell application id “com.figure53.QLab.4” to tell front workspace
  try
    set setlevelcue to (notes of cue “CALC”)
    set theduration to duration of cue “SETLEV” as number
    set theoldcuename to q name of cue id setlevelcue
    start cue “ENGINE”
    delay theduration + 0.1
    set thevalues to notes of cue “SETLEV” as text
    cue id setlevelcue setLevel row 0 column 0 db (do shell script “echo ” & notes of cue “SETLEV” & ” | awk ‘{s+=$1}END{print 20*log(s/(NR-1))/log(10)}’ RS=\” \” “)
    stop cue “ENGINE”
    set q name of cue id setlevelcue to theoldcuename
    start cue id setlevelcue
  end try
end tell
This gets the unique id of the cue whose level we’re setting from the notes
field of cue CALC, which is where the NOALA Script cue stored it.
It then sets a variable called theduration from the action time of the cue
numbered SETLEV, which was set from the post-wait of the NOALA Script cue.
It saves the cue name of the cue whose level we’re setting so that we can substitute our flashing indicator during the sampling period.
It then starts Group cue ENGINE which contains the Network cues from the
previous examples which contain the OSC messages that take the measurements and
store them, together with a little Script cue which drives the flashing of the
cue name.
The main script then waits for Group cue ENGINE to do its work before doing
the math.
Rich Walsh been kind enough to take all the math in the previous version and condense it down to a single instruction. In the previous script, it took 16 lines to perform. Everything in those 16 lines is now achieved with:
(do shell script "echo " & notes of cue "SETLEV" & " ' awk '{s+=$1}END{print 20*log(s/(NR-1))/log(10)}' RS=\" \" ")
The secret weapons here is awk. Awk is a programming language designed for text processing and typically used as a data extraction and reporting tool. It is a standard feature of most Unix-like operating systems, including macOS. It is run outside of AppleScript as a shell script. If you’d like to know more, here’s an excellent if somewhat dense introduction and tutorial.
This is the great thing about scripting QLab. You can pretty much achieve anything by writing simple, verbose scripts which pretty much read like everyday language, or, if you’re willing to put in a little time to learn Awk or some other command-line tool, you can produce optimized compact code like the example above.
After the math is done, the script stops any cues it isn’t using anymore, sets the flashing cue name back to what it was, sets the level based on the measurement, and plays the cue.
Music in the final demo: “We Got Trouble”, “Welcome to the Show” Kevin MacLeod (incompetech.com). Licensed under a Creative Commons Attribution 3.0 Unported License.
