Video Composition
QLab 5
QLab 5’s new video engine is not longer compatible with Quartz Composer, so many of the techniques to achieve the advanced compositions in this article will not work with QLab 5. Fortunately, many of them are no longer necessary because of the new features built into QLab 5. We’ve updated this article with QLab 5-specific notes throughout.
QLab 4
This chapter requires QLab 4.1.7 or later and macOS 10.13.3 or later. Some examples may require adjustment, or may not work properly, in later versions of QLab or macOS. Quartz Composer, which this chapter relies upon, is no longer supported by Apple which makes projects such as these slightly unpredictable. This chapter is not compatible with QLab 3.
Three video features which are not included in QLab are:
- The ability to add more than one video effect to a Video cue.
- Blend modes, allowing Video cues to be composited e.g. multiplicatively, differentially, etc.
- Cropping and masking of images inside Video and Camera cues.
This chapter examines ways in which QLab can achieve each of the above, and how these techniques can be combined to produce complex layered video compositions.
The workspaces using blend modes require Syphon Quartz Composer. It can be downloaded from https://github.com/Syphon/Quartz-Composer/releases/tag/4.
All these techniques require a lot of computer power and you are not going to be able to composite many layers of HD video at full frame rate with blend modes and masks. But even using a single layer of video with a few layers of stills can still yield good results and extend the video capabilities of QLab in all sorts of useful ways.
Using Multiple Video Effects
QLab 5: The solution here is simple; QLab supports multiple video effects on cues. You can simply go to the Video FX tab of the inspector for a Video, Text, or Camera cue and add as many video effects as your Mac can handle.
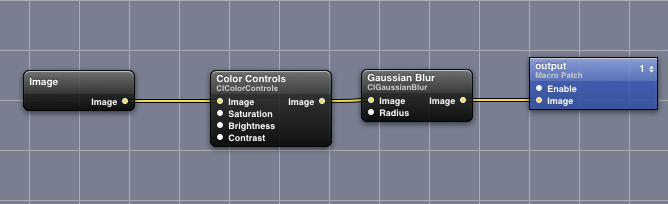
This example examines how we can use two video effects simultaneously on a camera feed. We’ll use a FaceTime camera which first fades up blurry and with super-saturated color. Then, on a cue, it fades into a sharp black and white image. Here it is in action:
In a node-based editor, the set up would look something like this:
To achieve this in QLab, we take advantage of the fact that any video surfaces which are output via Syphon can be used as sources for Camera cues. (Syphon is a system for routing video between applications, and is used internally by QLab. You can learn more about Syphon here.)
First, we create two video surfaces: one which will only output to Syphon, and the other which will be for actual output to a projector or monitor. The dimensions of the Syphon-only surface should be the same size as the actual output surface. Once the two surfaces are created, we set Camera Patch 1 to use the FaceTime camera, and Camera Patch 2 to use the Syphon-only surface.
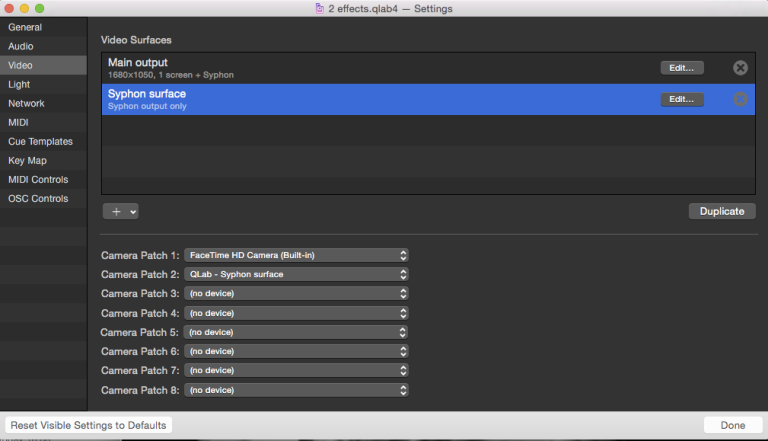
(You may need to save, close, and re-open the workspace for Syphon to notice when surface’s names are changed.)
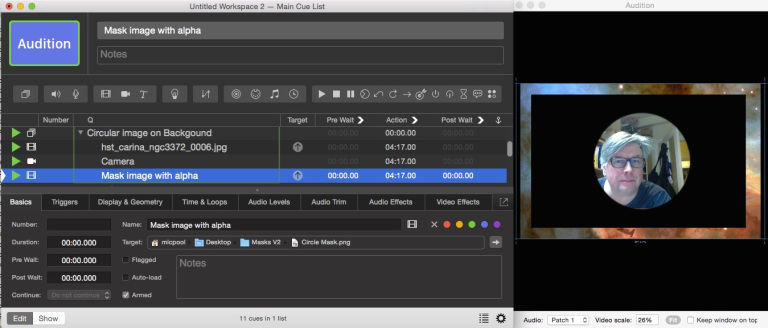
Here’s the cue list:
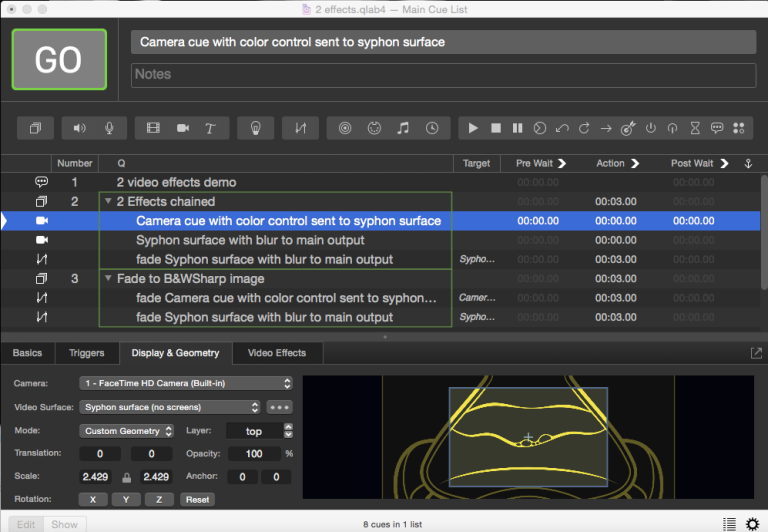
In the first Group cue, the first Camera cue uses Camera Patch 1 (the FaceTime camera) and has the color controls video effect applied in the Video Effects tab. This cue is assigned to the Syphon-only surface.
The second Camera cue uses Camera Patch 2 (the Syphon-only surface) and has the blur effect applied in the Video Effects tab. This cue is assigned to the output surface.
To fade both effects, the second Group cue contains two Fade cues each targeting one of the Camera cues.
Masking Camera Inputs
QLab 5: For simple square masks, you can use the Crop controls in the lower left corner of the Geometry tab in the inspector. The method for creating round or feathered masks is shown in the QLab 5 downloadable example workspace. It sends the image from the Camera cue to a dedicated stage which has a mask in the stage editor. That whole stage is sent to a Syphon output, which is brought right back into QLab via a second camera input, which will appear with the mask.
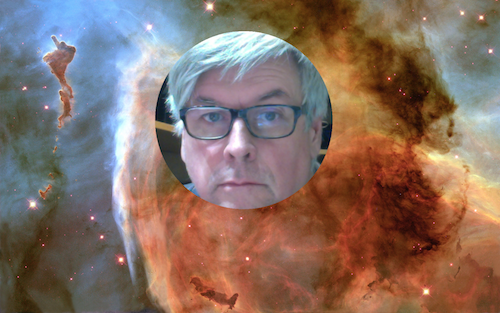
When we use Video cues, we are able to create prerecorded video with the exact dimensions we desire, and generally clean things up so that the frame looks just as we need. With a camera input, we have no such luxury. Let’s say we have a 1080p camera focused on an actor, but the framing of the camera causes the crew to be visible on the left side of the shot. Let’s make it even harder for ourselves; we want to have a circular picture, and of course we’d like to mask out all that extraneous activity on the left side. We’d like to project this image in front of a background image on the projector and make the image recede (by making it smaller) on cue over 30 seconds.
If we just wanted to project a circular image by itself we could mask it using a Video cue on a higher layer playing a black image with a circular transparent area “cut out” of the middle, saved as a .png file with alpha channel to support the transparency.
We could put the Camera cue and the Video cue into a Group cue set to “start all children simultaneously,” and produce this:
But when we try to put a background image behind it, we have a problem:
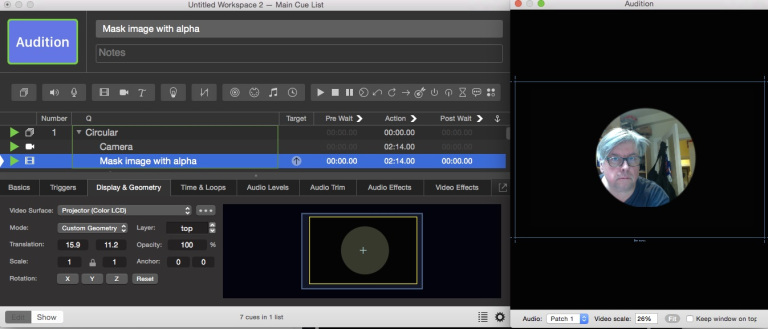
If we just wanted to project a circular image at a fixed size on top of the background, everything would be quite straightforward. We could create a separate surface on a higher surface layer than the main surface, and add a circular surface mask to that surface:
Note the dimensions of this surface, the surface’s layer, and the image in the Mask well.
Masks for surfaces are greyscale images where the black portions of the image are masked out, and the white areas display the content of the surface. Do not use surface masks with alpha channels or colors.
Set the main output surface to use the bottom layer, assign the Video cue playing the background image to the main output surface, the Camera cue to this new surface, and your output will look something like this:
If we only ever need the circle to be in exactly that position at exactly that size, this is a good method. But if we need to change the position or size of the camera feed, we can’t. We could scale the Camera cue, but that would only make the cue look larger or smaller within the same size circle.
If we need to resize the image or move it around, we’ll need to find another way of doing this. What would be really nice is to find some way to create a controllable circular mask as a video effect, so that we can scale the circular image, move it, change its opacity, etc. since it would just be a regular video cue.
Fortunately, this is possible! We can use Quartz Composer to create our own video effects and use them on Video, Camera, and Text cues. Quartz Composer, sometimes referred to simply as “QC”, is a node-based visual programming environment for creating video effects and rendering them.
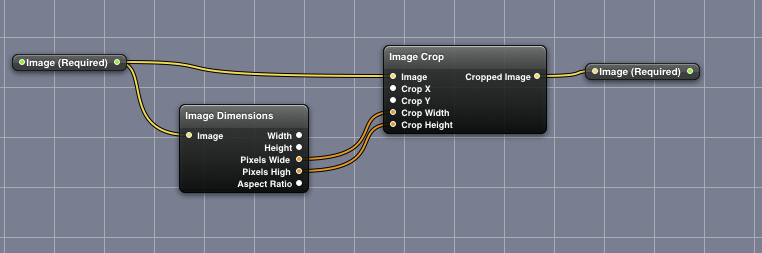
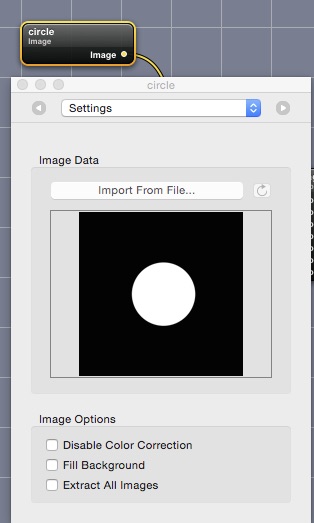
Quartz Composer documents are called patches. The patch for our circular mask effect looks like this:

At the top left and right are the Image (required) in and out ports which give QLab a way of sending video into the effect and receiving video back from it. All custom video effects for QLab must have these nodes. At the end of this tutorial is a link to a basic template which you can use once you’re ready to start experimenting with your own effects.
The node at the middle of the left side, called Image is the mask image. This contains a grayscale image where black is the area to be masked and white is the circular area we want the image to show in. The image file is embedded in the patch; it doesn’t need to be saved separately.
Moving to the right, the mask image is fed to the Affine Clamp node. This basically just allows the mask to be resized and moved around to select the area of interest. It can also be rotated, though this isn’t very useful with a circular mask. If you were using a star-shaped mask image, rotation would be rather more interesting.
Each of the parameters for the Affline Clamp node are “published” using their own nodes along the left side and routed to input ports on the Affline Clamp. These nodes will appear in QLab as sliders in the Video Effects tab of the inspector, and can be used to control the mask.
The mask image then passes to a Blur node which allows us to soften the edge of the mask. It is then is combined with the incoming video from QLab in the Blend With Mask node. The output of that node is routed to an Image Crop node to ensure that the output image is constrained to the same size as the incoming video. The pixel dimensions of the source video are gathered by the Image Dimensions node and fed into the Image Crop node.
Finally, the image is fed to the output port where it will reappear in the Camera cue in QLab.
The video effect will look like this in the Video Effects tab of the inspector:
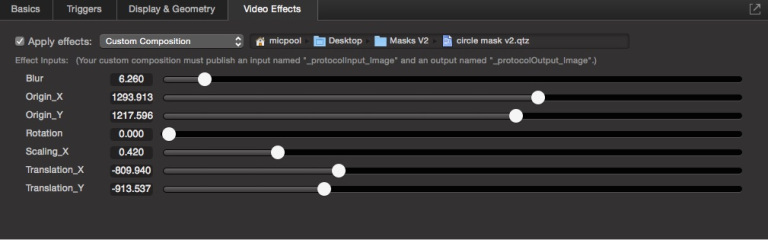
These are good starting values for a 720p camera feed. We use the origin, translate, and scale controls to select the area of interest in the camera image. Don’t worry about the placement of the feed on the surface at this moment; we’ll get to that soon. Here is what the cue looks like in QLab”
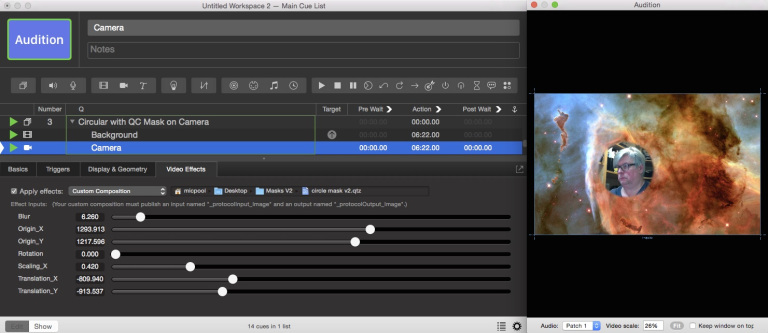
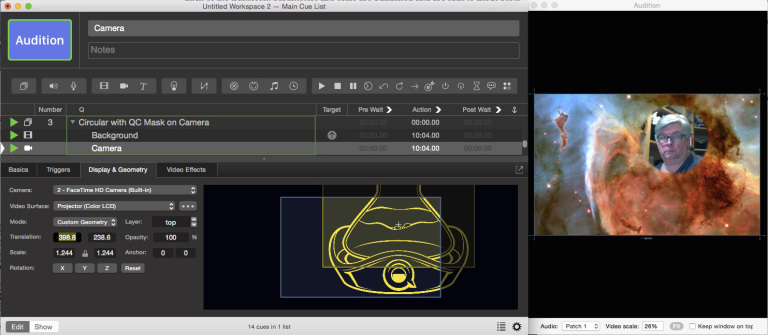
We can now use the controls in the Display & Geometry tab of the inspector to position and resize the masked camera image to place it on top of the background.
Finally, we add some Fade cues to make the circular image recede and fade out. We’ll use separate Fade cues for the opacity and scale so that they can use different curves.
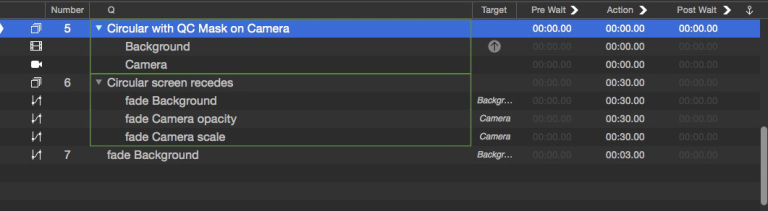
The sequence then looks like this:
Blend Modes
QLab 5: Blend modes are a feature in QLab 5. You have lots of options in the Video FX tab of the inspector. You can read a bit more about them from the section on blend modes in the QLab 5 manual.
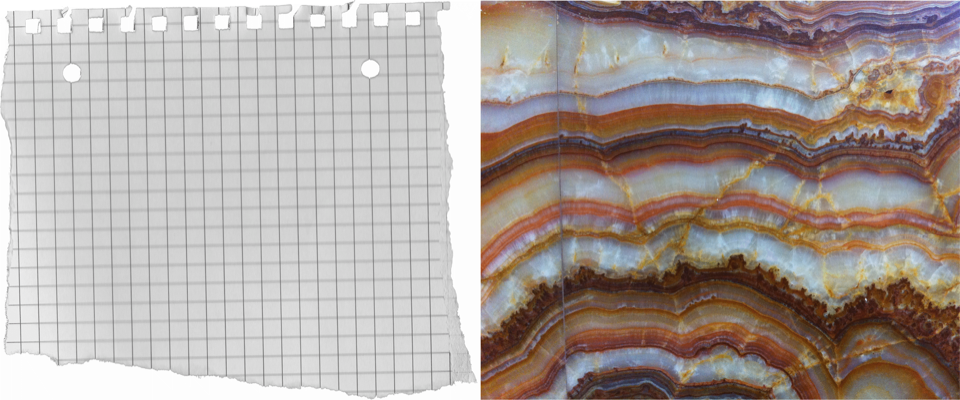
Video in QLab can be layered, but layers can only be combined by altering their opacity. In this third example, we’ll explore how to use a custom QC effect blend to composite an image of ripped graph paper over a background image using an overlay blend. Later on, we’ll expand the example to use a variety of blend modes.
Here are the two images:
In Workspace Settings → Video, we set up three surfaces and a few camera patches like this:
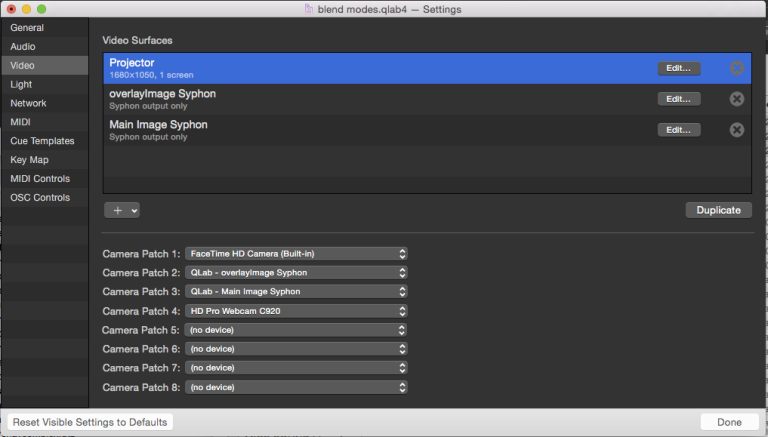
All three surfaces must have the same dimensions, in this case 1680x1050.
The first surface, named “Projector”, is the output surface that our projector is assigned to.
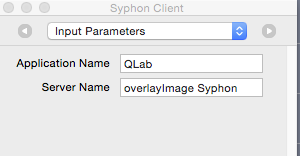
The second surface, “overlayImage Syphon”, is a Syphon-only surface which will be used by a Syphon client within the Quartz Composer patch to display the overlaid image.
The third surface, “Main Image Syphon”, is a Syphon-only surface which we’ll use to display the background image.
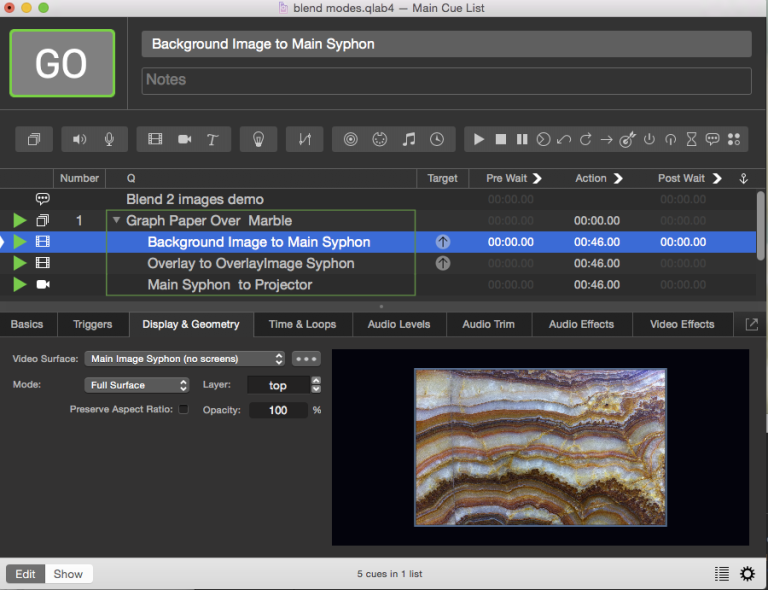
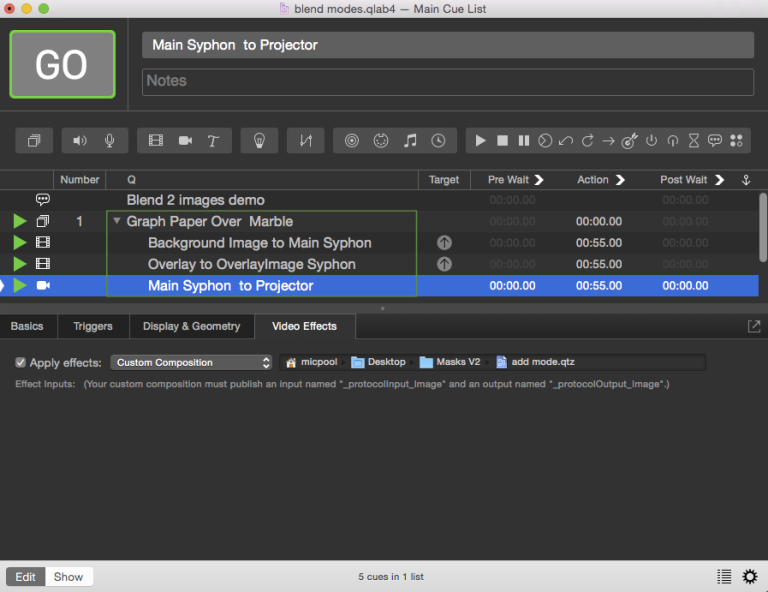
In the cue list, a Group cue contains two Video cues (one each for the background image and the overlay image) and a Camera cue.
First, the background image is assigned to the Main Image Syphon surface:
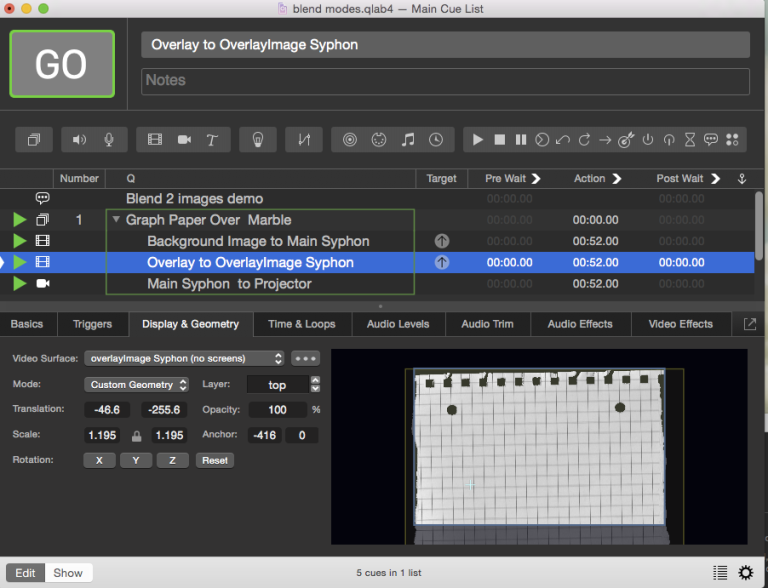
Next, the graph paper images is assigned to the overlayImage Syphon surface:
Finally, the Camera cue uses Camera Patch 3, which is the “Main Image Syphon” surface, as its source, and is assigned to the Projector surface.
In the Video Effects tab, it uses a custom QC patch called “add mode”.
The Quartz Composer patch itself is fairly straightforward and has no controls:
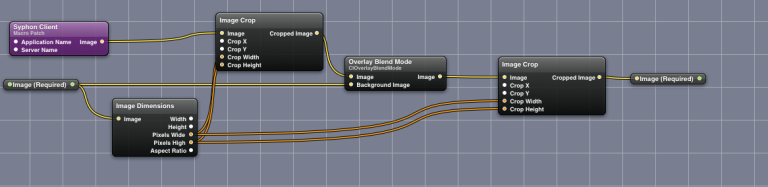
The Syphon Client node in the top left is set up to receive the image from the overlayImage Syphon surface, i.e. the graph paper.
The Image node below it receives the video from the cue that is hosting the video effect, i.e. the Camera cue and thus the marble background,
The Overlay Blend Mode node does the blend magic, then feeds the result back to the host cue.
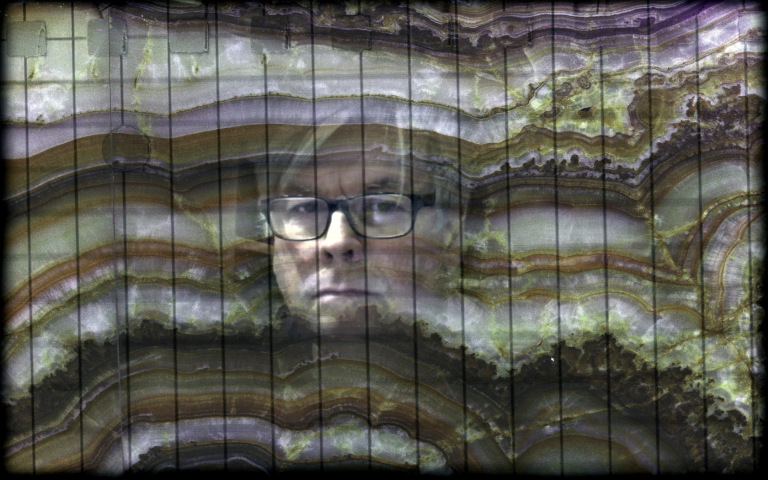
An overlay blend, at least in Quartz Composer, either multiplies or screens the source image pixels with the background image pixels, depending on the background color. The result is to overlay the existing image samples while preserving the highlights and shadows of the background. The background color mixes with the source image to reflect the lightness or darkness of the background.
Here is the resultant output, which the Camera cue displays onto the Projector surface:

Compositing With Masks
We now have all the methods we need in order to create a video composition involving a background, a masked camera cue, and a foreground overlay, with the final result given a soft-edged border. The whole enchilada will look like this:
In Workspace Settings → Video, surfaces and camera patches are set up like this:
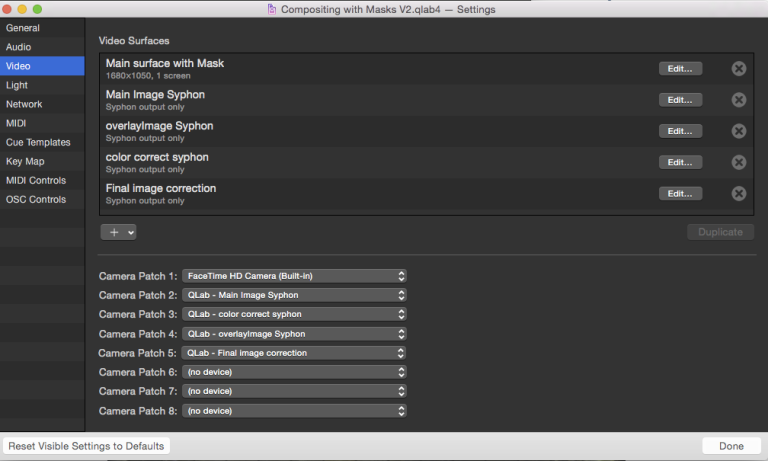
We have a “Main surface with Mask”, which has a surface mask to do the soft edge, and four Syphon surfaces with the same pixel dimensions as the main surface. We will use these four surfaces to route video around as needed to achieve the final composition.
Our FaceTime camera is assigned to camera patch 1. The four Syphon surfaces are assigned to camera patches 2 through 5.
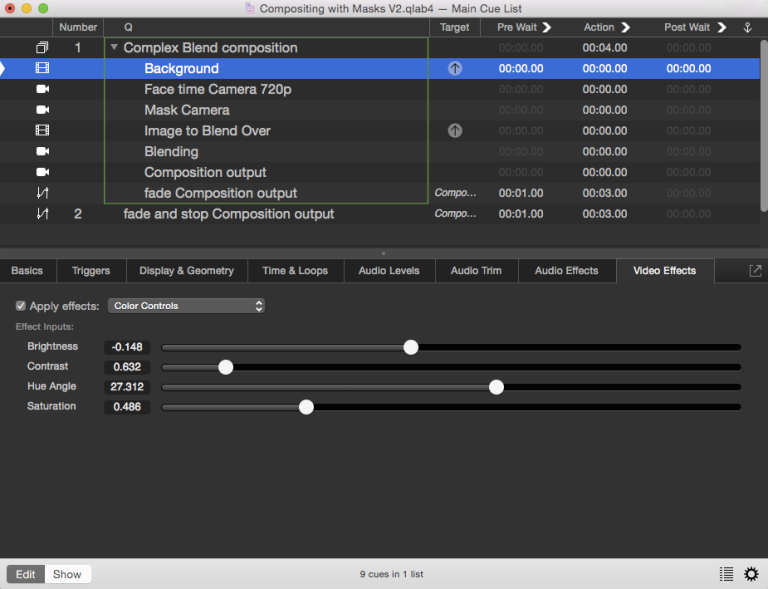
In the cue list, one Group cue containing two Video cues, four Camera cues, and one Fade cue makes it all happen.
The background image is assigned to the “Main Image Syphon” surface:

It has color controls applied in the Video Effects tab for fine tuning.
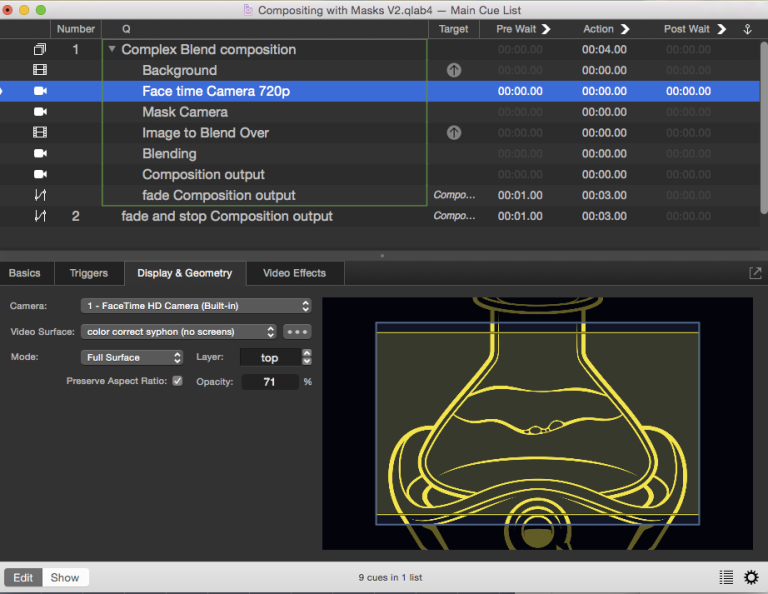
The first Camera cue uses the FaceTime camera and assigned to the “color correct syphon” surface. It also has own color controls applied in the video effects tab.
The second Camera cue uses the “color correct syphon” surface as its source, i.e. the color corrected live camera video, and is assigned to the “Main Image Syphon” surface. In the Custom Geometry tab of the inspector, we locate and scale the camera feed to taste.
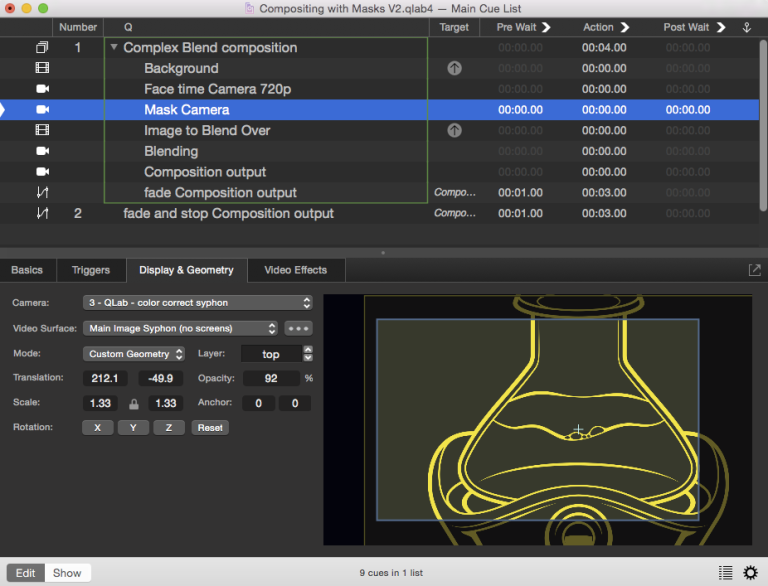
In the Video Effects tab, the cue uses the “circle mask” custom composition discussed earlier. The controls select the area of interest within the camera feed and mask out the rest:
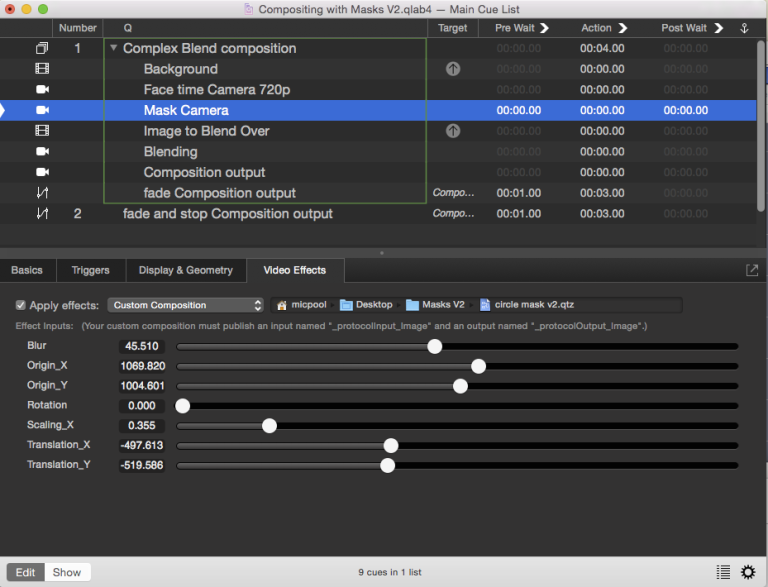
Here’s a reminder of how the circular mask QC patch works:
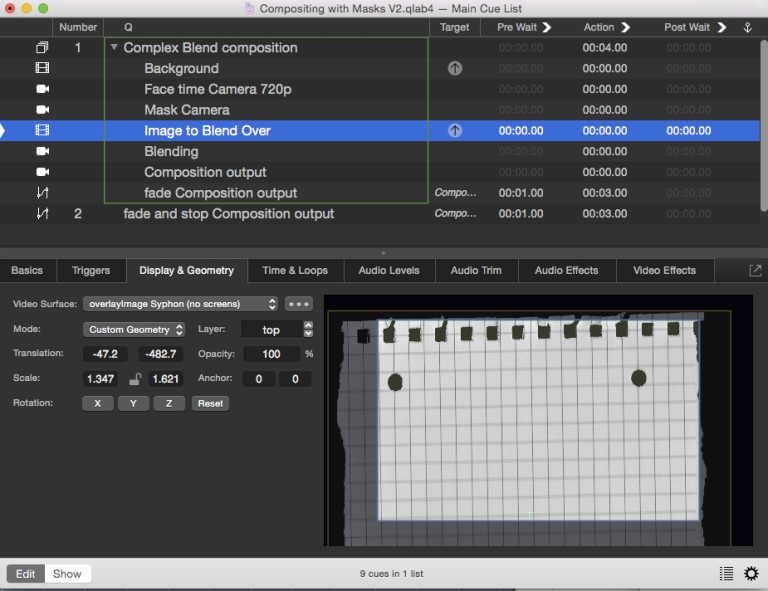
The second Video cue displays the graph paper image, and is assigned to the “overlayImage Syphon” surface. Custom geometry is used to place the image to taste. It also has color controls applied in the Video Effects tab for fine tuning.
The third Camera cue, called Blending, uses the “Main Image Syphon” surface as its source, and is assigned to the “Final Image Syphon” surface:
It uses the “add mode” custom QC patch in the Video Effects tab:
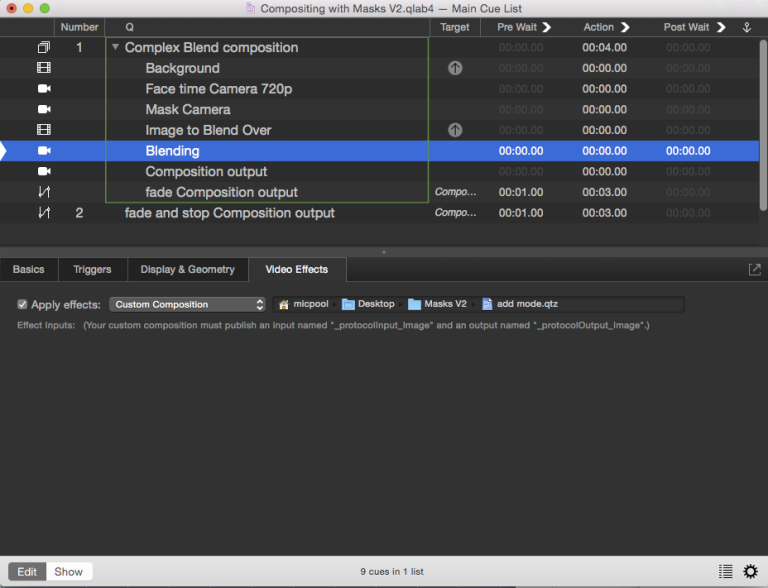
This composition grabs the “overlayImage Syphon” surface (which has the graph paper image on it from the “Image to Blend Over” Video cue) and overlays it onto the image from this cue, which currently has the “Background” and main camera images pre-composited on it. Here’s a reminder of how the “add mode” QC patch works:
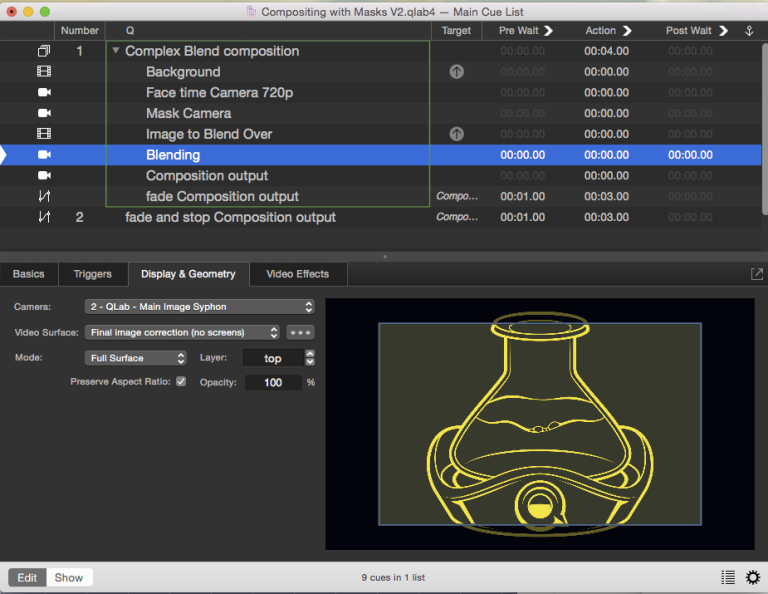
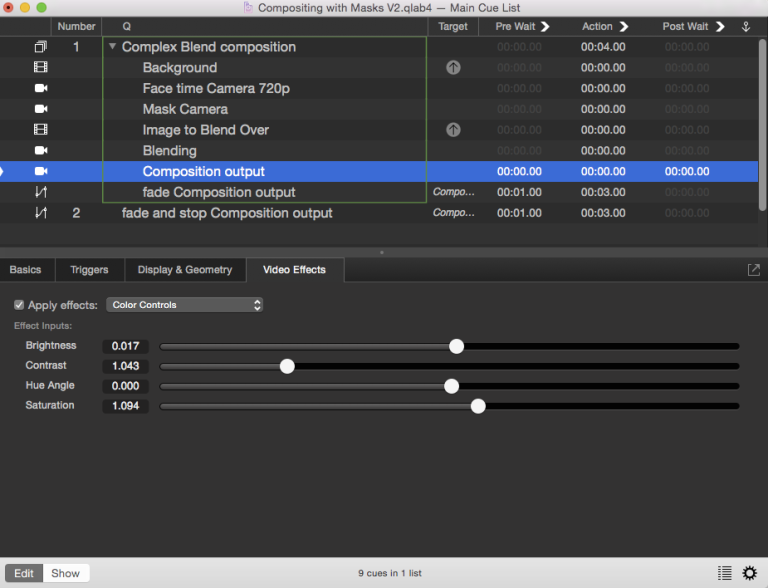
Finally, the last Camera cue, called “Composition output”, uses the “Final Image correction” Syphon surface as its source, and is assigned to the “Main surface with Mask” surface.
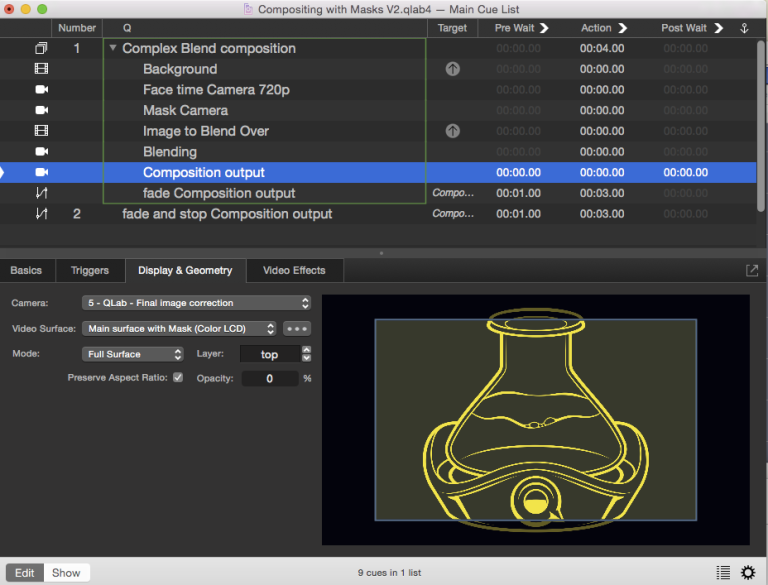
This cue also has color correction applied in the Video Effects tab:
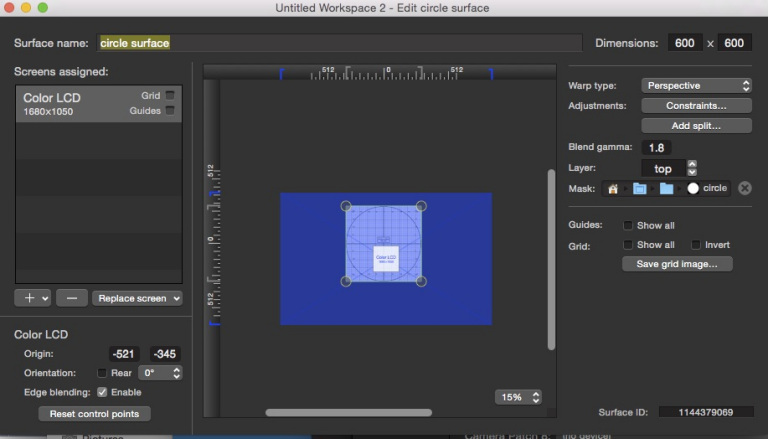
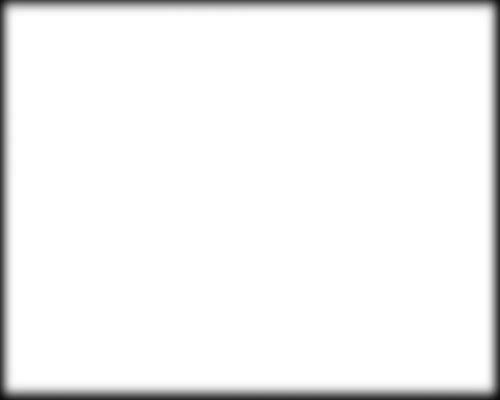
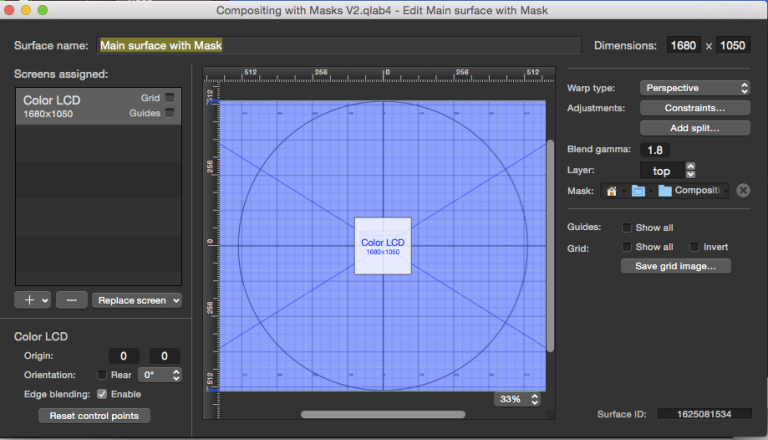
The Main Video Surface has a surface mask applied to give the whole composition a soft edge. This is a greyscale image with the same pixel dimensions as the surface.
In the video surface editor, which you reach via Workspace Settings → Video → Edit, it looks like this:
The end result, again, looks like this:
Rolling Your Own
After seeing these examples, you may be interested in creating your own custom QC patches for use in QLab. You can start from scratch, of course, but a template is provided in the downloads section of this chapter. It has the required input and output ports and the dimension and crop nodes that will ensure the output is as expected.
The basic template patch looks like this.
Here’s an example of how you might edit it to provide a simple filter. You’ll need Quartz Composer installed, which can be found on Apple’s developer website.
Open the template in Quartz Composer, and click the Patch Library button, which be default is the left-most button in the toolbar.
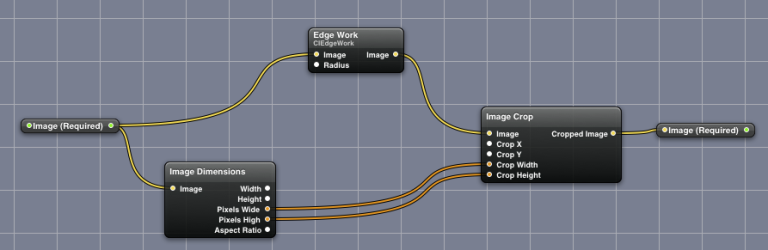
This will open the Library palette. Click on the drop-down menu at the top of the palette, and choose Image → Filter. In this example, we will use a node called Edge Work. Drag the Edge Work node into the editor window and connect it between the Image input node and the Image Crop node like this:
Edge Work has one control called radius. We will want to include this as a slider in QLab’s Video Effects tab when the effect is used as a custom composition.
To do this, right-click (or control-click, or two-finger-click) on the Edge Work node and choose Publish Inputs → Radius. You’ll be given a chance to give the published parameter a different name, but it’s usually simplest to leave it alone. Change the name if you like (we won’t in the example), and hit enter. Right-click again and choose Insert input splitter → Radius. This will create a node called Radius.
Choose Show Inspector from the Editor menu, or use the keyboard shortcut ⌘I. With the Radius node selected in the main editor window, choose Settings from the drop-down menu at the top.
Here, you can set the range of values that you want to permit for the slider. For this filter, a minimal value of 1 and a maximal value of 100 will work well. In general, experimentation is the best way to see what ranges are ideal for a given parameter.

You patch should now look like this:
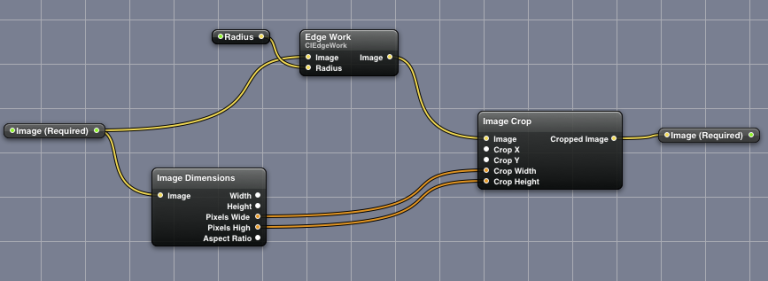
Save it patch as Edge Work.qtz.
You can now use this as a custom composition in the Video Effects tab of any Video, Camera, or Text cue.
If you edit the patch, for example to change the maximal value to 200, don’t forget to save the patch after making the change. If you make this change while QLab is open, you can nudge QLab into updating to the newly saved revision by going to the Displays & Geometry tab of the cue using the patch and clicking on the Video Surface drop-down menu. You don’t need to change the surface; just clicking will do it. The effect should update.
A Full Toolbox
As the grand finale of this chapter, we’ll now distill all the techniques above into a workspace that uses only two custom Quartz Composition patches.
The first patch expands on the circle mask example, and allows you to select one of six mask shapes for a given cue, including a mask that can receive input from any Video or Camera cue in the workspace.
The second patch expands on the blend mode example and allows you to select one of 21 different blend modes. Different blend modes can be used on different cues at the same time.
The Mask Selector Patch
The Mask Selector patch is an improved version of the circle mask we used earlier.
To make it more useful, we are going to add separate controls for the x-scale and y-scale of the mask, and add a master scale so that the overall scale can be adjusted while retaining the x/y scale ratio.
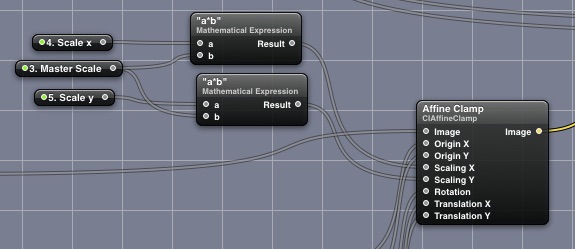
There are two mathematical expression nodes which are set to a*b. These allow the master scale to be multiplied by the separate x-scale and y-scale controls.
In the circle mask patch from before, we had one mask image:
We’ll expand this to five different shapes and provide a drop-down menu control in the Video Effects tab in QLab to allow the user to select which shape to use.
When given blur and rotation controls, these five provide a nice selection of mask shapes:
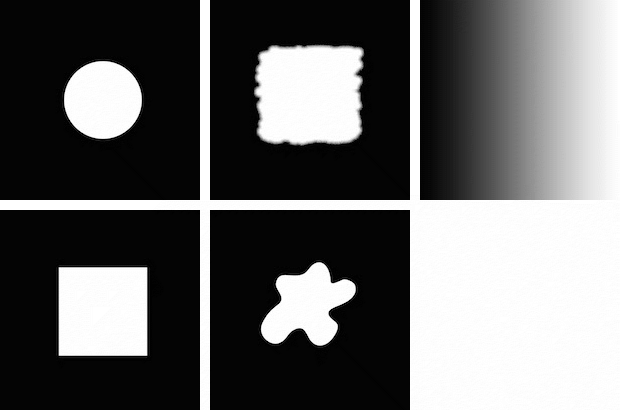
In addition, a sixth option is a Syphon input that will use anything on a QLab surface named syphonMaskFeed as a mask. This can be a greyscale image or even a video, allowing animated masks to be achieved.
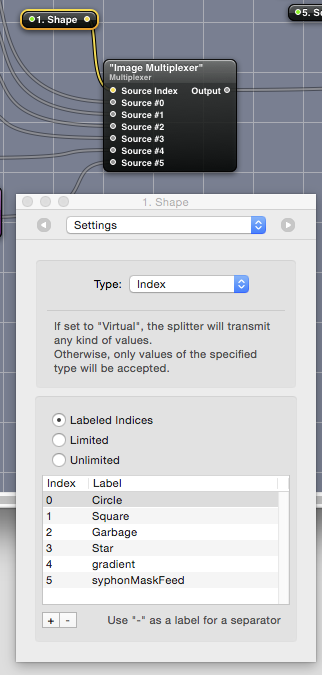
The node that allows choosing between mask images is called the multiplexer node:

Each of our mask image nodes is connected to one of the multiplexer source ports, and the source index parameter is published as 1. Shape. The published input is given a splitter to make it available to QLab. We want 1. Shape to be a drop-down menu with a list of options, rather than a slider, so we’ll show the inspector (⌘I), select the 1. Shape node, and choose Settings from the drop-down menu at the top of the inspector window.
We set the type to Index, choose “Labeled indices” from the radio buttons, and list the names that we want to appear in the drop-down menu in QLab:
The result looks like this in the Video Effects tab in QLab:

Putting numbers in the published names of each splitter node is purely optional; controls appear alphabetically in the Video Effects tab, so the numbers allow us to set the order as we see fit.
The Blend Mode Selector Patch
A similar method is used with the blend mode selector which is based on the add mode.qtz composition we used earlier. We use a couple of multiplexer nodes with two inputs to allow the foreground and background images in the blends to be optionally swapped. We connect the outputs of these to every blend mode available in the standard patch set.
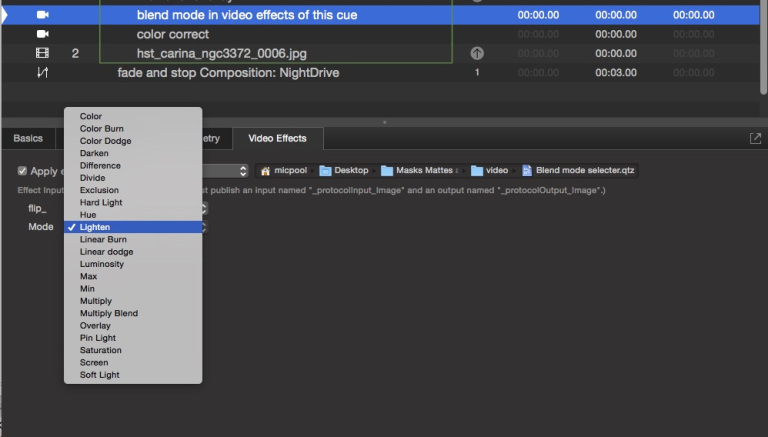
We then use a multiplexer with 21 sources and connect the output of each of the blend mode nodes to one of the source inputs.
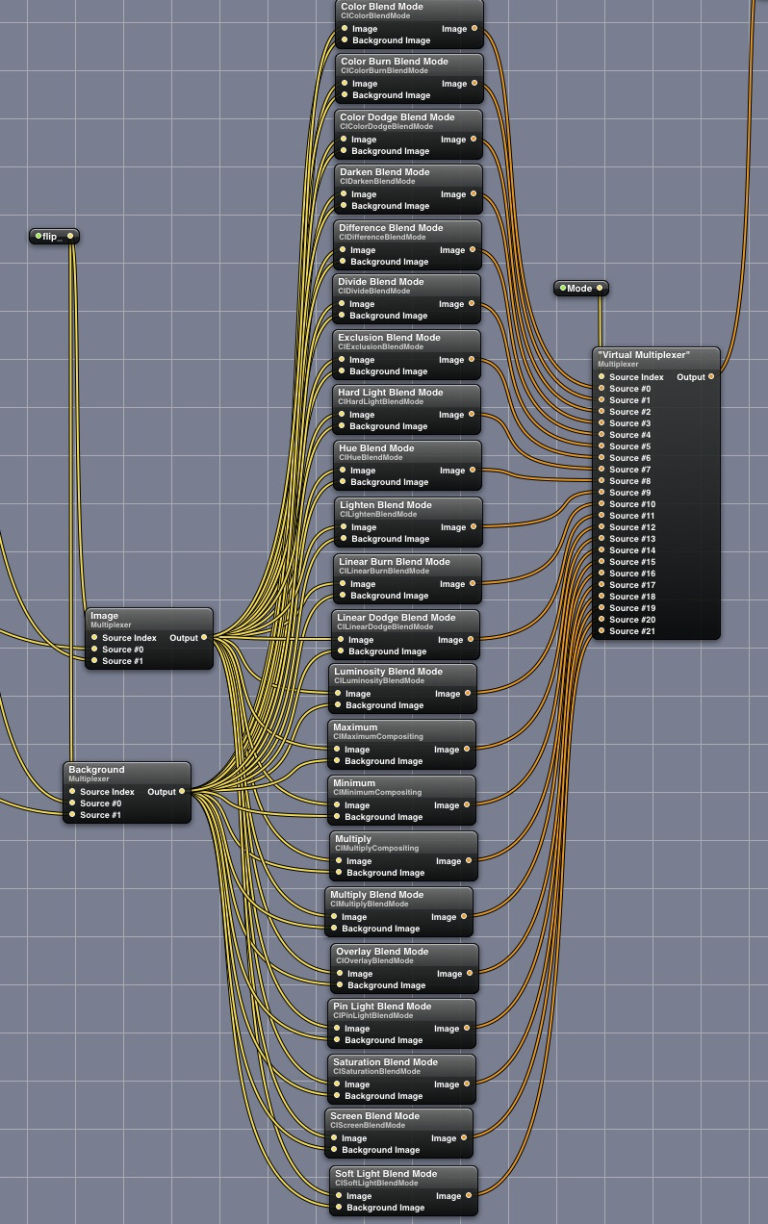
The source index is published as “Mode”. In QLab, the controls in the Video Effects tab of any cue that has this patch applied looks like this:

Here’s a look at Workspace Settings → Video for the example QLab workspace provided below:

Here’s the cue list:
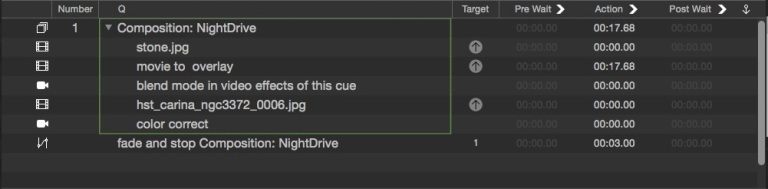
In these cues, the stone image is sent to the composition Syphon surface as the background.
The “movie to overlay” Video cue shows a movie of driving past apartments at night. That cue is assigned to the overlayImage Syphon surface which feeds the Syphon node in the Blend Selector patch which is used in the Camera cue below.
The “blend mode…” Camera cue uses the composition surface as its source, which currently has the stone image on it. It uses the Blend Selector QC patch in its Video Effects tab. This cue outputs to the surface named finalColorCorrect.
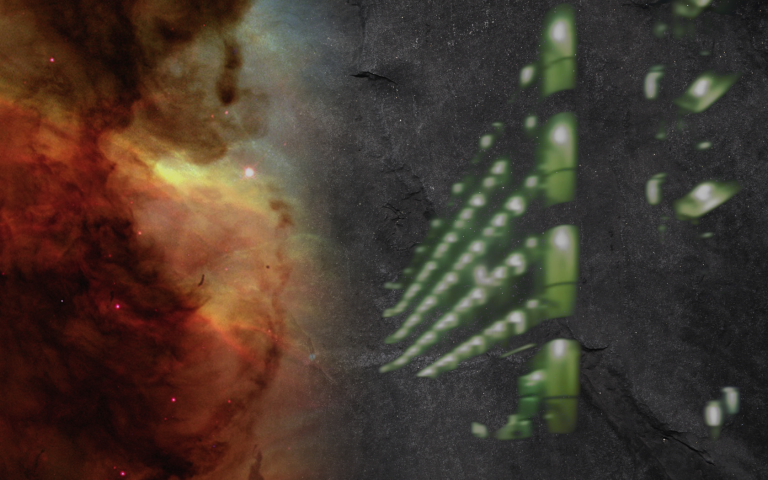
The “hst_carina…” Video cue shows a space image. It’s also assigned to the finalColorCorrect surface, but it’s masked using the Mask Selector patch.
Finally, the “color correct” Camera cue uses the finalColorCorrect surface as its input, has some color controls applied in its Video Effects tab, and outputs to the Projector Output surface.
In total, it looks something like this: