Way Off Grid
Spreadsheets can be enormously helpful for preparing data for use in QLab workspaces, and also for presenting data from QLab workspaces in a clear, at-a-glance form which does not require spelunking through inspector tabs.
This is the third of three chapters on this subject and expands the example in the Off Grid chapter to demonstrate more techniques for using a spreadsheet side by side with QLab. Readers are advised to read the Off Grid chapter before this one, as many of the techniques used in this tutorial are introduced there.
Note: The examples in these tutorials are primarily demonstrations of how QLab can read from and write to spreadsheets. The downloadable examples should be consider proofs of concept, and should not be regarded as show-ready solutions!
The demo in this chapter shows a six-channel cue light system, automated from a spreadsheet cue list that shows all the cue light states in a single view. As all the data manipulation features of a spreadsheet are available, the cue light plot can be edited rapidly.
Previous cookbook chapters haven’t included any practical electronics. However, because this proof of concept project doesn’t make much sense without physical output devices, this chapter shows how to hook up QLab to an Arduino single-board microcontroller and some homemade cue lights.
QLab controls the spreadsheet through a cart, triggering the activation of the cue lights and providing navigation buttons to control the spreadsheet.
Here it is in action
At the top of the screen recording is the CONTROL cart with cues to mimic the state of the cue lights, set cue light states from QLab, update existing spreadsheet rows, and create new cues. The cues in the bottom row are very similar to the cart cues introduced in the Off Grid chapter.
In the spreadsheet, the green marker in the left column indicates the state that will be fired on the next GO, and the blue marker in the MEM column indicates the current state.
The demo begins with the operator jumping to MEM 0 which is the first cue in the spreadsheet.
When a GO is received, the cue light state is updated to reflect the indicators shown in the corresponding row of the spreadsheet. The mimic buttons in the CONTROL cart display the state in QLab, and QLab outputs the required messages to control the cue lights. In this proof-of-concept project, these are simple traffic light LEDs controlled by an Arduino.
The Increment cue is then started automatically, the green and blue indicators increment one cell down, and the cue on that line is read to “preload” the next cue light state so it will activate immediately when the next GO is received.
The GOs, triggered by NUM 0 on the numeric keypad in the demo, step through the spreadsheet cue light rows one at a time.
After this, some new cues are added and the cue light states are set using the QLab mimic buttons. QLab updates the current spreadsheet row.
How it Works
Spreadsheet Setup
Microsoft Excel is a mature software package; the first version was published in 1985. It has an extensive AppleScript dictionary and its own macro language, Visual Basic for Applications (VBA). This makes it ideal for this project. However, the normal operation of the program, its AppleScript dictionary, and its VBA implementation haven’t been kept consistent with each other as the program has evolved over the years, meaning that care and caution are necessary to ensure they play nicely together.
It’s important to note that any alterations to a spreadsheet workbook by AppleScript or VBA do not appear in the undo stack, and in fact making changes via scripting will clear the existing undo stack. This means it is quite easy to erase rows of mute data quickly without the option of undoing that action!
Implementing undo stacks is way beyond the scope of this tutorial so, as a safety feature, this example includes a method to optionally autosave a copy of the spreadsheet every minute, limiting the amount of work that can be lost.
This will result in potentially hundreds of files which will have to be carefully managed by manually deleting those no longer required as necessary. Autosaving can be disabled when the programming is finished (and a backup copy is saved and readily available to revert to.)
Cue lights can either be set in the CONTROL cart in QLab or manually edited by right-clicking in the cells in columns D through I. Each click cycles through the possible settings: “S” on a red background for STANDBY (warn), “G” on a green background for GO, or blank for off.
Included in the downloadable example is an Excel workbook named QLights6 which is set up as follows:
- In the header row: all cells text alignment center;
- Top row frozen (from the View menu on the Ribbon.)
- All cells bordered.
- Headings switched off (from the View menu on the Ribbon.) This is to avoid double-clicking on an entire mute column, which would toggle all the mutes in that column but also extend the active cells in the sheet to a very large row number, which would slow down the operation of the spreadsheet considerably.

The file extension of the blank workbook is .xlsm; the “m” in that extension denotes a workbook that contains macros. The macros can be accessed and edited from the Visual Basic Editor, which is accessed from the Macros sub-menu in the Tools menu in the menu bar.
Visual Basic for Applications (VBA) is a programming language integrated into Microsoft Office applications, including Excel. It allows users to automate tasks, enhance functionality, and create custom solutions within spreadsheets. VBA is used to write macros, which are sequences of instructions that perform repetitive tasks, manipulate data, interact with Excel objects (like worksheets and cells), and extend the application’s capabilities beyond its standard features. It is accessible via the Visual Basic Editor (VBE) and is particularly useful for users looking to streamline workflows and build complex data-driven tools.
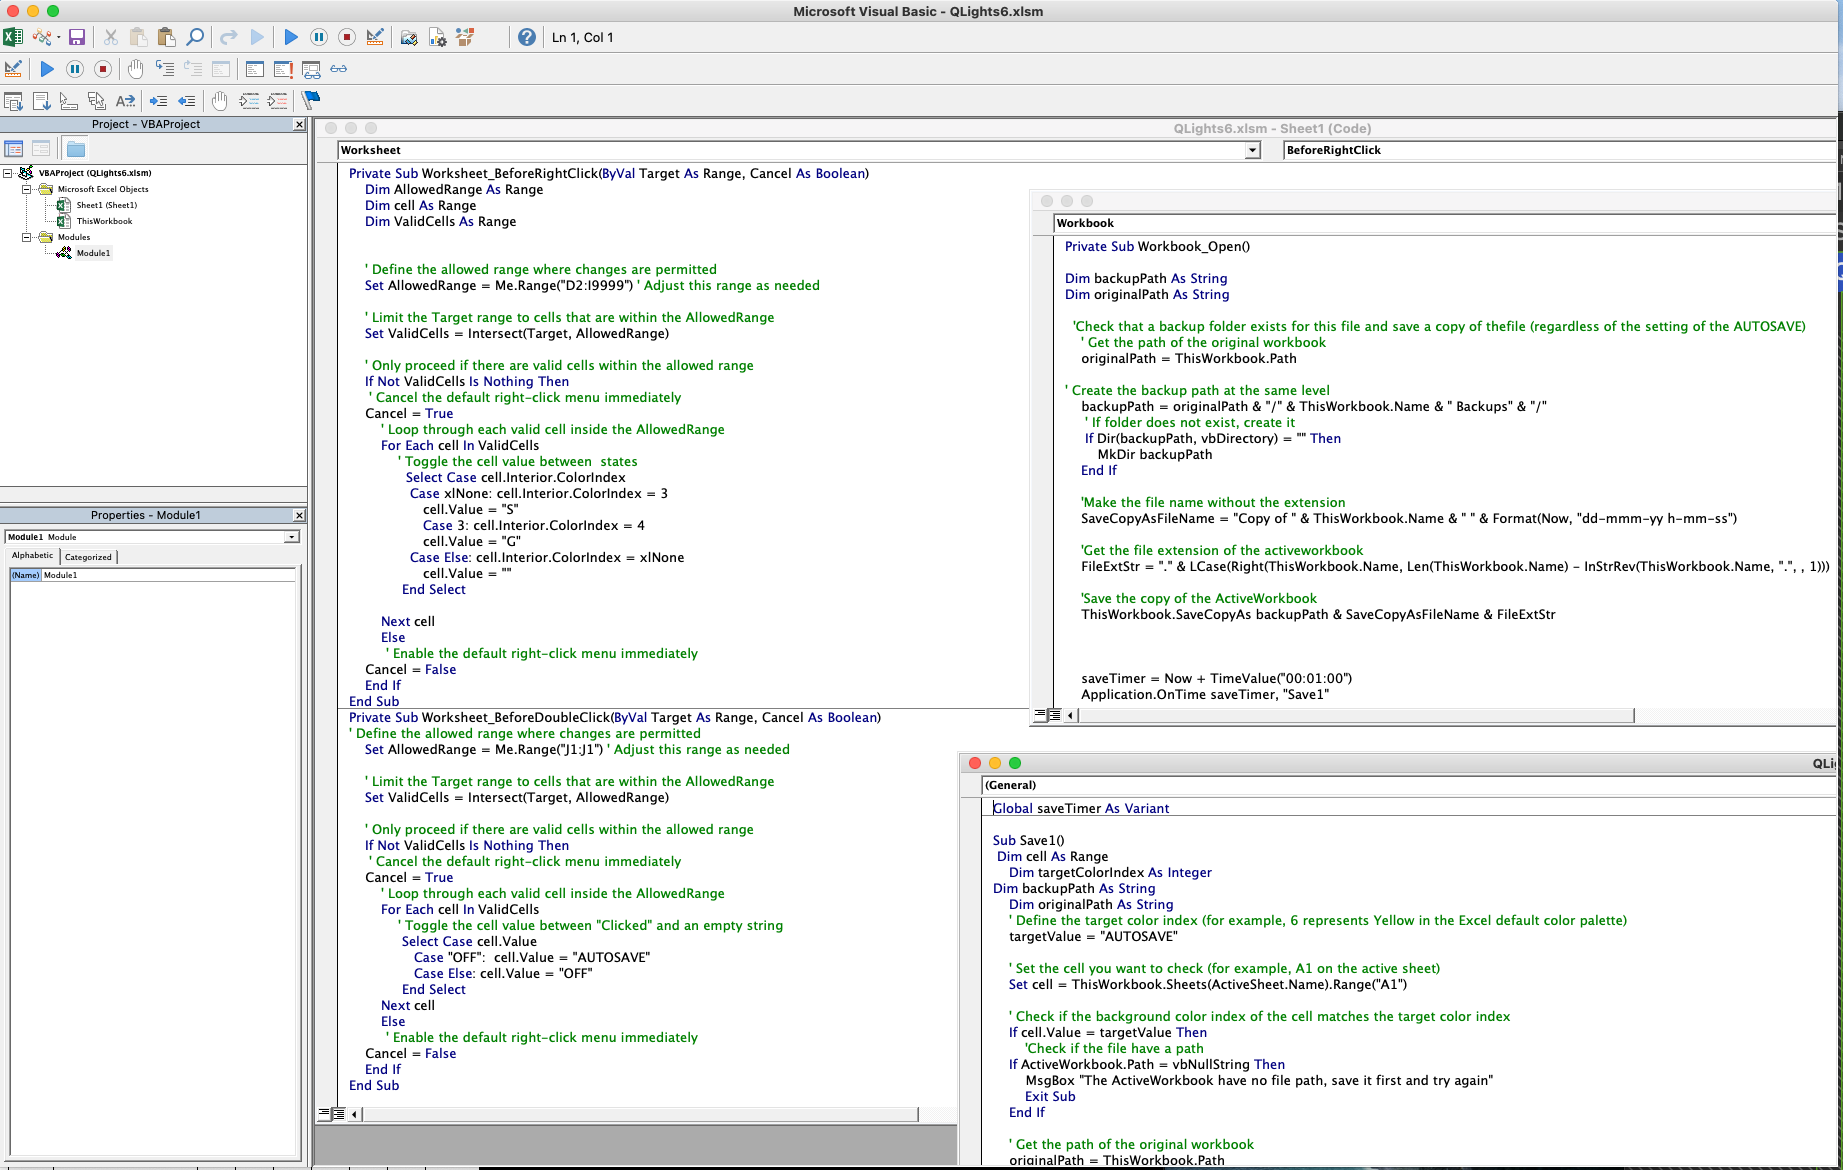
You can see from the screenshot that there are three sets of code. One for the sheet, another for the workbook, and a third that is a code module. The workbook and module code are used for the autosave features, and the sheet code is used for the right-click toggling of the cue light cells and the double-click toggling of the AUTOSAVE cell (A1).
Here’s the sheet code:
Private Sub Worksheet_BeforeRightClick(ByVal Target As Range, Cancel As Boolean)
    Dim AllowedRange As Range
    Dim cell As Range
    Dim ValidCells As Range


    ' Define the allowed range where changes are permitted
    Set AllowedRange = Me.Range("D2:I9999") ' Adjust this range as needed

    ' Limit the Target range to cells that are within the AllowedRange
    Set ValidCells = Intersect(Target, AllowedRange)

    ' Only proceed if there are valid cells within the allowed range
    If Not ValidCells Is Nothing Then
     ' Cancel the default right-click menu immediately
    Cancel = True
        ' Loop through each valid cell inside the AllowedRange
        For Each cell In ValidCells
            ' Toggle the cell value between  states
              Select Case cell.Interior.ColorIndex
               Case xlNone: cell.Interior.ColorIndex = 3
                  cell.Value = "S"
                  Case 3: cell.Interior.ColorIndex = 4
                  cell.Value = "G"
               Case Else: cell.Interior.ColorIndex = xlNone
                  cell.Value = ""
             End Select

        Next cell
        Else
         ' Enable the default right-click menu immediately
    Cancel = False
    End If
End Sub
This VBA subroutine toggles the background color and text in a right-clicked cell between an “S” on a red background, a “G” on a green background, and a blank cell. It tests to see whether the cell being right clicked is a mute cell i.e. a cell in AllowedRange. If it is, it suppresses the normal right click action (displaying a contextual menu.) It then tests the contents of the cell and cycles through the three options accordingly.
If the cell is not a cue light cell then the normal right click behavior is allowed.
Private Sub Worksheet_BeforeDoubleClick(ByVal Target As Range, Cancel As Boolean)
' Define the allowed range where changes are permitted
    Set AllowedRange = Me.Range("J1:J1") ' Adjust this range as needed

    ' Limit the Target range to cells that are within the AllowedRange
    Set ValidCells = Intersect(Target, AllowedRange)

    ' Only proceed if there are valid cells within the allowed range
    If Not ValidCells Is Nothing Then
     ' Cancel the default right-click menu immediately
    Cancel = True
        ' Loop through each valid cell inside the AllowedRange
        For Each cell In ValidCells
            ' Toggle the cell value between "Clicked" and an empty string
             Select Case cell.Value
                Case "OFF":  cell.Value = "AUTOSAVE"
                Case Else: cell.Value = "OFF"
             End Select
        Next cell
        Else
         ' Enable the default right-click menu immediately
    Cancel = False
    End If
End Sub
This VBA subroutine toggles the text in cell J1 between “AUTOSAVE” and “OFF” when the cell is double-clicked. It tests to see whether the cell being double-clicked is cell J1. If it is, it suppresses the normal double-click action. It then tests if the cell value is “AUTOSAVE”, and if it is, toggles it to “OFF”. If it isn’t, toggles it to “AUTOSAVE”.
If the double-click isn’t in cell J1 then double-clicking reverts to the normal behavior and displays the contextual menu.
Unless you are doing regular complex work with spreadsheets, learning VBA is a lot of effort for very limited usefulness, and it’s certainly beyond the scope of this tutorial to explore in any depth. However, because VBA has so much published material to support it, ChatGPT and other so-called AI systems can answer most questions about using it. A combination of the commenting within the script and ChatGPT should enable you to find out as much (or as little) as you want to know. It is important to remember, though, that ChatGPT nor any other so-called “artificial intelligence” LLM-based tool can be relied upon to be factually correct. They present completely fictional answers as confidently as real ones, so you need to check the answers you receive from them.
The only part of the code that you may need to edit is the AllowedRange for the right-click action. e.g. If you modified the spreadsheet to deal with twelve cue lights (by duplicating columns D to I), you would change the code to:
Set AllowedRange = Me.Range("D2:09999") ' Adjust this range as neededand move the Autosave cell to cell P1 and adjust the code in the other scripts to match.
Worksheet Code:
Private Sub Workbook_Open()

Dim backupPath As String
Dim originalPath As String

  'Check that a backup folder exists for this file and save a copy of thefile (regardless of the setting of the AUTOSAVE)
    ' Get the path of the original workbook
    originalPath = ThisWorkbook.Path

' Create the backup path at the same level
    backupPath = originalPath & "/" & ThisWorkbook.Name & " Backups" & "/"
     ' If folder does not exist, create it
     If Dir(backupPath, vbDirectory) = "" Then
        MkDir backupPath
    End If

    'Make the file name without the extension
    SaveCopyAsFileName = "Copy of " & ThisWorkbook.Name & " " & Format(Now, "dd-mmm-yy h-mm-ss")

    'Get the file extension of the activeworkbook
    FileExtStr = "." & LCase(Right(ThisWorkbook.Name, Len(ThisWorkbook.Name) - InStrRev(ThisWorkbook.Name, ".", , 1)))

    'Save the copy of the ActiveWorkbook
    ThisWorkbook.SaveCopyAs backupPath & SaveCopyAsFileName & FileExtStr

    saveTimer = Now + TimeValue("00:01:00")
    Application.OnTime saveTimer, "Save1"

End Sub
This code runs once when the workbook is opened, and makes a backup copy of the workbook regardless of the AUTOSAVE toggle in Cell J1.
If no backup folder for the specific workbook exists, one is created and the backup is stored there.
At the end of the script, the code sets a timer for one minute. When that minute has elapsed, it runs the subroutine “Save1”, which is contained in the code for the module (Module 1):
Global saveTimer As Variant

Sub Save1()
 Dim cell As Range
    Dim targetColorIndex As Integer
Dim backupPath As String
    Dim originalPath As String
    ' Define the target color index (for example, 6 represents Yellow in the Excel default color palette)
    targetValue = "AUTOSAVE"

    ' Set the cell you want to check (for example, J1 on the active sheet)
    Set cell = ThisWorkbook.Sheets(ActiveSheet.Name).Range("J1")

    ' Check if the background color index of the cell matches the target color index
    If cell.Value = targetValue Then
        'Check if the file have a path
    If ActiveWorkbook.Path = vbNullString Then
        MsgBox "The ActiveWorkbook have no file path, save it first and try again"
        Exit Sub
    End If

    ' Get the path of the original workbook
    originalPath = ThisWorkbook.Path

' Create the backup path at the same level
    backupPath = originalPath & "/" & ThisWorkbook.Name & " Backups" & "/"
     ' If folder does not exist, create it
     If Dir(backupPath, vbDirectory) = "" Then
        MkDir backupPath
    End If

    'Make the file name without the extension
    SaveCopyAsFileName = "Copy of " & ThisWorkbook.Name & " " & Format(Now, "dd-mmm-yy h-mm-ss")

    'Get the file extension of the activeworkbook
    FileExtStr = "." & LCase(Right(ThisWorkbook.Name, Len(ThisWorkbook.Name) - InStrRev(ThisWorkbook.Name, ".", , 1)))

    'Save the copy of the ActiveWorkbook
    ThisWorkbook.SaveCopyAs backupPath & SaveCopyAsFileName & FileExtStr

    saveTimer = Now + TimeValue("00:01:00")
    Application.OnTime saveTimer, "Save1"

    Else
        saveTimer = Now + TimeValue("00:01:00")
        Application.OnTime saveTimer, "Save1"
    End If

End Sub
This checks the value of the background of cell J1, which is toggle-able by double clicking (as driven by the sheet code.) If the text is “AUTOSAVE”, it saves the workspace as a copy in the backups folder and re-starts the one minute timer.
If the text isn’t “AUTOSAVE”, then the timer starts again; if autosave is toggled later, autosaving will resume.
This coded autosave must not be confused with Excel’s built-in autosave, which only works for files stored in cloud services like OneDrive or SharePoint. Because of this, Excels built-in autosave is less suitable for this project, but it could be used if preferred. For locally saved files, Excel provides a feature called AutoRecover. If Excel crashes, AutoRecover can restore the last saved version of the workbook which is stored in a temporary AutoRecover directory. However, access to that directory is only made available if Excel has crashed, so this tool cannot be used to revert a change that was deliberately made.
If you use the autosave feature written in this script, it’s best to close Excel if you are changing to a different spreadsheet. The reason for this is that VBA code in the module continues running even when the workbook is closed. There are ways of stopping it, but these seem to cause Excel to hang if you try to quit without saving. At the moment, restarting Excel when switching away from using this workbook is the least problematic option.
The engine
The cues that are primarily responsible for the operation of the Workspace are contained in the cue list named ENGINE.
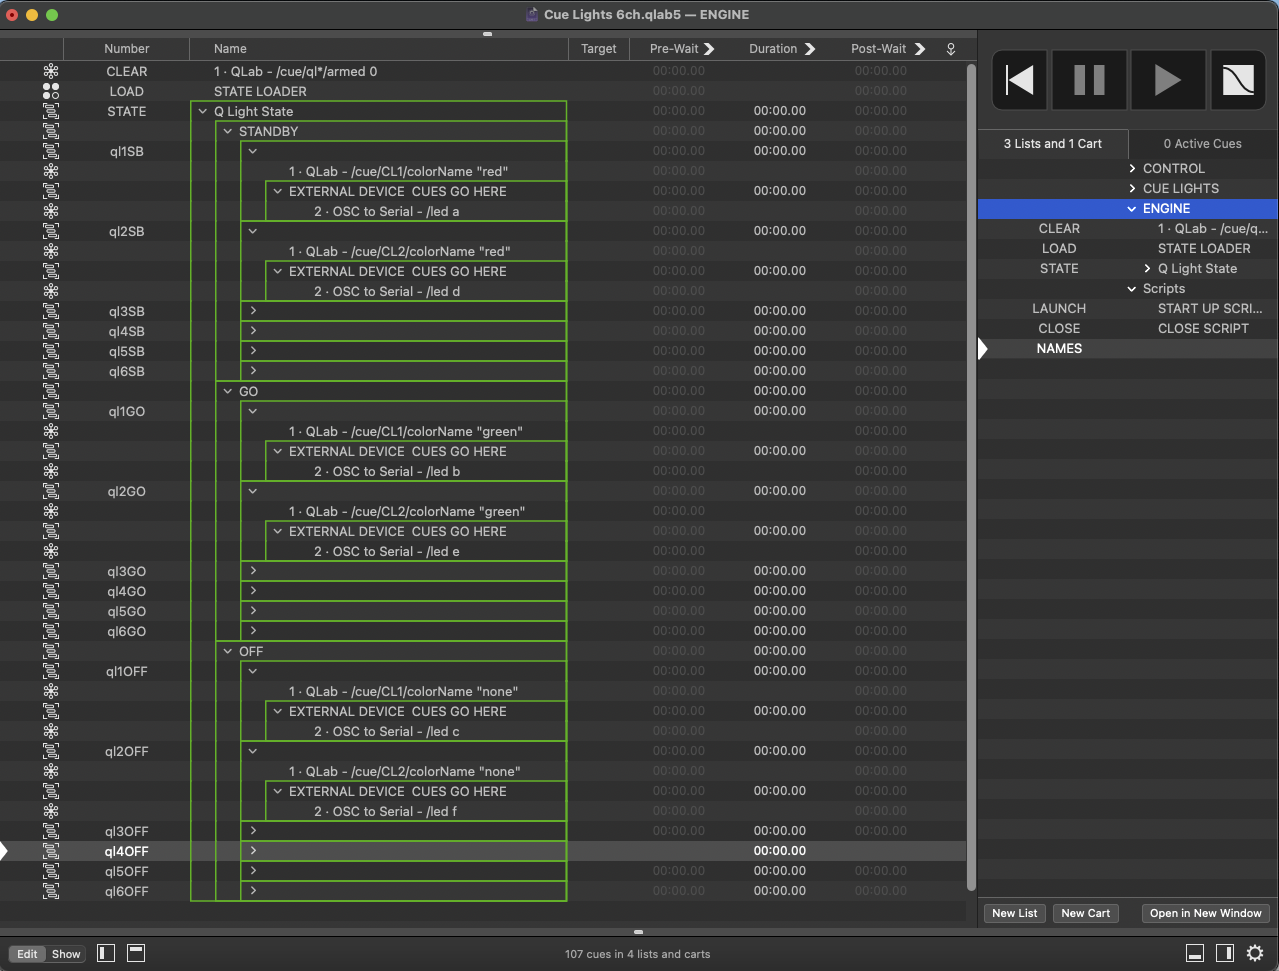
A Group cue numbered CLEAR disarms all the cue light STANDBY, GO, and OFF cues in cue STATE.
A Group cue numbered STATE contains a Timeline Group cue containing a set of cues which set the six cue lights to STANDBY (red), another Group cue containing a set of cues which sets them to GO (green), and a third which sets them to OFF.
Each STANDBY Group cue contains a Network cue with an OSC message which sets the color of a cue in the CONTROL cart to red to mimic the current cue light state, together with the cues to control the corresponding red cue light. In teh example this means sending serial data to the Arduino, but depending on the control arrangements for the cue lights these cues might be OSC, MIDI, or Script cues.
Each GO Group cue contains a network cue with an OSC message which sets the color of a cue in the CONTROL cart to green to mimic the current cue light state, together with the cues to control the corresponding green cue light.
Each OFF Group cue contains a Network cue with an OSC message which sets the color of a cue in the CONTROL cart to none to mimic the current cue light state, together with the cues to switch off the corresponding cue light.
The light state is set by disarming the GO and OFF Groups and arming the STANDBY Groups for cue lights that are set to STANDBY, disarming the STANDBY and OFF Groups and arming the GO Groups for cue lights that are set to GO, and disarming the STANDBY and GO Groups and arming the OFF Groups for cue Lights that are set to OFF.
The heart of the ENGINE is the Script cue numbered LOAD. This reads the spreadsheet and sets the arms and disarms of the cues in the STATE Group to match the cue light cells in the spreadsheet.
--**********************Load the  next QLight State*******************************************************
---Translate Mute Data from an Excel spreadsheet to control Q lights
--RUN WITH SCRIPT CUE  INSPECTOR WINDOW ON BASICS TAB REGARDLESS OF WHETHER THE INSPECTOR IS OPEN OR NOT!!! 10 TIMES FASTER.
--try
set thestate to {}
tell application id "com.figure53.QLab.5" to tell front workspace
  set theCount to count of (cues whose q number begins with "QQ") --number of cuelights
  start cue "CLEAR" --disarm all Mute Unmute Cues
  set theRow to notes of cue "MEM"
end tell
set thetids to AppleScript's text item delimiters
set AppleScript's text item delimiters to ","
tell application "Microsoft Excel" to tell front sheet
  set theNotes to value of cell ("C" & theRow)
  set theMem to value of cell ("B" & theRow)
  repeat with eachLight from 1 to theCount
    set the end of thestate to value of cell (eachLight + 3) of row (theRow as integer)
  end repeat
end tell
--Parse the data and perform actions depending on the value of the cell
tell application id "com.figure53.QLab.5" to tell front workspace
  set theIndex to 1
  repeat with eachitem in (text items of thestate)
    if text of eachitem is "G" then
      set the armed of cue ("ql" & theIndex & "GO") to true
    else if text of eachitem is "S" then
      set the armed of cue ("ql" & theIndex & "SB") to true
    else
      set the armed of cue ("ql" & theIndex & "OFF") to true
    end if
    set theIndex to theIndex + 1
  end repeat

  set AppleScript's text item delimiters to thetids
  --Store Notes
  set the notes of cue "GO" to theNotes
end tell
This script:
- Gets the number of cue lights in use from the CUE LIGHTS cue list;
- Disarms all STANDBY GO and OFF Group cues in cue STATE by starting cue CLEAR;
- Gets the number stored in the notes of cue MEM, which is the row number (not the MEM number) of the spreadsheet row that will be actioned on the next GO trigger.
The script then gets the following information from that row number of the spreadsheet.
- The notes
- The MEM number
- The state of each cue light
It then processes this data in QLab to arm the appropriate Group cues in cue STATE so that the cue lights will immediately be actioned when the next GO is triggered. It also sets the notes of cue “GO” to theNotes.
The CONTROL cart
The CONTROL cart is the main controller for playback of the cue light MEM presets.
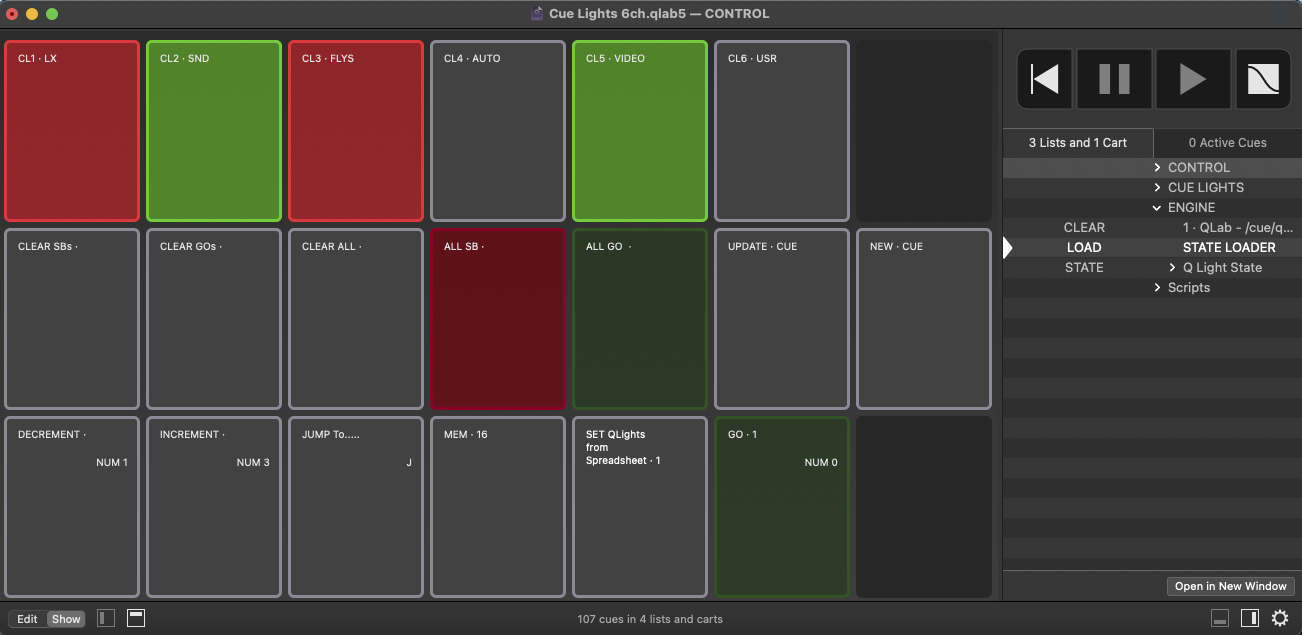
DECREMENT, triggered in the demo workspace by hotkey NUM 1, is a Script cue with this script:
--get the current row number
tell application id "com.figure53.QLab.5" to tell front workspace to set theRow to notes of cue "MEM" as integer
--decrement the row number
if theRow is greater than 2 then set theRow to theRow - 1
tell application "Microsoft Excel" to tell front sheet
  set theRangeString to ("A" & theRow as text)
  set theRange to (range theRangeString)
  set color index of interior object of column 1 to 0 --clear the green indicator (State to be set when next GO is triggered )
  set color index of interior object of range theRangeString to 4 --set the green indicator  to the new row
  select range theRangeString
  set theValue to value of cell ("B" & theRow as text) --get the MEM number for this MEM

end tell
tell application id "com.figure53.QLab.5" to tell front workspace
  set the notes of cue "MEM" to theRow --store the Excel row number for the next GO in the notes of cue MEM
  --display the MEM number of the mute state to be actioned on the next GO on the GO and SET MUTES CART BUTTON Mutes
  set the q name of cue "GO" to theValue
  set the q name of cue "SET QLights from Spreadsheet" to theValue
  start cue "LOAD"
end tell
INCREMENT, triggered in the demo workspace by hotkey NUM 3, is a Script cue with this script:
--get the current row number
tell application id "com.figure53.QLab.5" to tell front workspace to set theRow to notes of cue "MEM" as integer
--increment the row number
set theRow to theRow + 1
tell application "Microsoft Excel" to tell front sheet
  set theRangeString to ("A" & theRow as text) --& ":A" & theRow as text
  set theRange to (range theRangeString)
  set color index of interior object of column 1 to 0 --clear the green indicator (State to be set when next GO is triggered )
  set color index of interior object of range theRangeString to 4 --set the green indicator  to the new row
  select range theRangeString
  set theValue to value of cell ("B" & theRow as text) --get the MEM number for this MEM
end tell
tell application id "com.figure53.QLab.5" to tell front workspace
  set the notes of cue "MEM" to theRow --store the Excel row number for the next GO in the notes of cue MEM
  --display the MEM number of the mute state to be actioned on the next GO on the GO and SET MUTES CART BUTTON Mutes
  set the q name of cue "GO" to theValue
  set the q name of cue "SET QLights from Spreadsheet" to theValue
  start cue "LOAD"
end tell
MEM is a Memo cue which displays the MEM number of the current state and stores the row number (not the MEM number) of the state that will be actioned when the next GO is triggered

GO, triggered in the demo workspace by hotkey NUM 0, is a Script cue with this script:
--*********************DO MUTES***********************
tell application id "com.figure53.QLab.5" to tell front workspace
  set theRow to notes of cue "MEM"
  set theRowRef to "B" & theRow
  start cue "STATE"
end tell
--Highlight the last memory data recalled in the excel spreadsheet
tell application "Microsoft Excel" to tell front sheet
  set color index of interior object of column 2 to 0
  set color index of interior object of range theRowRef to 8
  select range theRowRef
  set theValue to value of cell ("B" & theRow as text)
  --****************************DO DIALOG******************	--Display Dialog
  tell application id "com.figure53.QLab.5" to tell front workspace
    start cue "INCREMENT"
    set the q name of cue "MEM" to theValue
  end tell
end tell
The order of events in this script prioritizes the immediate activation of the new cue light state by starting cue STATE.
It then clears the background color from all cells in column 2 and sets the background color of the current MEM to indicate the current cue light state.
Finally, the script updates the name of cue MEM to display the current MEM.
JUMP (hotkey J) is a Script cue with this script:
set theMaxCues to 9999 --maximum search range for cues
set theQ to text returned of (display dialog "Spreadsheet Memory to Jump To" default answer 1)
tell application "Microsoft Excel" to tell front sheet
  set searchRange to range ("B1:B" & (theMaxCues as text))
  try
    set foundrange to (find searchRange what theQ look at whole)
  on error
    tell application id "com.figure53.QLab.5" to display alert "MEM does not exist"
    return
  end try
  set theRow to first row index of foundrange
  set theRowRef to "A" & theRow
  set color index of interior object of column 1 to 0
  set color index of interior object of range theRowRef to 4
  select range theRowRef
end tell
tell application id "com.figure53.QLab.5" to tell front workspace
  set the notes of cue "MEM" to theRow
  set the q name of cue "GO" to theQ
  set the q name of cue "SET QLights from Spreadsheet" to theQ
  start cue "LOAD"
end tell
All the other CONTROL cues use the number of the spreadsheet row stored in the notes of cue MEM as the row reference, but JUMP finds a cue from it’s MEM number.
The MEM number is entered by the user in a dialog. The reply to this dialog is searched for using Excel’s AppleScript search function:
set foundrange to (find searchRange what theQ look at whole)It then sets the green marker to the found cue
SET Q lights from Spreadsheet is a Script cue:
tell application id "com.figure53.QLab.5" to tell front workspace
  set theRow to notes of cue "MEM"
  set theRowRef to "B" & theRow
  start cue "LOAD"
  repeat while (running of cue "LOAD") is true
    delay 0.1
  end repeat
  start cue "STATE"
end tell
--Highlight the last memory data recalled in the excel spreadsheet
tell application "Microsoft Excel" to tell front sheet
  set color index of interior object of column 2 to 0
  set color index of interior object of range theRowRef to 8
  select range theRowRef
  set theValue to value of cell ("B" & theRow as text)

end tell
Its operation is similar to GO, except it does not advance the playhead.
The three CLEAR cues all work in a similar way and set the STANDBYs, GOs, or both to off.
CLEAR SB:
tell application id "com.figure53.QLab.5" to tell front workspace
  set thecues to cues whose (q number begins with "CL") and (q color is "red")
  repeat with eachcue in thecues
    set the q color of eachcue to "none"
  end repeat
end tell
CLEAR GO:
tell application id "com.figure53.QLab.5" to tell front workspace
  set thecues to cues whose (q number begins with "CL") and (q color is "green")
  repeat with eachcue in thecues
    set the q color of eachcue to "none"
  end repeat
end tell
CLEAR BOTH:
tell application id "com.figure53.QLab.5" to tell front workspace
set thecues to cues whose q number begins with "CL" and (q color is "red" or q color is "green")
  repeat with eachcue in thecues
    set the q color of eachcue to "none"
  end repeat
end tell
The SET ALL cues, similarly, set all cue lights to either STANDBY or GO.
ALL SB:
ell application id "com.figure53.QLab.5" to tell front workspace
  set theCount to count of (cues whose q number begins with "QQ") --number of cuelights
  repeat with eachcue from 1 to theCount
    set the q colour of cue ("CL" & eachcue) to "red"
  end repeat
end tell
ALL GO:
tell application id "com.figure53.QLab.5" to tell front workspace
  set theCount to count of (cues whose q number begins with "QQ") --number of cuelights
  repeat with eachcue from 1 to theQLights
    set the q color of cue ("CL" & eachcue) to "green"
  end repeat
end tell
UPDATE is a Script cue which sets the spreadsheet row with the green marker to the cue light state of the mimic buttons in the top row of the control cart.
set thestate to {}
set theLegend to {}
tell application id "com.figure53.QLab.5" to tell front workspace
  set theCount to count of (cues whose q number begins with "QQ") --number of cuelights
  set theMem to notes of cue "MEM" as integer
  repeat with eachcue from 1 to theCount
    set theCue to cue ("CL" & eachcue)
    if q color of theCue is "red" then
      set the end of thestate to 3
      set the end of theLegend to "S"
    else if q color of theCue is "green" then
      set the end of thestate to 4
      set the end of theLegend to "G"
    else
      set the end of thestate to 0
      set the end of theLegend to ""
    end if
  end repeat

end tell
tell application "Microsoft Excel" to tell front sheet
  repeat with eachcell from 1 to theCount
    set the color index of interior object of ((cell (eachcell + 3)) of row theMem) to item eachcell of thestate
    set the value of ((cell (eachcell + 3)) of row theMem) to item eachcell of theLegend

  end repeat
end tell

tell application id "com.figure53.QLab.5" to tell front workspace to start cue "LOAD"
NEW is a Script cue which sets the spreadsheet row with the green marker to the Q light state of the mimic buttons in the top row of the control cart.
set thestate to {}
set theLegend to {}
tell application id "com.figure53.QLab.5" to tell front workspace
  set theCount to count of (cues whose q number begins with "QQ") --number of cuelights
  set theMem to notes of cue "MEM" as integer
  repeat with eachcue from 1 to theCount
    set theCue to cue ("CL" & eachcue)
    if q color of theCue is "red" then
      set the end of thestate to 3
      set the end of theLegend to "S"
    else if q color of theCue is "green" then
      set the end of thestate to 4
      set the end of theLegend to "G"
    else
      set the end of thestate to 0
      set the end of theLegend to ""
    end if
  end repeat

end tell
tell application "Microsoft Excel" to tell front sheet
  if theMem > 1 then
    set theMem to theMem + 1
    insert into range (row theMem)
    set the color index of interior object of row (theMem) to 0

    --generate new mem number
    set x to the value of cell 2 of row (theMem - 1)
    set y to the value of cell 2 of row (theMem + 1)
    if y > x then
      set newMem to x + (y - x) / 2
      set the value of cell 2 of row theMem to newMem
    else
      set the value of cell 2 of row theMem to ((x + 1) as integer)
    end if


    repeat with eachcell from 1 to theCount
      set the color index of interior object of ((cell (eachcell + 3)) of row theMem) to item eachcell of thestate
      set the value of ((cell (eachcell + 3)) of row theMem) to item eachcell of theLegend
    end repeat
  end if
end tell
CL1 through CL6 are the cue light mimic cues and all have the same script apart from an identifying variable mycue.
tell application id "com.figure53.QLab.5" to tell front workspace
  set mycue to cue "CL1"--change to cue number of this button
  if q color of mycue is "red" then
    set q color of mycue to "green"
  else if q color of mycue is "green" then
    set q color of mycue to "none"
  else
    set q color of mycue to "red"
  end if
end tell
CUE LIGHTS cue list
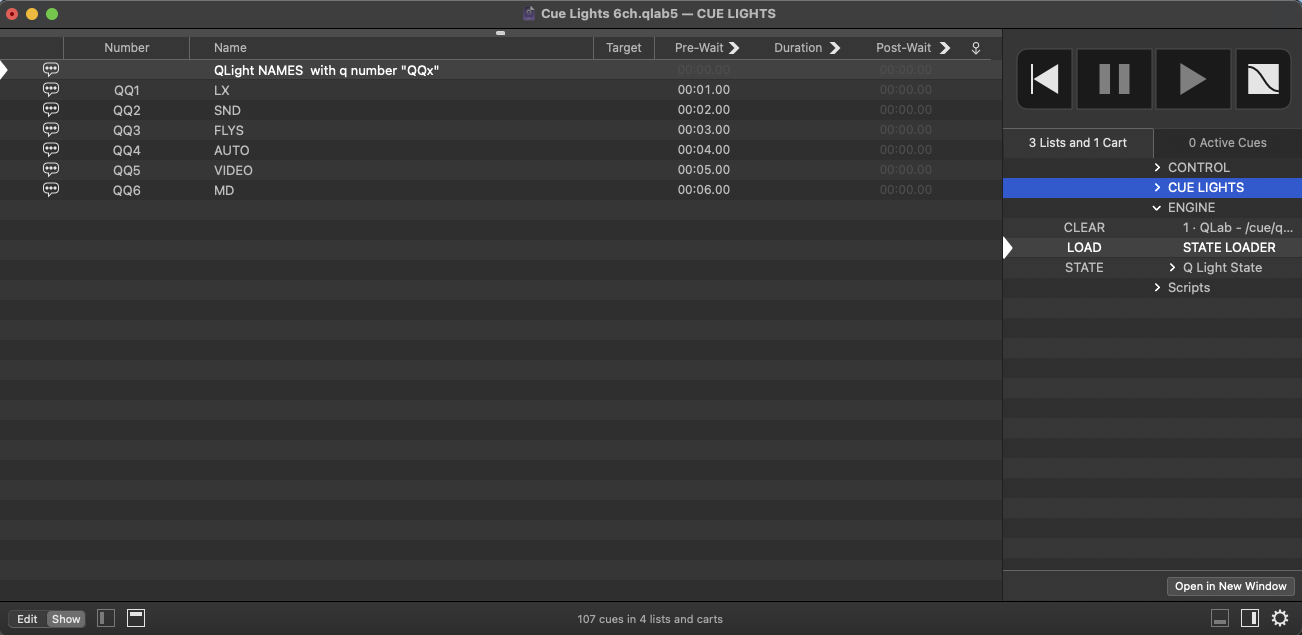
This cue list lists the cue light names.
Scripts cue list
The QLab workspace has cues that are set to start when the workspace opens and closes. These are set in Workspace Settings → General.
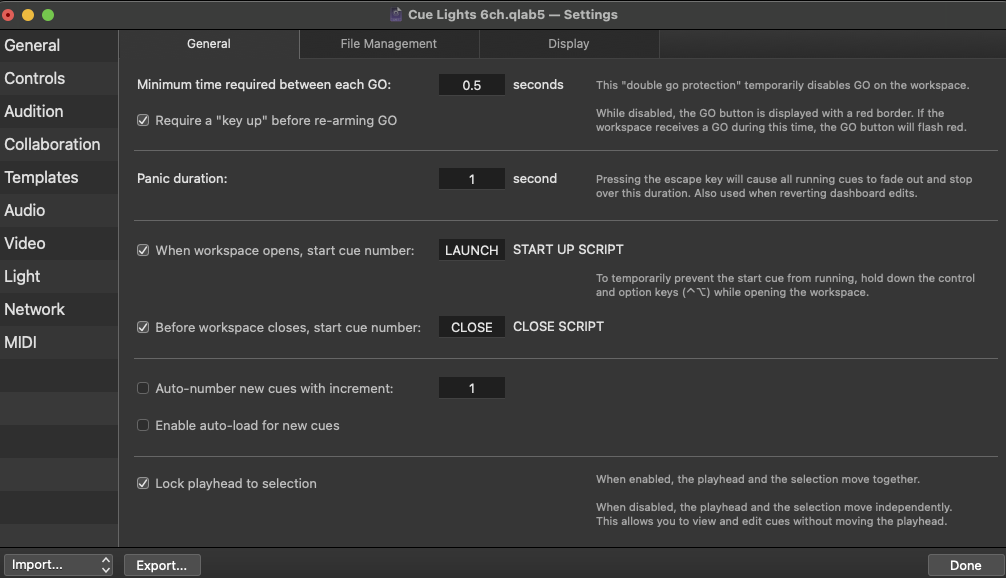
Cue LAUNCH is a Script cue with this script:
--open excel Spreadsheet
set theFile to "QLights6.xlsm"
tell application id "com.figure53.QLab.5" to tell front workspace to set thePath to path
tell application "System Events"
  set thePath to path of container of file thePath
  open file (thePath & theFile)
end tell
--Open any helper applications here
tell application "Chataigne" to activate
--other OSC to serial options
--tell application "OSC to Serial Arduino" to activate
delay 3
tell application "Microsoft Excel" to tell front sheet
  set theRow to 2
  set theRowRef to "A" & theRow
  set color index of interior object of column 1 to 0
  set color index of interior object of range theRowRef to 4
  select range theRowRef
end tell
tell application id "com.figure53.QLab.5" to tell front workspace
  set the notes of cue "MEM" to theRow
  set the q name of cue "GO" to " "
  set the q name of cue "MEM" to " "
  set the q name of cue "SET QLights from Spreadsheet" to " "
  start cue "LOAD"
end tell
The script opens all the helper apps, sets the green cursor to the top of the cue list in Excel, and sets the names of some cues in the CONTROL cart to the corresponding cue number.
The helper app in the demo is a custom app named “OSC to Serial Arduino”. This program converts OSC messages to serial data to send to an Arduino.
Cue CLOSE is a Script cue with this script:
--Close any helper appplications here
tell application "Chataigne" to quit
--tell application "OSC to Serial Arduino" to quit
tell application "Microsoft Excel" to quit
which closes any helper apps that are open.
Cue NAMES is a Script cue with this script:
tell application id "com.figure53.QLab.5" to tell front workspace
  set theCount to count of (cues whose q number begins with "QQ") --number of cuelights
  set theNames to {}
  repeat with eachName from 1 to theCount
    set the end of theNames to q list name of cue ("QQ" & eachName)
  end repeat
  repeat with theName from 1 to theCount
    set thisName to item theName of theNames
    set the q name of cue ("QQ" & theName) to thisName
    tell application "Microsoft Excel" to tell front sheet to set the value of cell (theName + 3) of row 1 to thisName
  end repeat
end tell
This script copies the cue names from the CUE LIGHTS cue list to the relevant column headings in the spreadsheet and to the cue names of the top row of buttons (CL1-CL6) in the CONTROL cart.
Output
A project like this wouldn’t be complete without including some real-world output as proof of concept. The output in this demo is to an Arduino Uno R3, which is an inexpensive single-board microcontroller, and commonly available 5V LED traffic lights. In a real system, these would probably be replaced by relays that control traditional cue lights.
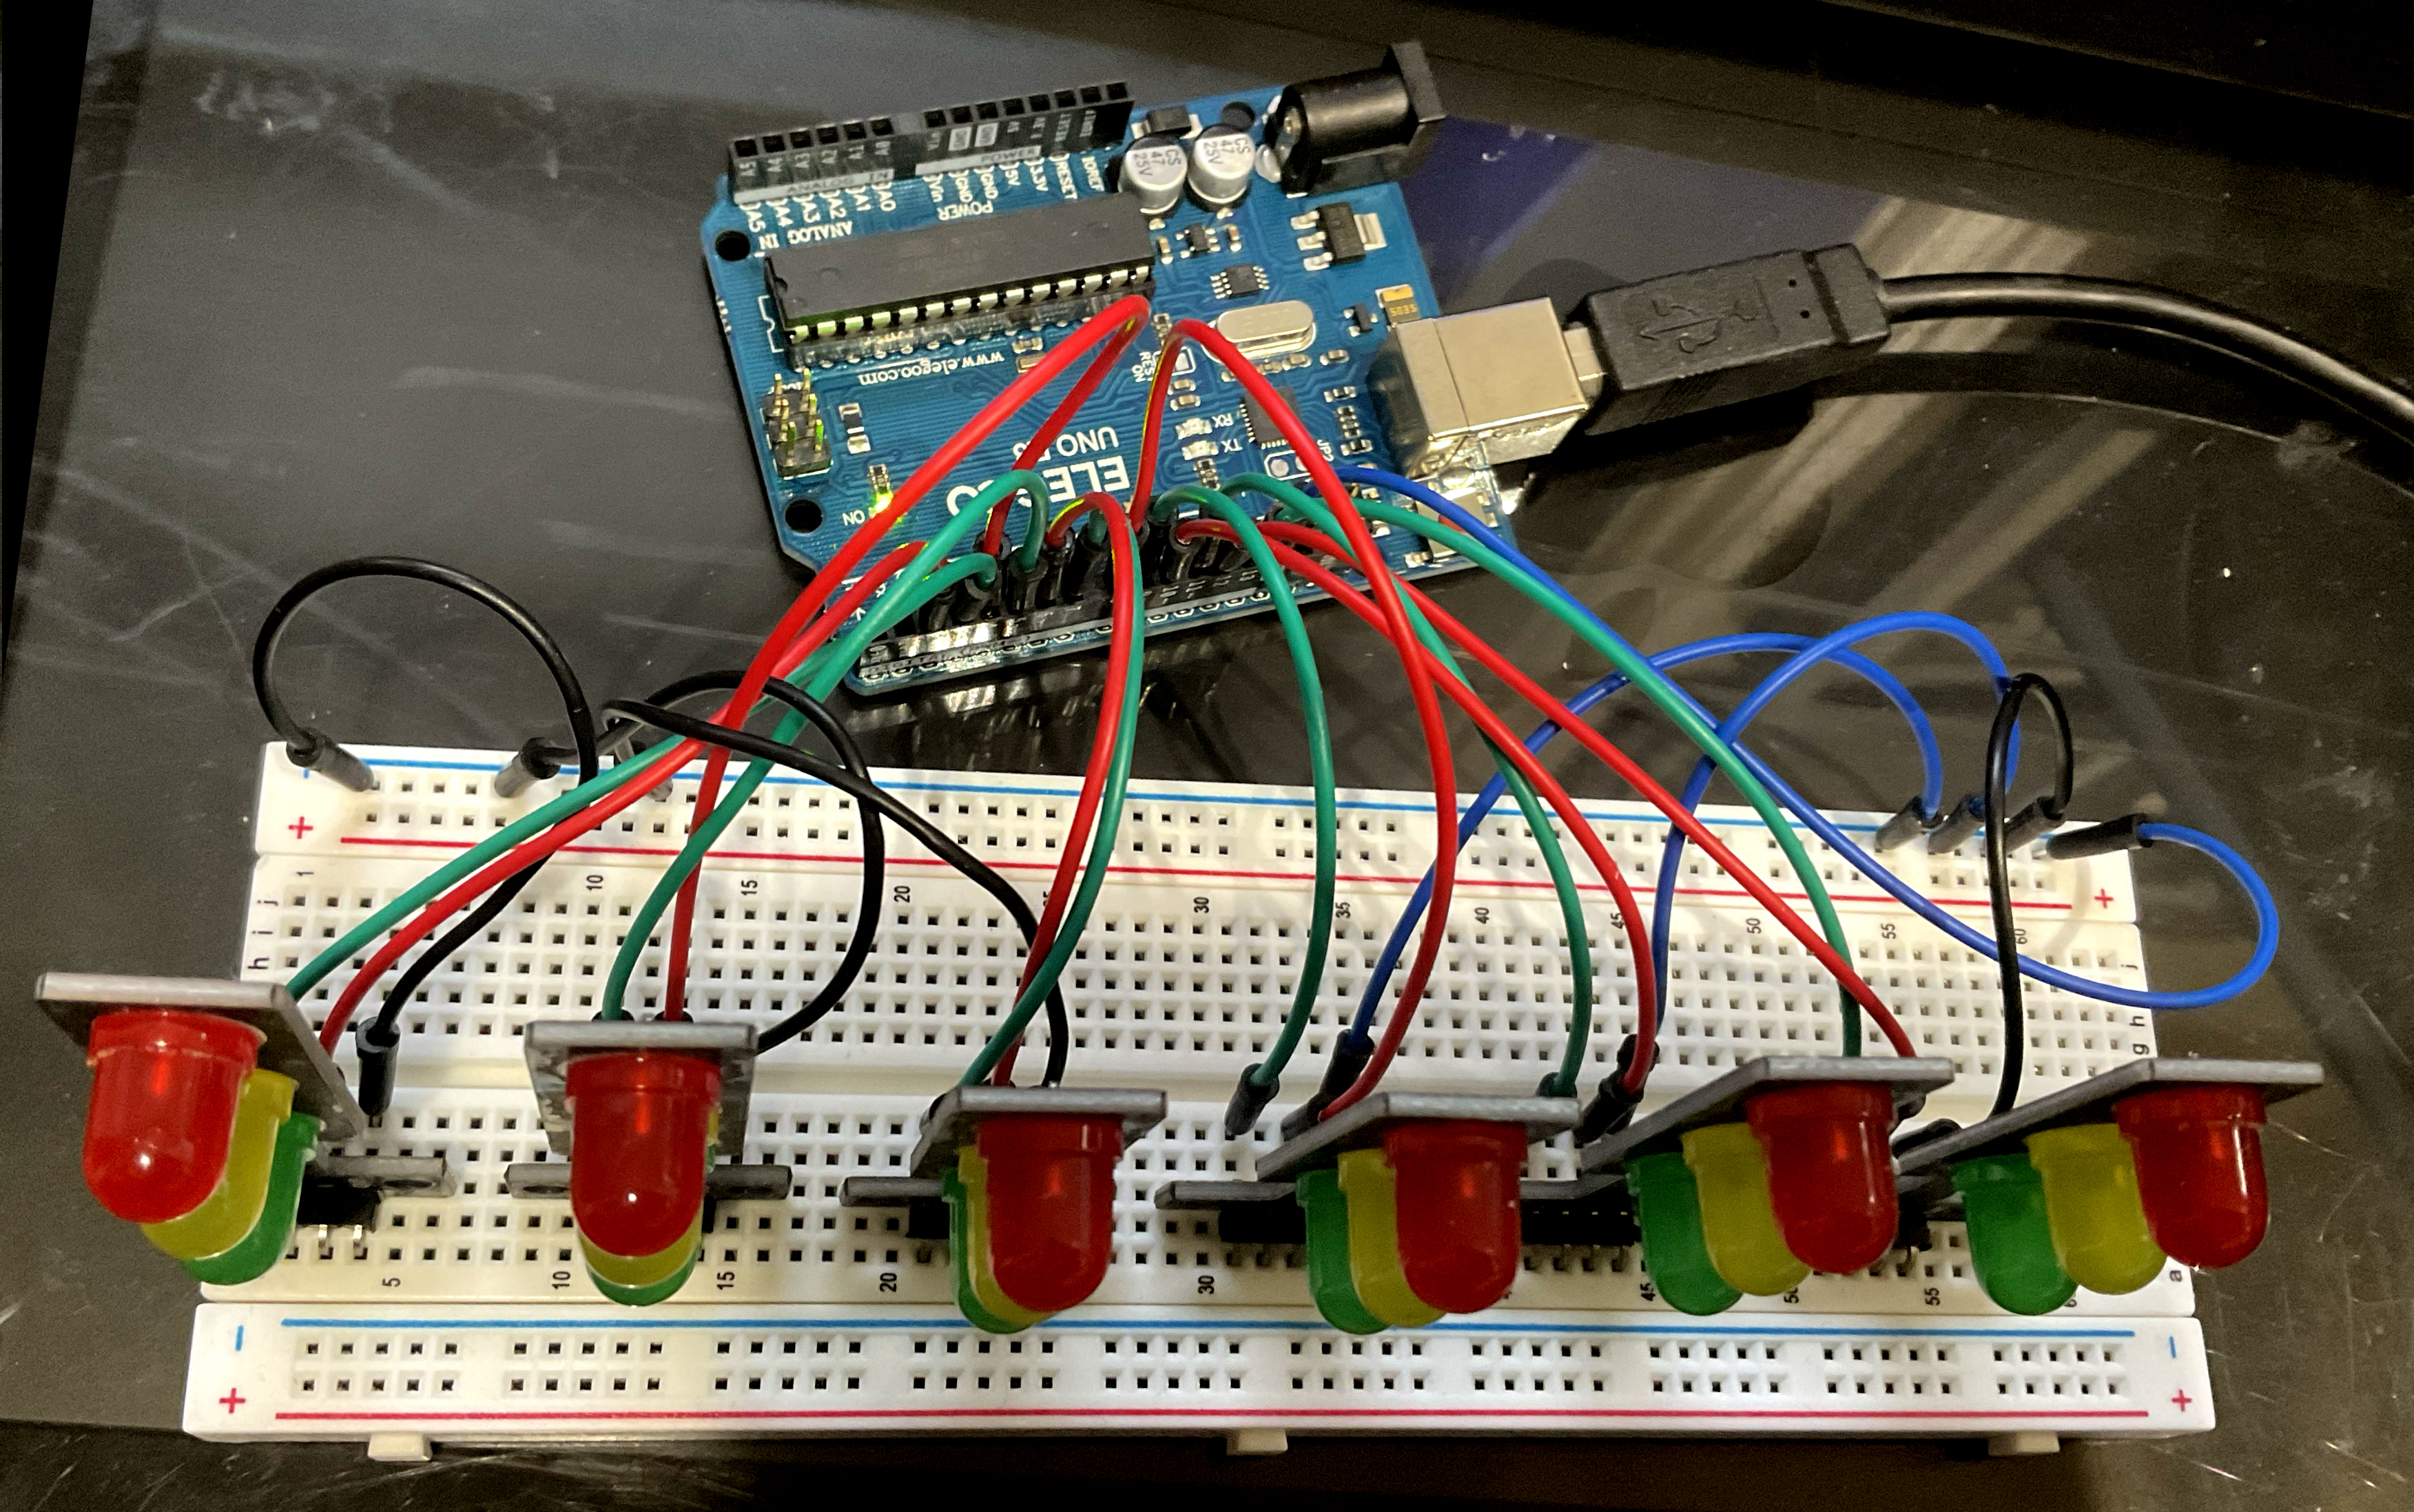
Arduino is designed as a fast prototyping system and can connect your computer to many real-world input and output devices, including sensors, motors, indicators, etc. An Arduino starter kit, which includes an Arduino, breadboards and wires, and a selection of input and output devices, is a great way to experiment with controlling QLab with data from sensors and switches and for enabling QLab to output to physical devices.
The Arduino Uno has a USB connector for serial communication and 14 pins (numbered 0-13) for digital input/output. Pins 0 and 1 are needed for serial communication, so there are 12 pins available for driving the LEDs. In this example:
- Pin 2 is connected to cue light 1 red
- Pin 3 is connected to cue light 1 green
- Pin 4 is connected to cue light 2 red
- Pin 5 is connected to cue light 2 green
- …
- Pin 12 is connected to cue light 6 red
- Pin 13 is connected to cue light 6 green
All the cue light common terminals are connected to GND.
(For projects requiring more channels, the Arduino Mega has 54 digital I/O pins.)
The Arduino is programmed from the Mac using the Arduino integrated development environment, or IDE.

At the top left of the window is a drop down menu to select the connected Arduino device.
Here is the code that needs to be uploaded to the Arduino:
int r1 = 2;
int g1 = 3;
int r2 = 4;
int g2 = 5;
int r3 = 6;
int g3 = 7;
int r4 = 8;
int g4 = 9;
int r5 = 10;
int g5 = 11;
int r6 = 12;
int g6 = 13;

char key = 0;

void setup() {
  Serial.begin(9600);

  pinMode(2, OUTPUT);
  pinMode(3, OUTPUT);
  pinMode(4, OUTPUT);
  pinMode(5, OUTPUT);
  pinMode(6, OUTPUT);
  pinMode(7, OUTPUT);
  pinMode(8, OUTPUT);
  pinMode(9, OUTPUT);
  pinMode(10, OUTPUT);
  pinMode(11, OUTPUT);
  pinMode(12, OUTPUT);
  pinMode(13, OUTPUT);

  digitalWrite(2, LOW);
  digitalWrite(3, LOW);
  digitalWrite(4, LOW);
  digitalWrite(5, LOW);
  digitalWrite(6, LOW);
  digitalWrite(7, LOW);
  digitalWrite(8, LOW);
  digitalWrite(9, LOW);
  digitalWrite(10, LOW);
  digitalWrite(11, LOW);
  digitalWrite(12, LOW);
  digitalWrite(13, LOW);
}

void loop() {
  if (Serial.available()) {
    char key = Serial.read();
    switch (key) {
      case 'a':
        digitalWrite(r1, HIGH);
        digitalWrite(g1, LOW);
        break;
      case 'b':
        digitalWrite(r1, LOW);
        digitalWrite(g1, HIGH);
        break;
      case 'c':
        digitalWrite(r1, LOW);
        digitalWrite(g1, LOW);
        break;
      case 'd':
        digitalWrite(r2, HIGH);
        digitalWrite(g2, LOW);
        break;
      case 'e':
        digitalWrite(r2, LOW);
        digitalWrite(g2, HIGH);
        break;
      case 'f':
        digitalWrite(r2, LOW);
        digitalWrite(g2, LOW);
        break;
      case 'g':
        digitalWrite(r3, HIGH);
        digitalWrite(g3, LOW);
        break;
      case 'h':
        digitalWrite(r3, LOW);
        digitalWrite(g3, HIGH);
        break;
      case 'i':
        digitalWrite(r3, LOW);
        digitalWrite(g3, LOW);
        break;
      case 'j':
        digitalWrite(r4, HIGH);
        digitalWrite(g4, LOW);
        break;
      case 'k':
        digitalWrite(r4, LOW);
        digitalWrite(g4, HIGH);
        break;
      case 'l':
        digitalWrite(r4, LOW);
        digitalWrite(g4, LOW);
        break;
      case 'm':
        digitalWrite(r5, HIGH);
        digitalWrite(g5, LOW);
        break;
      case 'n':
        digitalWrite(r5, LOW);
        digitalWrite(g5, HIGH);
        break;
      case 'o':
        digitalWrite(r5, LOW);
        digitalWrite(g5, LOW);
        break;
      case 'p':
        digitalWrite(r6, HIGH);
        digitalWrite(g6, LOW);
        break;
      case 'q':
        digitalWrite(r6, LOW);
        digitalWrite(g6, HIGH);
        break;
      case 'r':
        digitalWrite(r6, LOW);
        digitalWrite(g6, LOW);
        break;
    }
  }
}
Arduinos execute code in setup() upon boot. In this program, setup() does the following:
- Sets a variable for each pin so it can be referred to by its cue light number and color;
- Starts serial communication at 9600 baud;
- Configures pins 2 through 13 as digital outputs;
- Initializes all pins to off (LOW).
Code inside loop() is run in a continuous loop as fast as the Arduino can process it.
Our program reads a new character in from the serial port when one is available, and selects an action based on the character that is received.
If the character is a, it sets r1 (the variable associate with pin 2) to HIGH and g1 (the variable associated with pin 3) to LOW, toggling cue light 1 to red.
The Arduino can be fitted with an ethernet board and can be configured to receive and send OSC, so it could be driven by QLab directly, but in this proof of concept, we are just using the onboard serial communication.
The Arduino IDE has a serial monitor built in which can be opened by clicking the magnifying glass icon in the top right of the window. This enables a quick initial test of the board and code by just typing characters in the message box and seeing if the expected LEDs switch on. For example, if you type “adgknq” into the serial monitor message box and hit return, it will send those characters to the Arduino and the cue lights should display RRRGGG.
Once your test is complete, the Arduino IDE can be closed. It does not need to be open or even installed, since the code resides on the Arduino hardware which runs independently.
In QLab, cue STATE contains cues to drive external devices. In the demo workspace, these are Network cues with simple OSC messages:
/led {a-r}
where the argument is a single lowercase letter representing an LED in the physical output.
Cue light 1 red   = a
Cue light 1 green = b
Cue light 1 off   = c

Cue light 2 red   = d
Cue light 2 green = e
Cue light 2 off   = f

etc.
As we are not communicating with the Arduino directly using OSC, the final part of the project requires the OSC output from QLab to be converted to serial.
This will require another app to be running alongside QLab, and you may recall that in the startup cue LAUNCH, we had a line of AppleScript that opens a program called Chataigne.
Chataigne is a free, open-source software capable of connecting and synchronizing a wide range of show control protocols and technologies.
Although Chataigne is capable of creating some truly mind-boggling setups, at its simplest, it can just be used to quickly translate one protocol to another.
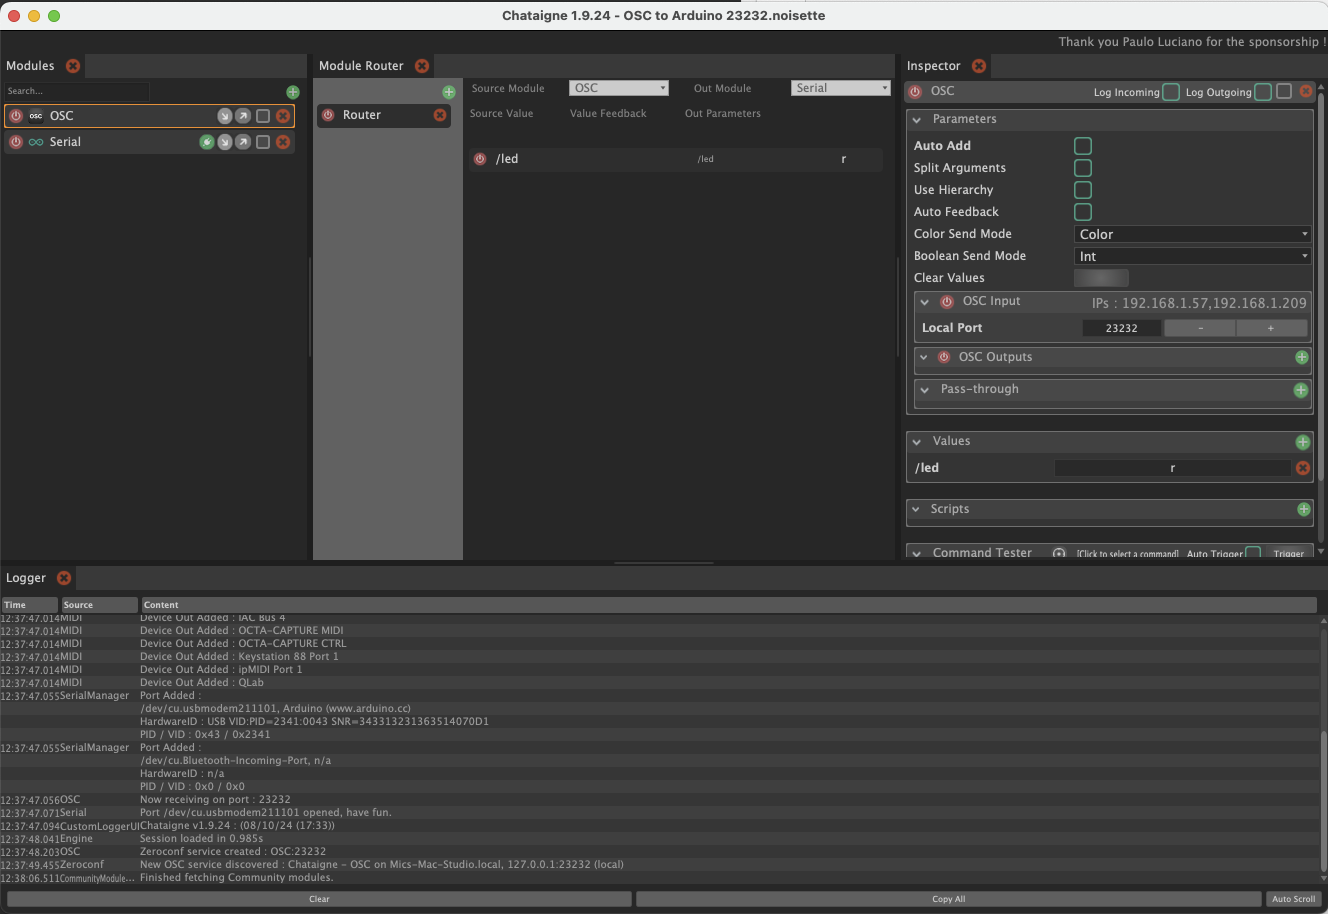
At the top left of the Chataigne window, two modules have been added for OSC and serial communication.
The Module Router in the center pane is set to translate OSC messages to serial.
The Inspector on the right shows the setup for the OSC module. This shows the port number (23232) for OSC input.
The OSC message /led has already been added to the Values section by checking the Auto Add checkbox and sending an OSC message to port 23232 from QLab. The Auto Add box was then unchecked.
If the Serial module is selected, the Inspector will show the settings for that module.
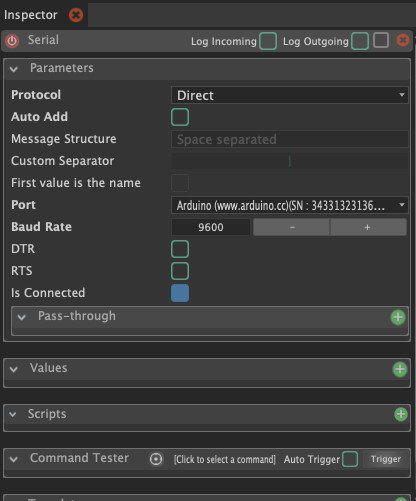
The Protocol is set to “Direct” and the Baud Rate is set to 9600.
In the Logger pane, there are entries to show that Chataigne has found the Arduino and has opened serial communication with it, and that Chataigne is receiving OSC on port 23232.
Selecting Preferences from the File menu will display project and app preferences in the Inspector.

The preferences for this project should be:
- Launch minimized set to ON. This means Chataigne will open with its interface minimized to the Dock.
- File to load on Startup set to “OSC to Arduino 23232.noisette” (This is selected using the Browse button.)
Over in QLab, in Workspace Settings → Network → Network Outputs, a network patch is configured to send OSC to IP address 127.0.0.1 (the local computer) on port 23232.

In cue STATE, the OSC messages that control the button colors in QLab’s CONTROL cart are routed to the “QLab” network patch. The messages to Chataigne are sent to the “OSC to Serial” network patch.

An alternative method for converting OSC message to serial messages is included in the downloadable example; a stand-alone app called “OSC to Serial Arduino.” This can be used by editing the scripts in cue LAUNCH and cue CLOSE to use this app instead of Chataigne. (Only one serial connection can be in use at any one time.) This app has no controls and is configured to use the same port 23232 and send serial to the first connected serial device.
This app was built using Vuo, and the source composition is also included so that you can modify it for your own needs if you wish.
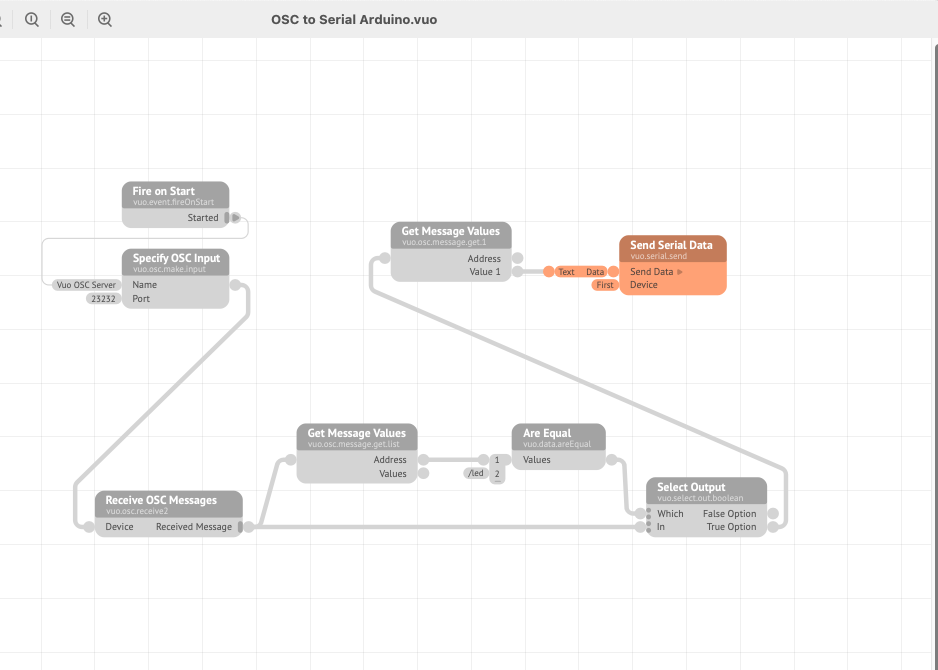
OSC is received on port 23232. Messages are dumped if their address is not /led. Valid messages are converted to serial data and sent to the first serial device.
Similar apps could be built quickly in programming environments like Max or PureData or, of course, coded from scratch.
Chataigne is free, open-source software written by Benjamin Kuperberg.
Arduino is a product of Arduino S.r.l.
Excel is a product and registered trademark of Microsoft, Inc.