Too Fab Q-Lab Beams Are Gonna Find Me
This workspace creates a projected simulation of a follow spot that can be controlled using a Wacom tablet and an OSC, MIDI, and general input translating tool called OSCulator.
Here it is in action:
How It Works
In short, OSCulator listens for input from the Wacom, generates OSC messages,
and sends those messages to QLab. First, it is necessary to set up an OSCulator
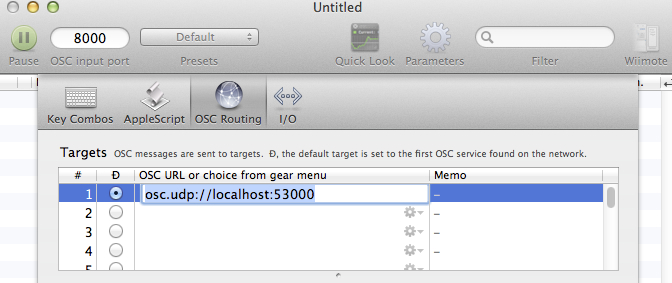
routing to QLab. Open OSCulator, click on the Parameters gear icon, select OSC
routing, and enter: osc.udp://localhost:53000 in the Target OSC URL.
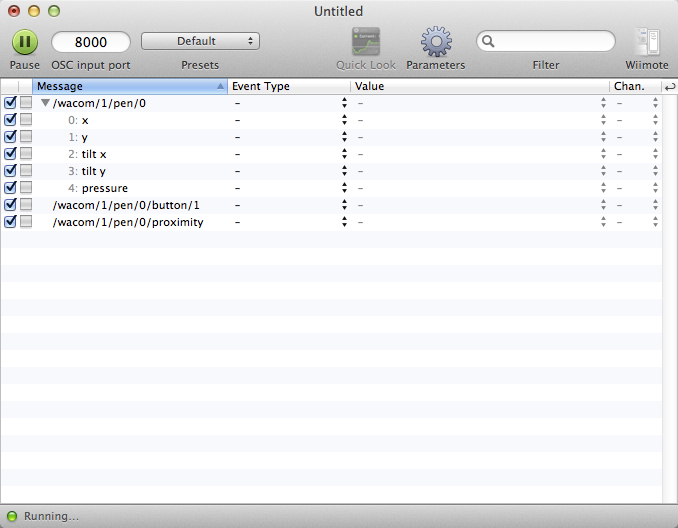
Close the Parameters window. Press caps lock on your keyboard and draw something with the pen on your Wacom tablet. The OSCulator main window will immediately populate with all the recognized parameters for tablets. Your tablet may not support all parameters, in particular, the cheaper ones don’t support pen tilt.
When you press caps lock, the mouse cursor should lock in place, and the tablet output will be directed to OSCulator. If your cursor is still moving, then your Wacom driver is out of date or incompatible. The Wacom driver for my very old Graphire 4x5 didn’t work, and there didn’t seem to be a more up to date version, but a quick trawl around the net quickly found a workaround using the Wacom Driver 6.1.7-5 for Intuos 2. Of course, if you are going to use this method on a big production, the bigger the tablet and the more features it has, the better. For experimenting, however, older models are available on eBay very cheaply.
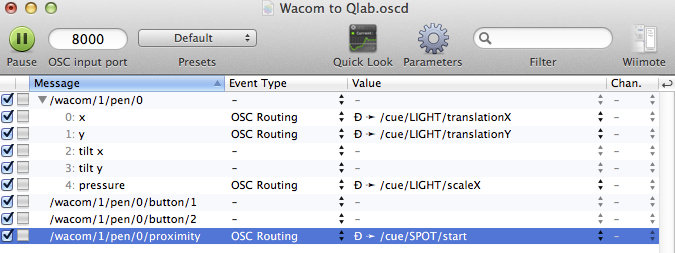
Once it’s working, you’ll need to set all the messages you want to use to the “OSC message” Event Type using the pop-up menu for each command in the Event Type column. Then, set a routing for each using the new pop-up under the Value column.
In this example, we are using the x and y pen positions and the pen tip pressure data. When we select New… from the Value pop-up menu, we go to the OSC routing window. We have previously set up QLab as the default target, so all we need to do is click in the Rewrite Address column in the Routes table, where it currently has ‘same address’. This will open the OSC Routing Editor window where the address can be rewritten to the OSC address for the QLab parameter we want to control:
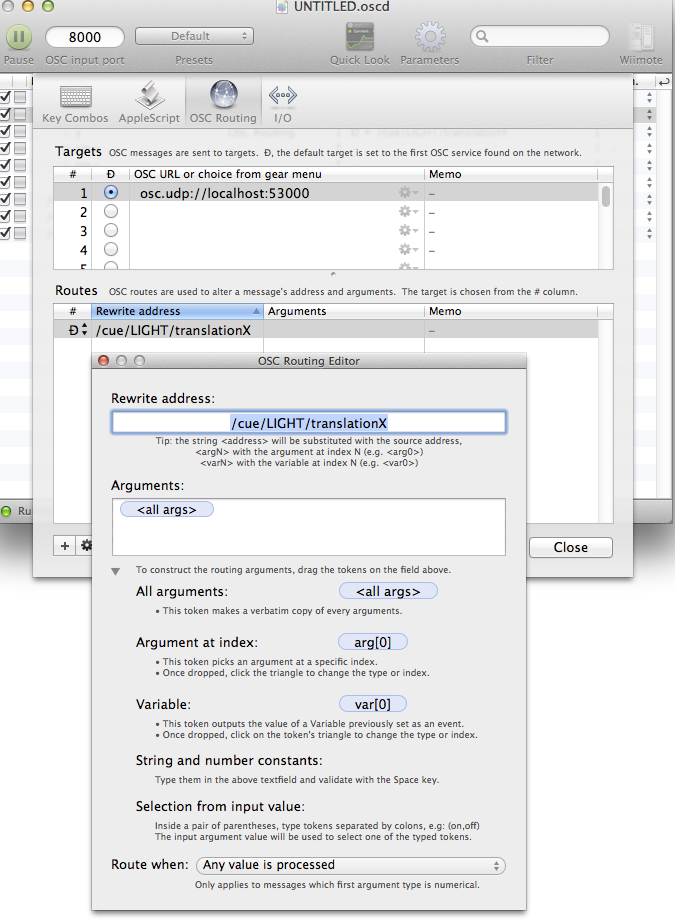
For the x axis, enter: /cue/LIGHT/translationX
For the y axis, enter: /cue/LIGHT/translationY
For pressure, enter: /cue/LIGHT/scaleX
OSCulator produces an output of 0.0 to 1.0 for these parameters, so we now need to scale that output to the range of values that QLab expects.
Select the Scalings page from the View menu (or press ⌘F, or click the curl icon next to the Chan. column in the main OSCulator window).
For the x and y parameters, we will need values that allow image placement anywhere on the surface we are using. For pressure, which we are using to change the scale of the image, we will need a range that corresponds to the minimum and maximum scale we want for the spotlight cue.
The example uses a range of -600 to +600 for x and y, and a range of 0 to
2 for pressure, which translates to scaleX in QLab.

Save the OSCulator file.
In QLab, the first thing we do is create a Script cue which will run automatically when the workspace opens. The cue launches OSCulator and loads the file we’ve just created so that it’s ready to go right away.
The example workspace has a Script cue numbered “OSCu” which runs this script based on prior work by Rich Walsh:
set thefilename to “QLab MIDI to OSC control.oscd” -- set filename of OSCULATOR file here

tell application id “com.figure53.qlab.3” to tell front workspace
-- Establish the path to the current workspace
  set workspacepath to path
  if workspacepath is missing value then
    display dialog “The current workspace has not yet been saved anywhere.” with title dialogTitle ¬
    with icon 0 buttons {“OK”} default button “OK” giving up after 5
    return
  end if

  -- Get the path that should prefix all media file paths
  tell application “System Events”
    set sharedPath to path of container of file workspacepath
  end tell
  set filepath to quoted form of (POSIX path of sharedPath & thefilename)
  try
    set thecommand to “open ” & filepath
    do shell script thecommand
  end try
  delay 0.1
  activate
end tell
This script expects the Osculator file (with file extension .oscd) to be in the same folder as the workspace. You set the name of the OSCulator file in the top line of the script.
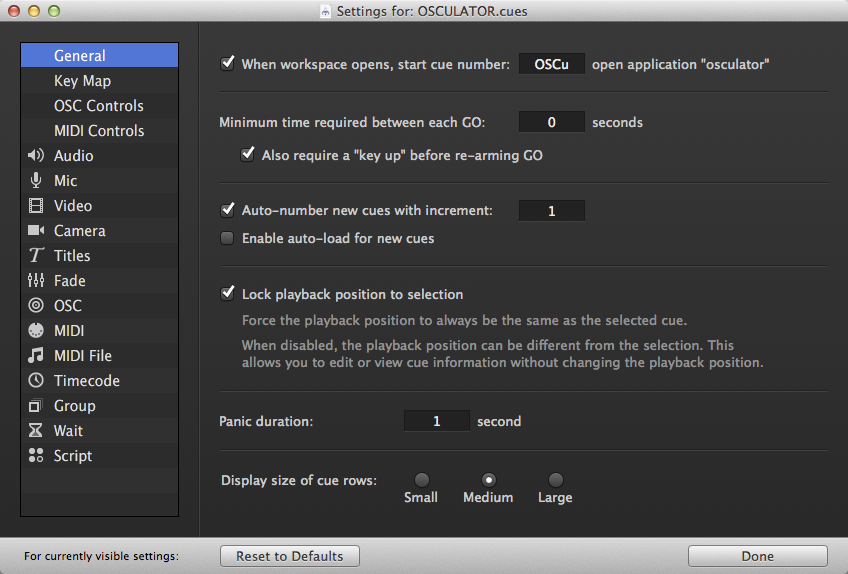
In Workspace Settings → General, we check the box marked “When workspace opens, start cue number” and enter the number of this cue, “OSCu”:
Next, create a Title Cue and number it LIGHT. Set the text of the cue to a
bullet point, which you can type by pressing option-8.
Change the font size of the bullet point to 600 points.

Engage Caps Lock, start the Titles cue and place the pen on the tablet. You should now have control of the white circle’s position on the surface, and pressing harder on the stylus should make the circle bigger.
As a further refinement, you can make the pen’s proximity to the tablet start
and stop the Titles cue. To do this, create a Script cue, number it SPOT, and
add this script:
tell application id "com.figure53.qlab.3" to tell front workspace
  if the running of cue "LIGHT" is true then
    stop cue "LIGHT"
  else
    start cue "LIGHT"
  end if
end tell
This creates a toggle that will start cue LIGHT if it is not running, and stop
it if it is running.
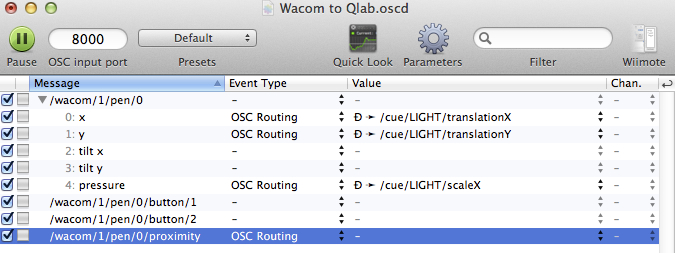
In OSCulator, change the event type of /wacom/.../proximity to OSC Routing
and rewrite the value to:
/cue/SPOT/start
Engage caps lock again and bring the pen to the tablet.
You can change the shape of the spotlight beam using pictograph characters in the Titles cue text. The easiest way to access these is from the Character Viewer palette.
Alternately, you can use an image editor to create any shape you like on a
transparent background, save this as a PNG with alpha, and use that image as the
target of a Video cue. Then use that Video cue as LIGHT instead of the Titles
cue.
The two important things to remember are:
- Caps lock must be engaged to route the tablet output to OSCulator.
- The cue that contains your spotlight shape, whether Titles or Video, must be
numbered
LIGHT.
The example workspace also uses a Video cue to create a background image, but of course this is entirely optional.