Teleprompters and Panoramas
This chapter is all about live control over the rate of a scrolling image. In the Y axis, this will be useful for teleprompter type applications. In the X axis, this can be used for scrolling panoramas.
It’s worth pointing out that if you want a teleprompter for serious use in broadcast, live speeches, or YouTubing, you’re probably better off spending a few bucks on a dedicated program specific designed for use as a teleprompter. The techniques discussed in this chapter are meant for lightweight teleprompter-style content in a stage play, and comes with a few limitations, notably the the maximum graphic render size within QLab (images or text about 17000 pixels high), which might limit the length of your text considerably. QLab also may not scroll text quite as smoothly as a program designed to do just that, and the text editor won’t follow the on-screen cursor position, so if a speaker wants an edit you will have to find the matching point in the text cue manually. However, for many casual uses, it can produce usable results.
Teleprompter Scrolling - The Y Axis
Here it is in action, controlled with a Contour Shuttle:
- The jog wheel adjust the scroll speed.
- The shuttle wheel fast-forwards and rewinds.
- The buttons immediately underneath the wheel set the scrolling speed to a the default speed.
- The buttons at the bottom stop scrolling.
- The button in the center above the wheel resets to the top of the text.
All functions can be performed by the buttons and wheels on the Contour Shutter, or by key presses:
| Key | Function | Controller |
|---|---|---|
| [5] | Reset to top | Center button above the wheel |
| [2] | Scroll faster | Jog clockwise |
| [3] | Stop scrolling | Bottom buttons |
| [1] | Scroll slower | jog counterclockwise |
| [4] | Scroll at default speed | Buttons under wheel |
| [NUM ⇧7] | Step back 16 pixels | Shuttle left 7 |
| [NUM ⇧6] | Step back 8 pixels | Shuttle left 6 |
| [NUM ⇧5] | Step back 6 pixels | Shuttle left 5 |
| [NUM ⇧4] | Step back 4 pixels | Shuttle left 4 |
| [NUM ⇧3] | Step back 2 pixels | Shuttle left 3 |
| [NUM ⇧2] | Step back 1 pixel | Shuttle left 2 |
| [NUM ⇧1] | Step back 0.5 pixels | Shuttle left 1 |
| [NUM 0] | Stop scrolling | Release shuttle wheel |
| [NUM 1] | Step forward 0.5 pixels | Shuttle right 1 |
| [NUM 2] | Step forward 1 pixel | Shuttle right 2 |
| [NUM 3] | Step forward 2 pixels | Shuttle right 3 |
| [NUM 4] | Step forward 4 pixels | Shuttle right 4 |
| [NUM 5] | Step forward 6 pixels | Shuttle right 5 |
| [NUM 6] | Step forward 8 pixels | Shuttle right 6 |
| [NUM 7] | Step forward 16 pixels | Shuttle right 7 |
The Contour Shuttle’s shuttle ring has seven zones on each side of center, and snaps back to center when release. Twisting the ring just a few degrees enters zone 1, then a few more degrees gets to zone 2, and so on. Twisting as far as possible is zone 7.
How It Works
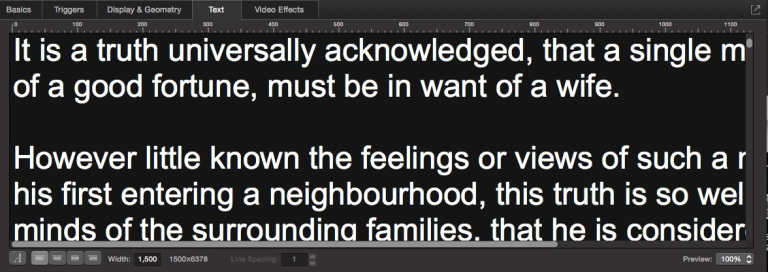
The text is displayed using a regular Text cue which has a transparent background. The pixel dimensions of the cue can be seen at the bottom of the Text tab of the inspector.
Each time a hotkey is pressed, or the Shuttle controller emulates a hotkey
press, it triggers a cue which adds or subtracts an amount from the rate which
is stored in the scale Y parameter of a cue numbered VARIABLES.
For example, when the jog wheel rotates one click clockwise, that triggers a Network cue which sends the following OSC message:
/cue/VARIABLES/scaleY/+ 0.05
A Network cue with a long duration numbered OSCsuperscroll continuously
queries the VARIABLES cue for the current value of /scaleY and adds that
value to the current Y position of the Text cue. It does that with this message:
/cue/PANO/translationY/+ #/cue/VARIABLES/scaleY/#
This message adds the value stored in the Y Scale of cue VARIABLES to the Y
position of cue PANO. We first set the duration of cue OSCsuperscroll to a
very long time, one hour in the example, and then go to the Settings tab of the
inspector and set the fade to “Resend”. Then we set the resend rate to 120 fps.
That frame rate is nominal; a low-powered (or extremely busy) Mac will likely
have a lower actual frame rate. If your Mac is performing sluggishly when
running this workspace, experiment with different frame rates here.
Even at high frame rates, scrolls controlled by Network cues often do not look as smooth as one might hope for. Some messages don’t get through and with those that do there is a high degree of jitter. For instance, you might get a movement of 1 pixel in 2ms followed by the next 1 pixel movement 14ms later and the next 2ms then 15ms then 19ms. This is the main limitation to using this method at higher scroll speeds.
Here’s the complete cue list:
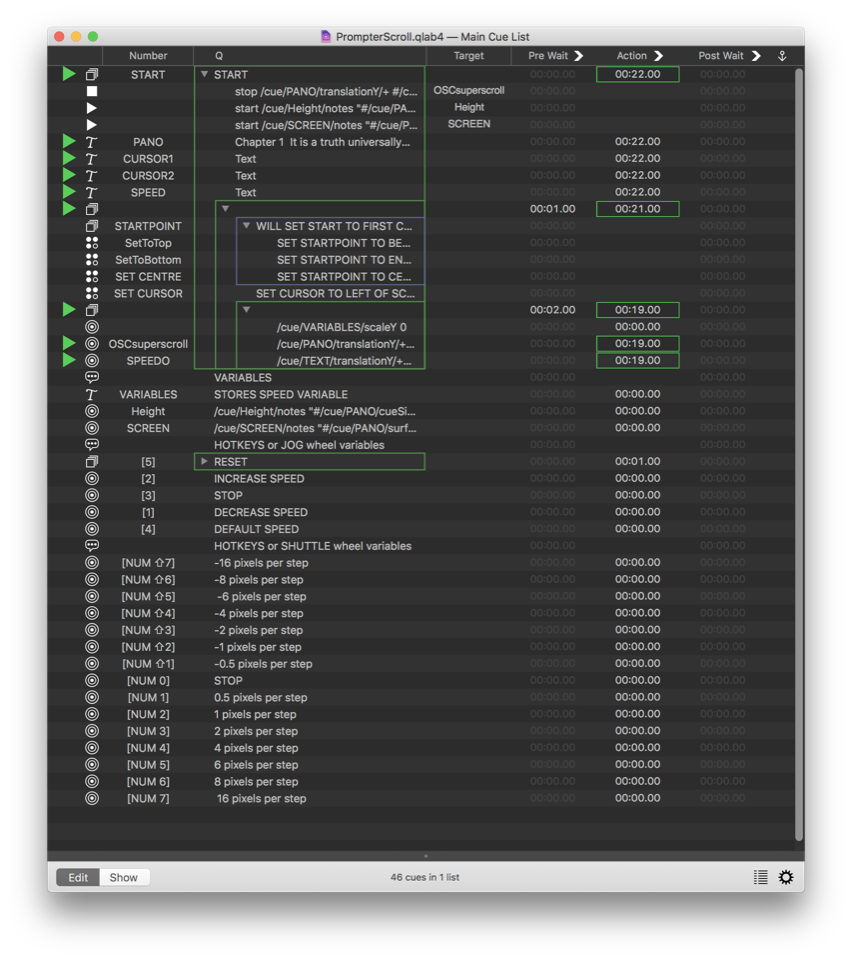
There is one main cue, a Group cue called “START” which does almost all the work. In addition, there are the cues that are triggered to increment or decrement the rate as explained above, and a few cues which store variables.
When the Group cue numbered START is triggered, it stops the Network cues with
duration so that they reset. Then it starts Network cues to find out the
dimensions of our text cue, and store it in the cue’s notes field. It also finds
out the display size of the surface that the cue is going to be sent to:
- Cue
Heightsends/cue/Height/notes "#/cue/PANO/cueSize#"which sets its own notes field to the JSON record obtained from querying cuePANOto obtain image size. - Cue
SCREENsend/cue/SCREEN/notes "#/cue/PANO/surfaceSize#"which sets its own notes field to the JSON record obtained from querying cuePANOto obtain surface size.
We will need this info in a moment to find the top of the text and set the cursor markers on the left of the display.
Next, Text cue PANO is started, displaying the teleprompt text on screen.
Next, Text cues CURSOR1 and CURSOR2 are started, displaying the cursor
markers and the speed indicator.
Next, a Group cue set to “start first child and go to next cue” is started. This
moves PANO to display the first line. We can also get it to start at the end
or in the middle by altering the order of the children in the Group cue. This
structure is mainly so we can use the same cue list with images instead of text
by substituting a Video cue numbered PANO for the existing Text cue.
These cues have quite messy scripts to extract the height of the text cue from
the image size record. This is done by crawling through the notes field of cue
Height and throwing away everything that isn’t the number we’re interested in.
This string stored in the notes of cue height is:
{
  height = 6378;
  width = 1500;
}
The script strips away everything besides the value of height (6378) and then sets the initial Y position of the Text cue using that number.
set translation y of cue "PANO" to - ((height / 2) * (scale y of cue "PANO"))Cues’ are measured from their anchor point, which by default is the center of the image. So, we take half the height of the text multiplied by any scaling and then set the Y translation of the cue (from the anchor at its center) to that value as a negative number, since Y values below the center are negative numbers.
The rest of the script extracts, by brute force, the value of height. There are other clever ways of converting JSON records to AppleScript lists, but this method gets the job done and is simple. Since we only need to do this once, there is very little disadvantage to using this relatively unsophisticated method:
-- set translation y to top of image
tell application id “com.figure53.QLab.4” to tell front workspace
  set thetext to (notes of cue “Height”)
  set AppleScript’s text item delimiters to “{“
  set theTextItems to every text item of thetext
  set AppleScript’s text item delimiters to “”
  set thetext to theTextItems as string
  set AppleScript’s text item delimiters to “}”
  set theTextItems to every text item of thetext
  set AppleScript’s text item delimiters to “”
  set thetext to theTextItems as string
  set height to (word 3 of thetext as number) –the height of the image
  set thetext to (notes of cue “SCREEN”)
  set AppleScript’s text item delimiters to “{“
  set theTextItems to every text item of thetext
  set AppleScript’s text item delimiters to “”
  set thetext to theTextItems as string
  set AppleScript’s text item delimiters to “}”
  set theTextItems to every text item of thetext
  set AppleScript’s text item delimiters to “”
  set thetext to theTextItems as string
  set screenheight to (word 3 of thetext as number) — the screen height
  set translation y of cue “PANO” to -((height / 2) * (scale y of cue “PANO”))
end tell
We do a similar thing to figure out where to place the cursor:
-- set translation x to left hand side of image
tell application id “com.figure53.QLab.4” to tell front workspace
  set thetext to (notes of cue “SCREEN”)
  set AppleScript’s text item delimiters to “{“
  set theTextItems to every text item of thetext
  set AppleScript’s text item delimiters to “”
  set thetext to theTextItems as string
  set AppleScript’s text item delimiters to “}”
  set theTextItems to every text item of thetext
  set AppleScript’s text item delimiters to “”
  set thetext to theTextItems as string
  set screenwidth to (word 6 of thetext as number) — the screen width
  set translation x of cue “SPEED” to -((screenwidth / 2) – 30)
  set translation x of cue “CURSOR1” to -((screenwidth / 2) – 25)
  set translation x of cue “CURSOR2” to -((screenwidth / 2) – 25)
end tell
Finally, we start the two Network cues which have long durations so they
continuously repeat: OSCsuperscroll, which we looked at earlier, and SPEEDO
which displays the scroll rate (actually number of pixels moved per OSC message)
on the screen:
/cue/SPEED/text "#/cue/VARIABLES/scaleY#"
Panorama Scrolling - The X Axis

Generally, the smoothest way of scrolling between two points in a video that is wider than the output display is to use a Fade cue. But this is only useful if we want to end up at a defined position over a specific. Once a fade is initiated we have no control over its rate, or the ability to slow down to stop at a completely arbitrary point. Imagine a projected background, side-scrolling behind a performer jogging in place, and the actors slows and stops. We would like to be able to slow and stop the background movement in concert with the actor. Using a modification of the teleprompter technique above, we can do just that:
The structure of the cue list is almost identical. Here are the major changes:
- We are storing the scroll rate in translation Y of the
VARIABLEScue. - The AppleScript that throws away superfluous information from the screen size and video cue size records is modified to extract the width instead of the height.
- The cues which calculate the starting position of the Video cue (either the
left, center, or right of the image) take account of the screen width so that
the screen is filled:
set translation x of cue "PANO" to -((width / 2) * (scale x of cue "PANO") - (screenwidth / 2)) - The cue numbered
OSCsuperscrollnow increments or decrements the X translation of the Video cue, rather than the Y translation.
All other controls remain basically the same.
This method is only really suitable for very slow moving scrolls, as we are increasing the size of each movement rather than speeding up the rate the movements happen. It is very good for imperceptible movements, where the audience only realizes after half an hour that they’re looking at something completely different.
Additional reading
The image used in the example was generated using a digital emulation of a technique called “slit scan photography.”
The original video it was made from is called keep it rollin by Jan Goldfuß, found on Vimeo.
You can learn more about digital slit scan emulation from this lovely article on diyphotography.net
Slitscan processing of image used in panorama example from an original video by Jan Goldfuß, used with permission. All rights reserved.
Shuttle Controllers are registered trademarks of Contour Design, which is not affiliated with nor endorsed by Figure 53.