Main Volume Control
For two-channel playback, it is usually quite easy to adjust the volume of all QLab outputs simultaneously. Most interfaces have a volume knob which controls the level of the stereo output of the device. When using the headphone output of a Mac, and sometimes when using an external interface, the volume controls on the Mac’s keyboard will control the volume. In the rehearsal room, a simple mixer may be available for level control purposes.
In more complex setups, things are not so simple. To get simultaneous control of volume on all the outputs, the minimum required equipment is a mixer with some means of ganging control all levels to a single knob or fader. This is usually in the form of DCA control of multiple input or output levels, and this may be beyond the budget or equipment availability, particularly in rehearsal rooms.
Having effective level control in the rehearsal room is important. Among other things, it allows the volume to be lowered so that the director can be heard when giving instructions over loud music. It also means that high-level sound effect sequences, which the actors would only be exposed to once per performance, can be repeatedly rehearsed at lower levels for the safety and comfort of all.
In QLab 5.2, an OSC method was added which allows individual control of any crosspoint in the audio patch routing matrix:
/settings/audio/patch/{name}/level/{inChannel}/{outChannel} {decibel}
/settings/audio/patch/{name}/level/{inChannel}/{outChannel}/live {decibel}
/settings/audio/patchID/{id}/level/{inChannel}/{outChannel} {decibel}
/settings/audio/patchID/{id}/level/{inChannel}/{outChannel}/live {decibel}
Read: If no argument is given, return the volume level of the specified crosspoint.
Write: If decibel is given, set the specified crosspoint to
decibel.decibelcan be any number, decimals allowed, or a string such as-inf. Ifdecibelis a string (any string, in fact) QLab will set the crosspoint to-inf.
Using this method to set the main level of an output patch named MainOutput to -30, we use Network Cue patched to localhost port 53000 to send this OSC message:
/settings/audio/patch/MainOutput/level/0/0/live -30
Obviously, it would be more useful to be able to alter the main levels using a fader or knob either in hardware or an on-screen software controller. In this tutorial, we will look at controlling QLab’s main volume with various third-party software controllers, including TouchOSC (which, as a bonus, we will get to open automatically in kiosk mode.) We will also explorfe using MIDI hardware controllers such as the Behringer X-Touch Mini.
But first, we will look at an method of on-screen slider control achieved entirely within QLab itself, which can optionally be controlled directly with the fader of a hardware MIDI controller.
Method 1 - Light Dashboard
QLab’s Light Dashboard which can control a minimum of 16 channels, regardless of your license type. Conveniently, for the purposes of using it for main level control, its sliders can send their values as MIDI data and can be remotely controlled from MIDI. These sliders are the only controls in QLab that have this capability, and this fact can be exploited by the adventurous lateral thinker for many purposes beyond the lighting control purpose for which it was designed.
Here it is in action; controlling the main volume of a patch with a Light Dashboard slider and controlling that slider with a MIDI hardware controller.
How it Works
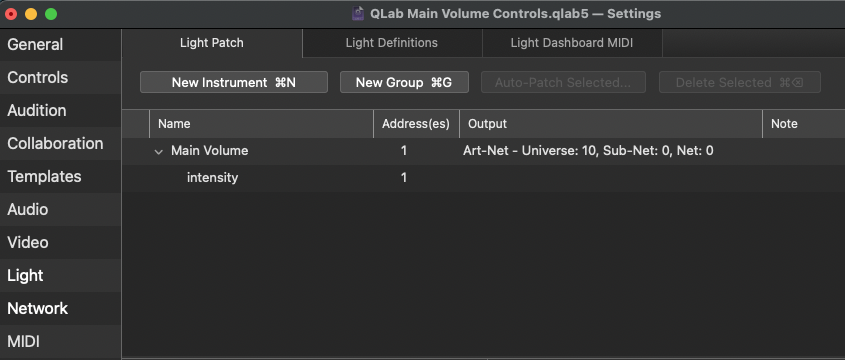
In Workspace Settings → Light → Light Patch, there is a single instrument named “Main Volume” which uses the generic dimmer instrument definition. This is patched to address 1 of universe 10, which is out of the way of any other DMX addresses we might use for lighting purposes.
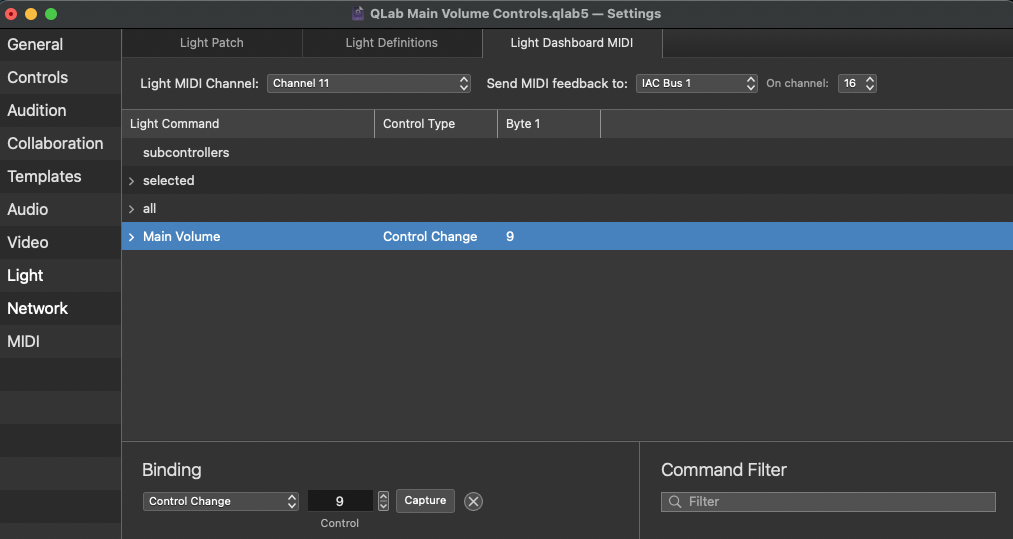
In the Light Dashboard MIDI tab, the Light MIDI channel is set to channel 11. The “Main Volume” instrument has a MIDI binding set to Control Change 9. These settings were chosen because they correspond to the default settings of the single fader on a Behringer X-Touch Mini controller. You can set them to match any other controller as required.
MIDI feedback from the Light Dashboard sent to IAC Bus 1 on channel 16.
In the Cue List, the first cue is a Reset cue which sets the level of the main level control of the audio output patch to its preset level of 0. We’ll be using the /live OSC message to control this level, which means we won’t be making level changes which are saved with the workspace.
The Light cue syncs the Light Dashboard slider to this level.
A Script cue opens the Light Dashboard:
tell application "QLab" to tell front workspace to set dashboard visibility of current light dashboard to trueA Timeline Group cue is used as a test source for the multiple outputs. This Group contains Audio cues with stems of a music cue routed to different outputs. These can be seen on the output meters in the top right of the screen recording.
When the “Main Volume” slider is adjusted in the Light Dashboard, the handle of the slider moves shows the current level and the audio output level changes. The thin yellow line on the slider indicates the set level of the slider before the live levels are adjusted.
When the fader on the hardware controller is moved, sending MIDI control change 9 values on channel 11, the slider in the Light Dashboard follows along.
So far, so simple, but you may wonder how the Light Dashboard sends OSC to the main level control in the audio output patch when it can only output MIDI.
This is achieved with a technique first discussed in the chapter entitled Mind-Bending MIDI Binding.
A separate cue list named MIDI to OSC in this workspace contains 128 OSC cues. Each of these cues sends the OSC message /settings/audio/patch/MainOutput/level/0/0/live with a decibel argument calculated from the MIDI CC value that triggers it. This functions as a look-up table for the Midi CC value and the corresponding level in decibels.
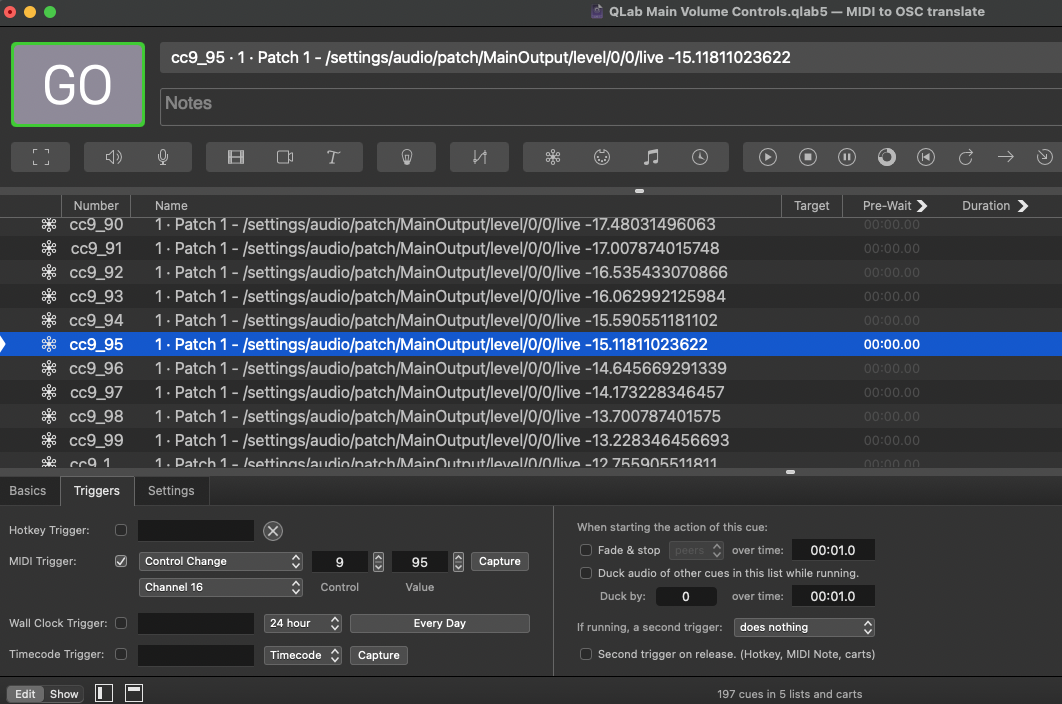
The Network cue triggered by control change 9 with a value of 0 sends the OSC message
/settings/audio/patch/MainOutput/level/0/0/live -60.0
The Network cue triggered by control change 9 with a value of 64 sends the OSC message
/settings/audio/patch/MainOutput/level/0/0/live -29.763779527559
The Network cue triggered by control change 9 with a value of 127 sends the OSC message
/settings/audio/patch/MainOutput/level/0/0/live 0
This cue list is automatically generated by this script:
--Generate MIDI triggered Network cues to control Main Volume from Light Dashboard
--Set up network cue template trigger MIDI channel to Ch16
--Play cue GEN

--Set Up Parameters
set theNumberOfControllers to 1
set theFirstCC to 9
-----Don't change anything below this line----------------------------
set theRange to 60 --required dB range of fader
set theInc to theRange / 127


tell application id "com.figure53.QLab.5" to tell front workspace
   repeat with ccnn from theFirstCC to (theFirstCC + (theNumberOfControllers - 1))
   	repeat with cc from 0 to 127
   		make type "Network"
   		set theselected to last item of (the selected as list)
   		set the q number of theselected to "cc" & ccnn & "_" & cc
   		set the midi command of theselected to control_change
   		set the midi byte one of theselected to ccnn
   		set the midi byte two of theselected to cc
   		set the midi trigger of theselected to enabled
   		set the parameter values of theselected to "/settings/audio/patch/MainOutput/level/0/0/live " & (-theRange + (cc * 20 * theInc) / 20 as string)
   	end repeat
   end repeat
end tell
The Script cue with this script should be disarmed after generating the list to guard against accidental operation.
Here’s a screen recording of the list being generated.
Apart from the fact that the Light Dashboard, even at its smallest size, is quite large and has a lot of buttons that aren’t relevant to this usage, this method works well and has the virtue of being achieved entirely within QLab without any third-party software.
Method 2 - Volume Control Cart
An alternative control method entirely within QLab can be devised using a cart.
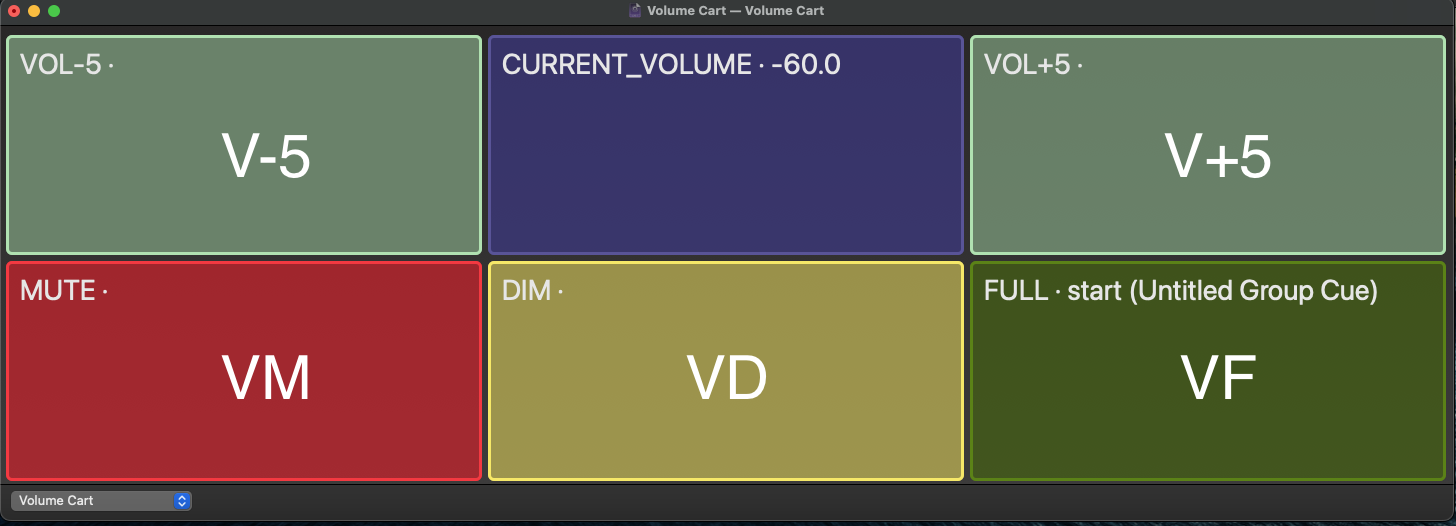
This doesn’t allow for continuous volume changes but works more like a monitor DIM and MUTE system on a recording console with the addition of + and - buttons which can change the level from the MUTE, DIM, and FULL preset levels in 5 dB increments.
The cart comprises five Start cues, which target Timeline Group cues in another cue list named “Volume OSC”. This allows each button to initiate multiple OSC messages. The cart also contains a Memo Cue whose name is used to display the current main volume level.
Here’s the cart overlaid with the cue targets for each button:
And here’s the Volume OSC Cue List.
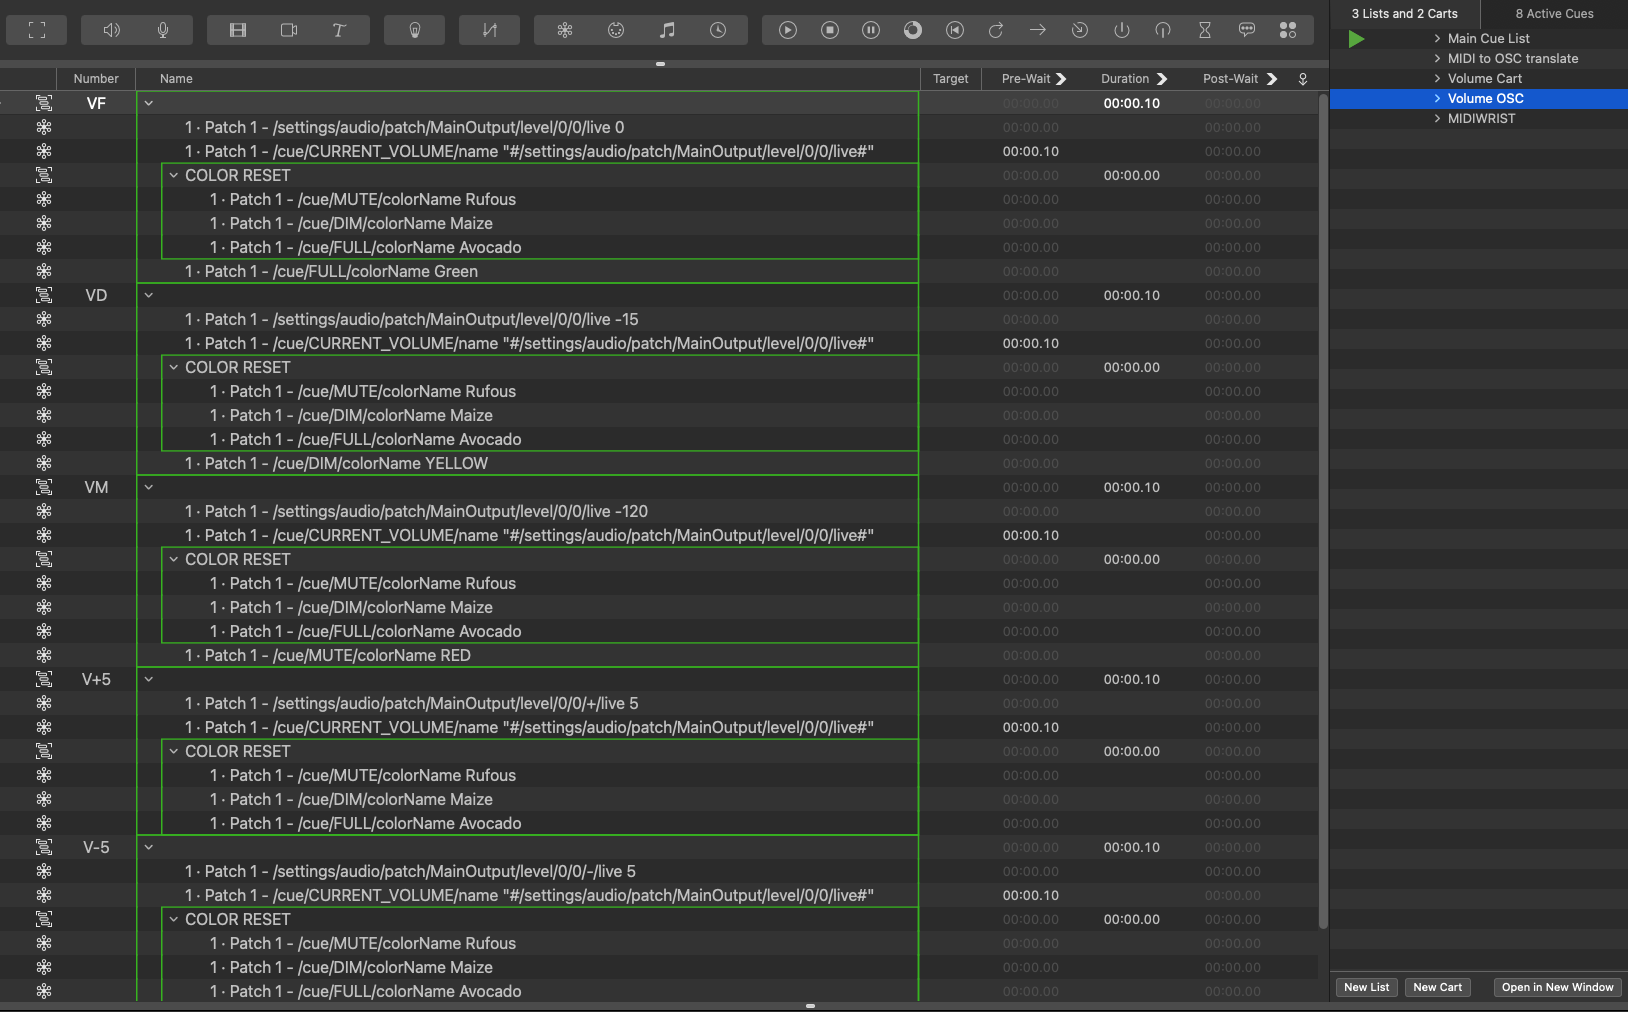
Cue “VF” sets the main output volume to 0. After a short delay, it sets the name of the cue numbered “CURRENT_VOLUME” to a value obtained by querying the live level of the audio output patch’s main level. It then resets three of the cues in the cart to their standard non-highlight colors and then highlights the FULL cue in bright green.
Cue “VD” sets the main output volume to -15 and, as before, sets the name of the cue numbered “CURRENT_VOLUME” to the live level of the audio output patch’s main level, resets the cues to their standard non-highlight colors, and then highlights the DIM cue in bright yellow.
Cue “VD” sets the main output volume to -120 and, as before, sets the name of the cue numbered “CURRENT_VOLUME” to the live level of the audio output patch’s main level, resets the cues to their standard non-highlight colors, and then highlights the MUTE button in bright red.
Cue “V+5” increases the main output volume by 5 dB, displays the new level, and resets the cues’ colors so none is highlighted.
Cue “V-5” decreases the main output volume by 5 dB, displays the new level, and resets the cues’ colors so none is highlighted.
You could easily modify the method outlined above just to use six preset levels and highlight the last selected if you prefer.
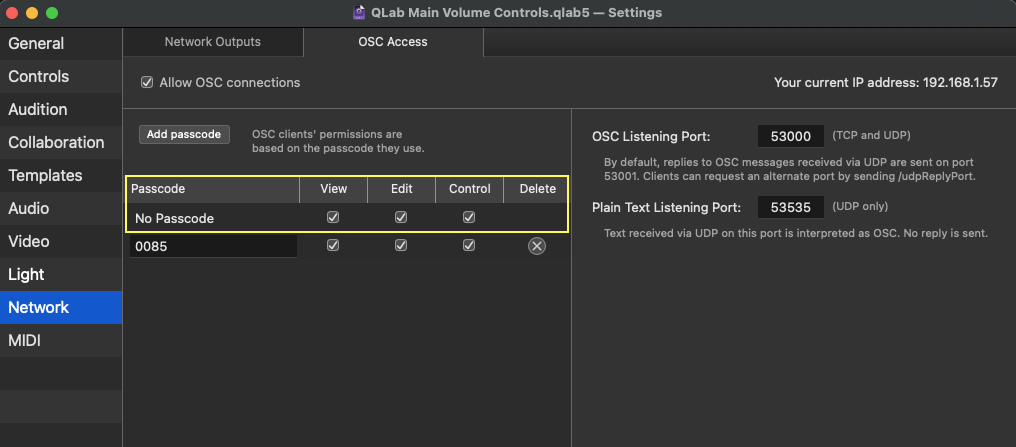
Note: The remaining examples in this chapter require QLab to receive OSC data from other programs which can’t send passcodes easily. To use these methods, a “No Passcode” route should be established in Workspace Settings → Network → OSC Access like this:
Method 3 - TouchOSC
This method controls the main level of the audio output patch using a fader in a TouchOSC layout. As above, this fader is also programmed to be controlled by the hardware fader using MIDI CC 9.
One thing about TouchOSC that may be considered less than ideal is that it always opens in editor mode. To get around this, a Script cue can be used to open a TouchOSC layout stored in the same folder as the workspace and then automatically switch it to kiosk mode using the ⌘E keystroke. Here’s the script:
--open a TouchOSC Layout in Kiosk Mode.
tell application id "com.figure53.QLab.5" to tell front workspace to set workspacePath to path
tell application "System Events" to set sharedPath to ((path of container of file workspacePath) & "vol.tosc") as alias
tell application "TouchOSC"
	if application "TouchOSC" is not running then
		ignoring application responses
			activate
			open sharedPath
			repeat while application "TouchOSC" is not running
				delay 0.1
			end repeat
		end ignoring
		delay 0.5
		activate
		tell application "System Events" to keystroke "e" using command down
	end if
end tell
You may get an error message saying that osascript is not permitted to send keystrokes. The fix is to grant accessibility access to QLab. In older versions of macOS, you do this in System Preferences → Security & Privacy → Accessibility:

In more recent versions of macOS, you do it in System Settings → Privacy & Security → Accessibility:
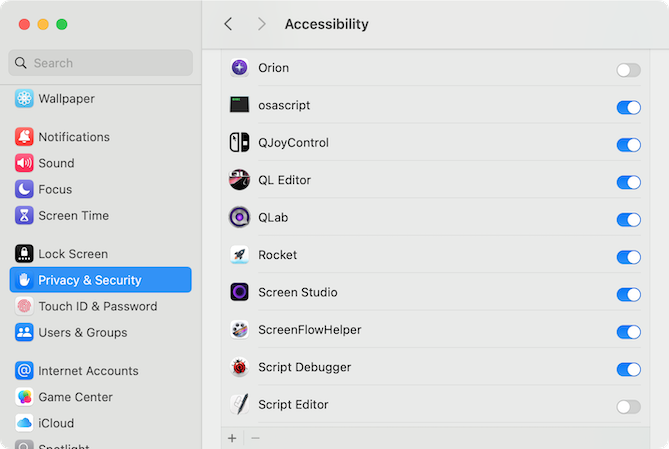
You may also need to give accessibility permission to osascript, as shown in the second screenshot.
In TouchOSC, the network is configured by entering editor mode (by pressing the dot in the top right of the window), and pressing the chain link icon. Since we are running TouchOSC on the same computer as QLab, we make a UDP connection to 127.0.0.1 (which is the IP address that means “this computer”) on port 53000 (which is QLab’s default incoming OSC port.) We also set the receive port to receive OSC from QLab on port 8000.

Here’s the TouchOSC layout:
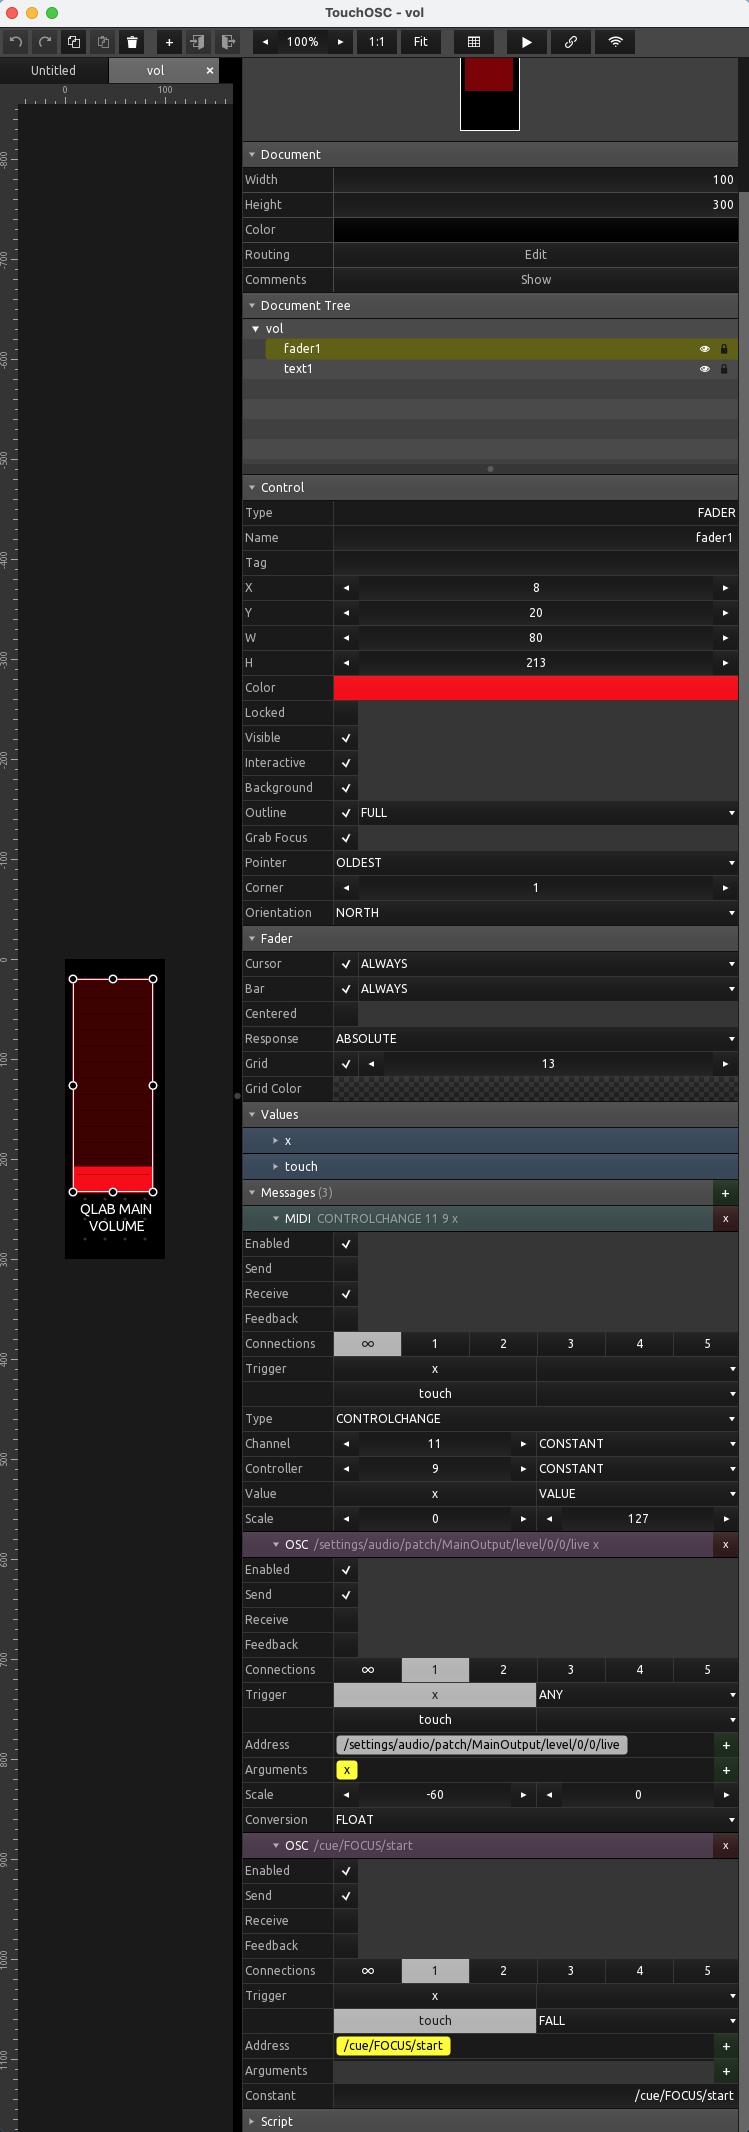
The Fader object is set to receive Control Change 9 on MIDI channel 11, and its normalized range of 0 to 1 is scaled to match the incoming MIDI value range of 0 to 127.
Moving the fader generates an x value, normalized from 0 to 1, which is used in the first OSC message as the argument to the address /settings/audio/patch/MainOutput/level/0/0/live scaled from -60 to 0. This message is sent to QLab whenever the fader moves.
When the fader is released, the touch value changes from 1 to 0, i.e. it falls. The second OSC message is triggered by this fall and sent to QLab: /cue/FOCUS/start.
This starts a Script cue in QLab numbered “FOCUS” which has this script:
tell application id "com.figure53.QLab.5" to tell front workspace to activateThis returns the keyboard focus to QLab so the space bar can be used to trigger subsequent cues.
Again, the minimum size of the TouchOSC window is far bigger than the document dimensions set in the TouchOSC layout and is wasteful of screen area.
The TouchOSC window has to be active before clicking on the slider will change value, meaning you have to double-click to take control of the slider. If you click anywhere in the window other than on the slider, the keyboard focus changes to TouchOSC, and until there is a mouse release on the slider or QLab is clicked on to make it frontmost, it will remain there. Nothing about this is ideal.
Fortunately, TouchOSC can be run remotely on another device such as a phone or tablet. This allows remote volume control and avoids the problems outlined above.
Method 4 - Kiosc
Kiosc is a more rudimentary controller which has no MIDI capabilities. It also has a large minimum window size. This is smaller than the minimum document size that can be set in Kiosc Editor, and the graphics do not scale well to this smaller size. It also can’t be programmed to return focus to QLab for keyboard entry. It is mainly included in this tutorial for users who are already using Kiosc for other purposes so that they can integrate QLab volume control into these systems. For most people, TouchOSC will be the best control option.
Here’s the Kiosc controller in Kiosc Editor:
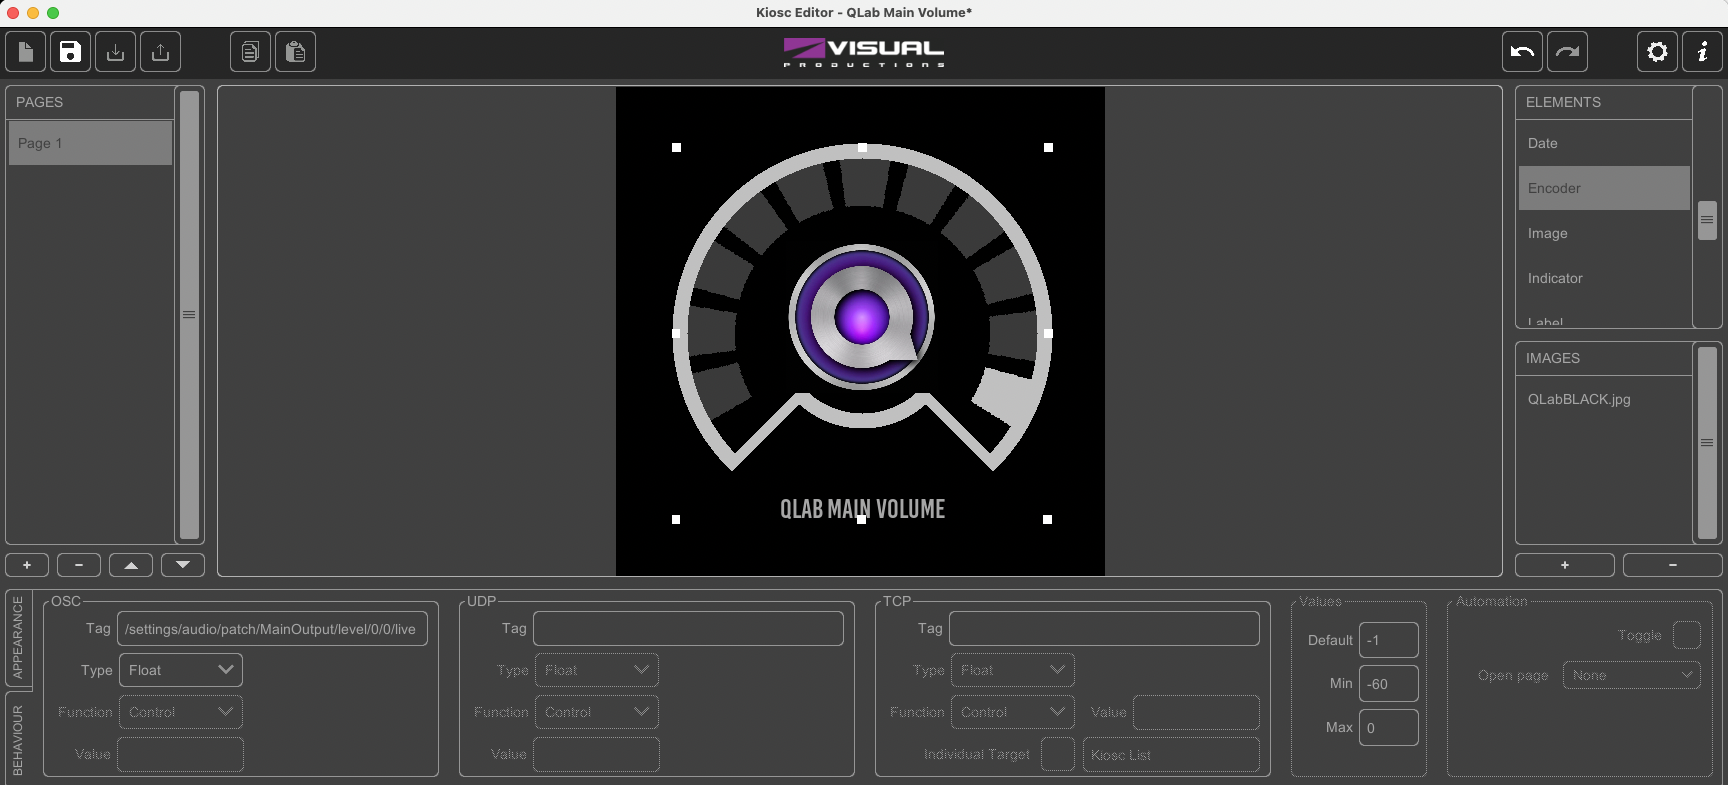
Kiosc doesn’t follow Mac conventions regarding file handling. To open the Kisoc volume controller file in the workspace folder you need to:
- Open Kiosc.
- Click the cog in the top left of the Kiosc window.
- Select File.
- Click the folder icon on that page. This will open the folder where Kiosc expects to find its programs.
- Copy the file called “QLab Main Volume.kiosc” from the workspace folder to this folder.
- Click on the file in Kiosc.
- Select OSC and add Target
127.0.0.1:53000. - Click the cog again.
Kiosc always opens with the last layout active, so you should only need to do this once.
Method 5 - Volume Control Application made with Vuo
In an attempt to address some of the shortcomings of previous examples, the next controller is built from scratch in Vuo. Vuo is a node-based programming environment ideally suited to solving OSC and MIDI control problems. For this project, a minimal Vuo composition was created with all the options, such as MIDI devices and channels, hard-coded. The project was then saved as a standalone Mac application. If a new version is required for a different hardware setup, the original Vuo file can be quickly modified, and a new app can be saved. This keeps the interface very clean and minimal, as the fader is the only control in the app’s GUI.
Here is the Main Volume Control app in action:
And here’s the Vuo Composition that created it:
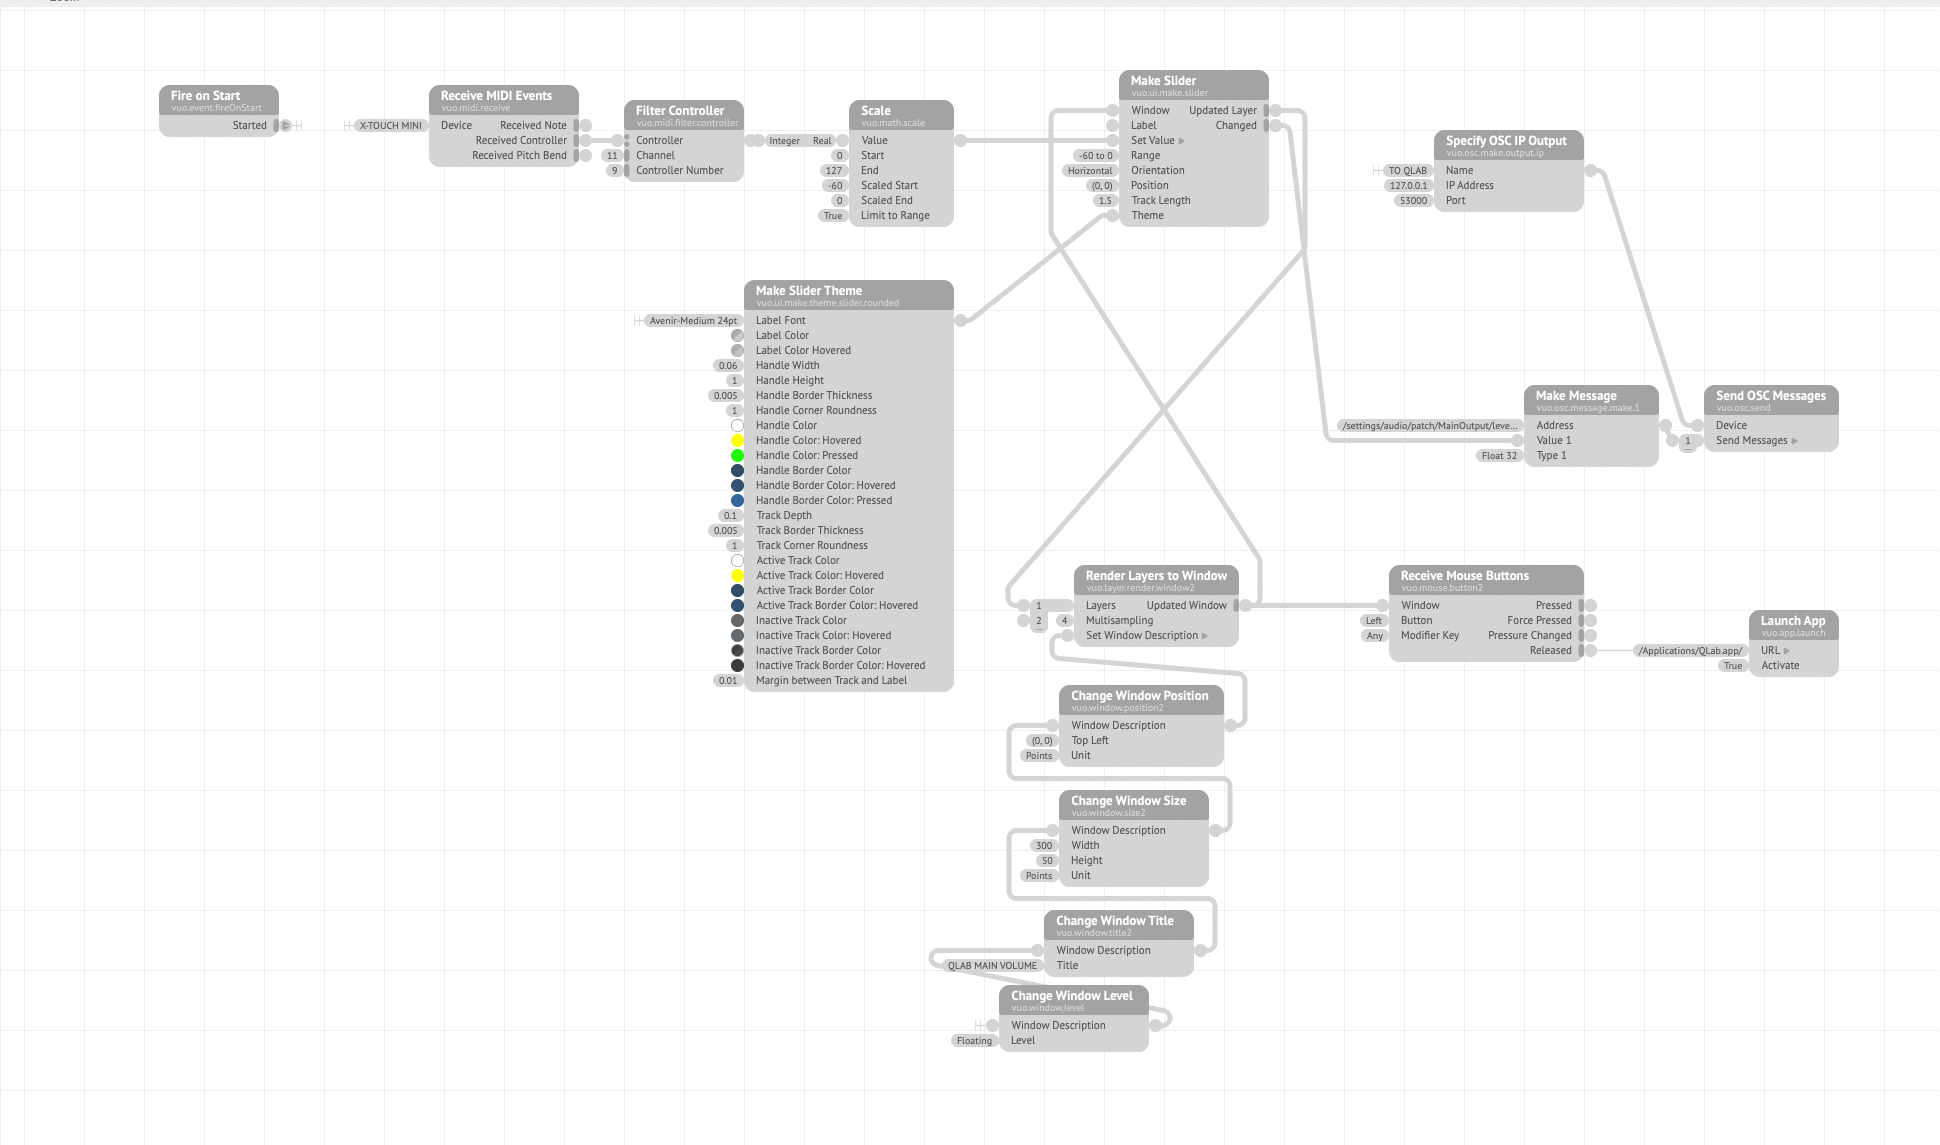
A Receive MIDI Events node is set to receive from an X-Touch Mini device.
It sends any controller data received to a Filter Controller node, which extracts CC 9 data on MIDI channel 11.
The Scale node scales the MIDI values in a range of 0 - 127 to a range of -60 to 0.
This is sent as the value in the Make Slider node.
The Make Slider node can also be driven directly by the slider being dragged onscreen in its window with the mouse. The range of the slider is set to match the scaled MIDI input, i.e. -60 to 0.
The slider’s value is sent to a Make Message node as the argument to the address /settings/audio/patch/MainOutput/level/0/0/live, and the full OSC message is sent to the Send OSC Messages node, which is set by the Specify OSC IP Output node.
One of the great advantages of Vuo is that it doesn’t impose many limits on the dimensions of objects or the windows those objects appear in. The rest of the nodes are concerned with making the most compact and clear interface possible, which can float in front of QLab’s windows.
As a final touch, the release of the mouse button is detected with a Receive Mouse Buttons node fed from the Render Layers To Window node, so that a mouse up in that window sends an event to the Launch App node which makes QLab the frontmost application again, returning keyboard focus to it.
Another advantage of Vuo is that clicking on the slider immediately brings the Vuo app to the foreground, which isn’t the case with TouchOSC or Kiosc.
Note: Only the full version of Vuo can export standalone applications. Those using the free community edition will have to run the composition from the Vuo Editor.
Vuo by Kosada in Athens, Ohio.
Kiosc by Visual Productions BV.
Scarborough Fair, traditional. Arranged and recorded by Mic Pool, © all rights reserved.