Level Playing Field
Note: This chapter relies on an external tool called
r128x-cliwhich comes in several versions, some of which can be difficult to install. The version of this tool that is included in the two downloadable examples is known to work on most Macs and is very straightforward to install. The version maintained on GitHub by ShikiSuen is a more complex package with a GUI and is not compatible with this tutorial.Prior to September 2024, the downloadable example from this chapter did not work on Macs set to use the comma as the decimal separator. This is now fixed. The new method works in both QLab 4 and QLab 5, and downloads are provided for each version.
Some QLab users often find themselves having to assemble cue lists from audio files supplied at the last minute, with wildly differing levels. Throwing those audio files into QLab without having the time to check levels manually can result in audibility problems, and conceivably, hearing damage.
This tutorial demonstrates a method to analyze a set of selected cues in a QLab workspace and adjust their main levels in the Audio Levels inspector tab, so that they all playback at a subjectively similar volume.
This is useful for any situation where you want to normalize a set of cues to a standard playback level.
There are many ways of defining the loudness of an audio file but one of the best, and the one used in this tutorial, is the European Broadcasting Union’s R128 standard which defines the LUFS measurement system. LUFS stands for Loudness Units Full Scale, which is a carefully developed method which measures the loudness of an audio signal taking into consideration many aspects of the physiology of human hearing. The goal of the LUFS standard is to ensure that tracks with an equal LUFS measurement will be perceived subjectively as being at the same volume. The R128 standard both defines this unit, and outlines its use in broadcast audio.
To achieve the goal of matching Audio cues’ levels to the R128 standard entirely within a QLab workspace, some way is needed of expanding the capabilities of QLab to analyze files to calculate LUFS. This project uses a command line tool that can easily be installed and then utilized within an AppleScript in a QLab Script cue.
The analyzer is called r128x, and it was written by Audionuma and released under a GNU General Public License. ShikiSuen now maintains it, but the new version is incompatible with the methods used in this chapter. A compiled and tested copy of the original plain r128x-cli is included in the example workspace download, and you should use this version.
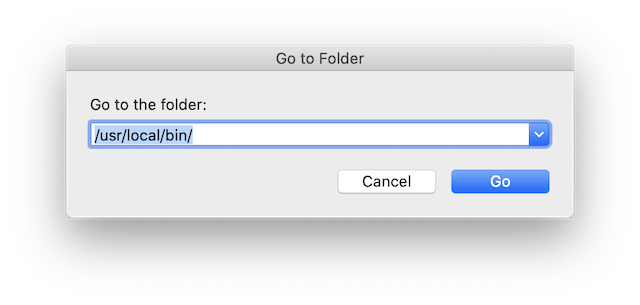
To use it, move the file named r128x-cli from the download into the folder /usr/local/bin, which you can easily locate by choosing Go to Folder… from the Go menu in the Finder.
If your Mac has an Apple Silicon processor (M1, M2, etc…) you need the Rosetta 2 translator installed. Here is Apple’s article explaining Rosetta 2 and how to install it.
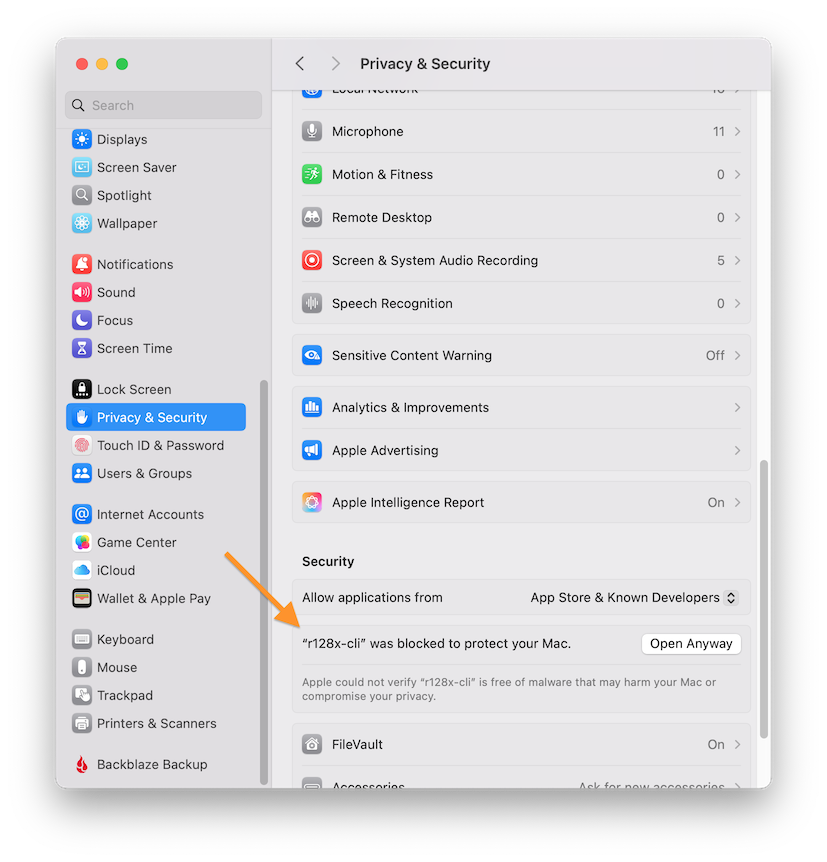
Once you’ve installed r128x-cli into the /usr/local/bin folder, right-click (or two-finger-click, or control-click) on it and select Open. You’ll be presented with a rather frightening warning that the program could be malicious; should it be deleted? Say NO, then go to System Settings → Privacy and Security. Towards the bottom, you’ll see a notice that r128x-cli was blocked to protect your Mac.
Click “Open Anyway” and then confirm again that yes, you really really do want to use this program.
After you do this process once, your Mac will regard this file as safe to run, and QLab will be able to use it without any further intervention from you.
Here it is in action (using QLab 5 on an Apple Silicon Mac running macOS Monterey):
In the video you can see four Audio cues with their main levels set to -10.
While this video was being created, an A-weighted SPL meter measuring the actual output of QLab was on a camera shown in the Audition Window.
The Piano cue is metering in the bottom half of the meter, around 60 to 70 dBA.
The Announcement cue is metering in the top half of the meter, around 70 to 76 dBA.
The Disco cue is off the top of the scale.
The Brass Band cue is so quiet it doesn’t even register on the meter.
When the script is run (hotkey ⌃L in the example), the selected Audio cues are analyzed and each cue’s main level is adjusted so that all cues have a subjectively similar loudness.
When the cues are played again, they are, indeed, all at the same volume.
How it works:
Here’s the AppleScript inside the Script cue:
--2024 version usable in regions all regions regardless of decomal separator in use.
set theReferenceLevel to -24 --set desired LUFS level
set thefaderLevel to -10 --set the main fader level to your preferred output level for cues with an LUFS at the reference level
set currentTIDs to AppleScript's text item delimiters

tell application id "com.figure53.QLab.4" to tell front workspace
    display dialog "WARNING: This will change the main levels of all selected cues" & return & return & "A dialog will signal when the level setting is complete." & return & return & "PROCEED?"
    try
        set theselected to the selected as list
        if (count of items of theselected) > 0 then
            repeat with eachcue in theselected
                if q type of eachcue is "audio" then
                    set currentFileTarget to quoted form of POSIX path of (file target of eachcue as alias)
                    set theLUFS to (do shell script "/usr/local/bin/r128x-cli" & " " & currentFileTarget as string)
                    --parse theLUFS to extract the actual LUFS from a very long string
                    --replace every occurrence of "+" with "plus"
                    set AppleScript's text item delimiters to "+"
                    set the item_list to every text item of theLUFS
                    set AppleScript's text item delimiters to "plus"
                    set theLUFS to the item_list as string
                    --replace every occurrence of "-" with "minus"
                    set AppleScript's text item delimiters to "-"
                    set the item_list to every text item of theLUFS
                    set AppleScript's text item delimiters to "minus"
                    set theLUFS to the item_list as string
                    set AppleScript's text item delimiters to currentTIDs
                    --get the third word from the end
                    set the theLUFS to word -3 of theLUFS
                    --replace the string "minus" in theLUFS with "-"
                    if character 1 of theLUFS = "m" then
                        set theLUFS to "-" & characters 6 thru -1 of theLUFS
                    else
                        --replace the string "plus" in theLUFS with "+"
                        set theLUFS to "+" & characters 5 thru -1 of theLUFS
                    end if
                    -- check for decimal localisation and convert to comma separator if neccesary
                    set o to (offset of "." in theLUFS)
                    if ((o > 0) and (0.0 as text is "0,0")) then set theLUFS to (text 1 thru (o - 1) of theLUFS & "," & text (o + 1) thru -1 of theLUFS)
                    set theadjustment to (theReferenceLevel - theLUFS) + thefaderLevel
                    set the notes of eachcue to theLUFS & " " & theadjustment
                    eachcue setLevel row 0 column 0 db theadjustment
                end if
            end repeat
            display dialog "Level Setting Complete" buttons "OK" default button "OK"
        end if
    end try
end tell
At the top of the script, two variables are set. The first is the target LUFS, which in the demo is set to -24 LUFS, which is a standard broadcast level and a good starting point.
Since it’s possible that some cues will already be at the target LUFS, the second variable lets you set the main level control which will represent that loudness.
So, in the example above, if you have a cue whose audio target file has a LUFS of -24, that cue will replay at your preferred volume when the main level control is at -10. A file with an LUFS of -34 would require a boost of +10 dB to play at your preferred volume, so the fader would be at 0 dB. A file with an LUFS of -14 would require a 10 dB cut, so the fader would be at -20 dB.
It’s important not to set the value of faderLevel too high. If a quiet cue required a 20 dB boost and faderLevel was set to -10, then the main level control of that quiet cue would need be set to +10 to achieve the boost. If faderLevel was set to -5, though, the required main level would be +15. Since the default maximum level in QLab is +12, this would not work correctly in most workspaces.
The script then records the current value of AppleScript’s text delimiters. Text delimiters are the characters that AppleScript uses to separate text items in strings. We are going to change the text delimiter in a moment, and it’s good practice before changing it to get its current value and store it so you can change it back when you have finished.
A warning is displayed that the script will change the levels of selected cues, to give an opportunity to cancel the process if the script has been triggered accidentally.
The script then checks that some Audio cues have been selected and then does the following for each selected cue:
- Gets the full file path of the target audio file.
- Runs a shell script which calls
r128x-clito analyze that file and return a LUFS value. - Reformats the text returned by
r128x-cli. This requires some discussion.
r128x-cli returns the LUFS in a long string, with lots of other information we don’t need, as it normally prints its results in a terminal window. The string even includes progress indicators as the file is analyzed. The string output for printing looks something like this:
FILE                                       IL (LUFS)    LRA (LU)  MAXTP (dBTP)
Brick Walled Loud Disco.mp3                     -6.3        +0.2          +1.8
All that is required for this application is the LUFS value, i.e. -6.3. In theory this should be easy to extract as it is the third word from the end of the string. However a couple of “features” of AppleScript prevent it being as straightforward as that.
AppleScript treats a ”+” character at the beginning of a word as a separate word, and erases any ”-” character at the beginning of a word. For our purposes, this is less than helpful.
By manipulating AppleScript’s text item delimiters, we can perform a find-and-replace to change every minus sign to the word “minus” and every plus sign to the word “plus”. Once we do that, the value we want is indeed the third word from the end, which in AppleScript terminology is word -3. Once we copy that word, we just change the word “minus” back to the symbol ”-” and we have an LUFS value with the correct sign which can be read as a number.
Additional code determines which form of decimal separator (comma or period) is currently in use by testing whether 0.0 as text is “0,0” and changing the point separator to comma if the result is true.
The script then sets the main level of the cue by taking the LUFS reference level (set at the top of the script,) subtracting the measured LUFS, and then adding the fader level (also set at the top of the script.)
Finally, the script informs the user that all the audio files have been analyzed, and their levels set. The analysis and level setting is reasonably fast, but if you select a lot of cues you should be prepared to wait a bit. AppleScript has never won any awards for speed.
Chapter Image: Wikimedia Commons public domain.
Piano music: The Open Goldberg Variations, which is a project led by pianist Kimiko Ishizaka, working with MuseScore.com, to create a public domain recording and score of J.S. Bach’s main piece, Die Goldberg Variationen (BWV 988).
Disco music: Ether Disco by Kevin MacLeod. Licensed under Creative Commons By Attribution 3.0.
Brass band music: public domain.
Spoken word announcement: © Mic Pool, all rights reserved. Not for use outside this demo.


