Lemur Is Dead!
This chapter has been updated in 2024 to reflect the now historical status of the Lemur hardware and software.
Lemur started life in 2002 as a touchscreen hardware device called the Lemur Jazz Mutant, which cost thousands of dollars. In 2010 production of the hardware version of Lemur was discontinued. Lemur was resurrected by the software company Liine in the form of an app that ran on an iOS or Android device, which provided even greater functionality than the original controller. In 2022, Liine announced the discontinuation of Lemur and withdrew the app from the online stores.
In 2023 Midi Kinetics acquired Lemur but has yet to release a new version of the product. Therefore, this chapter is currently an archive for users who still have existing systems running Lemur. If and when a new version of Lemur is released, the chapter will be revised.
In the meantime, the functionality of the projects featured in this chapter has, as far as possible, been recreated (and improved upon!) using a combination of the new TouchOSC software and new features in QLab 5 in these chapters:
The new version of TouchOSC released in 2021 has many of the capabilities of Lemur, but there are several features of Lemur, such as multi balls and the advanced physics engine, which do not have a direct replacement in any other currently available software.
The original Lemur and Lemur 2 chapters are presented here for the historical record, and for anyone who still has access to the Lemur or Lemur app.
Lemur - Starting Down The OSC Rabbit Hole
If you are familiar with constructing controls on tablets (or phones) using the original version of TouchOSC, you may have been frustrated by some of its limitations.
Lemur is a more advanced type of programmable controller for tablets that, although more complex than the original version of TouchOSC, has some significant advantages:
- Objects in Lemur can output OSC or MIDI only on certain “state changes,” so, for example, they can send a message when value X goes from 0 to a positive number, but not when value X goes from a positive number to 0. This avoids the double trigger problem in the original version ofTouchOSC when a message is sent on both the press and the release of a button.
- Lemur contains a scripting language, which means it can offer far more functionality than just simply sending a single OSC message associated with each on-screen control.
- There is a greater range of objects including some which operate using physics modeling like bouncing or friction.
- The editor app syncs with the tablet live, rather than requiring a manual refresh. All changes to the programming are reflected almost immediately on the tablet.
This example tutorial constructs a physics-based auto quad-panner to control the crosspoint matrix in an Audio cue in QLab. Here’s it is in action, best viewed full screen:
What’s Going On Here
Because the values shown in QLab’s crosspoints do not update continuously, the thing to watch are the level meters in the cue outputs. The video uses a sine wave as the target of the Audio cue so that you can see what’s happening as clearly as possible.
The four sliders on the left of the Lemur controller send OSC to QLab to control the levels of the first four crosspoints in row 1 of the Audio cue’s level matrix. The target here is a mono recording, so only row 1 is visible.
Below the faders are text fields showing a readout of each fader’s current level.
In the center of the screen is a Multiball object. This is a two dimensional control pad that contains a physics engine allowing up to 10 “balls” to bounce around within its bounds. The rules of the physics engine are adjustable.
Below that is a switch which enables the physics engine (“Motion” mode) or disables it (“Manual/LFO” mode.)
A fader across the top of the Multiball object controls the speed of the ball when in Motion mode.
In Motion mode, you can throw the ball by dragging and releasing it. It will bounce around the rectangle forever at the release velocity, which can be modified using the speed fader above.
In Manual/LFO mode, the ball can be dragged around the window and remains where it is when you lift your finger. In this mode, the speed fader adjusts the drag against the ball. Set it higher for faster response, or lower for smoother response.
If you tap inside the rectangle but not on the ball, the ball will move to where you’ve tapped.
When in Manual mode, the LFO (low frequency oscillator) can be switched on. This allows the ball to be driven by a sine wave generator, with variable frequencies for the x and y axis set by the two knobs on the right of the controller. This allows complex but regularly repeating pan patterns.
How It Works
While this tutorial produces a quad panner that is usable, the main purpose of this chapter is to introduce some of Lemur’s programming possibilities. If you are mathematically inclined, you will be able to improve many aspects of the project such as introducing pan laws, other LFO shapes, and so on.
Before starting this tutorial, we recommend a quick skim of the Lemur manual and/or a browse through the Lemur tutorial videos](https://liine.net/en/downloads/lemur).
The QLab Workspace
Here is the QLab workspace we are going to control:
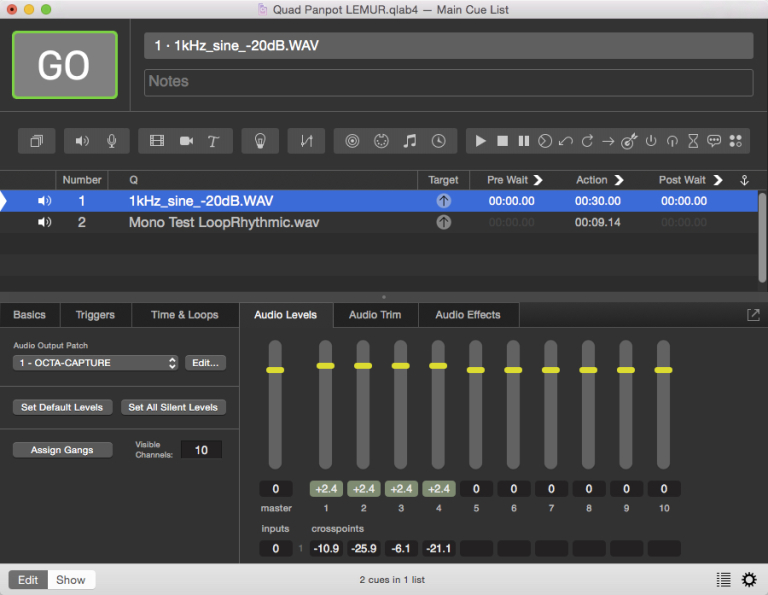
The audio cue has a mono file as its target which is sent to cue outputs 1 through 4. You can control the overall level in QLab using the sliders, but any changes you make to the crosspoints will be overwritten by Lemur sending OSC messages to control the crosspoints, which is how the quad panning will happen.
Connecting your Mac to Lemur
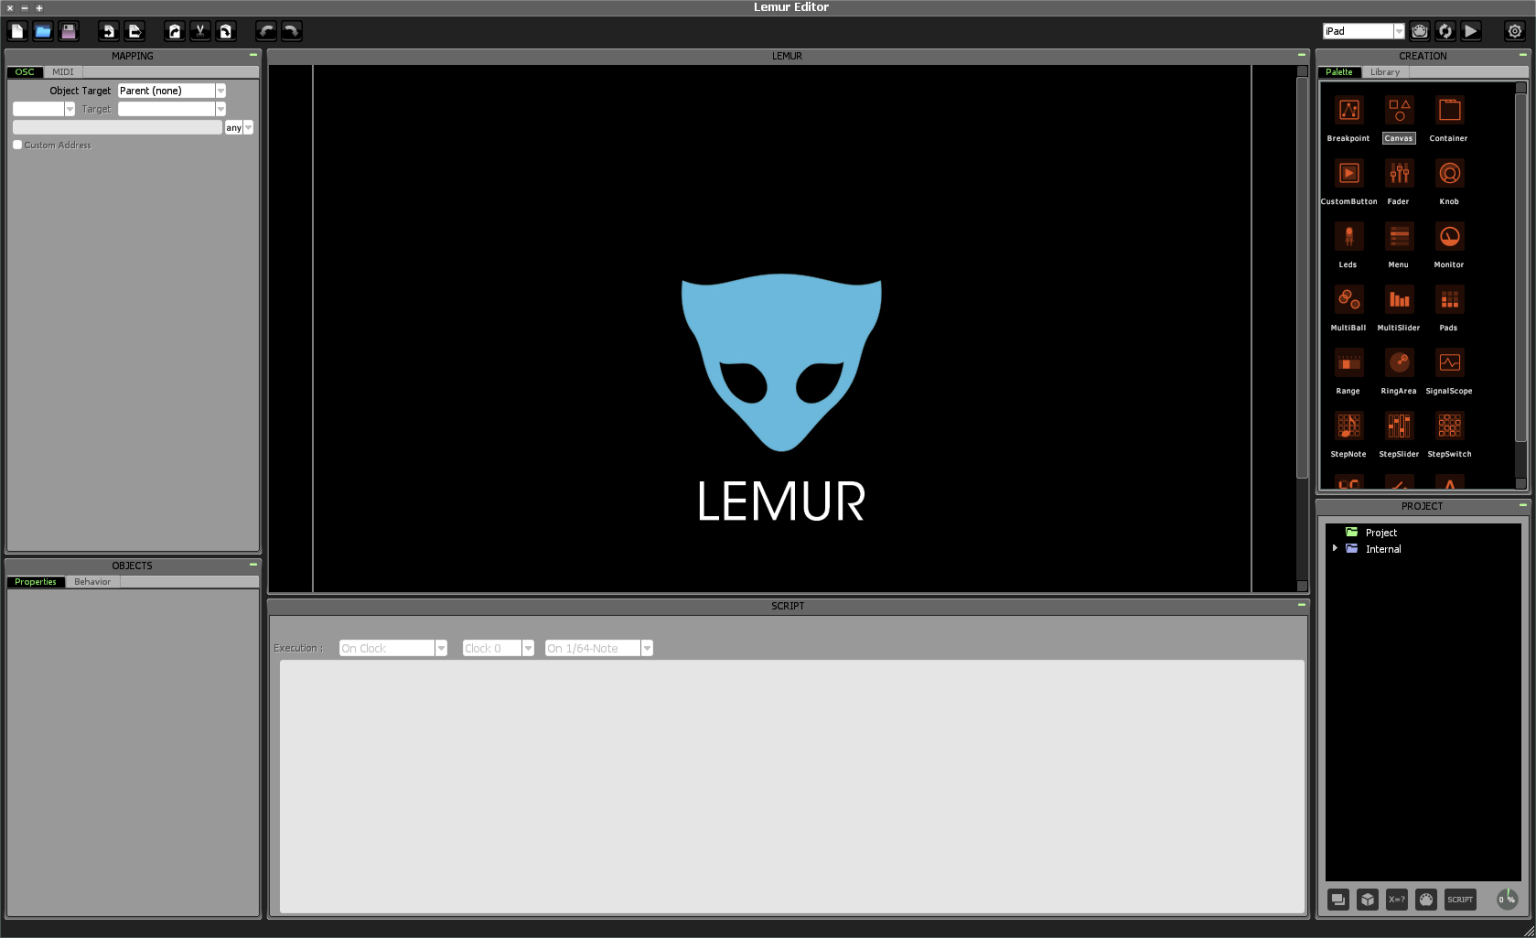
Open Lemur Editor on the Mac and Lemur on your iPad or Android tablet.

Open a new document in Lemur Editor and set the document size to iPad (or the size of your device) using the pop up menu in the top right of the editor window.
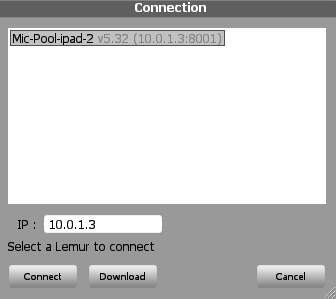
Click the play arrow button in the top right corner of the window to get a list of available devices running Lemur:

Select the iPad you want to sync with and click Connect. Then, click on the circular arrows “sync” button in the top right.
You are now synchronized.
Connecting Lemur to QLab
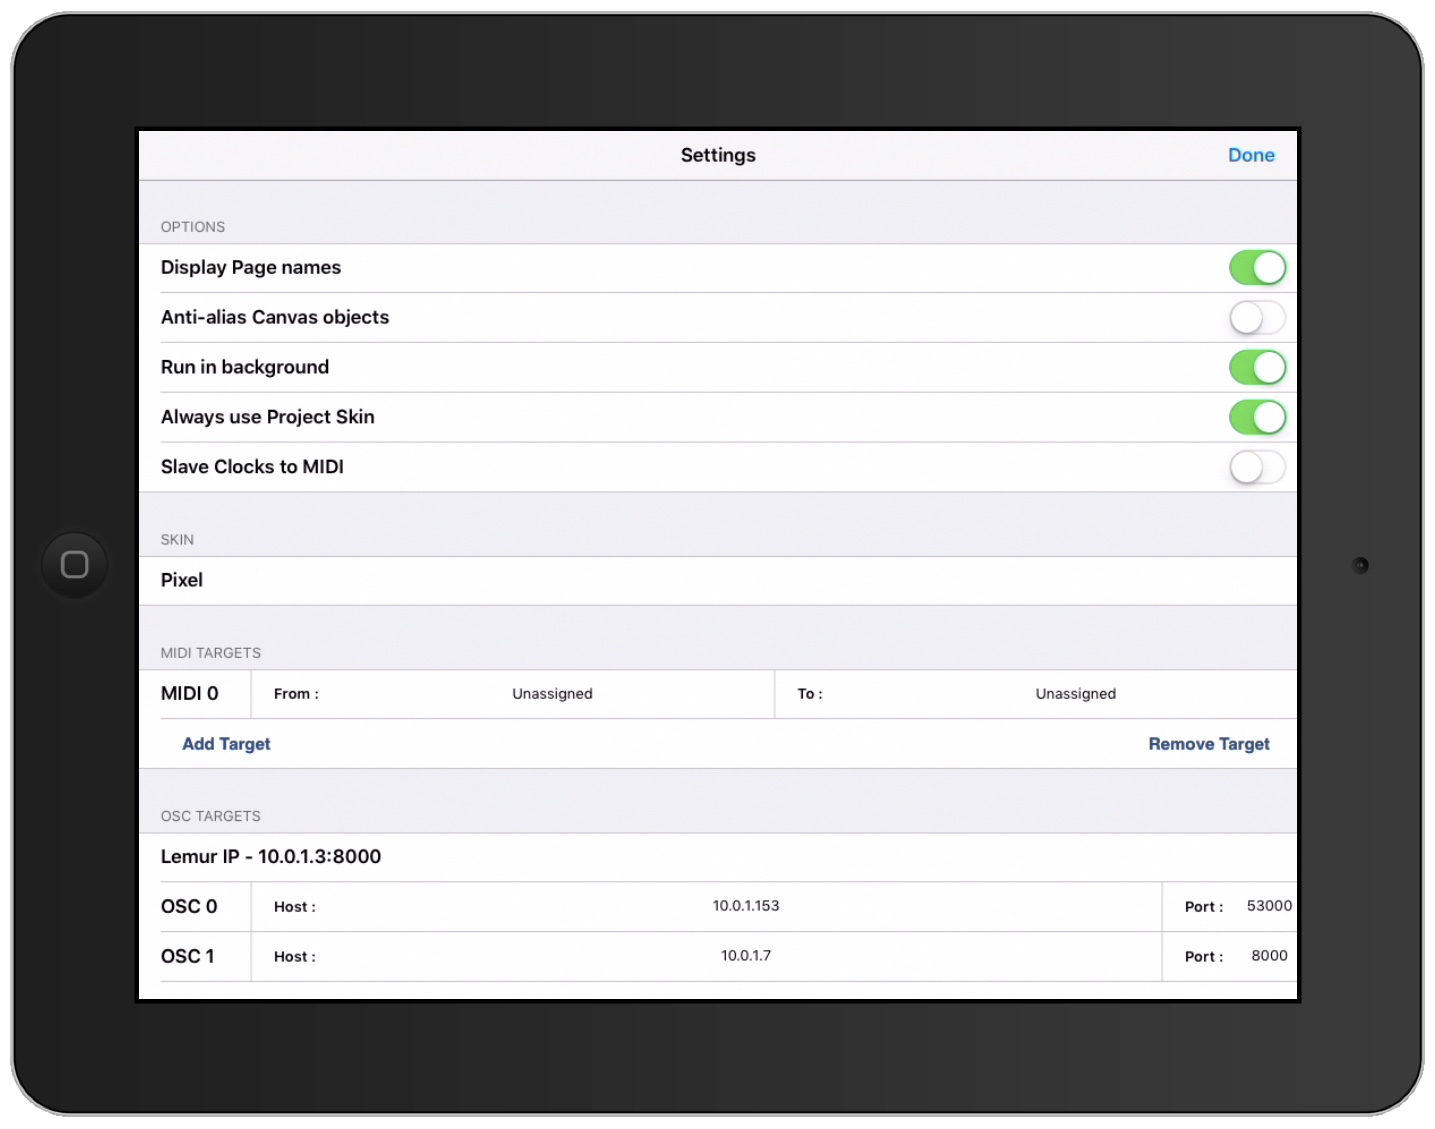
On your tablet, tap on the gear button in the top left corner to get to Settings:
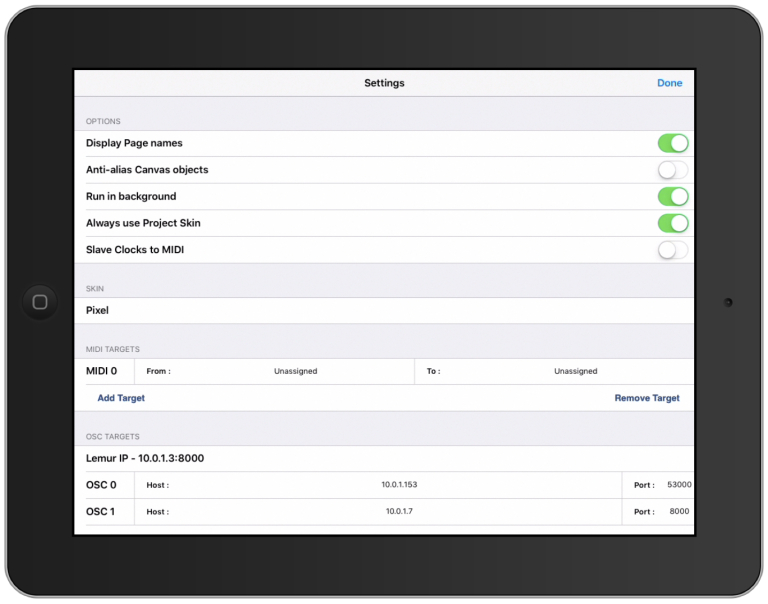
Under OSC Targets, which are analogous to QLab’s network patch destinations, connect OSC 0 to your Mac entering the Mac’s IP address into the Host field and 53000 (the port on which QLab listens for OSC) into the Port field. Then tap Done.
Building the faders
First, we will create four faders and set them up to send OSC messages to control the QLab crosspoints.
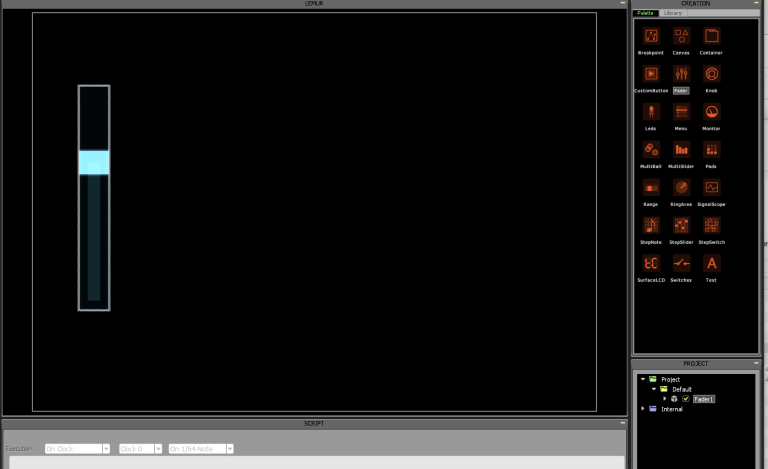
In Lemur Editor on the Mac, drag a fader object from the palette to the left of the Lemur work area.
In the OSC Mapping panel at the top left of the editor, type a custom address into the address area for the x parameter:
/cue/selected/level/1/1
Note that the pop-up menu to the right of the field is set to any which means this will be transmitted any time the value of x changes. Have a look at the other options offered on this menu, but make sure you set it back to any.
This OSC message sets the level of crosspoint [1,1] for the currently selected cue in QLab. If you want the messages to be sent to a specific cue number instead, you can change all references to selected throughout this chapter to the cue number you want to address.
QLab will want levels in the range -60 to 0 (by default), so we type these into the custom scale fields.
All other parameters can be left as the default.
When you finish, the OSC mapping pane should look like this:
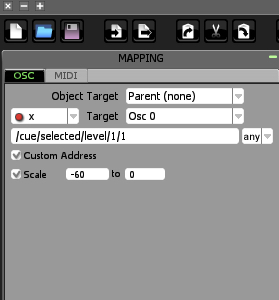
Click anywhere outside the panel to commit the changes.
We can now test this by moving the fader and checking the crosspoint in QLab. QLab only shows the updated value once you stop changing it, so drag the fader and then let go.
We can now copy and paste this fader object three times to make the four faders we need. We also need to edit the custom address fields for each slider so that they each control the correct crosspoint.

- Fader number 2 →
/cue/selected/level/1/2 - Fader number 3 →
/cue/selected/level/1/3 - Fader number 4 →
/cue/selected/level/1/4
Again, check your work by adjusting the faders one at a time, and looking at the cue in QLab to confirm the change.
One all four faders are working, we can label them. Monitor objects can be used to both label the faders and display their values.
Lemur Fader objects produce an OSC output between 0.0 and 1.0, which is why we adjusted the Scale boxes to re-scale that output to a range of -60 to 0. We’ll want the Monitor object to display values scaled to this range as well.
Drag a Monitor object from the palette and place it beneath Fader 1. In the Properties panel in the lower left of the editor, name it slider1.
Set the width to 50, the height to 32, and the font size to 9pt.
Type Fader1.x in the value field to tell it what to display, and set the precision to 1 decimal place.
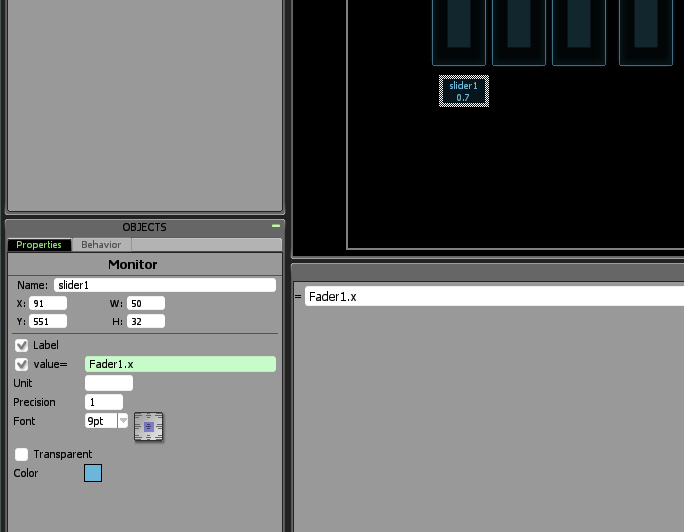
It’s probably worth pointing out at this stage that all names in Lemur are case sensitive. If you type “fader.x” your value will be in red which means it is invalid, and you’d need to work out for yourself that the reason is the lower-case “f” in “fader.x”. Typing “Fader.x” will correct it and the text in the field will turn black indicating a valid value.)
If you move the fader up and down, a value between 0.0 and 1.0 will be displayed.
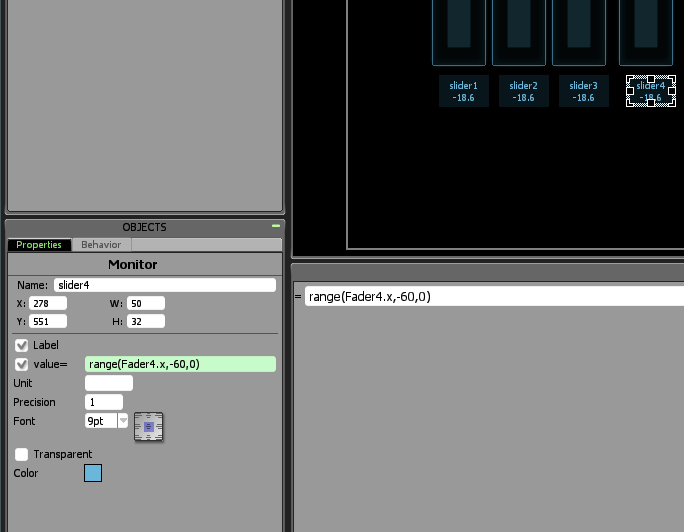
To get the actual value sent to the QLab crosspoint we change the value to
range(Fader1.x,-60,0)
which scales the displayed value to a floating point number (float) between -60.0 and 0.0.
Copy and paste the Monitor object three times to get four Monitors, place them beneath each fader. Lemur Editor will automatically name them slider2, slider3, and slider4.
Edit the value of slider2 to range(Fader2.x,-60,0), and so on for sliders 3 and 4.
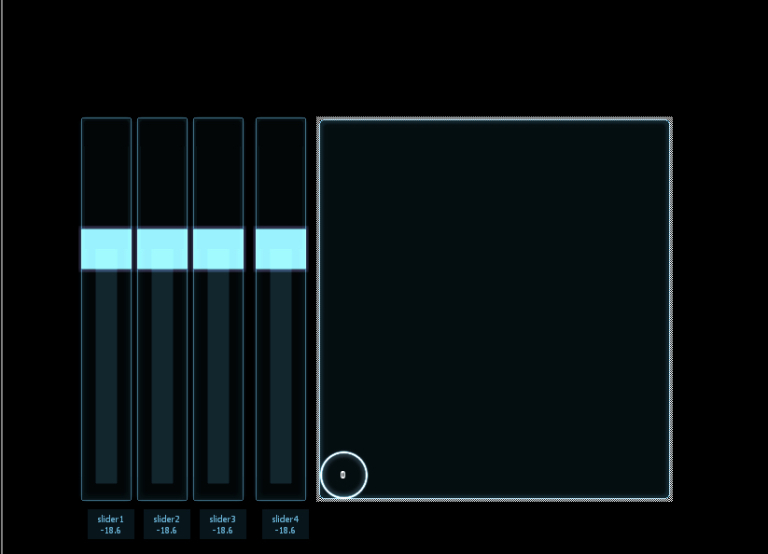
Building the X/Y pad in Lemur
The Multiball object in Lemur is a controller object on steroids! It can have up to ten cursors, represented by balls. These balls have a full physics engine, so their speed, friction, and attraction to the operator’s fingers can all be controlled either directly or through mathematical expressions.
This example just uses a single ball to control four faders for a mono source but is easily expanded to, for instance, four balls to control each track of a four-track wav, by simultaneously sending OSC to sixteen crosspoints.
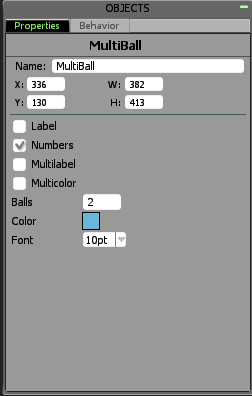
Drag the Multiball object to the center of the editor workspace.
In the Properties panel, set the number of balls to 1. This creates a ball numbered 0. If we add more balls, it might be confusing to have a ball numbered 0 so we are going to change the ball numbering. To do this, increase the number of balls to 2.
We then highlight the project folder in the Project pane in the bottom right of Lemur Editor, and click the Script button at the bottom of the pane.
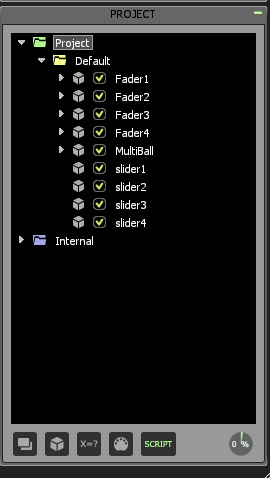
Create a new script called “setup”.
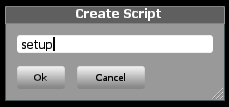
In the Script pane at the bottom center of the window, click on the Execution drop-down menu and choose “On Load”. Then, type the following into the script field:
setattribute(Multiball,'ball_enable',{0,1});
Note that each script line is terminated with a semicolon (;).
This instruction tells Lemur to only enable the second ball, i.e the one labeled 1, and to hide the ball labeled 0.
We now need to link the ball to the four faders.
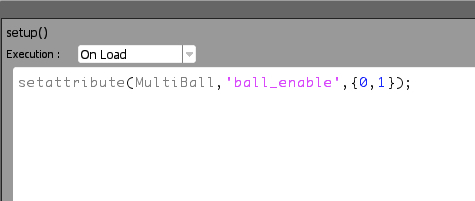
Highlight the Multiball object in the Project pane and click the script button. Make a new script with the name faderDriver which will be nested under the Multiball object. Select the script in the Project window, and set the execution to frame, which means the script will execute 60 times per second. Then, type the following in the script window:
Fader1.x=(1-x[1])*y[1];
Fader2.x=x[1]*y[1];
Fader3.x=(1-x[1])*(1-y[1]);
Fader4.x=x[1]*(1-y[1]);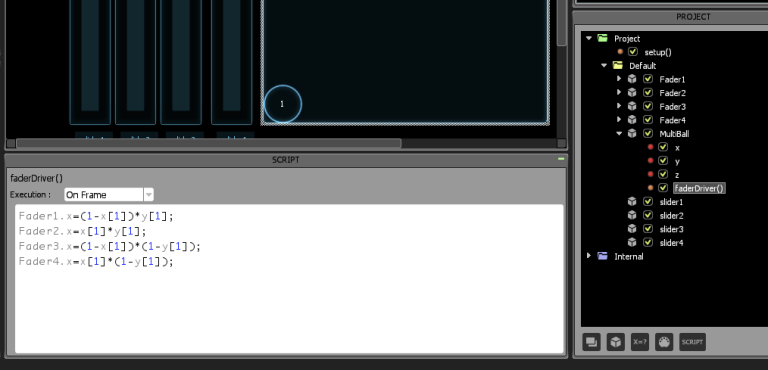
(Note that x[1] in the script means the x-position of ball 1.)
Fader 1, which will control the front left output of QLab, is set to a value which decreases as the ball moves away from the top left of the Multiball object. Remember, the raw output of the object for each axis (x and y) is a value between 0.0 and 1.0. As the ball moves left to right, the x value increases. Subtracting the x value from 1 gives the decreasing value we need. We multiply the x value by the y value. When the ball is at the top we are multiplying by 1 when it is in the middle by .5, and at the bottom by 0, For faders 1 and 2 these are the values we want so we use the y value as is. For the rear outputs (faders 3 and 4) we want the values to increase as the y value decreases so again we subtract the y value from 1.
Remember to click outside the script window to commit the edit.
You can now test that the movement of the ball in the Multiball object is acting on the faders.
Move the ball to each of the corners and you will see that the fader for that corner of the quad pan will be at 0dB, and all others will be at -60dB.
If you move the ball to the center top of the controller window you will see that faders 1 and 2 are both at 30dB. Even allowing for the fact that the sound is coming out of two speakers at that level instead of just one, this will create a significant dip.
If you move the ball to the center of the left-hand side of the object you will see the same level dip between faders 1 and 3. With the ball in the center of the object, the sound comes from all 4 speakers but at a level of -44dB; again a substantial dip.
What we need to do is transform the linear output of the Multiball object to produce a logarithmic relationship with the fader, so that when the ball is between 2 outputs the dip is only around 6dB and when it is in the center the dip is around 12dB. This will result in a reasonably constant output regardless of the position of the ball.
For fader 1 a formula that achieves the above is:
Fader1.x=1+log(**(1-x[1])*y[1]**)/6.4;(Thanks to Rich Walsh for help with this math.)
Replace the contents of the “faderDriver” script in the Multiball object with this:
decl panlawval;
panlawval=6.4;
Fader1.x=1+log((1-x[1])*y[1])/panlawval;
Fader2.x=1+log(x[1]*y[1])/panlawval;
Fader3.x=1+log((1-x[1])*(1-y[1]))/panlawval;
Fader4.x=1+log(x[1]*(1-y[1]))/panlawval;
We have replaced the value 6.4 with a variable panlawval which is declared at the top of the script. Changing the value of this variable will allow fine control of the pan law applied to the controller, without having to type in that new value four times.
Return to the Multiball object and drag the ball around, and you will see that the dip at the center of each edge and in the center of the object is reduced to the level required.
Adding the physics engine
First, drag a Fader object from the palette to the controller. Resize it to be horizontal, and place it above the Multiball object. Name it “speed”.
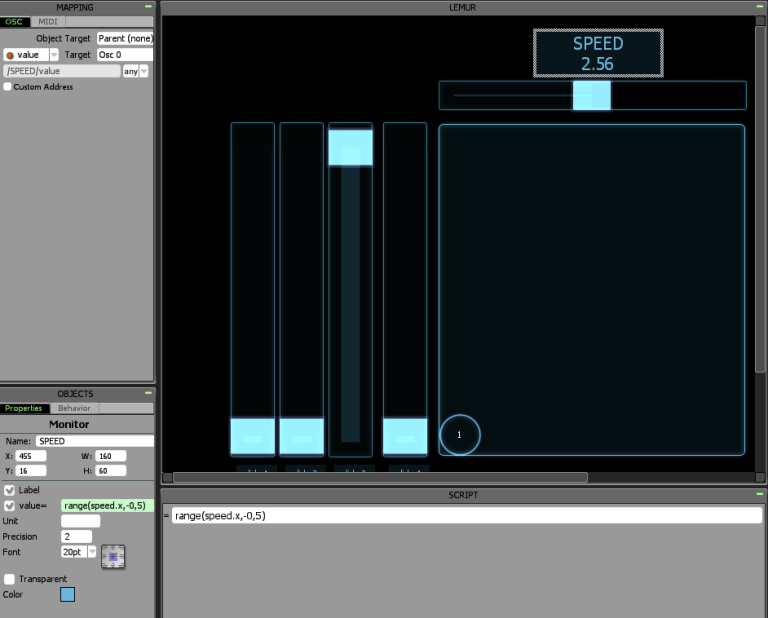
Drag a Monitor object from the palette to a position above the Fader and name it “SPEED”.
In the Script panel, define what SPEED will monitor by typing:
range(speed.x,-0,5)
This displays the value from the “speed” fader with its range scaled between 0.0 and 5.0.
Set the precision of the Monitor object to 2 in the Properties panel.
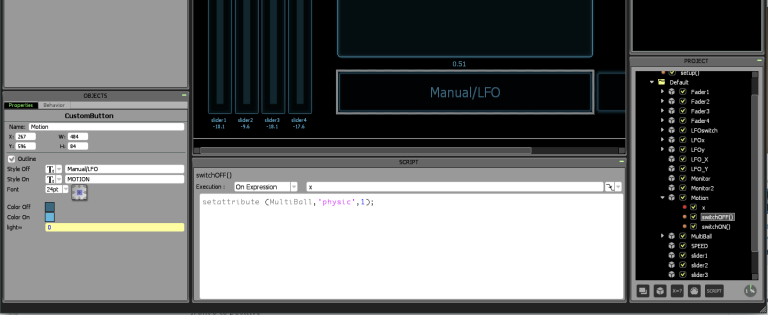
Next, drag a CustomButton object from the palette to the controller. Name it “Motion” and set its behavior to Switch.
In the Properties panel, next to Style Off, enter “Manual/LFO”. Next to Style On, enter “MOTION”.
In the Project panel, select the Multiball object and create two scripts called “switchOFF” and “switchON”.
In the Script panel for the “switchOFF” script, set Execution to On Expression x and set the trigger to “message sent when value goes from positive to 0.” Then enter this text:
setattribute (Multiball,'physic',1);
This sets the physics mode of the Multiball object to “interpolate”.
For the “switchON” script, set Execution to On Expression x and set the trigger to “message sent when value goes from 0 to positive.” Then enter this text:
setattribute (Multiball,'physic',2);
This sets the physics mode of the Multiball object to “Mass-Spring”.
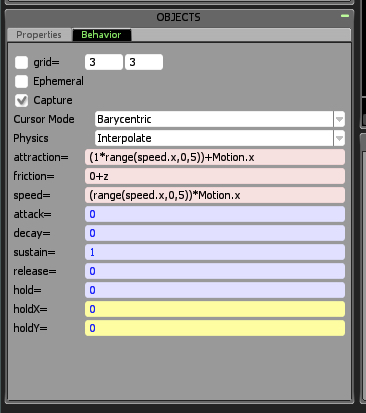
We then need to set the physics variables in the Behavior panel.
Set cursor mode to Barycentric.
Set attraction to (1*range(speed.x,0,5))+Motion.x This sets the speed the ball will travel to a finger placed on the pad.
Set Friction to 0+z. This means that in Motion mode, the ball will have a friction of 0 until a finger is placed on the object. When this happens, Multiball.z will change from 0 to 1, which will be added to the friction. In Lemur, 1 is the highest possible value, so 1 means “full friction”, causing the ball to stop.
Finally set the speed behavior to this:
(range(speed.x,0,5))*Motion.x
If the Motion switch is OFF (Manual/LFO Mode), its x value is 0 so the speed will be 0: (value of speed fader) multiplied by 0 equals 0. If the Motion Switch is ON, its x will be 1, so the speed will be (value of speed fader) multiplied by 1.
Test the physics engine by setting the speed fader to 1, switching MOTION on, and throwing the ball by dragging and releasing it. Here are a few things to try:
- Increase and decrease the speed.
- Stop the ball by placing a finger on it.
- Switch to Manual/LFO Mode.
- Set the speed to maximum.
- Drag the ball around.
- Set the speed to 0.03 and place a finger some distance from the ball.
Creating the LFO
Drag a CustomButton object from the palette to the controller. Name it “LFOswitch”, and set its behavior to Switch.
In the Properties panel, label its off state as “LFO OFF” and its on state as “LFO ON”.
Drag two Knob objects in from the palette and name them “LFOx” and “LFOy”.
Drag two Monitor objects in, and name them “LFO_X” and “LFO_Y”.
“LFO_X” needs this entered in the Script panel:
range(LFOx.x,-1,1)*range(speed.x,0,5)
“LFO_y” needs:
range(LFOy.x,-1,1)*range(speed.x,0,5)
In the Project panel, select Project and create a new script by clicking the Script button. Name the script “LFO”, set the execution to On Frame, and type this in the script window:
if(LFOswitch.x==1)
{
  Multiball.x[1]=sin(time*(range(LFOx.x,-1,1)*range(speed.x,0,5)))*0.5+ 0.5;
  Multiball.y[1]=sin(time*(range(LFOy.x,-1,1)*range(speed.x,0,5)))*0.5+ 0.5;
}
This means if the expression in the parentheses is true (in this case, if LFOswitch.x is equal to 1, i.e is ON), then the script between the braces will be executed. Note that “is equal to” is expressed by a double equals sign.
This script is a fairly conve/ntional sine wave generator.
Set the speed controller somewhere in the middle and set two values on the LFO knobs. Switch the LFO on, and experiment with different values of Speed and Knob controls.
Select the Motion “switchON” script in the Project panel and add the following line to the script:
LFOswitch.x=0;
This will switch LFO off whenever Motion is switched on.
Finally, we can slightly reduce the data rate of the OSC messages. Lemur is very good at filtering unnecessary messages and will only send them when a value changes. In our case, this means when the fader levels change. When the ball is moving, the sliders are continuously updated and send OSC messages to QLab once per frame, which is 60 times per second or about once every 16ms.
We can probably reduce this to a quarter this rate without causing any audible artifacts. To do this we will only execute the Multiball faderDriver script every 64ms.
We do this by starting one of Lemur’s ten internal clocks and setting it’s tempo to 60bpm. Then, we can set the execution of the “faderDriver” script to trigger from this clock rather than triggering on every frame.
Select the “setup” script in the Project panel and add the following lines to the existing script:
clock_start (0);
clock_setbpm (0,60);
Then, select the Multiball “faderDriver” script in the Project panel and set the execution to “On Clock”. Then set the two following drop-down menus to “Clock 0” and “On 1/64 note”.

A quarter note at 60bpm results in one trigger per second, so a 1/64 note at 60bpm results in sixteen triggers per second which should be fine for our needs. This cuts the flow of OSC messages to one quarter of their previous rate.
Lemur 2 - The Return of Lemur
This project uses Lemur to synchronize a fader bank on the iPad with the sliders in the selected cue in QLab. It also displays the cue number and name of the current cue. It exploits one of the advantages Lemur has over some other OSC apps; its internal clocks. We’ll use this feature to manage the synchronization with QLab.
While the example uses an iPad, Lemur is also available for Android. Any device capable of running Lemur will work. Because of the great variety of Android devices available, we are unfortunately unable to even guess about the compatibility of specific devices.
Here’s the example workspace in action, best viewed full screen:
Here is the QLab workspace we are going to control:
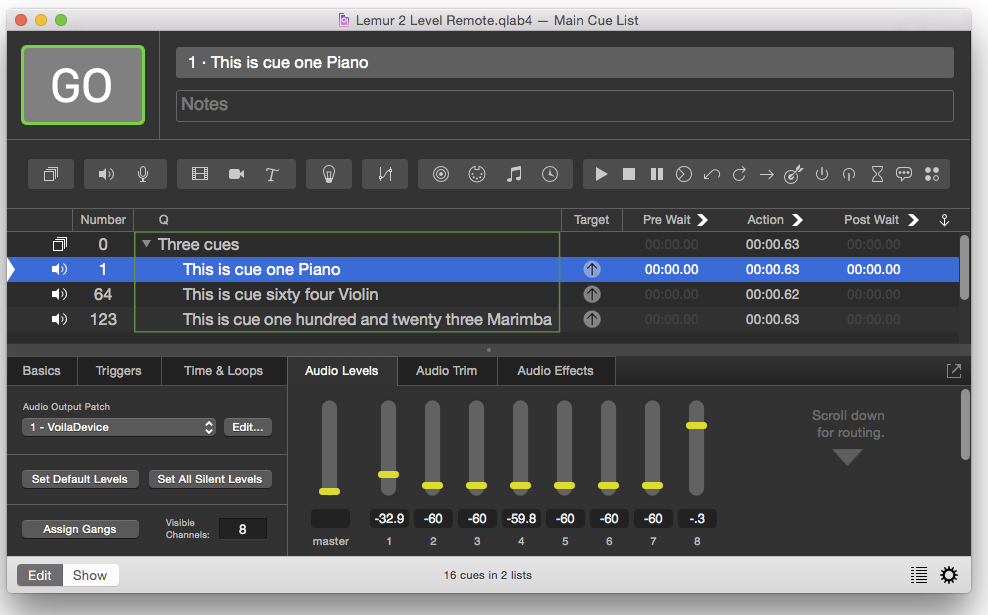
The main cue list contains three cues in a Group cue set to “start all children simultaneously” and a second cue list that contains all the utility cues which enable the clever Lemur integration.
Each of the Audio cues is an eight-channel WAV file containing repeated notes played on a single instrument. Each of eight notes of the C major scale, C-C, are on separate tracks.
Connecting your Mac to Lemur
Open Lemur Editor on the Mac and Lemur on your tablet.
Open a new document in Lemur Editor and set the document size to iPad (or the size of your device) using the pop up menu in the top right of the editor window.
Click the play arrow in the top right to get a list of available devices running Lemur
Select the device you want to sync to and connect. Then, click on the Lemur sync icon (circular arrows, right next to the connect button) in the top right.
You are now synchronized.
Connecting Lemur to QLab
In Lemur, tap on the gear menu to get to settings:
Under OSC targets, connect OSC 0 to your Mac by typing its IP address into the Host field and typing “53000” into the Port field. 53000 is the port number that QLab uses for incoming OSC messages.
Now tap Done.
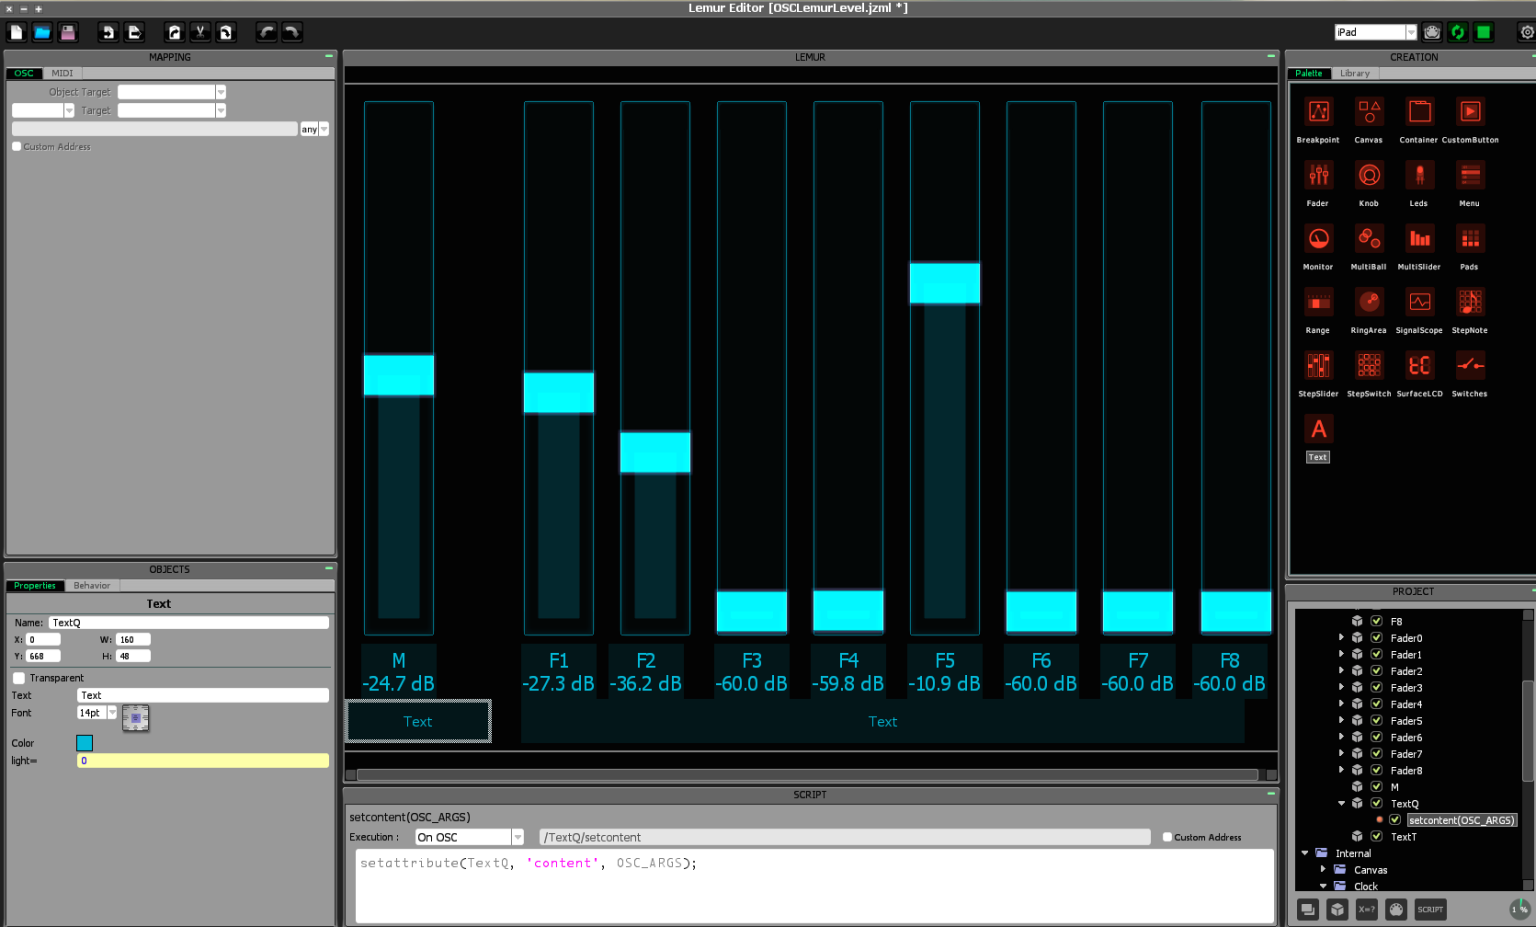
Creating Faders in Lemur
First, we will create nine faders, eight for cue outputs 1 through 8 and one for the master level, and set them up to control the level sliders of the selected cue in QLab.
In Lemur Editor on the Mac, drag a Fader object from the panel on the right side of the Lemur window. To keep things simple, we’ll give the faders in Lemur the same numbers as the QLab sliders that they’re going to control. With the new fader selected, look to the Properties tab of the Objects panel in the lower left of the Lemur Editor window. There, change the name of the fader to “Fader0”.
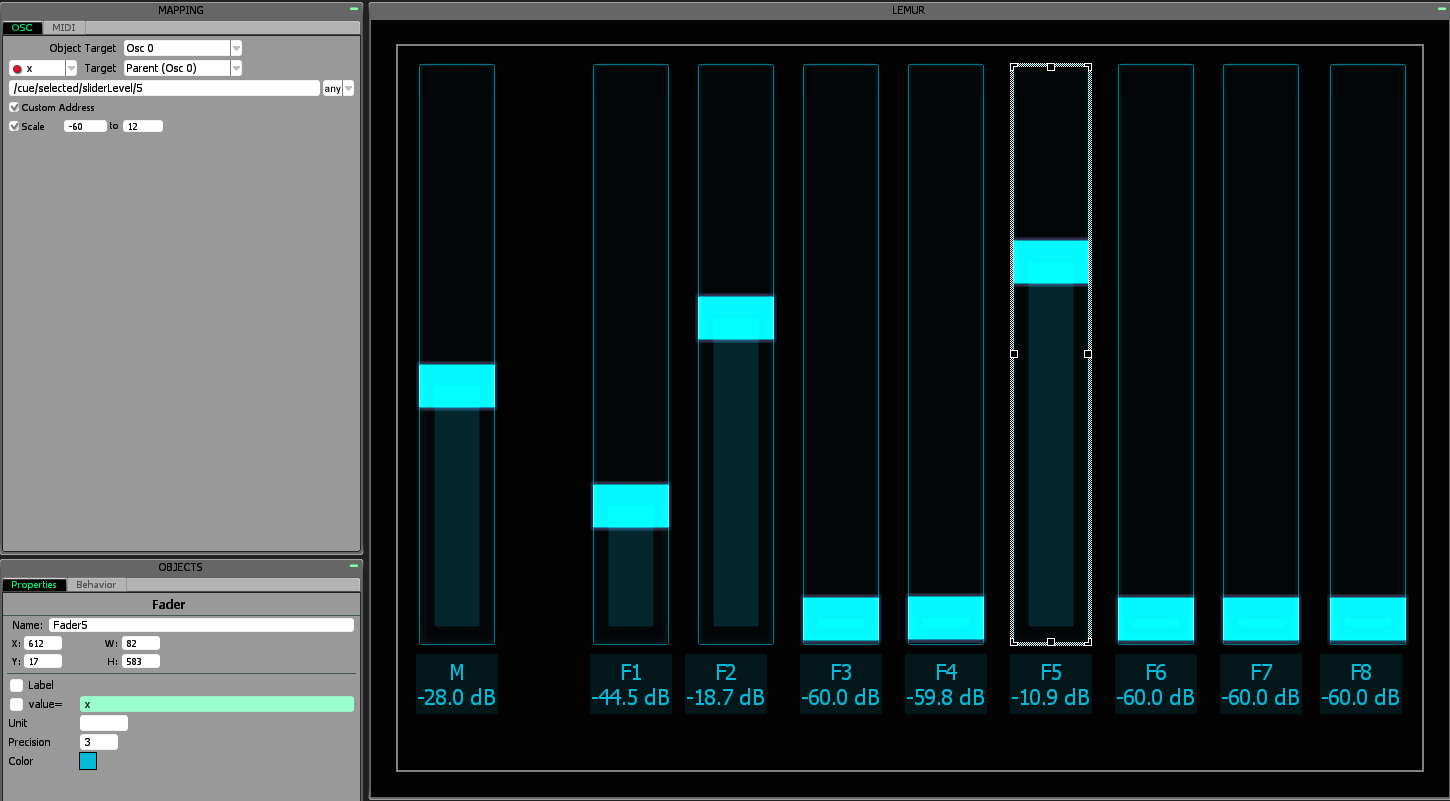
In the Mapping panel at top left of the Lemur Editor window, check the box labeled Custom Address and set the address to:
/cue/selected/sliderLevel/0
That message corresponds to the master fader of the currently selected cue in QLab.
Check the box labeled Scale and enter -60 in the first box, and 12 in the second. These set the minimum and maximum values for the Fader.
-60 is the default minimum audio level in QLab. If you’re using a different minimum level, which you can configure in Workspace Settings → Audio, you’ll want to replace any reference to -60 with whatever minimum level you’ve set.
When you’re done, the Lemur Editor window should look like this:

To label the fader, drag a Monitor object underneath the fader. Then, with the Monitor selected, type “M” into the Name field in the Properties tab of the Objects panel in the bottom left corner of the Lemur Editor window.
To direct the Monitor object to display values from Fader 0, check the box marked value= and enter range(Fader0.x,-60,12). This tells Lemur to look at Fader0, grab its current level (represented by x), and scale that value to a range of -60 to +12.
Set Units to “dB”, set Precision to “1”, and set Font to “16pt”.
We can now copy and paste the fader object and monitor object eight times to make a total of nine faders.
We need to edit the name and custom address for each of these faders so that they each correspond to the appropriate slider in QLab. So, for example, we’ll name the first copy “Fader1” and set its custom address to /cue/selected/sliderLevel/1
We also need to edit the fader’s monitor object name and value to match the Fader name. Lemur objects’ names cannot begin with a digit, so we’ll use “F1” for the first copy’s name. The range gets set to range(Fader1.x,-60,12).
Continue this incremental process for faders 2 through 8.
We can now test the Lemur remote by selecting an Audio cue in QLab and moving a fader in Lemur. If the corresponding slider in the Audio Levels tab of the inspector moves accordingly, then we’ve set things up correctly.
Text Fields for Current Cues
It’s nice to be able to see the cue number and name of the selected cue right in Lemur. To facilitate this, drag two Text objects into the main area of the Lemur Editor window and name them “TextQ” and “TextT”.
Select the “TextQ” object in the Project panel and click the script icon at the bottom of the panel. Name the script “setcontent(OSC_ARGS)“.
Set the Execution of the script in the script pane to “On OSC”
Then, enter the following script:
setattribute(TextQ, 'content', OSC_ARGS);
This tells Lemur to set the contents of the Text object named “TextQ” to the value of the OSC arguments every time the message /TextQ/setcontent is received. Later on, we’ll set up QLab to send that message with the appropriate arguments.
OSC messages are composed of an “address” with optional “arguments”. The address is the part of the message that contains slashes, and the arguments are the part of the message that come after that. So the message
/message/in a bottleconsists of the address “/message/in” with two arguments: “a” and “bottle”.
Create another script for the “TextT” object, also named “setcontent(OSCARGS)”, with _Execution also set to “On OSC”
Set the contents of the script to:
setattribute(TextT, 'content', OSC_ARGS);
Bi-directional Control
In order for Lemur to stay up to date as we select different cues and adjust levels in QLab, we need to get QLab to regularly report the cue number, cue name, and sliderLevels of the currently selected cue.
The first step is creating a network patch in QLab which will allow it to send OSC messages to Lemur.
In QLab, go to Workspace Settings → Network and set up Patch 2 like this:
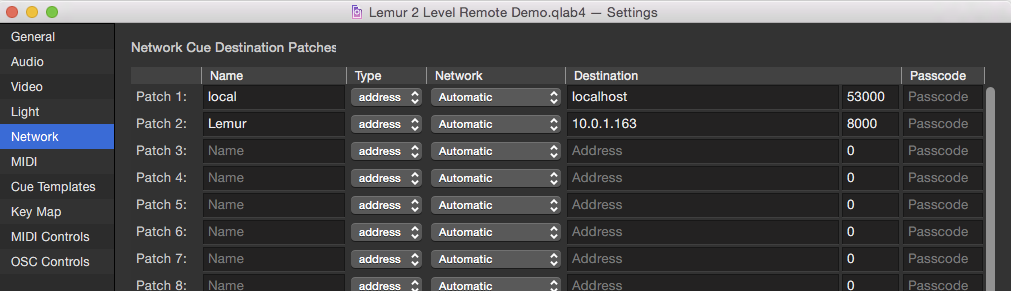
The name is set to “Lemur”, the type is set to “address”, the network is set to “Automatic”, the Destination is set to the IP address of your iPad or other device, the port is set to “8000”, and the passcode is left blank.
Do note that your iPad or tablet will probably not have the same IP address as in the screen shot above.
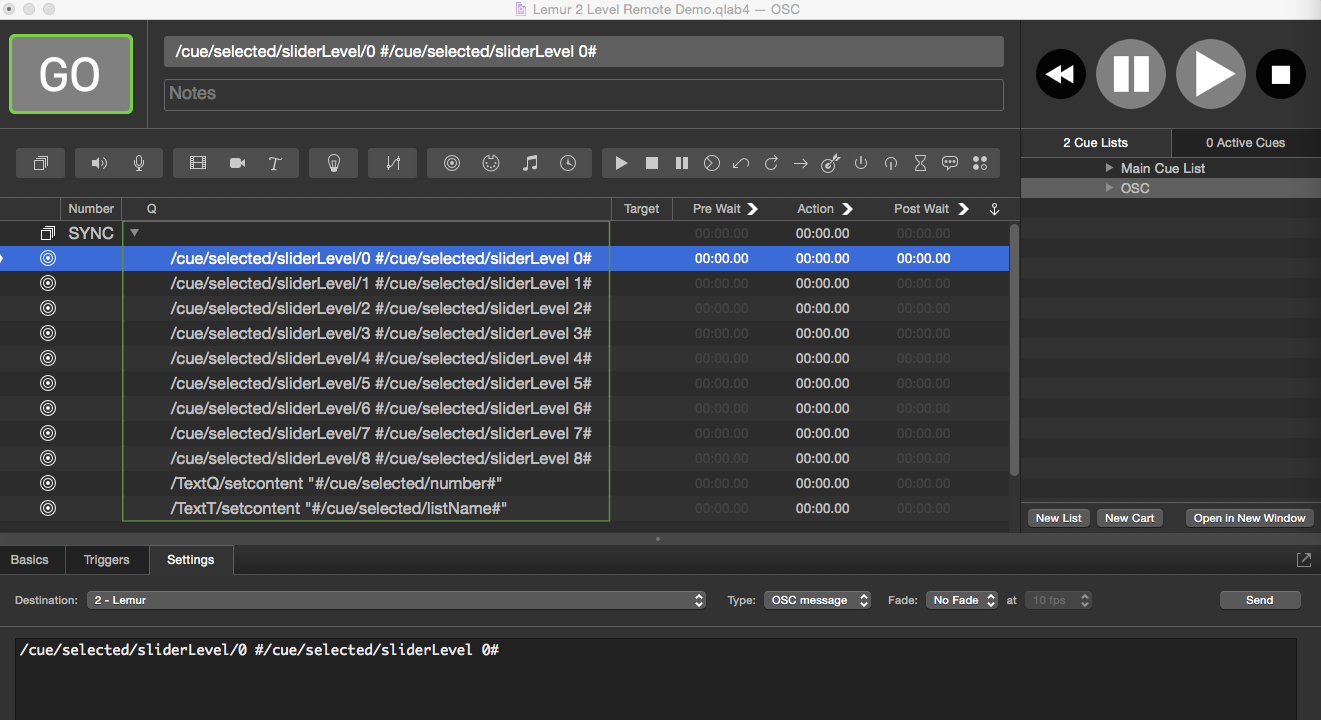
Now return to the main QLab window, open the sidebar, and create a new cue list and named “OSC”.
In the OSC list, create a Group cue set to “start all children simultaneously” and number it SYNC.
Inside the Group, create a Network cue. Set its destination to “Lemur”, and enter this OSC message:
/cue/selected/sliderLevel 0 #/cue/selected/sliderLevel 0#
This uses an OSC query (the part between the hash marks) to get the current level of slider 0 (master) of the currently selected cue, and send that as the second argument of an OSC message beginning with /cue/selected/sliderLevel 0. That message will set the level of the fader in Lemur with the corresponding address, “Fader0” in this case, to the level of the slider in the selected cue.
Copy and paste the cue eight times to create Network cues for the other eight Lemur faders, editing the OSC message appropriately. So, for Fader1:
/cue/selected/sliderLevel 1 #/cue/selected/sliderLevel 1#
And so on.
Next, create two more Network cues for sending the cue number and name of the selected cue to Lemur. The first will set the cue number using this OSC message:
/TextQ/setcontent "#/cue/selected/number#"
The second will set the cue name using this message:
/TextT/setcontent "#/cue/selected/number#"
Note the quote marks around the OSC queries. This allows spaces in the result of the query to be sent to Lemur. If you omit them, then only the first word of the cue name or number is sent.
Once all these Network cues are created, starting Group SYNC will update Lemur all at once. We now need to set up a mechanism which will trigger Group SYNC a few times per second so that Lemur stays up to date automatically. We could create a loop within QLab to do this, or give all the Network cues a very long duration, both of which would work perfectly well until the escape key was pressed. You’d then need to manually restart the SYNC group which is a bit of a hassle and easily forgotten.
Instead, it’s far better if the cue is started a few times per second from Lemur. Because Lemur has internal clocks, this is quite straightforward to arrange.
Lemur Clocks
To start a clock when a Lemur project opens, we need a script at Project level. In Lemur Editor, in the Project panel, select the Project folder and click the Script button at the bottom of the panel. Name the script “startclock”, set its Execution to “On Load”, and enter this script:
clock_start(0);
This starts clock number 0 (Lemur has several clocks which can each run independently) at its default tempo of 120 beats per minute.

Create another script at project level named “sync”. Set its Execution to “On Clock” which will cause two more drop-down menus to appear. Set the first to “Clock 0” and the second to “On 1⁄8 note”
This will cause the script to execute 16 times per second, because there are sixteen eighth notes per second at a tempo of 120 beats per minute.
Set the script to:
oscout(0,'/cue/SYNC/start',1);
This scripts sends the OSC message /cue/SYNC/start 1 to QLab. The first parameter of the message, 0, is the output patch to use. Since we configured OSC 0 to send to QLab, we use 0 here. The second parameter is the OSC message itself. The third parameter is an argument for the OSC message. This particular OSC message does not need an argument, but Lemur does not support sending OSC messages without arguments. Fortunately, QLab ignores arguments that it isn’t expecting, so this works out nicely.

Now, whenever this project is opened in Lemur, clock number 0 will begin ticking at 120 beats per minute, and the OSC message to trigger the SYNC cue in QLab will be sent every sixteenth of a second. Lovely.
However, there may be times that we’d like to turn this feature off. After all, the update cycle means one OSC message going to QLab, then ten OSC messages coming back to Lemur (one for each fader and one each for cue name and cue number). That’s 176 OSC messages per second, which isn’t nothing.
Let’s add a button to turn our OSC sync system on and off. Start by dragging a CustomButton object into the Lemur workspace. Name it “SYNC” and set its Color On to green and both its Style Off and Style On to the play symbol. That’s done by clicking on the button that’s labeled “Tt” and choosing the symbol from the drop-down menu.
Change the project script named “sync()” to this:
if(SYNC.x==1)oscout(0,'/cue/SYNC/start',1);
The new part of the message, if(SYNC.x==1), means that the OSC message to QLab will only be sent when the “SYNC” button is on.
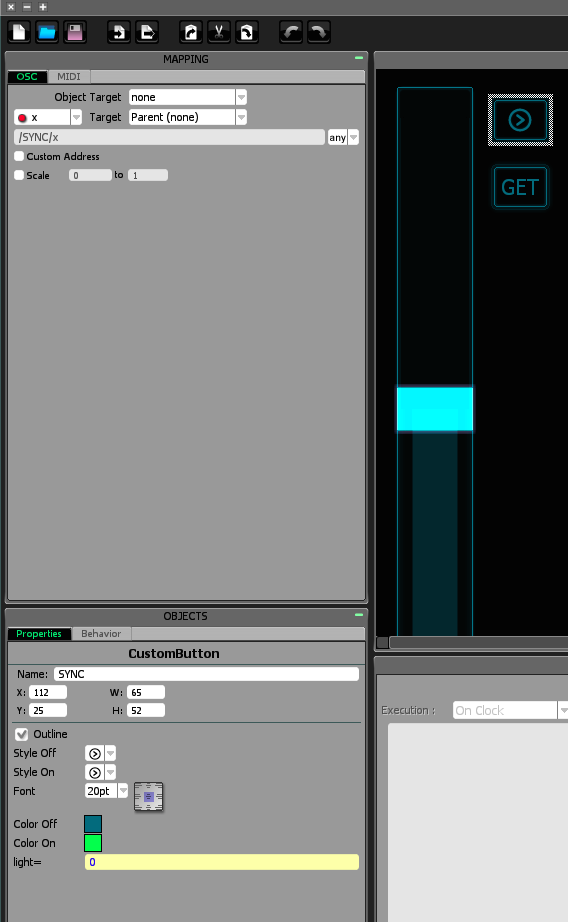
One more finishing touch is all we need: a manual sync button to update Lemur when automatic sync is switched off. To crate this, drag another CustomButton object into the Lemur editor. Click on the Behavior tab of the Object panel and change the button’s mode to “PAD”. This gives the button a momentary action like a drum pad, rather than a latching on/off action.
In the Mapping panel, give the button a custom address of /cue/SYNC/start, then click on the drop-down menu labeled “any” and change the execution to “message sent when value goes from 0 to positive” (the second choice, right below “any”).
In the Properties tab of the Objects panel, set both the Style On and Style Off to the text “GET”.
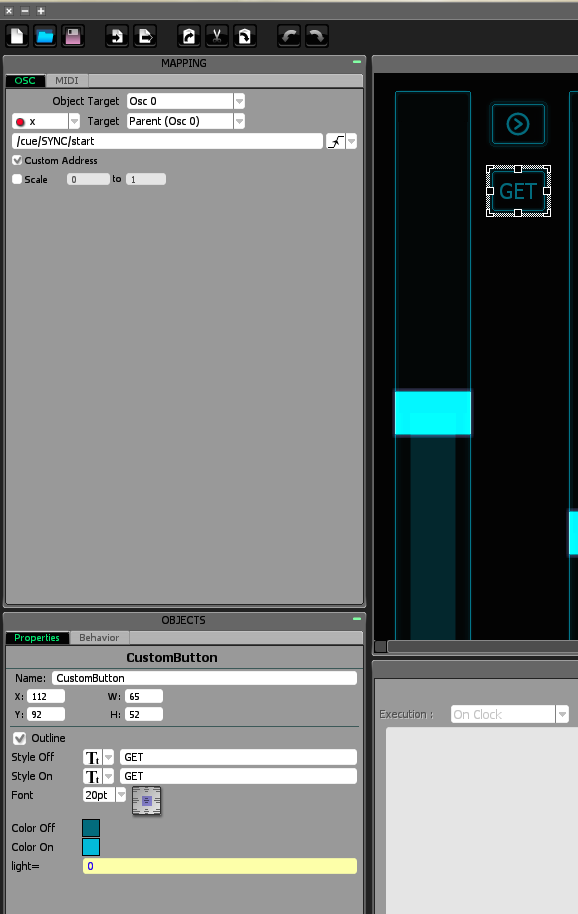
You can now tap that button at any time to manually synchronize Lemur.
