Workspace Settings
The Workspace Settings window can be accessed by choosing Workspace Settings → Settings Window from the File menu, or by using the keyboard shortcut ⌘, (command-comma). Settings in this window belong to the front-most workspace, not to QLab as a whole. Changes made here will not affect other workspaces, and will save and travel with the workspace if it’s moved to another computer.
Settings are grouped into ten sections listed on the left side of the window. Many of those sections are divided into several tabs. You can also access each section directly from the Workspace Settings sub-menu of the File menu.
Importing and Exporting Workspace Settings
On the left side of the footer of the Workspace Settings window are two buttons for importing and exporting workspace settings.
Clicking Import… will allow you to import workspace settings from a saved QLab Settings file, another open workspace, or from QLab’s default settings. In all three cases, QLab presents a list of checkboxes allowing you to choose which settings to import. You can use the up and down arrow keys to move up and down the list, and check or uncheck boxes with the mouse or the spacebar. You can also tap A on the keyboard to toggle all the checkboxes at once, and C to uncheck all checkboxes at once.
Imported settings will replace extant settings.
Clicking Export… will allow you to save the workspace settings from this workspace into a QLab Settings file which can then be used to import settings into another workspace. When you click Export…, QLab will present a list of checkboxes which looks and behaves like the list used for importing.
You can also use drag-and-drop in a few ways to import and export settings:
- You can drag a section from the list on the left side of the window to the Finder to create a QLab Settings file for that section of settings.
- You can drag a section from the list on the left side of the window into a Workspace Settings window belonging to another workspace to import that section of settings.
- You can drag a QLab Settings file from the Finder into any patch list, and if the file contains patches of the correct type, those patches will be imported to the workspace without replacing the existing patches.
You can also import and export settings from the Workspace Settings sub-menu of the File menu.
General
The three tabs in General settings apply to workspace-wide behavior.
The General tab

Minimum time required between each GO can be set to any duration, including zero, to help prevent accidentally starting cues. When a number greater than zero is entered, a red border will appear around the button after each GO to indicate that double-GO protection is in effect. If QLab receives a command to GO during this time, the area surrounding the button will flash red to indicate that the command was received, but disregarded. After the specified time elapses, the red border will disappear indicating that GOs are once again being accepted.
Double-GO protection applies to mouse clicks on the button, pressing the keyboard shortcut for GO (space, by default), and workspace MIDI, MSC, and OSC messages which directly trigger the “GO” action. Individual cue triggers and GOs via AppleScript are not protected by this mechanism.
Require a “key up” before re-arming GO applies only to the keyboard shortcut assigned to ; if this box is checked, it compels QLab to wait for the key to be released before accepting another command to . This can help prevent problems caused by unreliable keyboards or weird KVM switches.
Panic duration is the amount of time it takes for cues to fade out and stop when the workspace receives the command to panic. If the workspace receives another command to panic while it’s in the middle of panicking, everything which is in the midst of fading out will stop immediately.
When workspace opens, start cue number. If this box is checked and a cue number is entered, that cue will automatically start when the workspace is opened. If that cue begins a cue sequence, the sequence will play as normal. The playhead is not affected by this and will remain at the beginning of the cue list as usual. To temporarily prevent the cue from starting, hold down the control and option keys (⌃⌥) while opening the workspace.
Before workspace closes, start cue number. If this box is checked and a cue number is entered, QLab will present a dialog box when the workspace closes allowing you to choose to run that cue, close without running the cue, or cancel closing the workspace.
Auto-number new cues with increment causes newly created cues to be automatically numbered sequentially. QLab tries to be clever about this; if the increment is 1 and you have cues 2, 4, and 6, and add a cue after cue 6, the new cue will be numbered 7. If you add a cue between cue 2 and cue 4, the new cue will be numbered 3. If you then add another cue between cues 2 and 3, the new cue will be numbered 2.5.
Cues which are created via OSC messages, AppleScript, or copy/paste are not automatically numbered.
Enable auto-load for new cues automatically sets all newly created cues to auto-load. Existing cues are not affected when this box is checked or unchecked.
Lock playhead to selection causes the playhead and the selection to move together; anything that causes either the playhead or the selection to move will cause both to move. When this box is not checked, the playhead and selection move independently. This makes it easy to view and edit one cue while QLab stands by on another cue.
The File Management tab
The three checkboxes in this tab control the way QLab automatically handles the files targeted by cues as well as files generated by the workspace. All three boxes are checked by default.
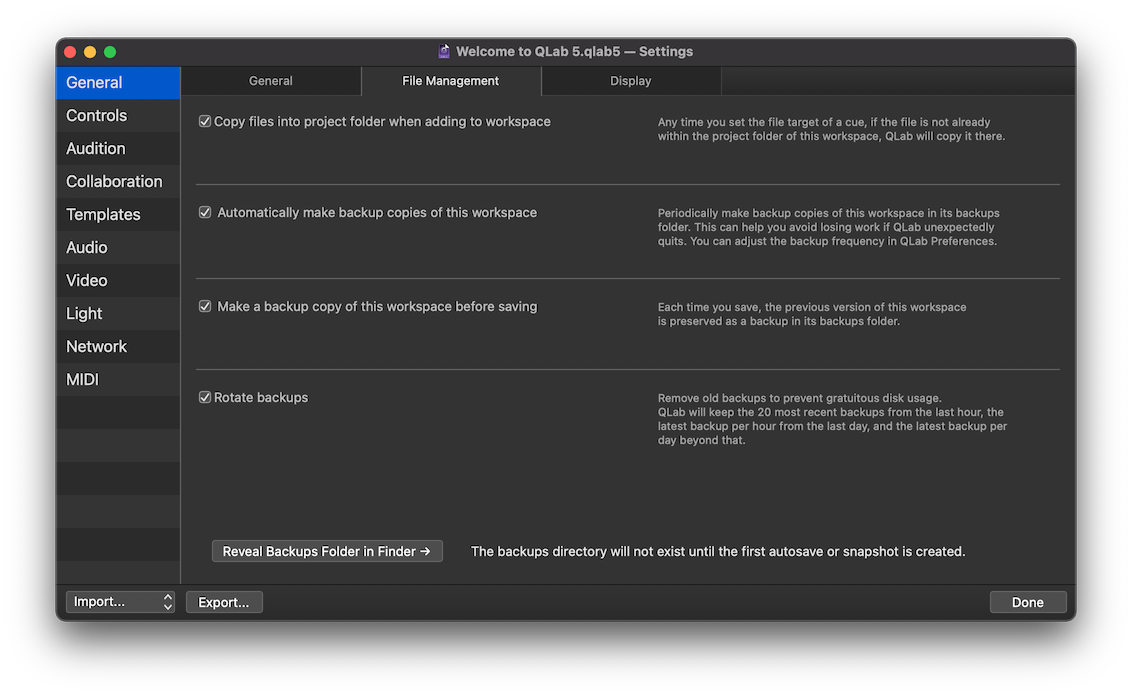
Copy files into project folder when adding to workspace. When this box is checked, any time you set the file target of a cue, QLab will copy that file into the workspace’s project folder. If there is already an identical copy of the file target in the folder, QLab will not made an additional copy but will reassign the target of of the cue to use the copy of the file that’s already in the folder. By keeping this box checked, you can always be confident that the project folder contains all necessary file targets to run your show. Because of that, you can easily move your workspace to another computer by simply copying the whole project folder.
You can alternately choose to direct QLab to copy media files whenever you wish by unchecking this box, and then choosing Workspace Files > Copy media files into project folder from the File menu.
Automatically make backup copies of this workspace. When this box is checked, QLab periodically creates backup copies of your workspace named {the name of your workspace} (Backup {year-month-day_hourminutesecond}).qlab5backup. These copies are stored in a folder named {the name of your workspace} backups. QLab never saves or changes your workspace file itself, it only creates copies. If your workspace document is ever lost or damaged, you can use a backup copy to recover your lost data.
You can configure the autosave interval in QLab Preferences to anywhere between five and 600 seconds (ten minutes.) Once set, QLab will watch your workspace for changes, and then wait for this amount of time to pass after the last change before autosaving. The reason for this delay is to minimize the possibility of the autosave interrupting your work. If you work continuously for a very long time, QLab will always save at least once every ten minutes.
Very important thing: automatic backups can only be made after you’ve manually saved the workspace. Automatic backup does not occur on unsaved, untitled workspaces.
Make a backup copy of this workspace before saving. When this box is checked, QLab watches for you to manually save and automatically saves a copy of the workspace as it was before you made the changes that you are currently saving. These copies are named {the name of your workspace} (Backup {year-month-day_hourminutesecond}) and are also stored in the backups folder.
If you open your workspace called “Hamlet” on August 30th, 2022 at 12:00 pm and begin work, then save at exactly 12:05, your workspace will obviously include all the changes you made between 12:00 and 12:05. At that moment, if this checkbox is checked, QLab will also create a backup called Hamlet (Backup 2022-08-30_120000).qlab4backup which reflects the exact state of your workspace when you opened it at 12:00.
If you do more work, then manually save again at exactly 12:12 pm, QLab will create another backup named Hamlet (Backup 2022-08-30_120500).qlab5backup which reflects the exact state of your workspace the last time you saved, at 12:05.
In order to keep from creating too many backups to be useful, QLab will only create one backup per minute. If you manually save your workspace more than once within a single minute, only the last backup created during that minute will be saved.
This makes it easy to return to an earlier state of your workspace if you discover that you need to revert lots of work, such as when returning from a dinner break and hearing the director say that dreaded phrase, “you know what, let’s forget everything we did since lunch.”
Rotate backups. When this box is checked, QLab automatically deletes old backups to prevent gratuitous disk usage. QLab will keep up to the 20 most recent backups within the last hour, the latest backup per hour from the last day, and the latest backup per day beyond that. The idea here is to make it simple for you to have very granular backups from your most recent work, somewhat granular backups over the last day (to help you, say, figure out what you were doing before lunch break), and a daily “end of day” backup reaching back indefinitely.
The Reveal Backups Folder in Finder → button at the bottom of the tab opens a Finder window showing the folder that contains your workspace and its backups folder. The current size of the backups folder is displayed next to the button.
The Display tab

The first set of small/medium/large buttons controls the display size of cue list rows.
The second set controls the display size of cue cart buttons.
Choosing “small” will maximize the information available on screen. Choosing “large” will maximum legibility, particularly at a distance. “Medium” is, unsurprisingly, a balance between the two.
The Sort Active Cues list control lets you choose how the currently playing or paused cues are ordered in the Active Cues tab of the Workspace sidebar, sorting the most recent cues to the bottom or to the top.
Controls
The three tabs in Controls settings pertain to keyboard shortcuts, MIDI messages, and OSC messages which are used to directly control the workspace or basic functions of QLab.
The Keyboard tab
QLab allows you to change keyboard shortcuts for core control and editing features to suit your needs. Like all other workspace settings, these shortcuts apply only to the workspace being edited.

To remove a keyboard shortcut from a command, click the button next to that shortcut. To change a shortcut, click in the text field for that shortcut and type the desired shortcut, optionally including one or more modifier keys:
| Symbol | Meaning |
|---|---|
| ⌘ | command |
| ⇧ | shift |
| ⌃ | control |
| ⌥ | option |
QLab will not prevent you from using a keyboard shortcut that has another meaning (in case you’re doing it deliberately), so take care when assigning shortcuts.
Note that a single press of the escape key is always assigned to panic, and a double press of the escape key is always assigned to hard stop. This is a safety measure; in an emergency, any person familiar with QLab can confidently use the escape key to stop all playback from any QLab system.
The up and down arrow keys cannot be used for shortcuts, but the left and right arrow keys can be used.
The Workspace MIDI tab
This tab allows you to define the way your workspace will respond to incoming MIDI and MIDI Show Control messages.
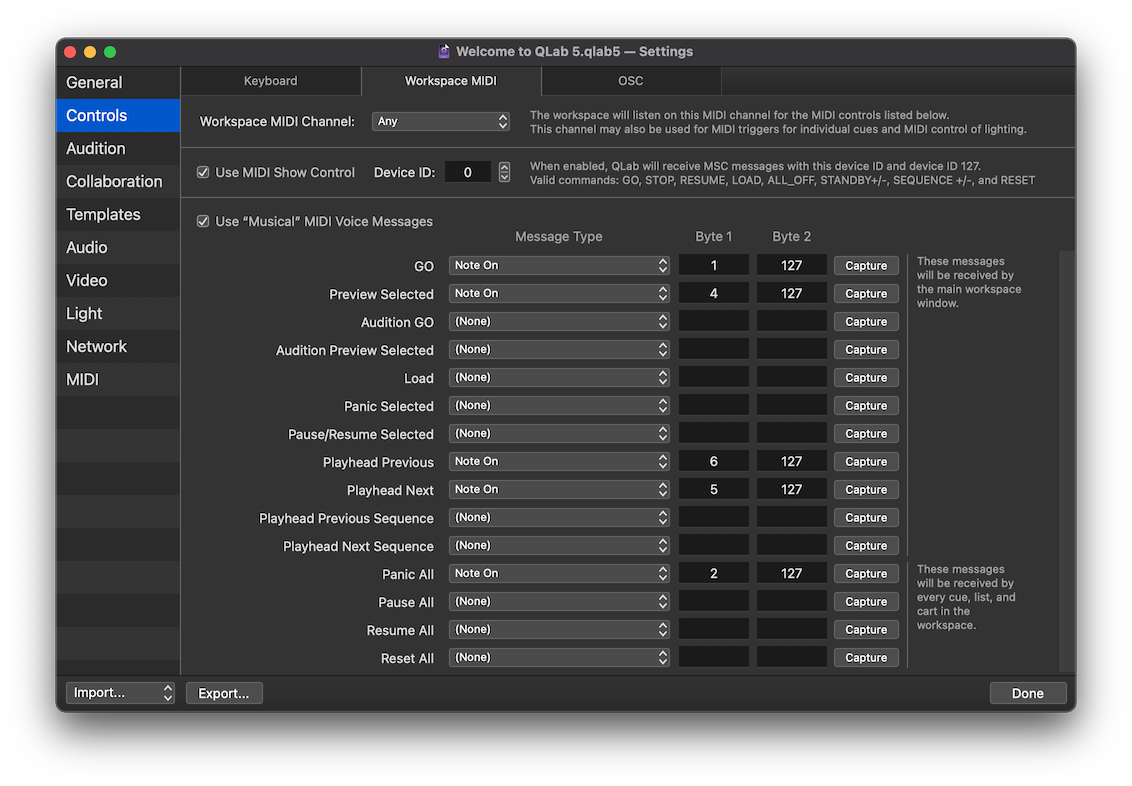
Workspace MIDI Channel can be set to a single channel or to “any”. The workspace will listen on the specified channel for MIDI messages that have been assigned to the commands below. Cues’ MIDI triggers and the Light Dashboard can also listen on the workspace channel, or they can be set to listen to a separate channel irrespective of this setting.
Use MIDI Show Control enables the workspace to respond to the following MSC messages:
| MSC message | QLab function |
|---|---|
| GO | GO. |
GO {cue_number} |
Start cue {cue_number} individually. The playhead is not moved. |
| STOP | Pause all |
STOP {cue_number} |
Pause cue {cue_number}. |
| RESUME | Unpause all |
RESUME {cue_number} |
Unpause cue {cue_number}. |
| LOAD | Load the currently standing-by cue. |
LOAD {cue_number} |
Load cue {cue_number}. |
| ALL_OFF | Panic. |
| STANDBY+ | Move the playhead down one cue. |
| STANDBY- | Move the playhead up one cue. |
| SEQUENCE+ | Move the playhead down one cue sequence. |
| SEQUENCE- | Move the playhead up one cue sequence. |
| RESET | Stop all cues and move the playhead to the top of the cue list. |
QLab listens for MSC commands categorized as Lighting (General), Sound (General), and Video (General).
Device ID should be unique for each device on an MSC network, or at least unique for all devices within a given category. When a workspace is set to use MIDI Show Control, it will respond to any message sent to this device ID, as well as any message sent to device ID 127 which is the “all call” identifier in the MSC specification.
MIDI channels and MSC device IDs have nothing to do with each other; all MIDI voice messages ignore MSC device IDs, and all MSC messages ignore MIDI channels.
Use “Musical” MIDI Voice Messages will enable the commands in the table below. There, you can manually assign an incoming MIDI message to some or all of the listed commands, or click on the Capture button next to a command to have QLab listen for the next incoming MIDI message on the workspace MIDI channel, and assign that message to that command.
Message Type can be Note On, Note Off, Program Change, or Control Change.
Byte 1 for Note messages represents the note number. For Program Change, it represents the program number. For Control Change, it represents the control number.
Byte 2 for Note messages represents the velocity. You can use any number from 0 to 127, inclusive, and you can use greater-than (>) or less-than (<) symbols to indicate a range. You can also use the word “any” to have QLab respond to any note velocity. For Program Change, this value is ignored. For Control Change, this value represents the control value.
The OSC tab
QLab has a very robust OSC dictionary which offers direct access to a wide variety of commands, settings, and functions via OSC messages. Sometimes, however, you may come across a device which you want to use to control QLab, and this device may not be able to send customized OSC messages.
To accommodate such devices, you can assign OSC messages to each of the commands listed in the table by typing or pasting in the OSC message, or by clicking the Capture button and letting QLab listen for the next incoming OSC message.
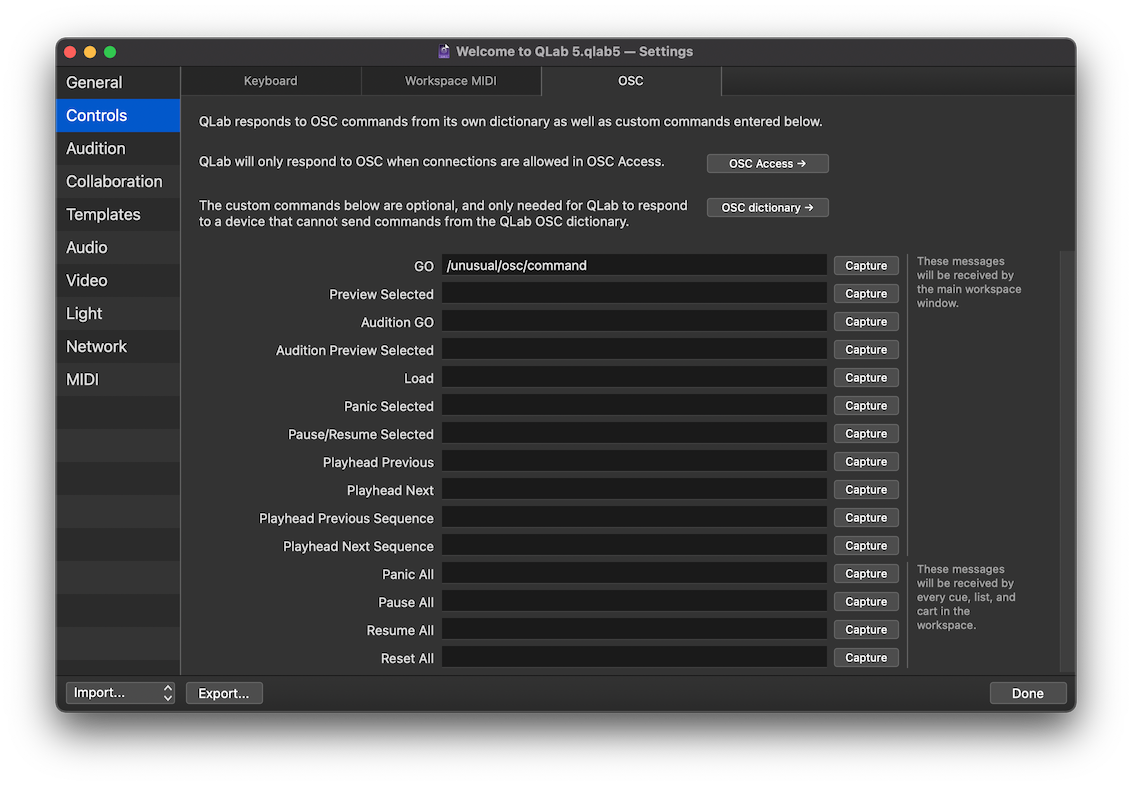
You do not need to use this section if your sending device can send OSC messages from QLab’s dictionary.
As the text in this tab states, you need to enable incoming OSC messages in [the OSC Access tab of Workspace Settings → Network] in order to use OSC messages here.
Audition
These controls allow you to define the behavior of the different types of outputs from QLab when cues are auditioned. Each type of output has two to four of the following options:
- Leave output unchanged - output of this type will behave the same way in cues which are auditioned as it will in cues which are played normally.
- No output - output of this type will be entirely prevented from cues which are auditioned.
- Alternate patch - output of this type will temporarily use the specified output patch instead of the patch that’s programmed into the cue.
- Audition window (video only) - output of this type will be displayed in a monitor window instead of sent to the video stage that’s programmed into the cue.
- Audition tab (light only) - output of this type will be displayed in the Audition tab of the Light Dashboard, and not output via Art-Net or USB DMX.
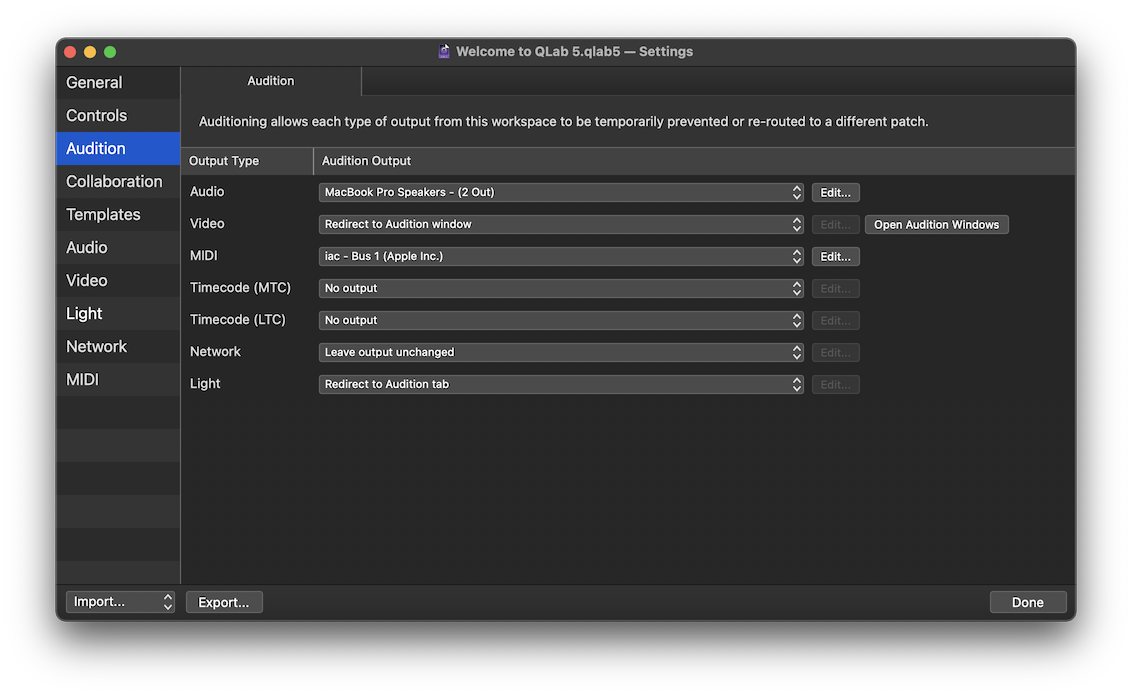
If an output type is set to an alternate patch, you can click the Edit… button to edit the selected patch.
You can learn more about auditioning cues from the Auditioning Cues section of this manual.
Collaboration
Other computers on your local network can use QLab to remotely connect to and collaborate on your workspace, through the power of QLab Collaboration, and this tab of Workspace Settings allows you to configure access permission for those connections.
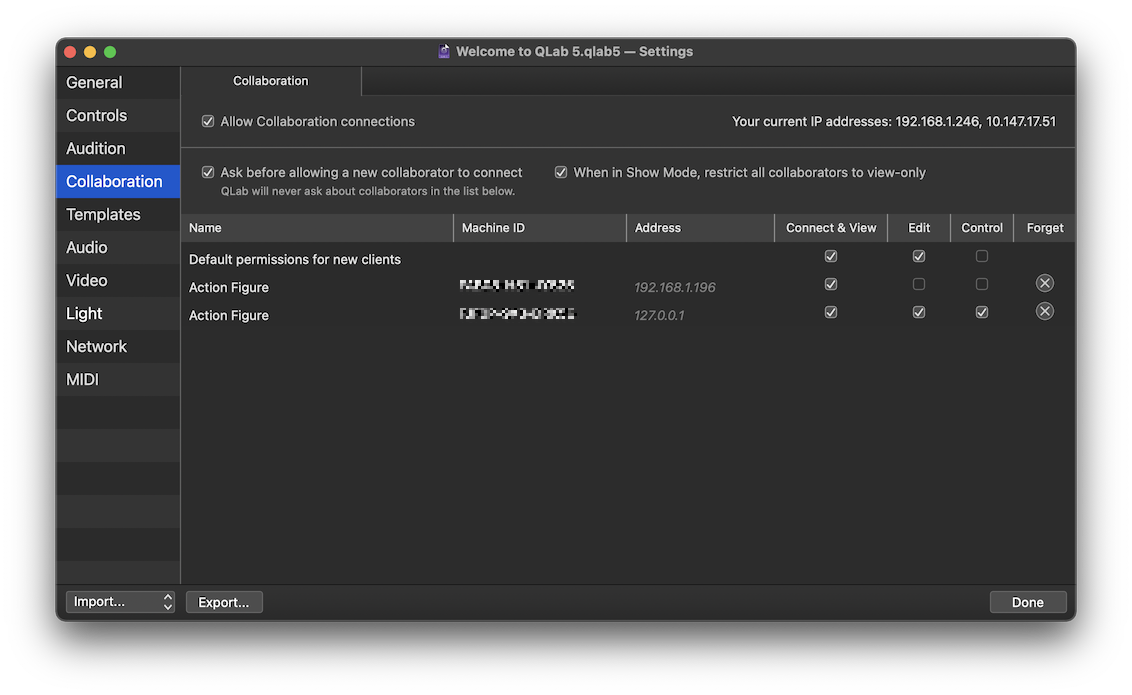
Allow Collaboration connections. When the box is checked, Collaboration connections will be admitted based on the rest of the settings in this tab. When this box is unchecked, Collaboration connections will not be accepted, regardless of any other settings. If any collaborators are connected to the workspace when the box becomes unchecked, those collaborators will be immediately disconnected.
The upper right corner of the tab displays the current IP address or addresses of your Mac.
Ask before allowing a new collaborator to connect. If this box is checked, a message will appear on screen when a new collaborator tries to connect to your workspace, and you will have the option to allow or deny that connection, as well as to assign access permission for the connection. If you allow the connection, the collaborator will be added to the list below with the level of access that you assign, and will thereafter be allowed to connect to the workspace without the approval message.
When in Show Mode, restrict all collaborators to view-only. If this box is checked, all collaborators will be prevented from editing the workspace, moving the playhead, starting cues, or stopping cues whenever the workspace is in Show Mode, even if those collaborators would otherwise be allowed more expansive access. This is a useful way to allow full remote collaboration some of the time, but prevent accidental edits or playback events from remote collaborators during a performance.
The Collaboration section of Workspace Settings looks different on a Collaboration remote. You can learn more about this from the Using A Remote section of the Collaboration page of this manual.
The collaboration access table
The first row in the collaboration access table allows you to set the default access permissions for new collaborators. When a request to collaborate appears, clicking the default button (or pressing the enter or return key) in the connection message will admit the collaborator and assign these permissions. Then, a new row will appear in the table for that collaborator, identified by their Collaboration Name, Machine ID, and IP address.
You can optionally edit a Collaborator’s access permissions after they’ve connected by using the checkboxes in the table. For example, you might allow your stage manager’s Mac to connect with view permission only, and allow your assistant designer to connect with view and edit permission.
You can disconnect a client using the button, or disconnect and forget a client using the button. A forgotten client can reconnect, but will be treated as a new first-time collaborator once more.
Templates
The two tabs in Templates settings pertain to QLab’s behavior when creating new cues and workspaces.
The Cue Templates tab
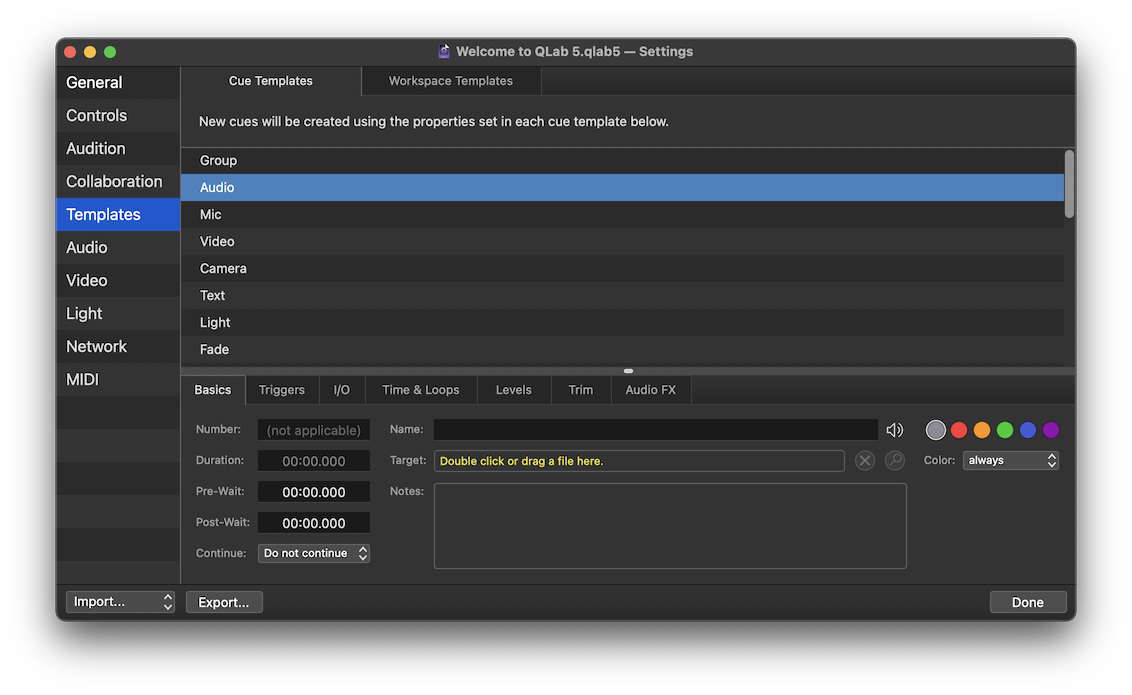
Cue Templates allow you to adjust the default settings of newly created cues. The Cue Templates section shows a list of all of the cue types in QLab and a copy of the inspector below that list. You can select one of the cue types and use the inspector to make any adjustments you like, including cue names, notes, targets, and everything else. Newly created cues in this workspace will use these settings as their default.
The Workspace Templates tab
Workspace Templates allow you to create your own set of starting conditions for new workspaces. This isn’t really a workspace setting per se, but a shortcut is available here to open the Workspace Template Manager.
You can learn more about this from the Workspace Templates section of this manual.
Audio
The two tabs in Audio settings pertain to audio input and output patching, routing, effects, and volume limits.
The Audio Outputs tab
An audio output patch is the mechanism that QLab uses to route audio from cues to your audio output hardware. Any cue which can generate audio ( Audio cues, Mic cues, Video cues, Camera cues, and :fig-timecode-5; Timecode cues set to LTC mode) must be assigned to a single audio output patch, and the configuration of the patch defines how the output from that cue will behave.
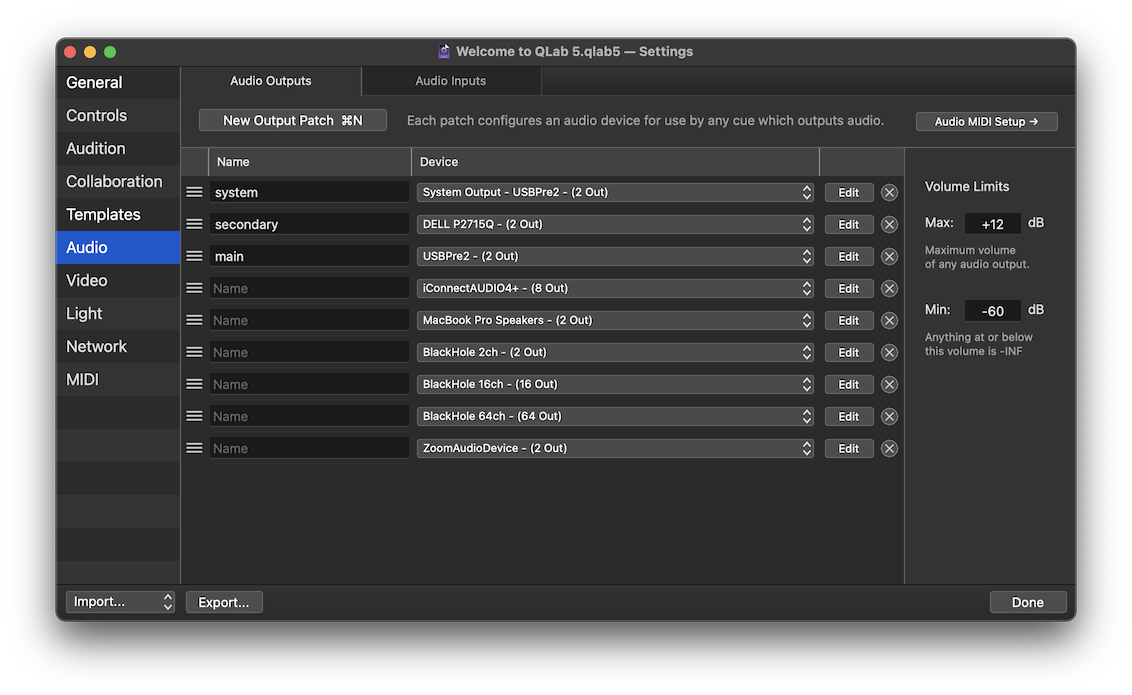
Workspaces in QLab 5 can contain any number of audio output patches. You can add an audio output patch by clicking on the New Output Patch button or by using the keyboard shortcut ⌘N while the Audio Output tab is open and in the foreground. A newly created blank workspace will automatically start off with a single audio output patch for each audio output device connected to your Mac at the moment you create the workspace.
Audio devices must have output channels to work with audio output patches.
Several actions are available in the patch table:
- Delete a patch by clicking on the button on the right side of the row for that patch.
- Reorder a patch by dragging it up or down in the patch list. You can click anywhere on the background of the row for that patch, but it’s easiest to click on the left side where the patch number is displayed.
- Duplicate a patch by holding down the option key (⌥) and dragging the patch up or down in the patch list.
- Copy a patch into another workspace by dragging it into that workspace’s patch list.
- Export a patch by dragging it into the Finder.
You can hold down the shift key (⇧) while clicking to select a range of patches, or the command key (⌘) while clicking to select two or more patches, allowing you to act on all the selected patches at once.
You can learn about editing audio output patches from the Audio Output Patch Editor section of this manual.
Volume Limits
The Max and Min volume limits for a workspace define the range of all audio in the workspace. Audio level controls, like the ones found in the Levels tab of the inspector for an Audio cue, will use the limits defined here, and setting audio levels via Fade cues, AppleScript, and OSC will similarly be limited to this range.
The maximum volume limit can be set anywhere from -30 dB and up. +12 is the default setting.
The minimum volume limit can be set anywhere between -180 dB and -40 dB, inclusive. -60 is the default setting.
These levels are not (and in fact cannot be) measures of actual absolute loudness (dB SPL). They are only relative measures of loudness within QLab. A source file normalized to -3 dBFS will output from QLab at -3 dbFS if all level controls that it passes through within QLab are set to 0. What happens downstream of QLab cannot be known to QLab, so that -3 dBFS signal may translate to 40 dB SPL on a very tiny sound system, or 120 db SPL on a very large sound system.
Setting the maximum volume limit
Note: It is essential to understand that setting the maximum limit too high will make it possible to raise audio levels above a safe volume. Please be exceedingly careful when adjusting this control, and indeed when first playing back any sound with a new system.
There is no specific rule or guideline for setting the maximum volume limit, but it should be set as low as possible while allowing for its use.
One productive way to set this limit is to take the quietest audio file that you plan to use in your show, and play it as loudly as you can imagine wanting to. The maximum volume limit that allows for that will likely be as high as you need to set the limit. That said, if you’re also using loud audio files in your show, setting a higher maximum limit opens the door to a little danger.
Setting the minimum volume limit
When QLab is used in a sound system that has been configured for optimal dynamic range, properly setting the minimum volume limit allows smooth fades without the sound dropping out at the end of a fade, or popping in at the beginning. Gain staging is a complex topic beyond the scope of this manual, but we can address the QLab part of the equation.
- Arrange for some time to have full acoustic control of the space that you’re working in. You will need as much quiet as possible for this process.
- Get your sound system up and running and adjusted to your preference.
- In Workspace Settings → Audio → Audio Outputs, set the minimum volume limit to
-180dB. - In the cue list, create an Audio cue and target either a test file such as pink noise or a 1 kHz tone, or a piece of music that has relatively even loudness throughout.
- Start the cue at a reasonable listening level, then slowly drag the main level control of the Audio cue down, getting quieter and quieter.
- When you feel you no longer hear the sound, stop dragging the fader and walk around the space listening.
- If you discover you can hear the sound anywhere, go back and drag it down a little more. Repeat until you are certain that the sound is inaudible.
- Whatever the main level control is set to on that cue is your actual minimum volume. Enter that level as the minimum volume limit.
Now, when you fade an Audio cue in from silence or fade out to silence, QLab will be using the full range of volume available in your sound system.
The Audio Inputs tab
An audio input patch is the mechanism that QLab uses to route live audio from external sources into Mic and Camera cues.
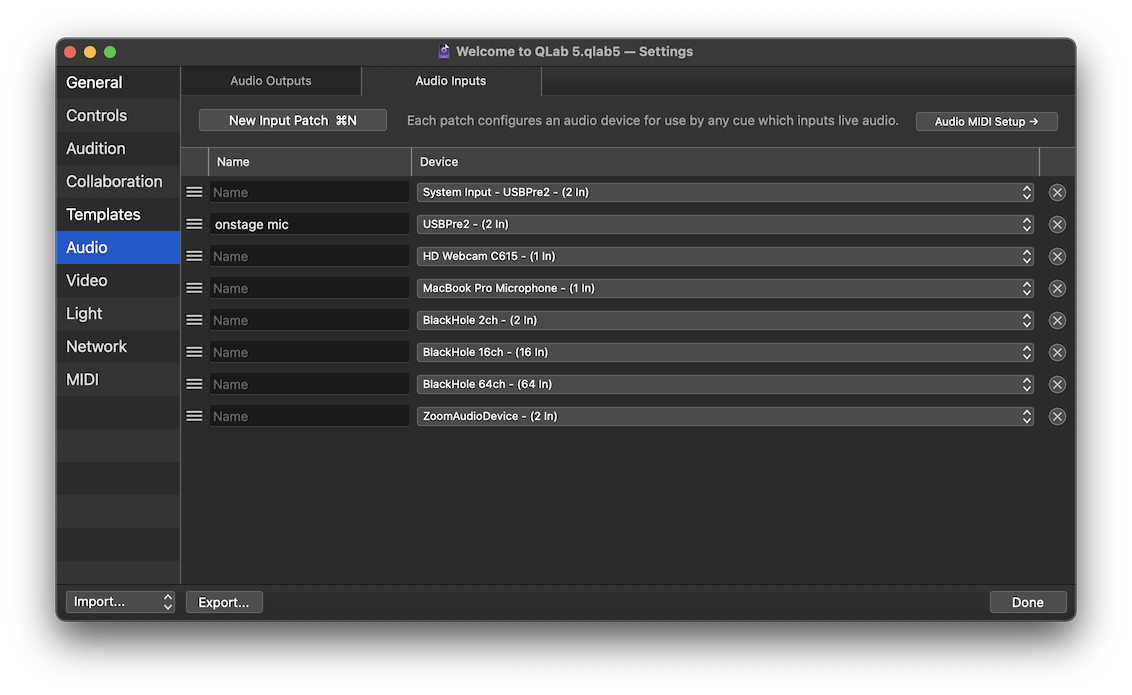
Workspaces in QLab 5 can contain any number of audio input patches. You can add an audio input patch by clicking on the New Input Patch button or by using the keyboard shortcut ⌘N while the Audio Input tab is open and in the foreground. A newly created blank workspace will automatically start off with a single audio input patch for each audio input device connected to your Mac at the moment you create the workspace.
Audio devices must have input channels to work with audio input patches.
Several actions are available in the patch table:
- Delete a patch by clicking on the button on the right side of the row for that patch.
- Reorder a patch by dragging it up or down in the patch list. You can click anywhere on the background of the row for that patch, but it’s easiest to click on the left side where the patch number is displayed.
- Duplicate a patch by holding down the option key (⌥) and dragging the patch up or down in the patch list.
- Copy a patch into another workspace by dragging it into that workspace’s patch list.
- Export a patch by dragging it into the Finder.
You can hold down the shift key (⇧) while clicking to select a range of patches, or the command key (⌘) while clicking to select two or more patches, allowing you to act on all the selected patches at once.
Video
The four tabs in Video settings pertain to video input and output patching, and the configuration of video output devices.
The Video Outputs Tab
A stage is the mechanism that QLab uses to route video from cues to your video output hardware, as well as to non-physical video outputs via Syphon and NDI. Any cue which can generate video ( Video cues, Camera cues, and Text cues) must be assigned to a single video output stage, and the configuration of that stage defines how the output from that cue will behave.
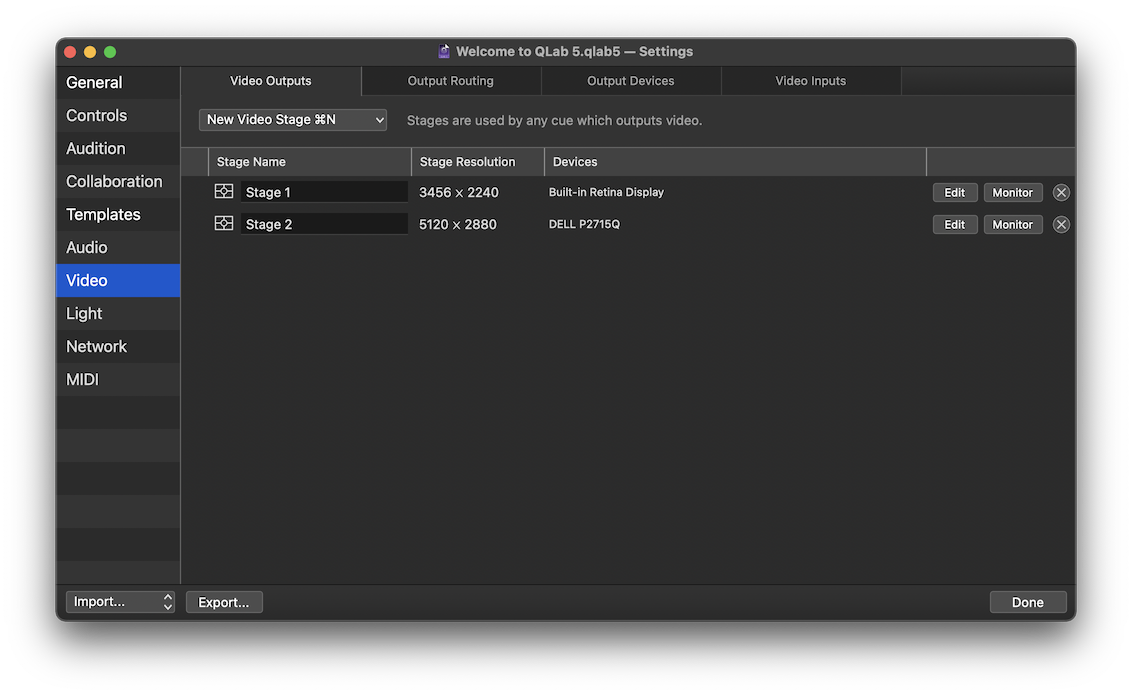
Workspaces in QLab 5 can contain any number of stages. You can create a new stage by clicking on the New Video Stage button or by using the keyboard shortcut ⌘N while the Video Outputs tab is open and in the foreground. A newly created blank workspace will automatically start off with a single stage for each video device connected to your Mac at the moment you create the workspace.
You can learn more about this tab from the Video Output section of this manual.
The Output Routing Tab
A route is a connection between a region of a stage and an output device such as a projector, screen, Syphon output, or NDI send. Because a route exists independently from both the stage and the output, you can make adjustments to the route or to the output device that the route uses without the stage “knowing” about it. This allows you to handle system changes without having to make cueing changes.
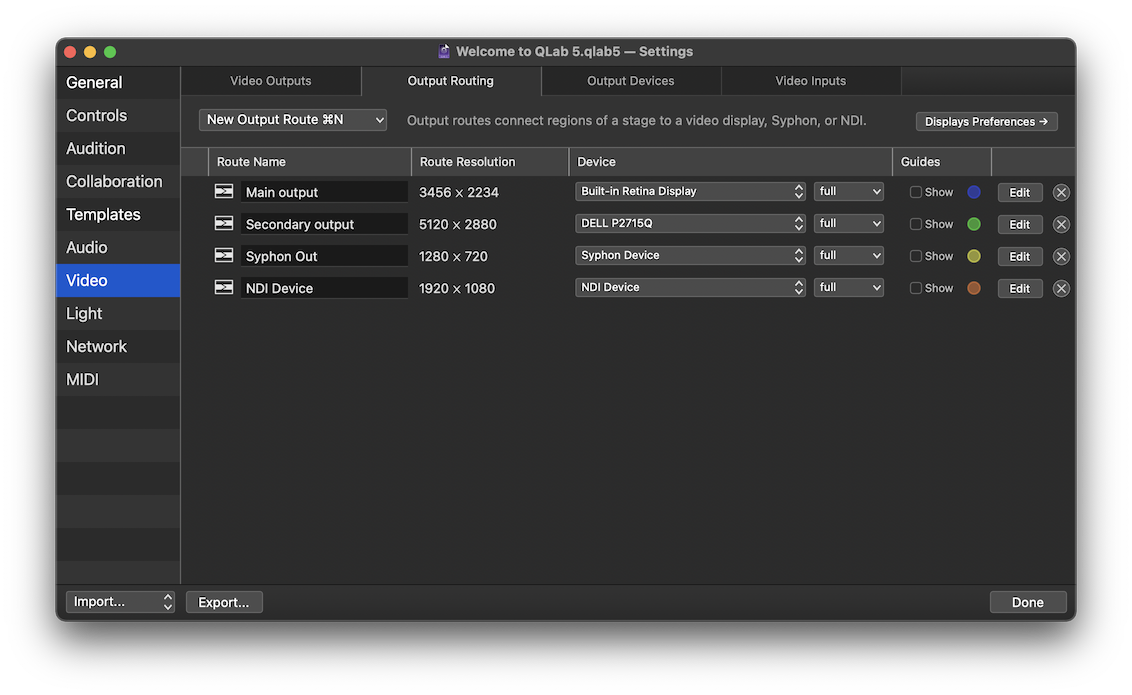
You can create a new route by clicking on the New Output Route button or by using the keyboard shortcut ⌘N while the Output Routing tab is open and in the foreground. A newly created blank workspace will automatically start off with a single route for each video device connected to your Mac at the moment you create the workspace.
You can learn more about this tab from the Video Output section of this manual.
The Output Devices Tab
A device is a physical or virtual endpoint for video. Displays built into or connected to your Mac are devices, as are video projectors, LED wall controllers, and televisions. Compatible Blackmagic PCI cards and USB-connected boxes are devices too; Blackmagic cards with multiple independent outputs are actually multiple devices built into one. Finally, each Syphon or NDI output is its own device.
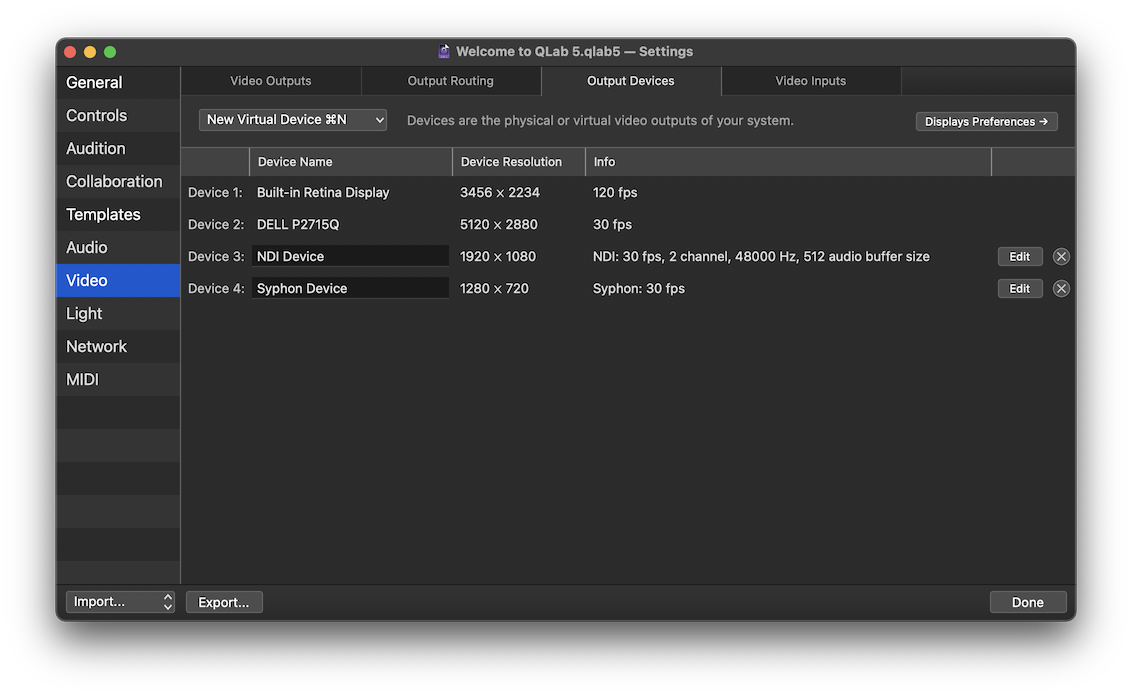
The Output Devices tab lists all the devices available to your workspace. Virtual devices and Blackmagic Designs devices can be adjusted using the Edit button on the right side of the list. Virtual devices can be deleted from the workspace by using the button.
You can create a new Syphon or NDI device by clicking on the New Virtual Device button or by using the keyboard shortcut ⌘N while the Output Devices tab is open and in the foreground.
The Video Output Device table consists of four columns.
- Device name is inherent to physical devices, and editable for virtual devices.
- Device resolution displays the pixel dimensions of the video device’s raster as width × height.
- Info displays any other available information about the device. This always includes refresh rate, but can also include other information depending upon the type of device.
- The Edit button, which is only available for Blackmagic devices and virtual devices, allows you to adjust the parameters of the device which vary depending on the type of device. The button, which is only available for virtual devices, deletes the device when clicked.
The Video Inputs Tab
A video input patch is the mechanism that QLab uses to route live video from external sources into Camera cues.
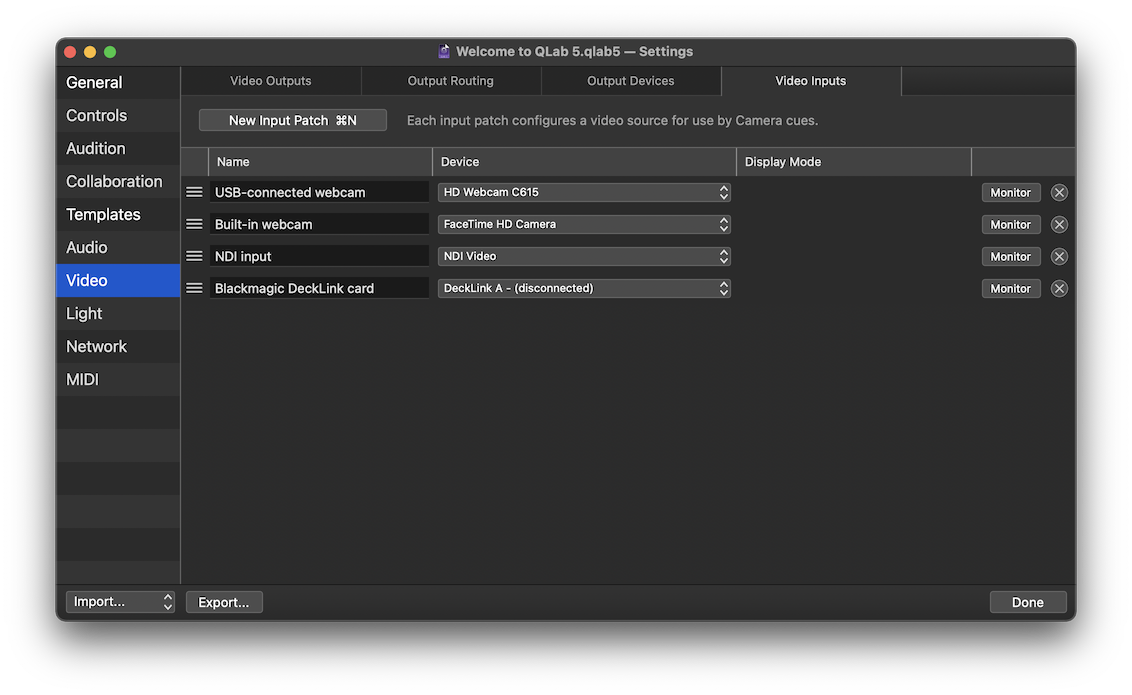
Workspaces in QLab 5 can contain any number of video input patches. You can add an video input patch by clicking on the New Input Patch button or by using the keyboard shortcut ⌘N while the Video Input tab is open and in the foreground. A newly created blank workspace will automatically start off with a single video input patch for each video input device connected to your Mac at the moment you create the workspace.
Several actions are available in the patch table:
- Delete a patch by clicking on the button on the right side of the row for that patch.
- Reorder a patch by dragging it up or down in the patch list. You can click anywhere on the background of the row for that patch, but it’s easiest to click on the left side where the patch number is displayed.
- Duplicate a patch by holding down the option key (⌥) and dragging the patch up or down in the patch list.
- Copy a patch into another workspace by dragging it into that workspace’s patch list.
- Export a patch by dragging it into the Finder.
You can hold down the shift key (⇧) while clicking to select a range of patches, or the command key (⌘) while clicking to select two or more patches, allowing you to act on all the selected patches at once.
The Video Input Patch table consists of four columns.
- Name is optional and can be any text. Note that if you plan to use OSC to control a patch by name, you must give the patch an OSC-compatible name, i.e. one without spaces or special characters reserved by the OSC spec.
- Device lets you select the video input device to use with the patch. QLab can use any USB video device class webcam or input device (i.e. most normal webcams), any IIDC-compliant camera or input device (these are typically referred to as DV devices), any Blackmagic Design DeckLink, UltraStudio, or Intensity device, any Syphon source on your Mac, or any NDI source available to your Mac via its local network.
- Info displays the IP address and port number of NDI sources, and the Display mode menu for configuring the resolution and frame rate of Blackmagic devices. For other types of video sources, this column shows nothing.
- The Monitor button opens a monitor window which lets you view the live input from the patch independently of any Camera cue. The button deletes the patch when clicked.
Light
The three tabs in Light settings pertain to light patching, instrument definitions, and MIDI control of the Light Dashboard.
The Light Patch tab
The Light Patch tab allows you to view and edit the instruments and light groups in the workspace. You can learn more about the Light Patch tab in the Light Patch Editor section of this manual.
The Light Definitions tab
The Light Definitions tab lists every light definition used in the workspace, and allows you to edit, copy, and delete definitions in the workspace. You can learn more about the Light Definitions tab in the Light Patch Editor section of this manual.
The Light Dashboard MIDI tab
This tab allows you to map incoming MIDI messages to light instrument parameters in the Light Dashboard. This lets you, for example, use MIDI control surfaces to directly control lights in QLab.
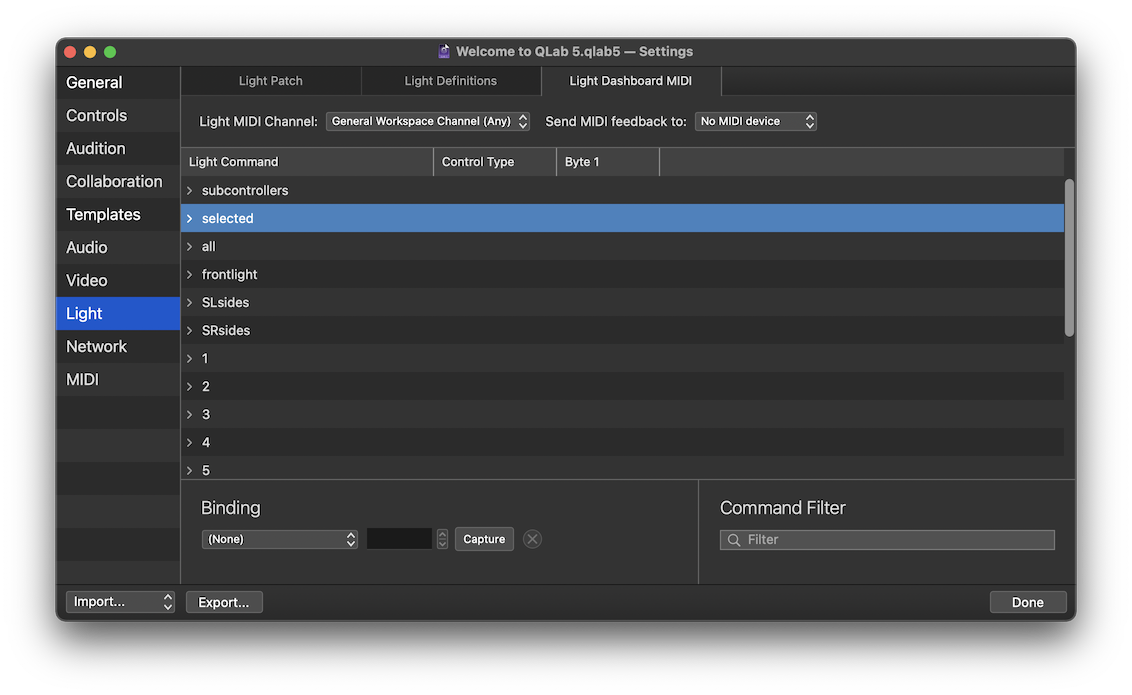
Light MIDI Channel can be set to follow the workspace MIDI channel, any single channel, or to “any”. The Light Dashboard will listen on the specified channel for MIDI messages that have been assigned to the commands below.
Send MIDI feedback allows MIDI devices such as motorized fader banks to follow along. QLab will send MIDI messages to the specified device which match the MIDI messages that have been assigned below.
The Light Command table
This table contains one row for each instrument and light group in the workspace, as well as two special-case rows at the top, which will be discussed in a moment. As you add instruments and light groups to the workspace, this table will be automatically updated. Rows can be expanded to show the parameters they contain.
The first special-case row is the subcontrollers row, which contains any lighting subcontrollers in the workspace.
The second special-case row is the selected row, which represents whichever instruments and groups are selected in the Light Dashboard at a given moment. Any MIDI commands mapped to parameters in this row will be directed to the selected instruments and light groups. This allows you to flexibly use a MIDI controller to work with your lights, even if you have only a small controller and many lights.
After the special-case rows are rows for instruments and light groups.
When any row is selected, you can either manually assign a MIDI message to it using the controls under the Binding heading below, or you can click the Capture button and QLab will listen for the next incoming MIDI message on the MIDI channel specified at the top of the window.
You can assign a MIDI message to individual parameters within an instrument or light group, and you can also assign a message to the instrument or light group itself, in which case the message will be directed to the default parameter of that instrument or light group.
The Command Filter lets you search for the name of an instrument or light group, and temporarily hide everything else. This can make it easier to work with a complex workspace.
Network
The two tabs in Network settings pertain to Network cues, which send OSC and other network messages, and to settings that control how your workspace can be accessed over a network using OSC and plain text commands.
The Network Outputs tab
A network patch is the mechanism that QLab uses to route messages from Network cues to their destinations, both within the same computer that QLab is running on, and other devices on the network. Every Network cue must be assigned to a single network patch, and the configuration of the patch defines how the output from that cue will behave.
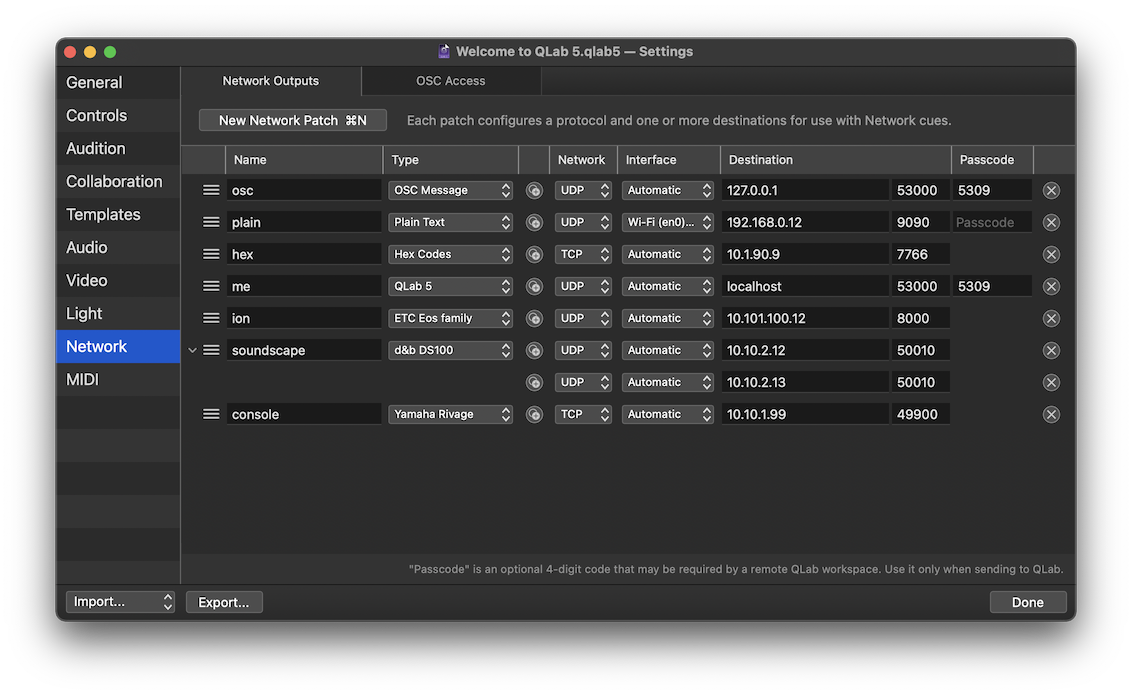
Workspaces in QLab 5 can contain any number of network patches. You can add a network patch by clicking on on the button labeled New Output Patch or by using the keyboard shortcut ⌘N while the Network Outputs tab is open and in the foreground. A newly created blank workspace will automatically start off with a single network patch preconfigured to allow QLab to send OSC messages to itself.
Several actions are available in the patch table:
- Delete a patch by clicking on the button on the right side of the row for that patch.
- Reorder a patch by dragging it up or down in the patch list. You can click anywhere on the background of the row for that patch, but it’s easiest to click on the left side where the patch number is displayed.
- Duplicate a patch by holding down the option key (⌥) and dragging the patch up or down in the patch list.
- Copy a patch into another workspace by dragging it into that workspace’s patch list.
- Export a patch by dragging it into the Finder.
You can hold down the shift key (⇧) while clicking to select a range of patches, or the command key (⌘) while clicking to select two or more patches, allowing you to act on all the selected patches at once.
The patch table consists of nine columns.
- The unlabeled column containing a button lets you drag patches to reorder them, copy them into other workspaces, or drag them to the Finder to save as a workspace settings file.
- Patch name is optional and can be any text.
- Type allows you to configure the patch to send generic OSC messages, plain text messages, or OSC messages using QLab’s built in library of network device definitions. You can learn more about the various network device definitions available and how to use them in the Network cues section of this manual..
- The unlabeled column containing a button lets you add destinations to a patch, each with its own network, interface, IP address, port number, and passcode setting.
- Network lets you select TCP or UDP transport for the patch.
- Interface lets you select a specific network interface for the patch to use, or “automatic” to allow macOS to route messages using that patch. Automatic routing usually works, but if your Mac is connected to multiple networks using similar IP address schemes, selecting a specific interface may be necessary.
- The Destination column contains both the IP address (such as
192.168.1.12) or mDNS name (such asqlab-computer.local) of the destination device and the port number of the destination device. You can enter the wordlocalhostin place of an IP address to have the patch route messages back into QLab with the lowest possible latency. These messages never leave QLab. You can enter127.0.0.1to route messages to other software on the same Mac. - Passcode allows you to use the patch to send messages to a QLab workspace that has a passcode set. This code is QLab-specific and should only be set when necessary.
- The button deletes the patch when clicked.
The OSC Access tab
This tab allows you to define how your workspace can be accessed via Open Sound Control (OSC) and plain text messages sent over UDP.
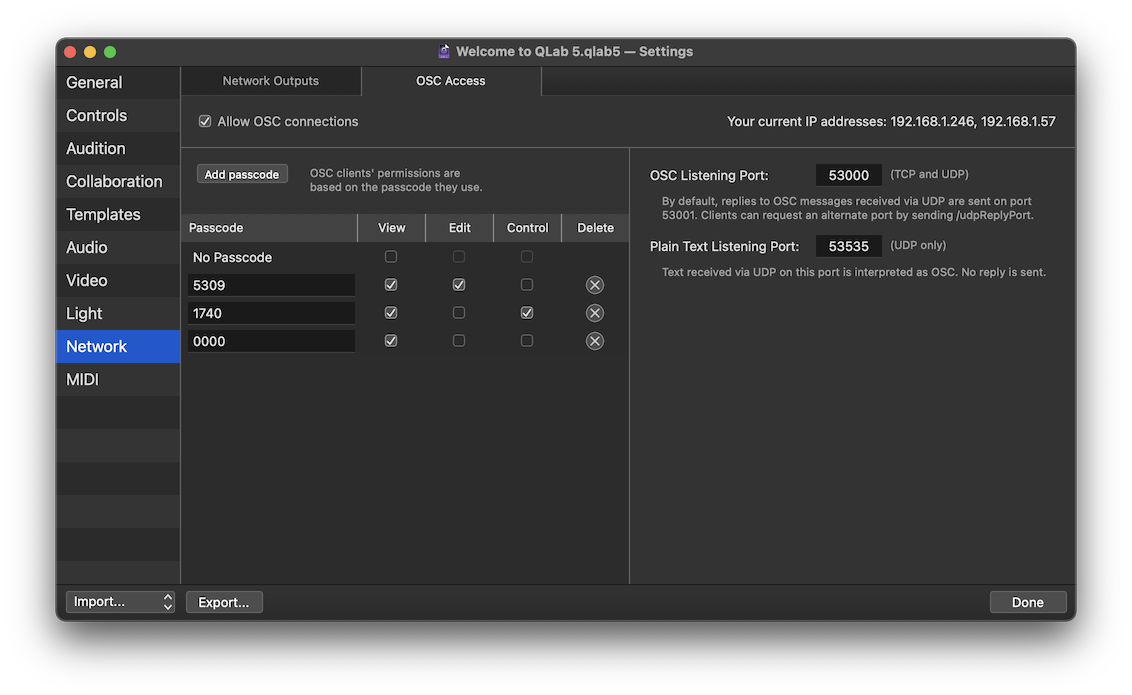
The upper left corner has a checkbox which turns OSC access on or off. When this box is unchecked, incoming OSC and plain text messages will have no effect on the workspace. When the box is checked, incoming OSC and plain text messages will be admitted based on the rest of the settings in this tab.
The upper right corner of the tab displays the current IP address or addresses of your Mac.
The OSC access table
Any program or device that sends OSC messages can communicate with your workspace using QLab’s extensive OSC dictionary. QLab 5 allows you to set the scope of access for OSC connections using three permission switches:
- View access allows clients to view information about the workspace.
- Edit access allows clients to create and delete cues, change parameters of cues, and adjust workspace settings.
- Control access allows clients to move the playhead and start and stop cues.
The OSC access table allows you to configure the use of these three levels of permission for incoming OSC.
The first row in the OSC access table is labeled No Passcode and the boxes checked here set the access permission for OSC clients that connect to QLab without sending a passcode. If all three boxes are unchecked, which is the default, clients will not be able to connect without a passcode.
New workspaces have a single randomly generated passcode configured to allow full access. You can configure this passcode as needed using the view, edit, and control checkboxes, and change the passcode itself if you like. Passcodes must be four digit numbers.
The Add Passcode button adds a row to the table with a new, randomly generated passcode which you can, of course, edit as you prefer.
You can delete a passcode using the button on the right side of the table.
Workspaces can have as many passcodes as you like. You can learn about how to connect to a QLab workspace using a passcode from this section of the OSC dictionary.
Listening Ports
To the right of the OSC access table are two text fields which allow you to define the ports that your workspace uses to listen for incoming messages. Ports are like doors in a computer’s network connection. Each separate type of message needs its own port.
The OSC listening port is used for OSC messages sent using either TCP or UDP connections. The default port is 53000, and you can change it to any valid port number, which is any whole number from 1 to 65,535. Be advised, though, that other software and network protocols may have a claim on certain port numbers, so do your homework before choosing a port. Generally speaking, one- and two-digit port numbers are spoken for. When messages come in via UDP, QLab sends replies on port 53001, no matter what port you choose here for listening. Individual clients can request a custom UDP reply port by sending the message /udpReplyPort x where x is the requested port number.
The workspace also receives plain text via UDP using the plain text listening port, which is 53535 by default, and attempts to interpret it as OSC. For example, sending the text /cue/selected/start via UDP to QLab on this port will have the same result as sending the actual OSC command /cue/selected/start to the OSC listening port. No replies are sent to plain text messages.
When using plain text messages, it’s wise to learn about and use the /forgetMeNot OSC message, which allows UDP clients to remain connected to QLab without having to re-send a passcode once per minute.
It’s important to remember that QLab itself always listens on port 53000. Any application-level OSC messages can still be received by QLab on port 53000 even if the workspace OSC listening port is changed.
If you are using NDI for video input or output, QLab will warn you of port number collisions to the best of its ability. Nevertheless, you should take care to only use port numbers that you know are available.
MIDI
The two tabs in MIDI settings pertain to MIDI and MIDI File cues, which send MIDI Voice, MIDI Show Control, and MIDI System Exclusive (SysEx) messages, and to QLab’s MSC show control broadcast feature.
The MIDI Outputs Tab
A MIDI patch is the mechanism that QLab uses to route messages from MIDI cues, MIDI File cues, Timecode cues using MTC, and MSC show control broadcast messages to their destinations. Every cue that sends MIDI must be assigned to a single MIDI patch, and the configuration of the patch defines how the output from that cue will behave.
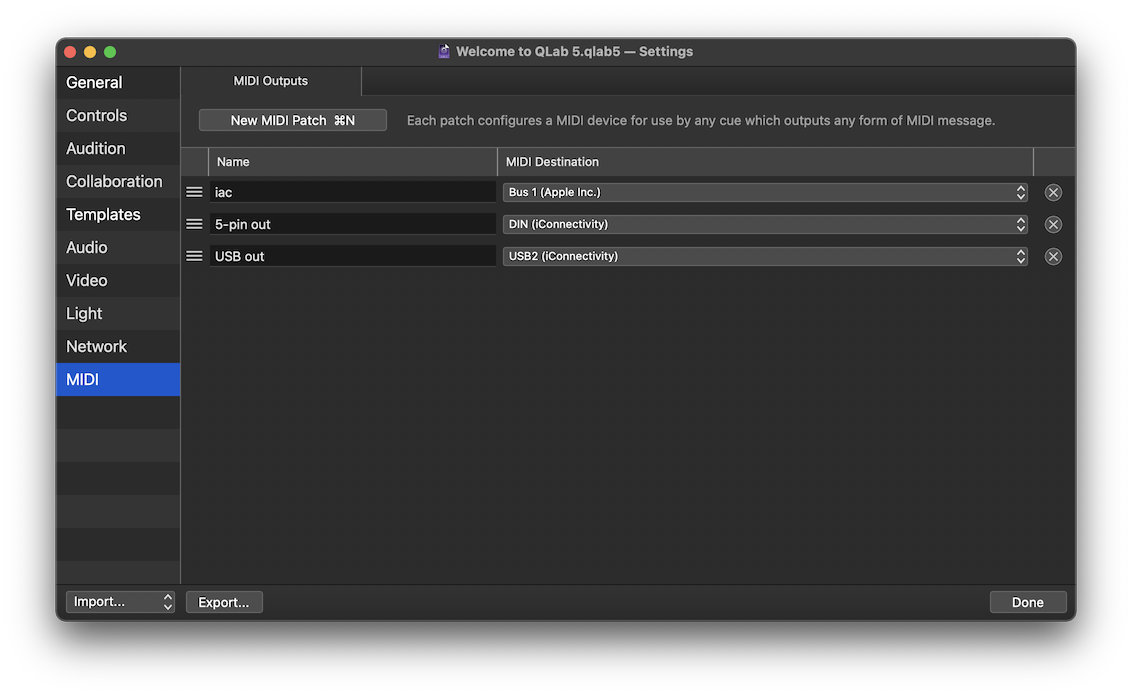
Workspaces in QLab 5 can contain any number of MIDI patches. You can add a MIDI patch by clicking on on the button labeled New Output Patch or by using the keyboard shortcut ⌘N while the MIDI Outputs tab is open and in the foreground. A newly created blank workspace will automatically start off with a single MIDI patch for each MIDI output available on your Mac at the moment you create the workspace.
Several actions are available in the patch table:
- Delete a patch by clicking on the button on the right side of the row for that patch.
- Reorder a patch by dragging it up or down in the patch list. You can click anywhere on the background of the row for that patch, but it’s easiest to click on the left side where the patch number is displayed.
- Duplicate a patch by holding down the option key (⌥) and dragging the patch up or down in the patch list.
- Copy a patch into another workspace by dragging it into that workspace’s patch list.
- Export a patch by dragging it into the Finder.
You can hold down the shift key (⇧) while clicking to select a range of patches, or the command key (⌘) while clicking to select two or more patches, allowing you to act on all the selected patches at once.
You can optionally give a name to each MIDI patch, which can be any text.
The pop-up menu for each patch displays all available MIDI destinations available on your Mac.
The MSC Broadcast Tab
This tab allows you to configure MSC broadcast outputs which allow other programs or devices to synchronize starting and stopping cues along with QLab.

Still have a question?
Our support team is always happy to help.