The Light Patch Editor
The Light Patch Editor comprises the first two tabs found in Workspace Settings → Light: the Light Patch tab and the Light Definitions tab.
The Light Patch Tab
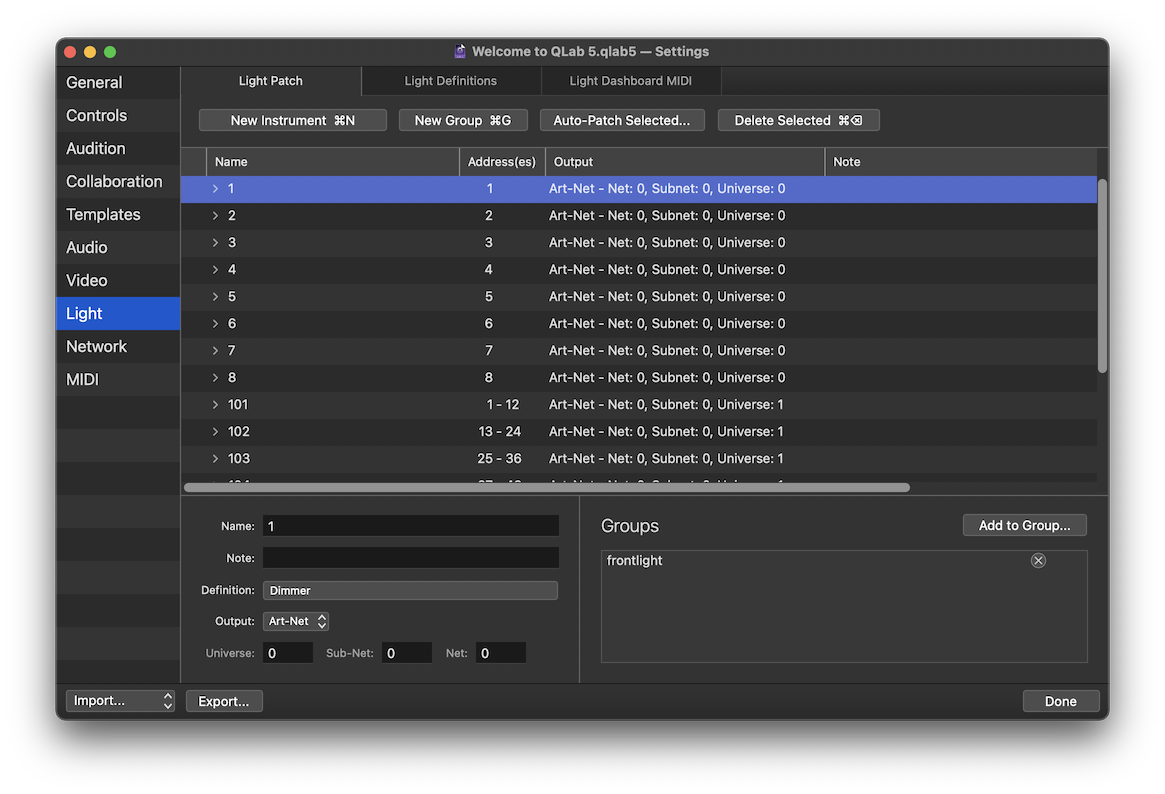
The Light Patch tab allows you to view and edit the instruments and light groups in the workspace.
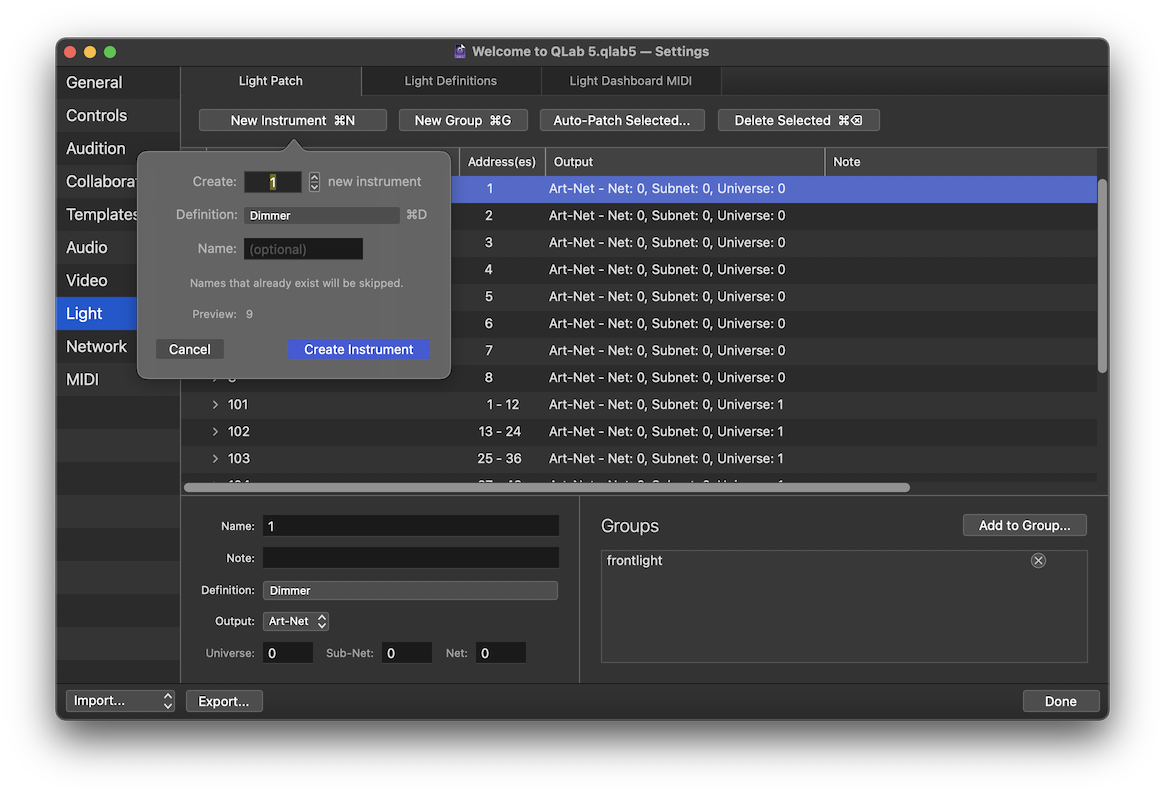
The button lets you add one or more instruments to the workspace. When you click the button, a popover will appear giving you several options, including the number of instruments you want to create, the definition they should use, and so on.
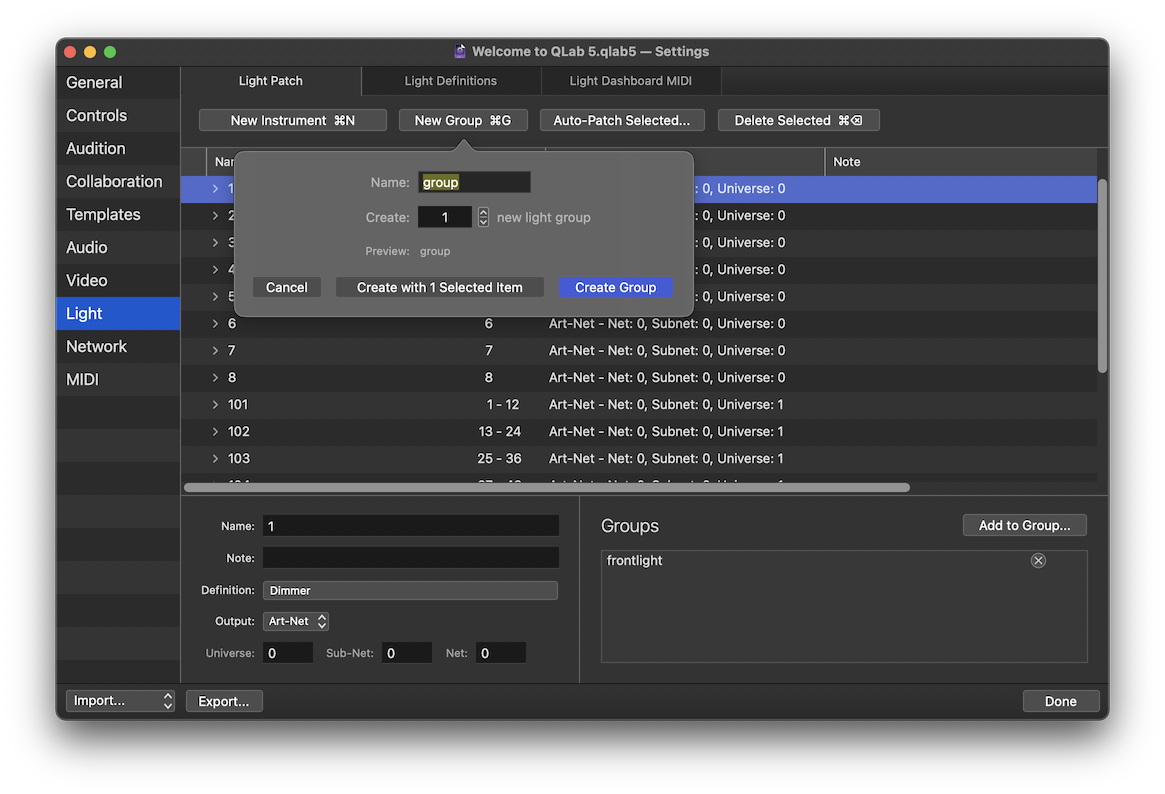
The button lets you add one or more light groups to the workspace. When you click the button, a popover will appear giving you several options, including how many groups you want to create and whether you would like the currently selected instruments to be included in the newly created group or groups.
The button lets you automatically assign DMX addresses to the instruments currently selected in the patch list. QLab will display a dialog box which allows you to choose the DMX device you want to use, as well as the starting address. QLab will then assign addresses to the selected instruments according to the specifics you enter into the box.
The button deletes the selected instrument(s) and/or light groups(s) from the workspace.
The Patch Table
All instruments and light groups in the workspace are listed here, sorted alphabetically by name. You can click on the right-pointing disclosure triangle to reveal the parameters for each instrument, or the instruments contained in each light group.
Status. The status column displays a icon for a broken instrument, or a icon for an instrument without an address assigned. Otherwise, this column displays nothing.
Name. Names must be unique within a workspace, and can contain letters, numbers, and spaces only.
Address(es). This column displays the DMX address or addresses for the instrument. You can double click on the address to edit it. If the instrument requires multiple addresses, enter only the starting address. Although multiple instruments cannot be assigned to the same address, QLab will allow you to enter an address which is already used. Instruments with conflicting addresses will be marked as broken and will not work until the conflict is solved. Without an applicable license installed, any instruments using more than the freely allowed 16 addresses will be marked as broken.
Addresses must be unique per universe, per device.
Output. This column displays the output device, Art-net or USB, that the instrument is set to use. If the output device supports more than one universe of DMX, that information is shown as well.
For multi-universe devices, the first universe is numbered 0. Art-net additionally allows 128 nets, each containing 16 sub-nets. Each sub-net contains 16 universes. So, the first 512 addresses in a lighting device are all part of universe 0, which is part of sub-net 0, which is part of net 0. Since sixteen universes contain 8,192 addresses, you likely will not need to worry about net or sub-net unless you have a very complex show.
Note. For your notational pleasure.
You can right-click (or control-click or two-finger-click) on the column headings to show two more columns which are hidden by default:
Definition. Shows the instrument definition for the instrument. Click on the definition icon to choose a different instrument definition.
Groups. Lists the light groups that the instrument belongs to, not including the default “all” light group, which all instruments always belong to.
You can also hide any of the default columns as you prefer.
Beneath the patch table is a sort of mini-inspector that shows details of the selected instrument or light group.
Name, Note, and Definition are all duplicate, alternative views for the same information listed in the patch table. You can view and change each of these properties in both places.
Output. QLab can use both Art-net and certain USB DMX devices to communicate with lighting equipment. Each individual instrument can be assigned to either the Art-net network or to an individual USB DMX device.
If you assign the instrument to Art-net, QLab will display Universe, Sub-Net, and Net fields for you to fill in. These fields should correspond with the configuration of the Art-net node that the instrument is connected to.
If you assign the instrument to a USB device, QLab will display a Device pop-up menu of available USB DMX devices. If you select a USB device has more than one universe, a text field will also be displayed allowing you to select which universe the selected instrument should use. Note that the first universe of a device is always universe 0.
If you select “None”, the instrument will remain unpatched. Unpatched instruments are not displayed in the Dashboard.
It’s important to remember that all Art-net nodes on a network share one set of Universes, Sub-Nets, and Nets, whereas all USB DMX devices have their own, unique sets of Universes. If you have two single-universe Art-net nodes both set to universe 1, sub-net 2, net 3, then the address space is shared on both devices, and you have a total of 512 addresses available to use. If you have two single-universe USB DMX devices, they each refer to themselves as universe 0, but they are in fact separate address spaces and you have a total of 1024 addresses available to use.
The button displays a pop-up of all light groups in the workspace, and allows you add the selected instrument(s) and/or light group(s) to a light group. Light groups can indeed contain other light groups.
Below the button is a list of the light groups that the selected instrument(s) and/or light group(s) belong to.
The Light Definitions Tab
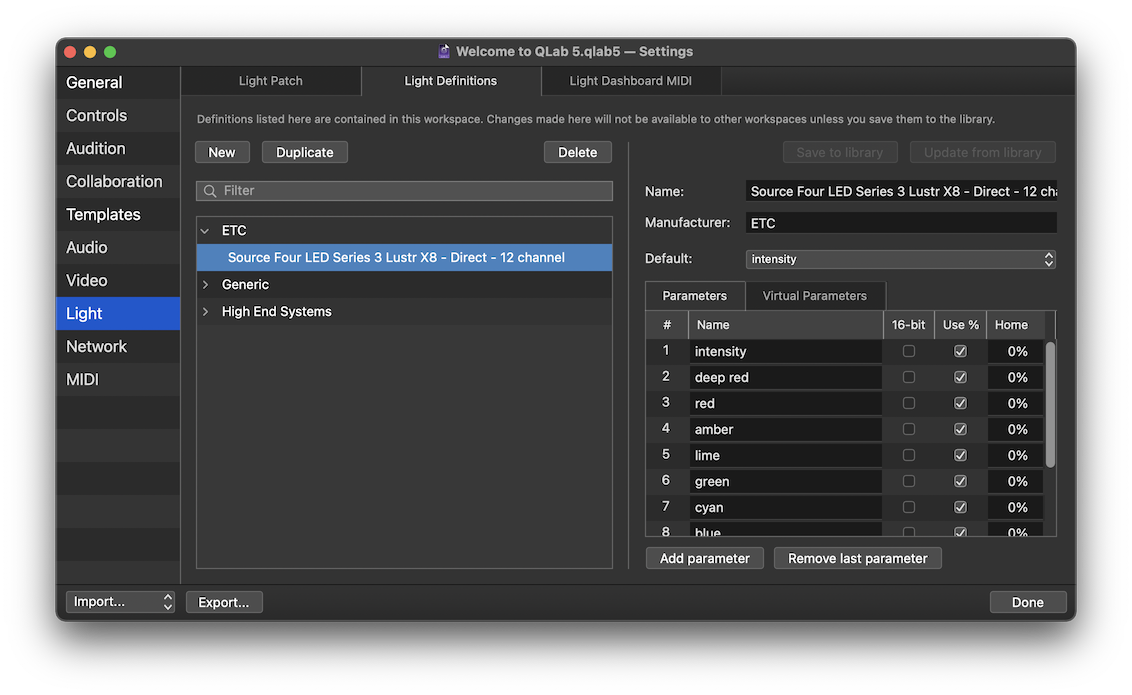
The Light Definitions tab lists every light definition used by at least one instrument in the workspace. Definitions are copied into the workspace from the Light Library when that definition is selected for an instrument in the light patch. If all the instruments using a particular definition are deleted from the workspace, however, the definition remains in the workspace until it’s manually removed.
There are five buttons across the top of the Light Definitions tab:
- The button creates a new instrument definition in the workspace.
- The button creates a copy of the selected definition within in the workspace.
- The button deletes the selected definition from the workspace. QLab will not permit you to delete a definition that is currently being used. Note that deleting a definition from a workspace does not delete that definitions from the Light Library.
- The is enabled when a definition is selected that exists in the workspace, but not in the Light Library. Clicking this button saves the definition to the Light Library, which allows it to be used in any workspace.
- The button is enabled if the definition in the workspace has the same name as a definition in the global Light Library, but different parameters. Clicking this button replaces the workspace’s definition with the global one.
Filter. Type here to temporarily filter the list of definitions by name, to make it easier to find what you’re looking for.
Definition List. Definitions are hierarchically sorted by manufacturer, and listed in alphabetical order. Selecting a definition allows you to view and edit its details to the right of the window.
Editing Instrument Definitions
Instrument definitions must include a unique name, a manufacturer, and at least one parameter. Definitions can optionally also include virtual parameters which enable the use of complex controls like color pickers.
Default. A definition can optionally have a default parameter, which is the parameter that will respond to commands that do not specify a parameter. In most cases, the default parameter is intensity, so that you can use commands like 1 = 100 or 1 = 50 and control the brightness of the light. If you want to set a different default parameter, or set no default parameter, use this drop-down menu.
To add a parameter to the currently selected instrument definitions, click the button below the Parameters table. To delete the last parameter from the current instrument definition, click .
The Parameters tab five columns: #. The order in which parameters are listed is defined by the manufacturer of the lighting instrument. If you are creating your own definitions, be sure to add parameters in the correct order according to the manufacturer’s specifications.
Name. Parameter names must be unique per instrument, and can contain only letters, numbers, and spaces.
16-bit. Some lighting instruments and accessories use two DMX addresses for a single parameter to allow much more precise control; two DMX addresses allows for a range of 0 to 65,535. Check this box to assign the parameter to use two adjacent addresses together as a single 16-bit address.
Use %. DMX values range from 0 to 255. Check this box to have QLab express the parameter in terms of a percentage scale. This does not alter the behavior of the parameter at all; it only alters how the parameter is displayed in the Light Dashboard and in cues.
Home. Set the home position for the parameter. For dimmers, that’s usually 0%, meaning off. For irises it’s typically 100%, meaning open. For moving mirrors it’s usually 50%, meaning center.
Virtual Parameters
Virtual parameters are a way of grouping together several related parameters of a light. These parameters can then be controlled together with a single light command, and with a corresponding control tool in the Light Dashboard.
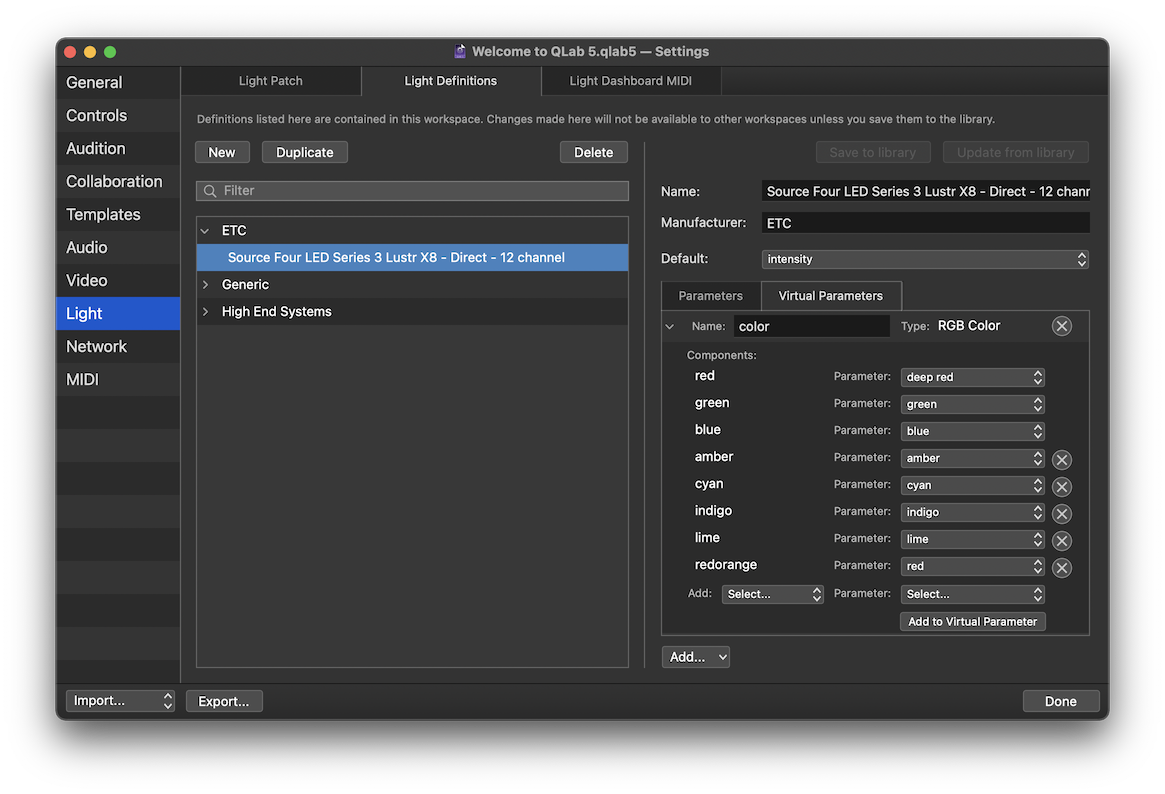
There are four types of virtual parameters, each of which behaves in a specific way. To create a new virtual parameter, navigate to the Virtual Parameters tab of the Parameters table, click on the button at the bottom, and select from the four options:
- RGB Color. This virtual parameter is used to combine color parameters on lights which use additive color mixing. Lights with this virtual parameter display an additive color picker control in the Light Dashboard and in the Light cue inspector. A light needs at least one
red, onegreen, and oneblueparameter to include in an RGB Color virtual parameter, and if the light has additional colors, such aswhite,amber, orlime, those can be added as well. If your light contains multiple cells or zones with their own color controls, you can create multiple RGB Color virtual parameters; one for each cell or zone. - CMY Color. This virtual parameter is used to combine
cyan,magenta, andyellowcolor parameters on lights which use subtractive color mixing (or simulated subtractive color mixing.) Lights with this virtual parameter display a subtractive color picker control in the Light Dashboard and in the Light cue inspector. - HSI Color. This virtual parameter is used to combine
hue,saturation, andintensity(orvalue) parameters on lights which use HSI or HSV color mixing. Lights with this virtual parameter display an HSI color picker control in the Light Dashboard and in the Light cue inspector. - Pan/Tilt. This virtual parameter is used to combine
panandtiltparameters. Lights with this virtual parameter display a pan/tilt control in the Light Dashboard and in the Light cue inspector. - One-to-Many. This virtual parameter is used to create a single control that simultaneously commands multiple individual parameters. For example, if you have a multi-cell strip light that does not have an overall intensity channel, you could create a
One-to-Manyvirtual parameter that includes the intensity parameter for each cell. This virtual parameter will then function as an overall intensity control for the whole fixture.One-to-Manyvirtual parameters can include both regular parameters and other virtual parameters.
The Light Dashboard MIDI Tab
The Light Dashboard MIDI tab allows you to map incoming MIDI messages to light instrument parameters in the Light Dashboard. This lets you, for example, use MIDI control surfaces to directly control lights in QLab. You can learn more about the Light Dashboard MIDI tab in the Workspace Settings → Light section of this manual.
The Patch Menu
When the Light Patch Editor is active, the Tools menu becomes the Patch menu, containing tools for working with the light patch:
Unpatch All. Remove the DMX address assignment for all instruments in the workspace. Needless to say, the instruments will need to have DMX addresses reassigned before they can be used. Unpatched instruments are not displayed in the Dashboard.
Unpatch Selected. Remove the DMX address assignment for the instruments currently selected in the patch list.
Auto-patch All… Automatically assign DMX addresses to all instruments in the patch list. QLab will display a dialog box which allows you to choose the device you want to use, as well as the starting DMX address. QLab will then assign addresses to all instruments according to the specifics you enter into the box, moving sequentially through to the last parameter of the last instrument. This will overwrite any existing DMX assignments, but will not alter instrument names, definitions, light group assignments, or any other attributes.
Auto-patch Selected… Automatically assign DMX addresses to the instruments currently selected in the patch list. QLab will display a dialog box which allows you to choose the device you want to use, as well as the starting DMX address. QLab will then assign addresses to the selected instruments according to the specifics you enter into the box, moving sequentially through to the last parameter of the last instrument. This will overwrite any existing DMX assignments, but will not alter instrument names, definitions, light group assignments, or any other attributes.
Select all instruments selects every instrument in the light patch.
Select all unpatched instruments selects only instruments with absent or incomplete patch information.
Still have a question?
Our support team is always happy to help.