Network cues you to send messages from QLab to other software or devices using the network connections of your Mac. They can also be used to send control messages to QLab itself. Messages can be sent via TCP or UDP.
The Network cue can send three types of network messages:
In addition, QLab includes the following collection of network device descriptions which allow a network patch to be configured to communicate with a specific device or program:
These network device descriptions include the full library of commands required to communicate with these devices or programs.1 When a network patch is configured to use one of these network device descriptions, the inspector shows a series of menus and controls specific to that description. This makes it easy to work with a device without having to constantly be referring to the device's manual to look up specific commands or syntax. Examples are provided below.
Network cues require a license of any type.
When a Network cue is selected, the inspector shows the Basics tab and Triggers tab, used by all cues, as well as a Settings tab.
The controls in the Settings tab very depending upon two factors: the selected network patch, and whether or not the cue has a duration. The examples and screen shots in this section of the manual use a variety of combinations of settings in order to give a sense of the possible layouts.
Patch. This pop-up menu allows you to select a network patch for the cue to use. Clicking on the menu allows you to select one of the network patches already configured in the workspace, or (unpatched) if you want to ensure that the cue does not play when started. You can also choose Open Network Settings to edit patch list... to quickly get to Workspace Settings → Network → Network Outputs, or choose New patch with network device to quickly generate a new network patch and select it for use. If a cue's patch has multiple destinations, the message sent by the cue will be sent to each destination simultaneously. This is convenient, for example, for easily controlling a primary and a backup device at the same time without needing to create separate cues to control each.
The contents of the lower portion of the Settings tab will change based upon the type of patch in use.
Fade. This pop-up menu will default to No Fade if the Network cue has no duration, or Resend if it does have a duration. This menu lets you set the Network cue to send its message just once (no duration, no fade), to send it repeatedly over time (duration, resend), or to perform a one-dimensional (1D) or two-dimensional (2D) fade to send more complex messages over time. These options are discussed more below.
Duration. You can edit the duration of the cue here, as well as in the Basics tab or in the Duration column of the cue list.
Send. Clicking this button will test-send your message and is the same as previewing the cue.
If the Network cue uses a patch configured to send an OSC message, the lower part of the Settings tab shows a single, large text field.

The text field allows to enter any single OSC command. OSC messages are made up of an address which is the part that looks like a web address, and zero or more arguments which follow the address. QLab uses the following formatting rules for OSC messages:
\T is a boolean true.\F is a boolean false.\I is an impulse.\N is a Null.While OSC itself only supports using a period (a.k.a. a "full stop") as a decimal separator, QLab is aware of the location settings on your Mac and will invisibly substitute a period in outgoing OSC messages if your Mac is set to use a comma as the decimal separator.
Here are a few examples showing proper OSC message formatting in QLab.
/my/groovy/message 2 10 12This sends a message to address /my/groovy/message with three integers, 2, 10, and 12, as separate arguments.
/day/start "mornin', ralph" "morning', sam"This sends a message to address /day/start with two strings, morning', ralph and mornin', sam, as separate arguments.
/osc/rocks \TThis sends a TRUE value to the address /osc/rocks.
If the Network cue uses a patch configured to send an OSC message and the cue has a duration, the Fade control comes into play.
If the Fade pop-up menu is set to Resend, the cue sends its message repeatedly over its duration. The frequency that the message is sent is adjusted by the fps pop-up menu which has several options from 1 message per second up to 120 messages per second.
The cue in this screen shot will send its message 30 times per second for ten seconds:

If the Fade pop-up menu is set to 1D Fade, the cue also sends its message repeatedly over its duration, but allows you to configure the message to change over time.

This cue is set to use a 1D Fade, resending its message at 60 fps using floats. This means:
The right side of the tab displays a fade curve (which you can edit to suit your needs) and two text fields. The From field sets a starting value, and the To field sets a final value.
The text field fills the left side of the tab. Note that the OSC message includes the text #v#. This is a token, which is like a stand-in for an actual value.
When the cue runs, QLab calculates a fade starting at the From value and ending at the To value. Each time the message is sent, the calculated value is sent in place of the #v# token.
The token is most commonly used in the place of an argument, but if the OSC message that you're sending includes a numerical value in the address, the token can be used there as well.
The pop-up menu in the lower right corner lets you choose between using a custom curve shape or a linear curve shape, and lets you reset the curve to its default state.
If the Fade pop-up menu is set to 2D Fade, the cue allows you to fade two values at the same time over the duration of the cue.

This cue is set to use a 2D Fade, resending its message at 100 fps using integers. This means:
The left side of the tab is filled by a large text field. Here, you can enter an OSC message including two tokens, #x# and #y#. When the cue runs and the fade animates, the X-axis value will replace the #x# token and the Y-axis value will replace the #y# token.
The right side of the tab shows a blue rectangular area inside which you can draw a path using your mouse or trackpad. The fade path is shown as a yellow line over a blue background, with the following details:
Along the left edge of the canvas is a set of tools for creating and editing paths.
The select tool lets you click on individual control points to select them for precise editing.

With one point selected, you can use the text fields in the lower right corner to type in a value or click and drag up and down to adjust the value.
You can also click and drag a selection box around several control points:

The draw tool lets you click to add points to the path, or click, hold, and drag to draw a freeform line. Holding down the option key (⌥) key allows you to add a point in the middle of a path, otherwise each drawn point will be added to the end of the path. Double-clicking while using the draw tool finishes drawing and switches to the select tool.
The circle tool lets you draw a perfectly circular path. The first click sets the starting (and ending) point of the circle, and the second click defines the diameter of the circle. Holding down the option key (⌥) allows you to instead click once to define the center point, and then click again to define the radius of the circle.

Flip vertical flips the selected group of points around the X axis.
Flip horizontal flips the selected group of points around the Y axis.
Rotate spins the selected group of points in 90 degree increments around the center point of the selection.
Reverse leaves the points in the same location, but reverses their order in the path. For example, consider this simple path with two points:

After using the reverse tool, what was the start point is now the end point, and vice versa:

The help button displays a list of the keyboard shortcuts and modifiers for working with 2D fades.
The alignment menu to the upper right of the path lets you choose where the axis is placed on the canvas. By default, it is placed at the center, both horizontally and vertically, corresponding with QLab's center origin point for video geometry. However, this menu allows you to place the axis in one of the corners to help achieve your mathematical goals. It has no functional difference beyond how the canvas is displayed, and therefore what sorts of values are easiest to enter.
To the right side of the canvas are a few more controls for configuring the canvas and the overall behavior of the path:
Width and Height allow you set the width and height of the blue rectangle, which defines the range of values sent by the cue.
Smooth path. When this box is un-checked, paths will be drawn precisely between each control point. When the box is checked, the path will be smoothed between points to create a naturally curving line.
You can use the and buttons to zoom in and out on the canvas. If you're using a trackpad, you can zoom in and out by placing the cursor over the canvas and pinching in and out. If you're using a mouse or trackball with a scroll wheel, you can zoom in and out by holding down the option key (⌥) and scrolling vertically.
While zoomed in, you can pan around using two-finger swipes on a trackpad. If you have a mouse or trackball with a middle button (oftentimes the scroll wheel can be clicked; this is usually the middle button,) you can pan around my holding that button down.
The button resets the path to the default shape defined by the cue template.
If Live Preview is on, QLab will transmit OSC messages as you click and drag so that you can see or hear the results in real time.
If the Network cue uses a patch configured to send a Plain Text message, the lower part of the Settings tab shows a single, large text field.

Plain text messages cannot be given a duration, and so cannot be faded or resent. Only ASCII characters can be used in plain text messages.
If the Network cue uses a patch configured to send a Hex Code message, the lower part of the Settings tab shows a single, large text field.

Plain text messages cannot be given a duration, and so cannot be faded or resent. Only hexadecimal symbols can be used in plain text messages; the numerals 0 through 9 and the letters A through F.
If the Network cue uses a patch configured with a network device description, the lower part of the Settings tab can show a variety of pop-up menus, text fields, checkboxes, sliders, 1D fade curves, and 2D fade curves. The specific controls that are available depend upon the network device description in use.
When using Network cues to communicate with another computer running QLab, or to send OSC messages from QLab back to itself, this option provides a very simple interface for accessing the commonly used OSC commands that QLab recognizes. Enter a cue number, and choose a command to send. Some commands have additional arguments, and additional fields will appear when those commands are chosen.


If you would like us to create a network device description for a specific network-controllable device or program, please contact us at support@figure53.com and tell us about it. We may be able to create a description, and if so we may be able to include it in a subsequent release of QLab.
As discussed in the section on Cue Templates in this manual, cues can be given a customized default state. Newly created cues in a workspace come into existence using this default state. If, for example, most of the Network cues in your workspace will be used to start a cue on an ETC console, you might configure the Network cue template like this:
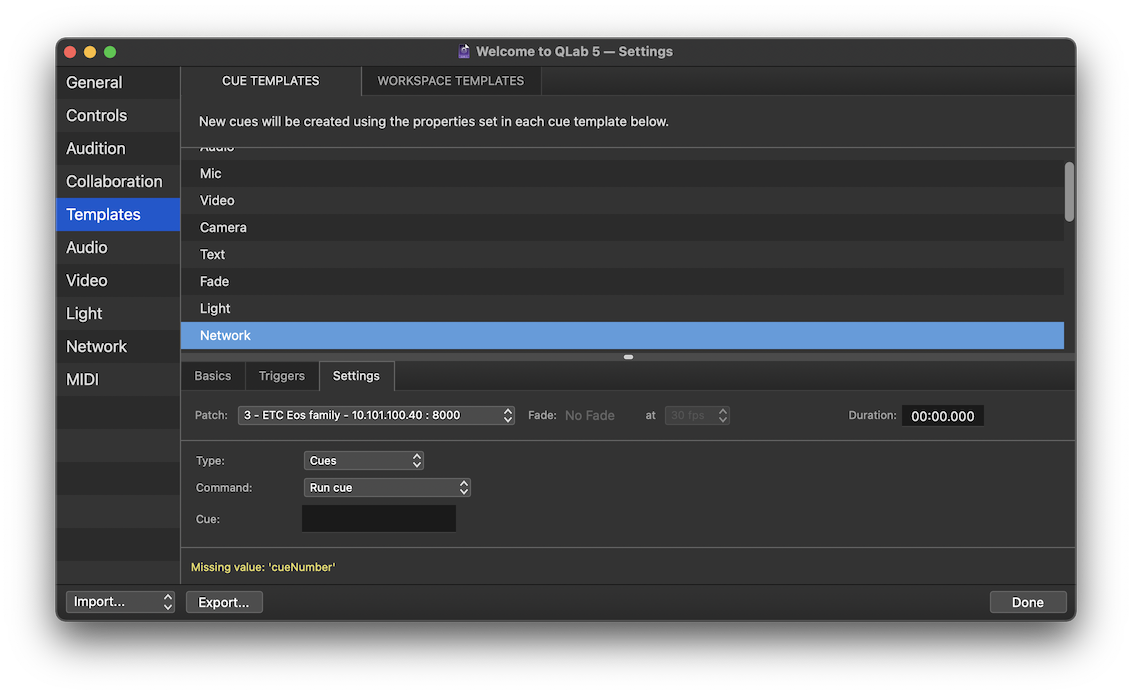
Then, every new Network cue would start off looking like that, and would need only a cue numbered to be entered in the Settings tab in order to be used.
However, if your QLab workspace communicates with several different OSC-controllable devices, say an ETC console, a d&b DS100, and another remote copy of QLab, you might find yourself wishing there were a way to make multiple cue templates. To address this need, follow these steps:
Now, newly created Network cues will appear using that patch and all its associated settings, but if you switch the cue to another patch, the default settings you created in the cue template will suddenly appear. In this way, you can capture the default state of each type of Network cue that you plan to use.
Network cues can become broken or warned for the following reasons:
The cue has no network patch assigned. Assign a network patch to clear this warning.
The cue has a network patch assigned, but something is wrong with it. The network patch will have warnings of its own, listed in the Warnings tab of the Workspace Status window, which you can use to figure out what's wrong with it. Either fix the network patch or select a new network patch to clear this warning.
Fill in a valid message in the Settings tab of the inspector to clear this warning.
The cue uses a network device description and one or more parameters have no value. Fill in values for every control in the Settings tab of the inspector to clear this warning.
The cue uses a patch configured to send OSC, but the OSC messages is malformed. Edit the OSC message in the Settings tab of the inspector to clear this warning.
The cue uses a network device description which sends hexadecimal values, but the cue contains at least one character that is invalid. Edit the message in the Settings tab of the inspector to clear this warning.
This non-breaking warning will appear on a Network cue which had a 2D fade background image assigned which QLab is not able to locate. Replace the image or click in the Settings tab of the inspector to clear this warning.
This non breaking warning will appear on a Network cue whose patch directs messages to some other device on the network when external network output is disabled via Override Controls. Re-enable external network output to clear this warning.
This non breaking warning will appear on a Network cue whose patch directs messages to QLab or to other software on the local Mac when local network output is disabled via Override Controls. Re-enable local network output to clear this warning.
A license of any kind must be installed to use Network cues.
All trademarks are the property of their respective owners, and their inclusion in this manual and in QLab does not represent any official relationship between Figure 53, LLC and any other entity. The inclusion of a particular device or program should not be construed as an endorsement, and omission of a device or program should not necessarily be construed as an admonishment. Every effort has been made to ensure that these network device descriptions are accurate and functional, but it is impossible to make a complete guarantee since manufacturers may change their devices or command libraries without notice. ↩