Mute/Solo
Two of the most important features of an audio mixing console or DAW are mute and solo, which enable the listener to selectively silence or isolate one or more tracks in a multitrack recording while the whole project plays. This helps the listener determine how a particular track contributes to and combines with the overall mix.
In QLab, the behavior of a multitrack recording is often achieved by placing multiple Audio cues playing one- or two-channel file targets inside a Timeline Group cue. In this context, mute and solo functions need to apply at the cue level to emulate the behavior of a mixing console or DAW. This would allow individual stems in musical backing tracks to be heard in isolation, or to identify individual elements in a complex soundscape. For example, you could solo cues in a layered mix of rain to figure out which cue is the source of over-prominent dripping, or you could mute and unmute cues in a complex soundscape while the whole thing is running to work out how best to thin it out.
This chapter describes a practical implementation of mute and solo buttons for selected cues. It also discusses and demonstrates how a programming idea can be optimized and refined until it achieves a speed of execution that makes it practical for use in real-world situations.
The example was built using QLab 5, but there’s a downloadable version for QLab 4 as well.
Here it is in action:
The example workspace contains two Timeline Groups in the main cue list, one with stems for a song, the other with sound effects for a rainstorm. It also contains a cart with three cues: MUTE, SOLO, and UNMUTE, which are Start cues which trigger Groups in a separate “engine: cue list. When the MUTE button (or its hotkey) is pressed, the audio of all selected cues is switched off; when the SOLO button (or its hotkey) is pressed, it MUTES every cue that is not selected. Muted cues continue to play, so sync between cues is preserved at all times.
Hotkeys are a very convenient way to use these tools, although accidentally activating them during a performance could be disastrous. You can adopt whatever strategy you like to avoid accidents; perhaps using a Streamdeck or MIDI buttons is the safest option.
The example uses hotkeys without modifiers because they’re simplest and fastest. M and U are free to use, but S is normally assigned to panic selected. To keep the example as smooth and easy as possible, we went to Workspace Settings → Controls → Keyboard and assigned ⌃S (control S) to panic selected.
How It Works
Normally, in this section of a Cookbook chapter there would be a full, detailed explanation of the precise script or OSC messages used. Because the secondary purpose of this chapter is to show how a solution is optimized for execution speed, we are going to identify all the steps required to implement this workspace from initial ideas through to finished programming.
Although there are really only two unique Timeline Group cues, “Scarborough Fair” and “Storm”, the workspace contains many copies of each, so that the workspace contains thousands of cues. This helps us ensure that whatever solution we come up with will work in a densely cues show, not just in a sparse testing environment.
Design Concerns
- Cues may have many channels; all channels need to be muted simultaneously.
- Cues should visibly indicate whether they’re muted or not. An obvious way to do this is to use cue color to make a cue red when it’s muted. If you are using cue colors for other purposes, you may need to adapt this strategy; for the purpose of the example we are assuming that this is the only use of cue colors.
- The cart cues also need to visibly indicate state.
In the example, mutes are toggled on and off with a single button. Solo can be actioned by selecting a cue, or shift selecting multiple cues, and clicking the Solo cart cue. Solos are cleared with the Unmute All cue. You may want a slightly different mode of operation. This can accomplished by modifying the contents of the timeline group that each button starts.
Solo: a first attempt
As a first attempt to solo a selected cue, we can try storing the current main level of each cue in its notes field. That way, we can set the cue’s main level to silent and restore it later by reading the stored value in the notes field. (Because this is not going to be our actual solution, we’re not going to worry about handling potential other use of the notes field. We’ll just assume an empty notes field for now. If this were going to be our real solution, we’d need to figure this out!)
So: we’ll copy every Audio cue’s main level to its notes and set every cue’s main level to -120. Then we’ll unmute just the selected cues by copying their main levels back from their notes fields.
tell application id "com.figure53.QLab.5" to tell front workspace
  set theCuesToSolo to (selected as list)
  set theCues to cues whose q type is "audio"

  -- copy the main level of every Audio cue into its notes field
  -- then set the cue to silent
  repeat with eachCue in theCues
    set the notes of eachCue to (getLevel eachCue row 0 column 0) as text
    setLevel eachCue row 0 column 0 db -120
    set q color of eachCue to "red"
  end repeat

  -- unmute all the selected cues
  repeat with eachCue in theCuesToSolo
    setLevel eachCue row 0 column 0 db notes of eachCue
    set q color of eachCue to "none"
  end repeat
end tell
This script uses -120 dB for muted. If the workspace’s minimum audio level (as set in Workspace Settings → Audio) is higher, then that’s the level that will actually be set.
This is what the script achieves:
This is clearly useless for any practical purpose. It takes somewhere between 3 and 5 seconds, on a really fast computer, to solo the selected cues, and that time varies depending on how far down the cue list they appear.
That’s enough of a problem by itself, but on top of that this script has no way to correctly handle Audio cue which fade in from silence. When we solo a faded-in cue, the level that is copied to notes and then restored is -60 (the minimum audio level setting for this workspace), because that is the initial level before any fades. So the soloed cue is silent, even though it was audible before the solo.
Clearly, using the main level control as the means of muting audio cues is not going to work, so what other options might be feasible?
Solo: a second attempt

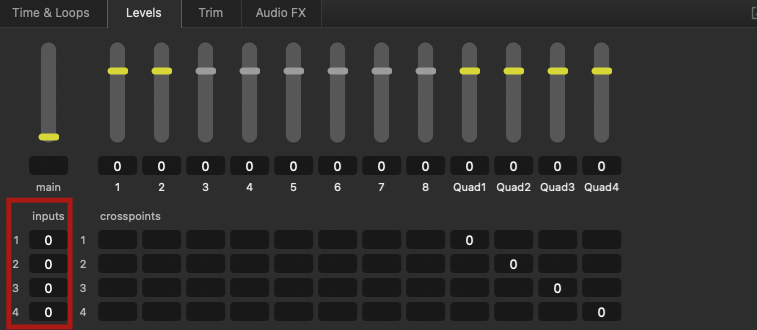
The least used crosspoints in the levels matrix for most people are probably the input levels in column 0. Except in a few cases, such as changing the main levels of stems in a multitrack audio file, they are often left at 0. Of the hundreds of show files on the author’s Mac, only a couple make use of the input levels column in any other way. Given that, this set of controls could be an ideal candidate for applying a mute by simply toggling them between 0 and -120 (or whatever your minimum audio level is set to.)
Obviously, this technique relies upon not using this set of controls in any other way.
We’re also going to employ another technique for speeding up AppleScript execution; references.
set theCues to cues whose q type is "audio"
set theCuesRef to a reference to theCues
We can use theCuesRef instead of theCues in the remainder of the script, and it will noticeably speed things up.
Here’s the new solo script:
tell application id "com.figure53.QLab.5" to tell front workspace
  set theCuesToSolo to (selected as list)
  set theCuesToSoloRef to a reference to theCuesToSolo
  set theCues to cues whose q type is "audio"
  set theCuesRef to a reference to theCues

  -- set all the levels in the input column of all cues to silent
  repeat with eachCue in theCuesRef
    repeat with eachInput from 1 to (audio input channels of eachCue)
      setLevel eachCue column 0 row eachInput db -120
    end repeat
    set q color of eachCue to "red"
  end repeat

  -- unmute all the selected cues
  repeat with eachCue in theCuesToSoloRef
    repeat with eachInput from 1 to (audio input channels of eachCue)
      setLevel eachCue column 0 row eachInput db 0
    end repeat
    set q color of eachCue to "none"
  end repeat
end tell
The corresponding unmute script looks like this:
tell application id "com.figure53.QLab.5" to tell front workspace
  set theCues to cues whose q type is "audio"
  set theCuesRef to a reference to theCues
  repeat with eachCue in theCuesRef
    repeat with eachInput from 1 to (audio input channels of eachCue)
      setLevel eachCue column 0 row eachInput db 0
    end repeat
    set q color of eachCue to "none"
  end repeat
end tell
This definitely solves the problems associated with trying to use the main volume slider, but even using references it’s still wildly too slow to be practical.
Conclusion: scripting will not provide the necessary speed for this problem!
What of OSC?
Next, let’s see if sending OSC via Network cues can achieve the same result any faster. For a test, let’s try setting the level of an unused cue output in every Audio cue to -120 using a script, and the restoring it back to 0 using OSC.
The script is:
tell application id "com.figure53.QLab.5" to tell front workspace
  set theCues to cues whose q type is "audio"
  set theCuesRef to a reference to theCues
  repeat with eachCue in theCuesRef
    setLevel eachCue row 0 column 6 db -120
  end repeat
end tell
The OSC message sent to localhost is:
/cue/*/sliderLevel/6 0 To begin with, this is much tidier. OSC wildcarding, i.e. the asterisk, means this message is passed to every cue in the workspace. We don’t need to carefully send it to only Audio cue, as the OSC message will fail silently when passed to any cues that can’t understand it.
Running this test returns promising results: restoring the level via OSC is about ten times faster than setting the level via AppleScript.
Adapting this technique to controlling all the input levels on a cue takes a bit of cleverness because without scripting, we can’t evaluate the number of channels to mute or iterate through those channels. So, we’ll solve it another way:

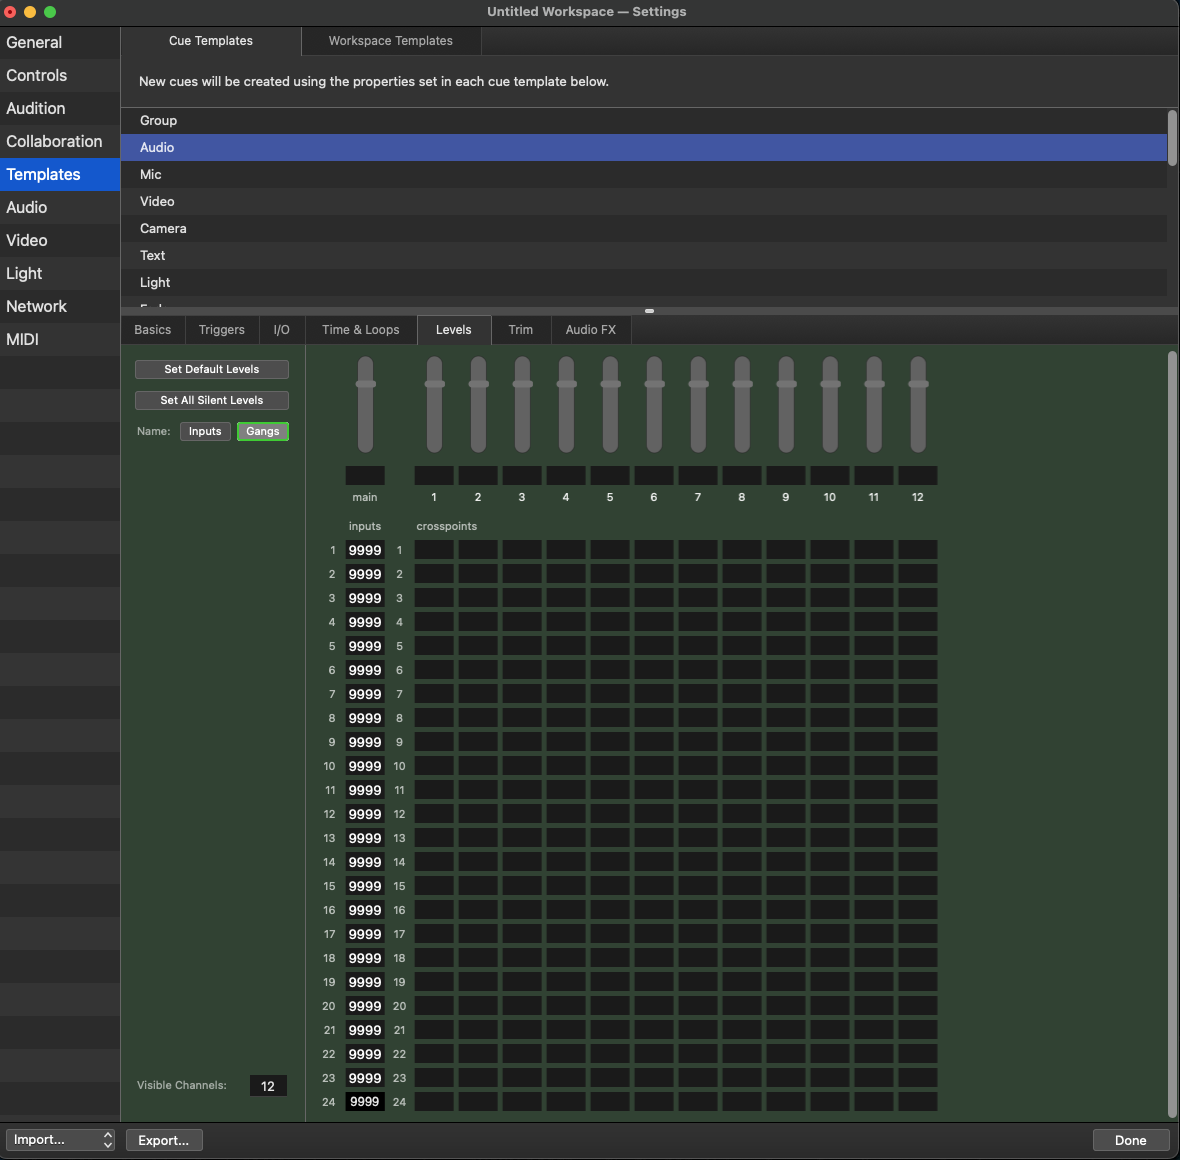
In Workspace Settings → Templates → Cue Templates, we gang together all the level controls in the input column except the main control. Any new Audio cues created, then, will have all their input levels ganged so that adjusting one adjusts them all.
To gang these level controls for cues already created in an existing workspace, we can run this script on a hotkey:
tell application id "com.figure53.QLab.5" to tell front workspace
  set theCuesList to (selected as list)
  set theCues to a reference to theCuesList
  repeat with eachCue in theCues
    if q type of eachCue is "audio" then
      repeat with theRow from 1 to (audio input channels of eachCue)
        setGang of eachCue row theRow column 0 gang "9999"
      end repeat
    end if
  end repeat
end tell
It is now only necessary to set the level of the first input level crosspoint with OSC, and all other input level crosspoints will automatically be set to match.
Completing the solution
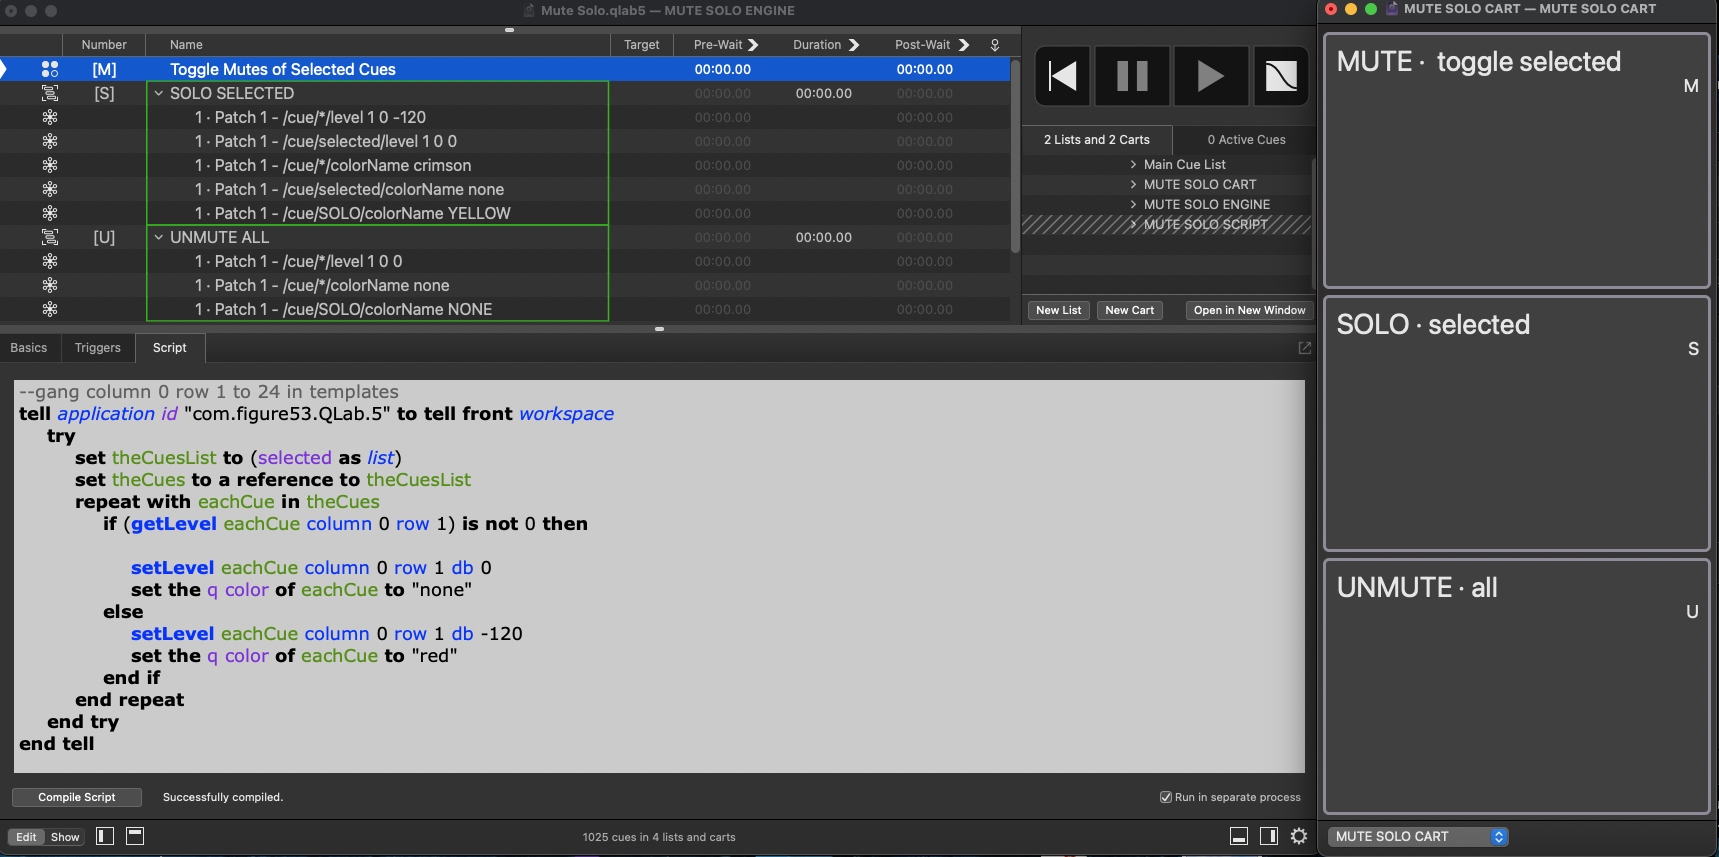
The cues in the cart are Start cues targeting cues in another list, so the next step is to populate that other cue list:

The MUTE button still starts a Script cue, as we want this to toggle selected cues between muted and unmuted states. It is considerably more complicated to toggle with Network cues, and since generally you’d only be muting a small number of cues at a time this script will execute very quickly.
The SOLO SELECTED Timeline Group contains Network cues sending these messages:
/cue/*/level 1 0 -120
Set every cue’s first input level to -120, i.e. muted. Because these levels are ganged for all inputs, this mutes all inputs.
/cue/selected/level 1 0 0
Set every cue’s first input level to 0, i.e. unmuted. Because these levels are ganged for all inputs, this unmutes all inputs.
cue/*/colorName crimson
Set the cue color of all cues to crimson.
/cue/selected/colorName none
Set all selected cues to no color.
/cue/SOLO/colorName YELLOW
Set the cue color of the SOLO cart cue to yellow. The other cart cues will be crimson because of the preceding message.
The UNMUTE Timeline Group contains Network cues sending these messages:
/cue/*/level 1 0 0
/cue/*/colorName none
/cue/SOLO/colorName none
Conclusion
The OSC messages are far less complex than the AppleScript equivalents, but the principal advantage is the speed at which the messages execute. This is the method used in the screen recording which began the chapter and is eminently usable on any reasonably fast Mac, even with very long cue lists.
Music arranged and recorded by Mic Pool. All rights reserved.