Companion for Musical Directors
This chapter requires Bitfocus Companion 3.5 or newer, which has some significant new features of which this tutorial makes use. The QLab with feedback Companion module, which is included in Companion, is not developed or maintained by Figure 53. Support and documentation for the module are only available via its Github page.
The documentation for QLab’s official Stream Deck plugin can be found here.
Readers who are not familiar with the Elgato Stream Deck or Bitfocus Companion are advised to read an earlier chapter in the QLab Cookbook, Button Button, Who’s Got The Button that looks at controlling QLab from Companion using generic OSC.
This chapter explores some more advanced techniques using Companion with the qlabfb module, including:
- Providing feedback from QLab to allow information about the standing by and playing cues to be shown directly on the Stream Deck, allowing comprehensive remote controls that do not require a separate cue list display.
- Using a Stream Deck on a network at any distance from the QLab computer using a second computer.
- Using an inexpensive Raspberry Pi to create a stand-alone Companion hardware device.
- Controlling a remote Stream Deck from QLab to provide utility functions.
The scenario in this chapter is a fairly typical use case in which a QLab workspace contains cue list(s) run by the sound operator and a separate cue list with backing and click tracks operated remotely by the musical director (MD) from the orchestra pit or band area. Although this is a specific scenario, all the techniques described in the tutorial are adaptable and widely applicable to a wide range of productions requiring remote control of an individual cue list.
Here it is in action
This screen recording shows a QLab workspace with three cue lists. At the bottom left is the main cue list with the sound operator’s cues. To the right of this is a utility list which uses a Stream Deck button as a call and cue light. At the top right is the MD’s list with the backing and click tracks that the MD will start themselves.
At the top left of the screen recording is the MD’s Stream Deck.
The buttons in the bottom row show the name and number of the cue that will be played when the green GO button is pressed, together with the next and previous sequence navigation buttons.
There is a STOP button for the MD to stop any cues playing in their cue list quickly and a fade button to fade and stop their cues more subtly if required during a performance.
The top left button is a utility button which normally displays the time of day, but can be remotely changed to display a flashing call light or cue light in either red or green. These might be used to get the MD to pick up their intercom, or to inform them that actors are in places, etc.
All the other buttons display information about the currently running cue, including cue number, cue name, and elapsed and remaining times.
In the screen recording of a very much sped up version of the start of a show, you can see:
00:00:03The sound operator starts the pre-show music.00:00:16The sound operator switches on the MDs call light from their cue list. (Can also be done in the demo workspace from hotkey 9.)00:00:24The MD replies on intercom, and the sound operator switches off the call light from the cue list. (Can also be done from hotkey 0.)00:00:33The sound operator switches on the MD’s red cue light, which flashes.00:00:38The MD presses the cue light button to acknowledge, and the light stops flashing.00:00:43The sound operator GOs cue2, fading the pre-show. At the end of the fade, the cue list switches on the MD’s green cue light.00:00:51The MD starts cueMD1from their Stream Deck. The cue information and running and elapsed counters are displayed on the Stream Deck.00:00:58The sound operator GOs cue3for some sea effects.00:01:23The sound operator GOs cue4and plays a seagull.00:01:25The MD starts cueMD2. This cue has looped slices with Devamp cues to exit.00:01:47Devamp2.1started by MD.00:02:07Devamp2.2started by MD.00:02:34Devanp2.3started by MD.00:02:44The trick goes wrong, so the MD fades the music early by pressing the FADE button on the Stream Deck.00:02:52The MD starts cueMD3. This is a Timeline Group with stems. The qlabfb module uses the Group cue for cue and timing information.
How it Works
Setting up the QLab Workspace
One of the the goals of this approach is to give the MD access to their own cue list, but prevent them from accidentally controlling cues in any other cue list. To achieve this, we name the MD’s cue list “MD List” and give it a cue number.
It’s not immediately obvious how to number cue lists, particularly if none are numbered when you first look. You can do it by selecting the cue list in the sidebar and then looking in the Basics tab of the inspector, or by pressing the hotkey to edit cue number (by default, N). You can also double-click in the middle of the space to the left of the disclosure arrow in the sidebar.
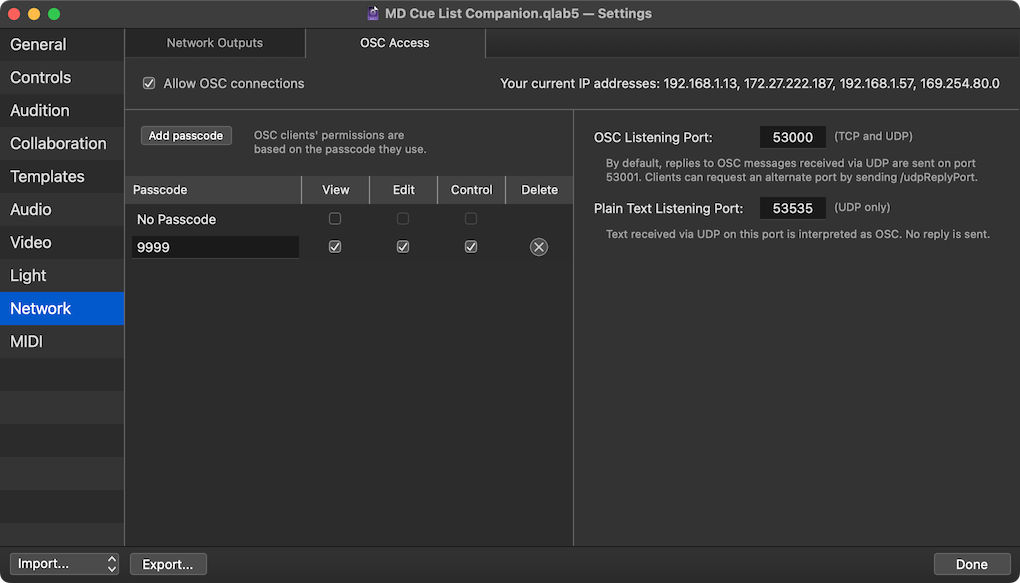
We are also going to use a passcode for OSC access. One thing you can do to keep setup time to a minimum is always use the same passcode on any workspace that contains MD cue lists. In the example, we use 9999. OSC access passcodes are set in Workspace Settings → Network → OSC Access.
Setting up Companion
This tutorial assumes you have installed Companion on the same computer as QLab; it can run in the background automatically at login and puts the Companion menu under an icon in the menu bar. It also assumes that, for setting up and testing, your Stream Deck is also plugged into the computer running QLab. From the Companion menu, select Show Window.
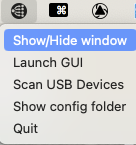
and the Companion window will open:
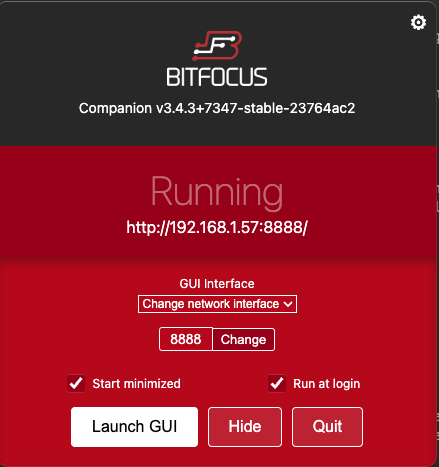
Here, you can set Companion to run at login and to start minimized, so this screen will not be shown at start-up.
You can launch the Companion GUI from the Companion menu or from the Companion window. Companion is configured in a web browser, and looks like this:
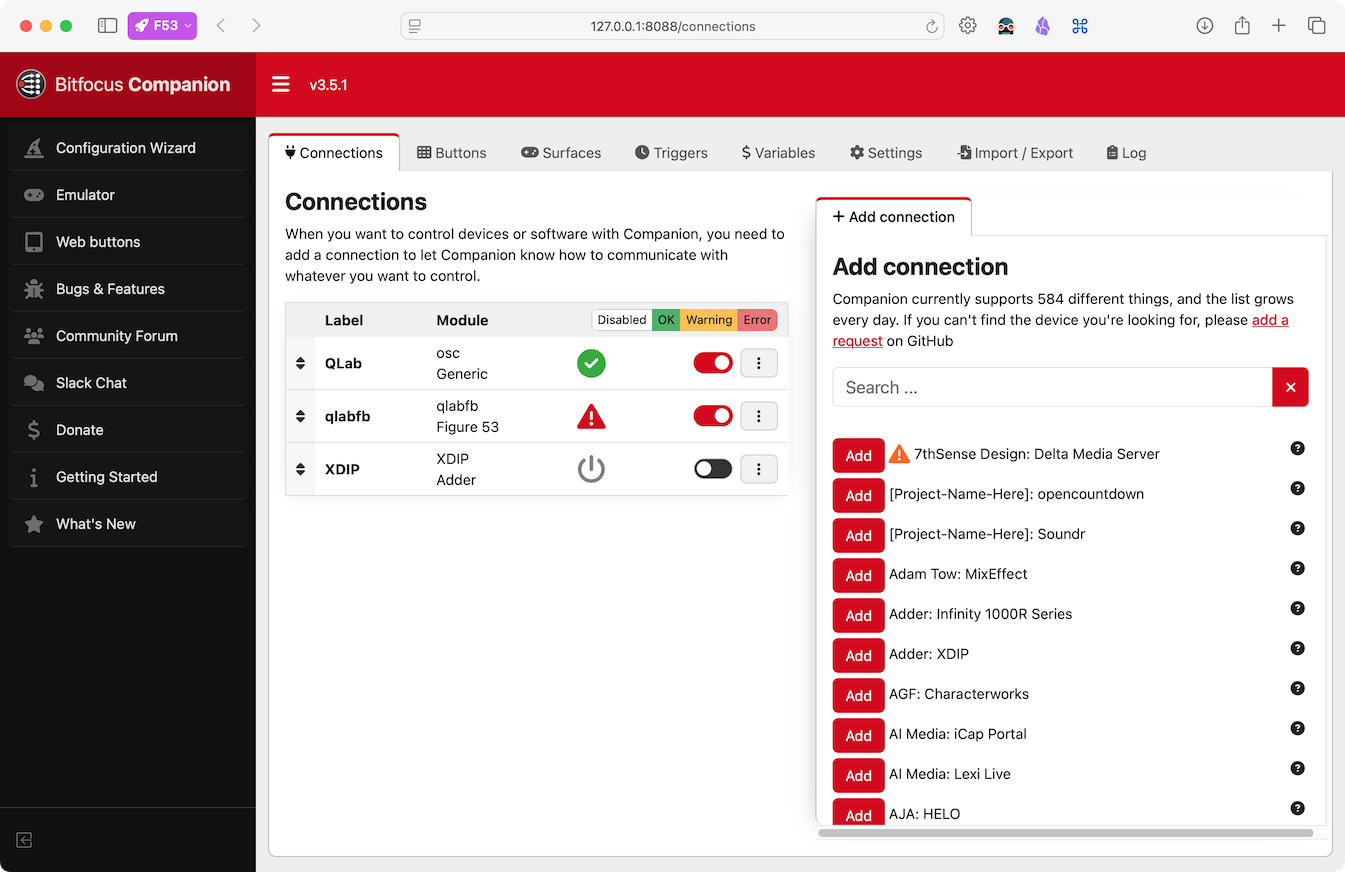
Companion opens in your default web browser with a URL similar to this:
http://192.168.1.57:8888/connections
If Companion is running on other computers on your local network, you can configure them remotely by typing in their IP address and port number 8000 in a browser, like this:
http://192.168.1.57:8000
From the Import/Export tab of the Companion GUI you can select and import the Companion for MD.companionconfig which is included in the downloadable example.

Important! If you want to save the current Companion configuration, be sure to export it first. Importing a
.companionconfigfile will completely replace the current configuration.**
After importing, the set-up wizard will run.
USB Surface Detection Configuration
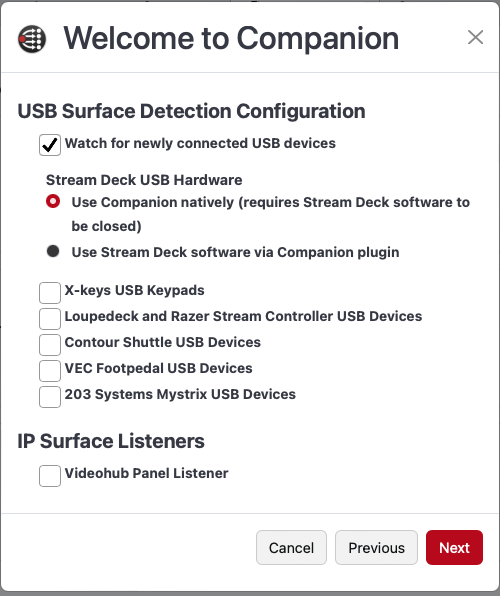
Check the box labeled Watch for newly connected USB devices.
Select Use Companion natively. This requires the Elgato Stream Deck app to not be running when using Companion. If you plan to use your Stream Deck solely with Companion, the simplest thing is not to install the Elgato software. If you have installed it, then it is sometimes tricky to prevent it from running on login. If you encounter this problem, the best action is to delete the com.elgato.StreamDeck.plist file from the ~/Library/LaunchAgents folder.
Uncheck the boxes for all the other types of devices (unless of course you’re using them, but that exceed the scope of this chapter.)
Click Next.
Button Grid Size
Set the grid size to match your Stream Deck (The standard Stream Deck is three rows × five columns.)

Click Next.
Remote Control Services
Check the box labeled Open Sound Control (OSC) and leave it on its default listen port of 12321.

Click Next to complete the configuration wizard.
Companion Settings
Next, navigate to the Settings tab and switch off Show the topbar on each button.
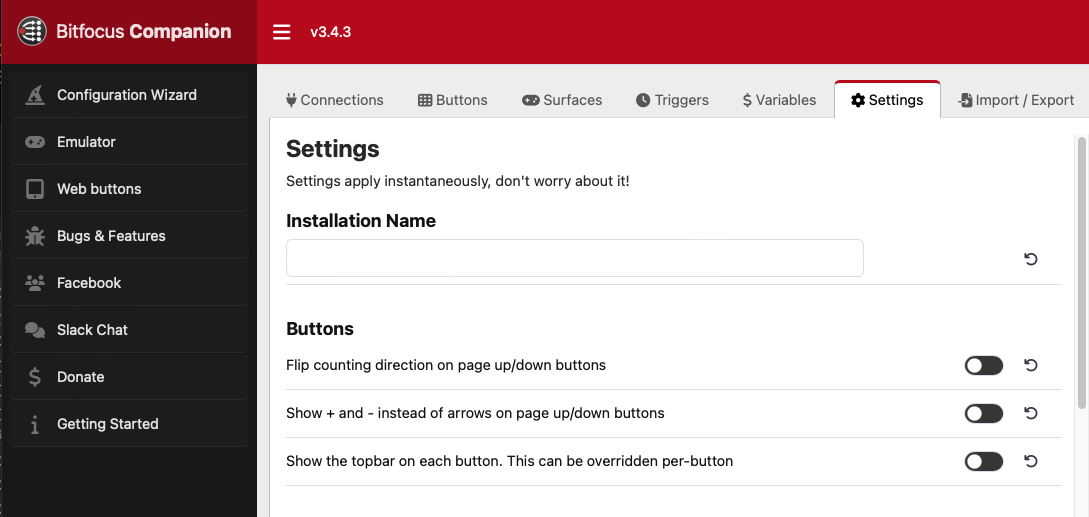
Next, navigate to the Connections tab.

QLab is one of the 500+ devices that Companion can control. There is a connection module named qlabfb, which is an advanced module for controlling QLab that can receive data about the current state of QLab workspaces and cues.
An Aside
Although not relevant to this chapter, it’s worth noting that if Companion can control it, then QLab can too! QLab includes a network device definition for Companion, which means you can configure a network patch to communicate with Companion directly.
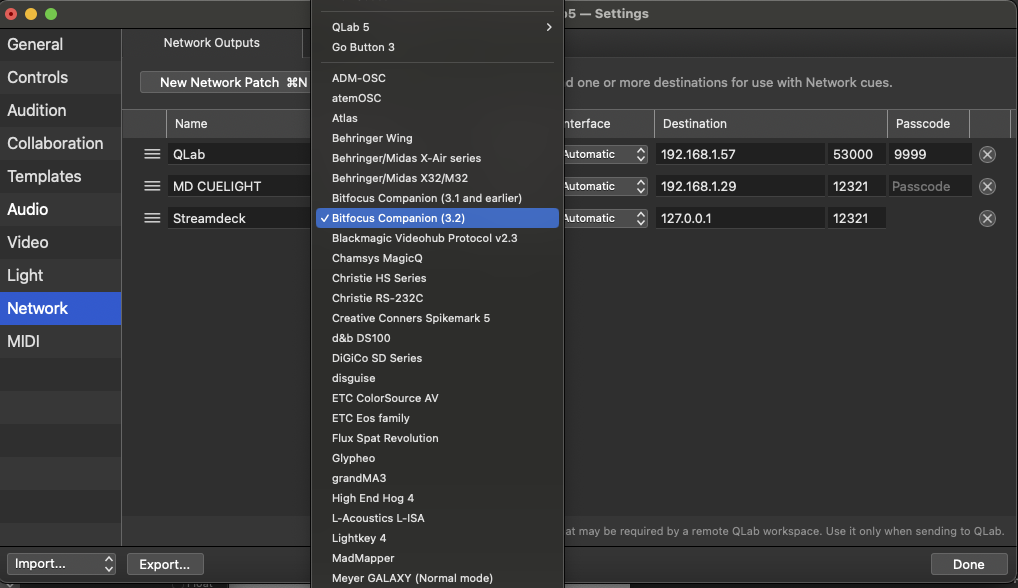
Once you have set a patch for your Stream Deck, you can use a Network cue to press any button on it. So if the button at page 1, row 0, column 2 is set up to fire Macro 3 on a BlackMagic Video Switcher, QLab can fire Macro 3 by sending
/location/1/0/2/press
as shown in this Network cue:

Now, back to the chapter.
Connections
Open the example QLab workspace, then navigate to the Connections tab in the Companion GUI.
Click the qlabfb connection to edit it.
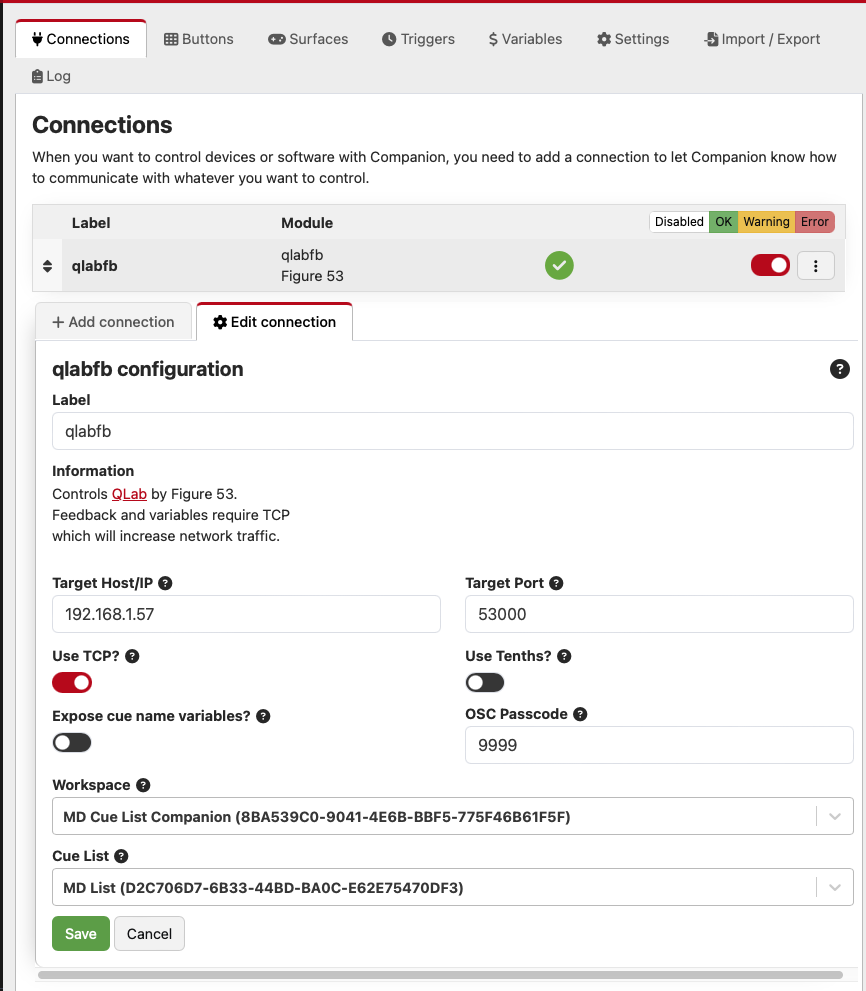
Enter the IP address of the computer that is running QLab. Since we’re running Companion and QLab on the same Mac, use 127.0.0.1 which is the IP address that means “this computer.” For port, enter 53000 which is QLab’s default OSC receive port.
The module requires a TCP connection.
Enter the OSC passcode for the QLab workspace. The demo uses 9999.
Since we want to restrict what the MD’s Stream Deck can control, we select the MD List in the Cue List field.
When you save those settings, your Stream Deck should look like this:
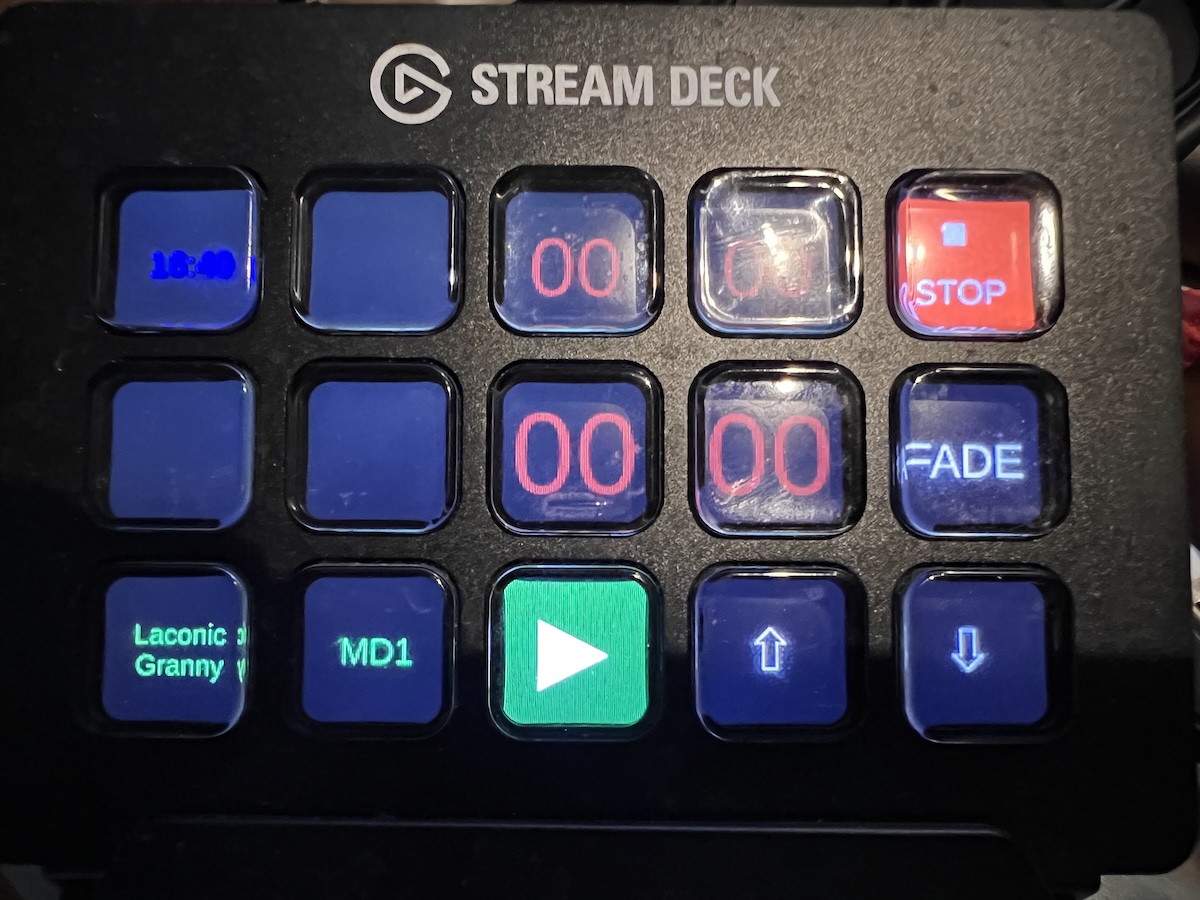
If you don’t currently have a physical Stream Deck connected, you can go to the Surfaces tab in Companion and create an emulator. This will open a new web page in your browser with a virtual Stream Deck. You can use this virtual Stream Deck exactly the same way that you would use an actual one.
Buttons
In the Buttons tab in Companion, we can now examine the programming of all the Stream Deck buttons used in the demo.
The bottom left button will display the name of the cue that’s standing by in QLab.
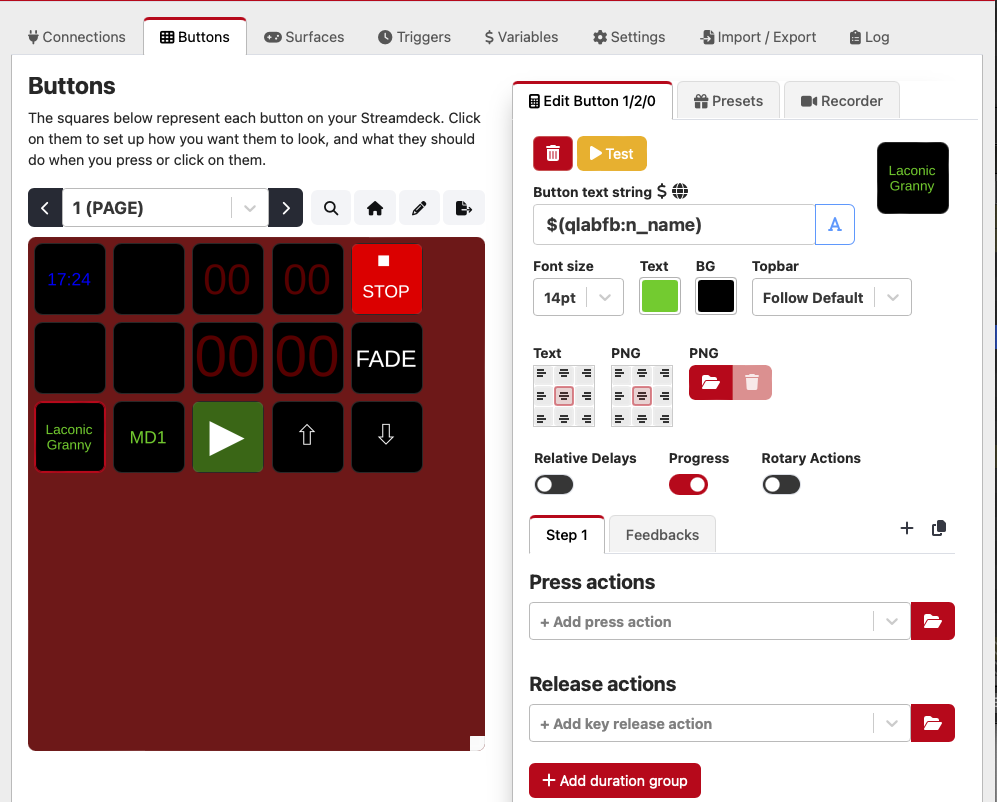
The button text is a variable: $(qlabfb:n_name)
You can find and copy all the variables that can be used as button text in the Variables tab, listed by connection. This tab also displays the current values of all the variables, which is useful when debugging.

The button has its text set to 14 point green on a black background.
The next button across is similar but uses the variable $(qlabfb:n_num) to display the cue number of the cue that’s standing by.
It may not be obvious, so just in case: neither of these buttons will do anything when they’re pressed. We are using them as displays only, not really as buttons.
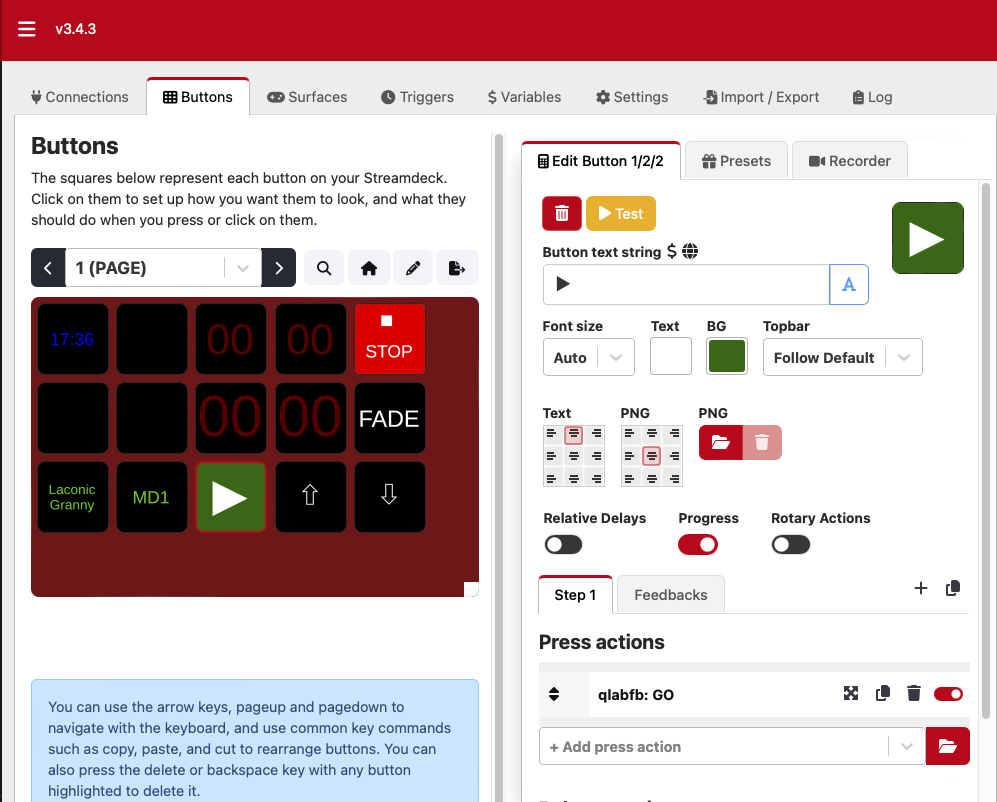
The Go button, however, has a press action which means that when you press it, something will happen. You assign press actions by clicking the folder icon to the right of the press action list to reveal all available actions, and choosing one. Here we have chosen: qlabfb: GO
The button also uses an image for its button text, set to auto size, white on a green background.
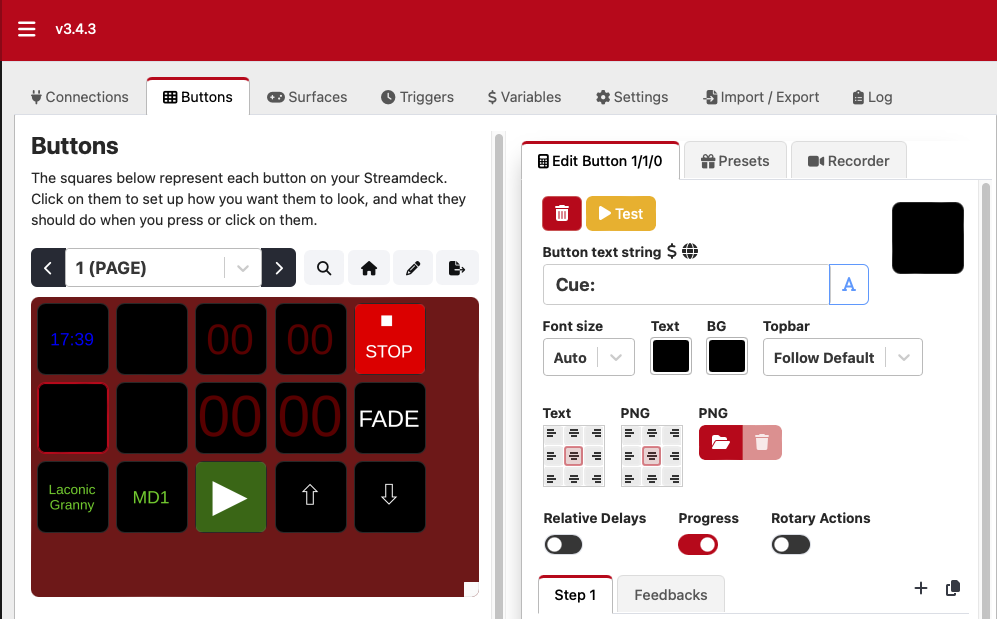
In the middle row, the left button just has the text “Cue:” displayed on it. When no cue is running, we don’t want to see it, so the default setting is black text on a black background. We’ll talk more about this button in a moment.
The button to its right displays the cue number of the running cue using the variable $(qlabfb:r_num) (again copied from the qlabfb list in Companion’s Variables tab.) The button above that shows the cue name using the variable $(qlabfb:r_name).
Because it is only practical to display one running cue, the qlabfb module must decide which cue to display if multiple cues are running. The basic principle it uses is:
Look for the most recently run (GO) cue and favor Group cues over other types of cues.
This works well for MD cue lists and generally results in useful elapsed and remaining times displayed on the Stream Deck.
The four buttons with dimmed red 00 text display the time of the running cue. The top two are the remaining minutes and seconds and use the variables $(qlabfb:r_mm) and $(qlabfb:r_ss).
The bottom two are the elapsed minutes and seconds and used the variables $(qlabfb:e_mm) and $(qlabfb:e_ss).
When no cue is running they are set to a default of dark red on black.
The “cue” button and the time buttons all have feedback actions set.
Button 1/1/0 has a feedback action to set the text color to white when any cue is running. Remember we have confined the Stream Deck’s actions to the cue list named “MD List” so the text color change only happens when cues in this list are running.
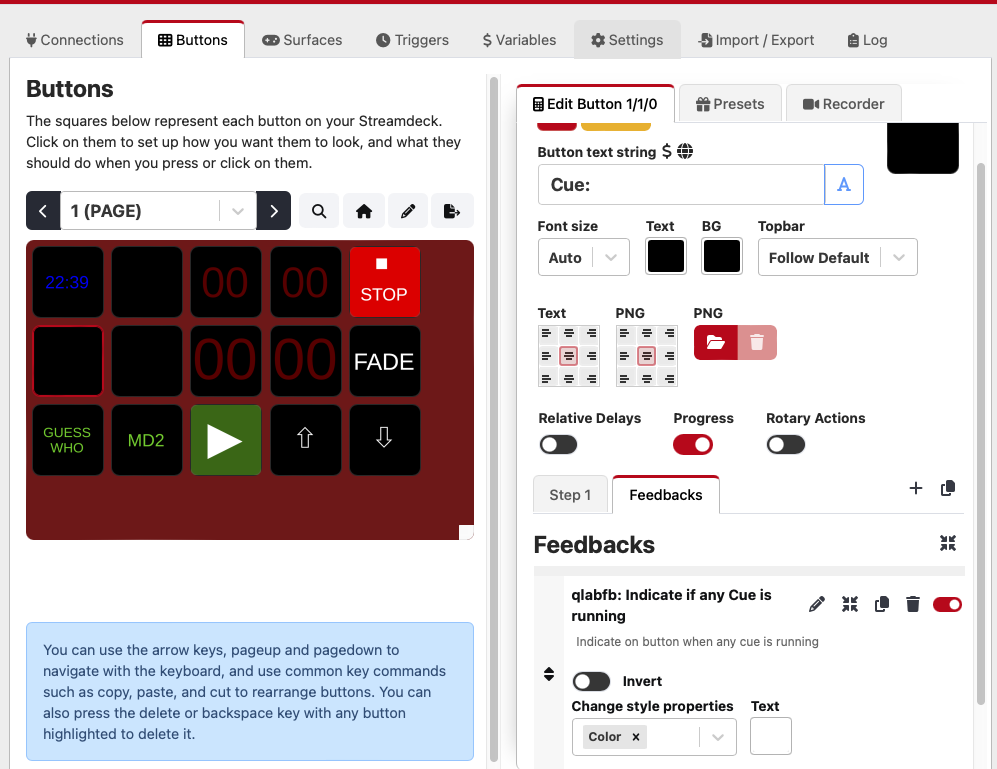
Similarly, the buttons which display time values have their text colors changed when cues in this list are running, elapsed times to light green and remaining times to orange.
The Stop button has a white square image and the word “STOP” as its button text. A line break is forced after the image with the \n (escaped n) character.
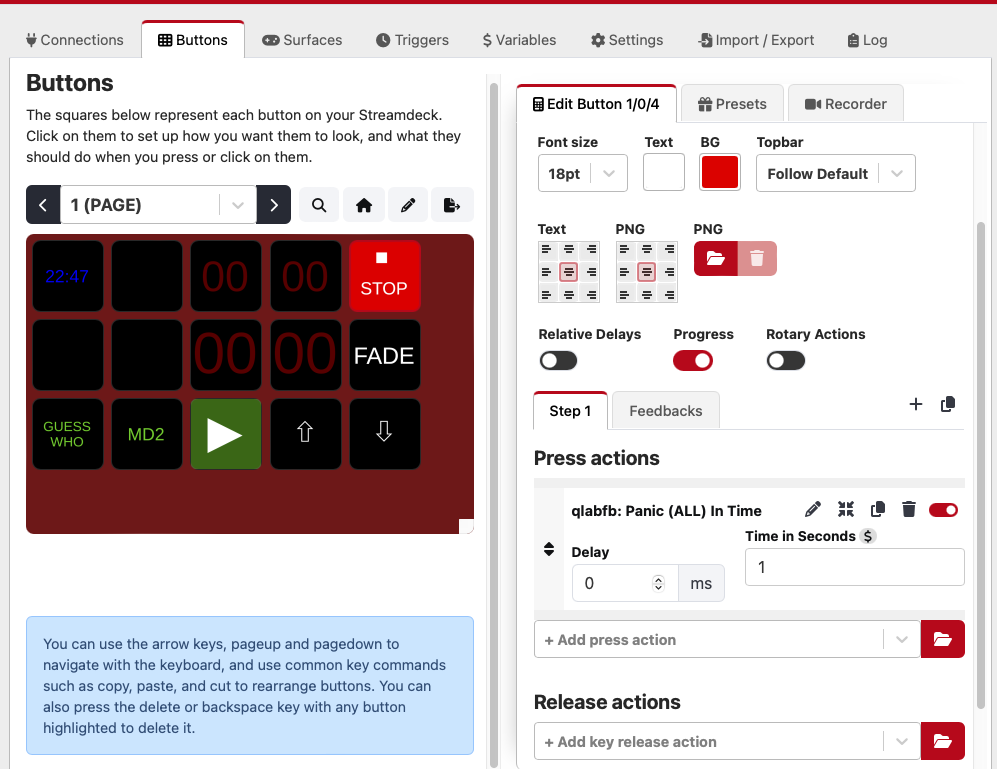
The button’s action is set to Panic (ALL) in 1 second. Again, ALL in this context is restricted to the MD List.
The FADE Button is set to Panic (ALL) in 5 seconds for a smooth fade out.
The top left button has a range of functions. When not used as a show-specific indicator, it displays the time of day in blue text using the variable $(internal:time_hm). You can add an s to the end of the variable to include seconds if preferred.
The button’s action is set to start QLab cue ACK, which can be used to acknowledge a flashing red cue light displayed on the button.
QLab’s MD CUE LIGHT cue list
The QLab workspace has a Network patch named MD CUELIGHT which sends OSC messages to port 12321 of the computer running Companion. As this is currently the same computer that is running QLab, it uses 127.0.0.1 as the IP address.
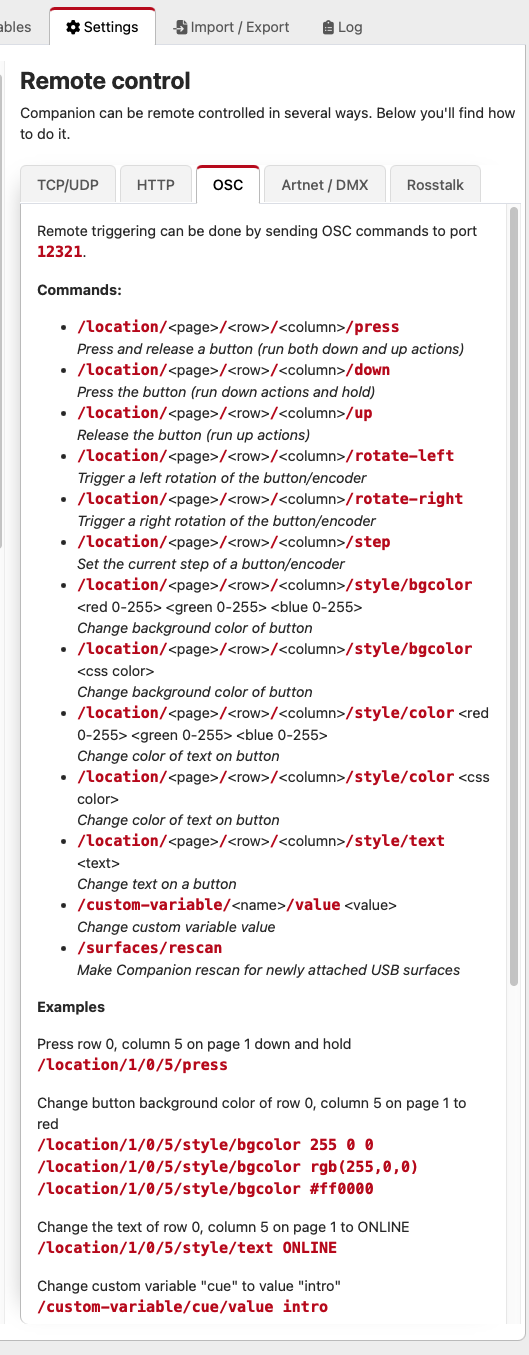
The OSC messages that Companion will respond to are listed in the Settings tab in Companion:
The cues in the cue list named “MD CUE LIGHT” contain all the OSC messages to be sent to Companion, and other cues to provide the interlocks required for the multi-function indicator button at the top left of the Stream Deck (button 1/0/0).
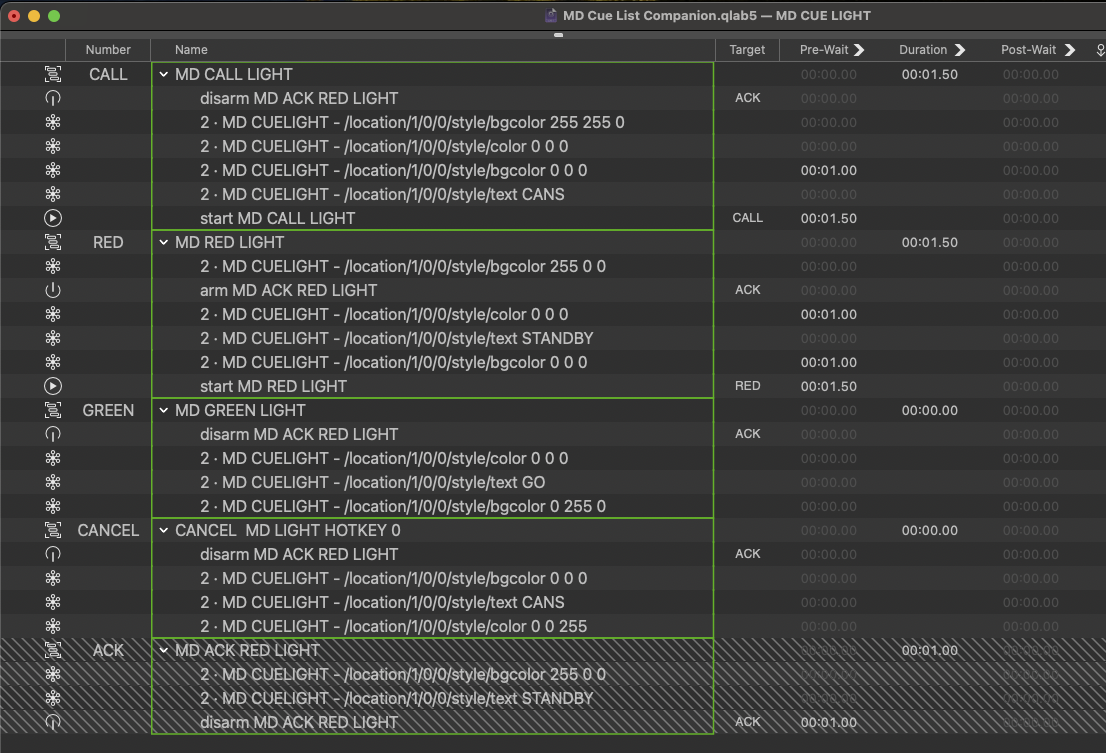
Cue CALL is a looping Timeline Group that causes button 1/0/0 to flash yellow with the text CANS. In the screenshot you can see all the OSC that is being sent to button 1/0/0. You can cross reference this to the list of OSC messages that companion buttons that will respond to.
Editor’s note: in the US, “cans” typically means “headphones.” In the UK, which is where the author is from, “cans” also commonly refers to an intercom headset.
Cue RED flashes button 1/0/0 red with the text STANDBY. It also arms cue ACK which is disarmed by all other Timeline Group cues in this list. The Companion button action for button 1/0/0 starts Cue ACK.
Cue ACK sets the button to static red with the text STANDBY.
Cue GREEN sets the button to static green with the text GO.
Cue CANCEL returns the button to its default time-of-day display.
All these cues can be triggered from Start cues in the main cue list. You could also trigger them with hotkeys or MIDI triggers. The demo workspace has 9 set as the hotkey for CALL and 0 for CANCEL.
You can, of course, also trigger them with OSC messages, e.g.:
/cue/GREEN/start
sent to the IP address of the computer running QLab on port 53000. If you want to send this message from a device that can’t handle OSC passcodes, you can set up no-passcode access alongside the 9999 passcode we’re using for Companion.
QLab’s MD List cue list
You can put cues in this list as required. Useful tips are to set any cues which will play music to fade and stop peers in the Triggers tab of the inspector. For example, the Group cues MD2 and MD3 and cues MD1, MD2 and MD3. It’s also a good idea to put a cue at the bottom of the list that sends the playhead back to the top so that it is not lost.
Accessing Companion
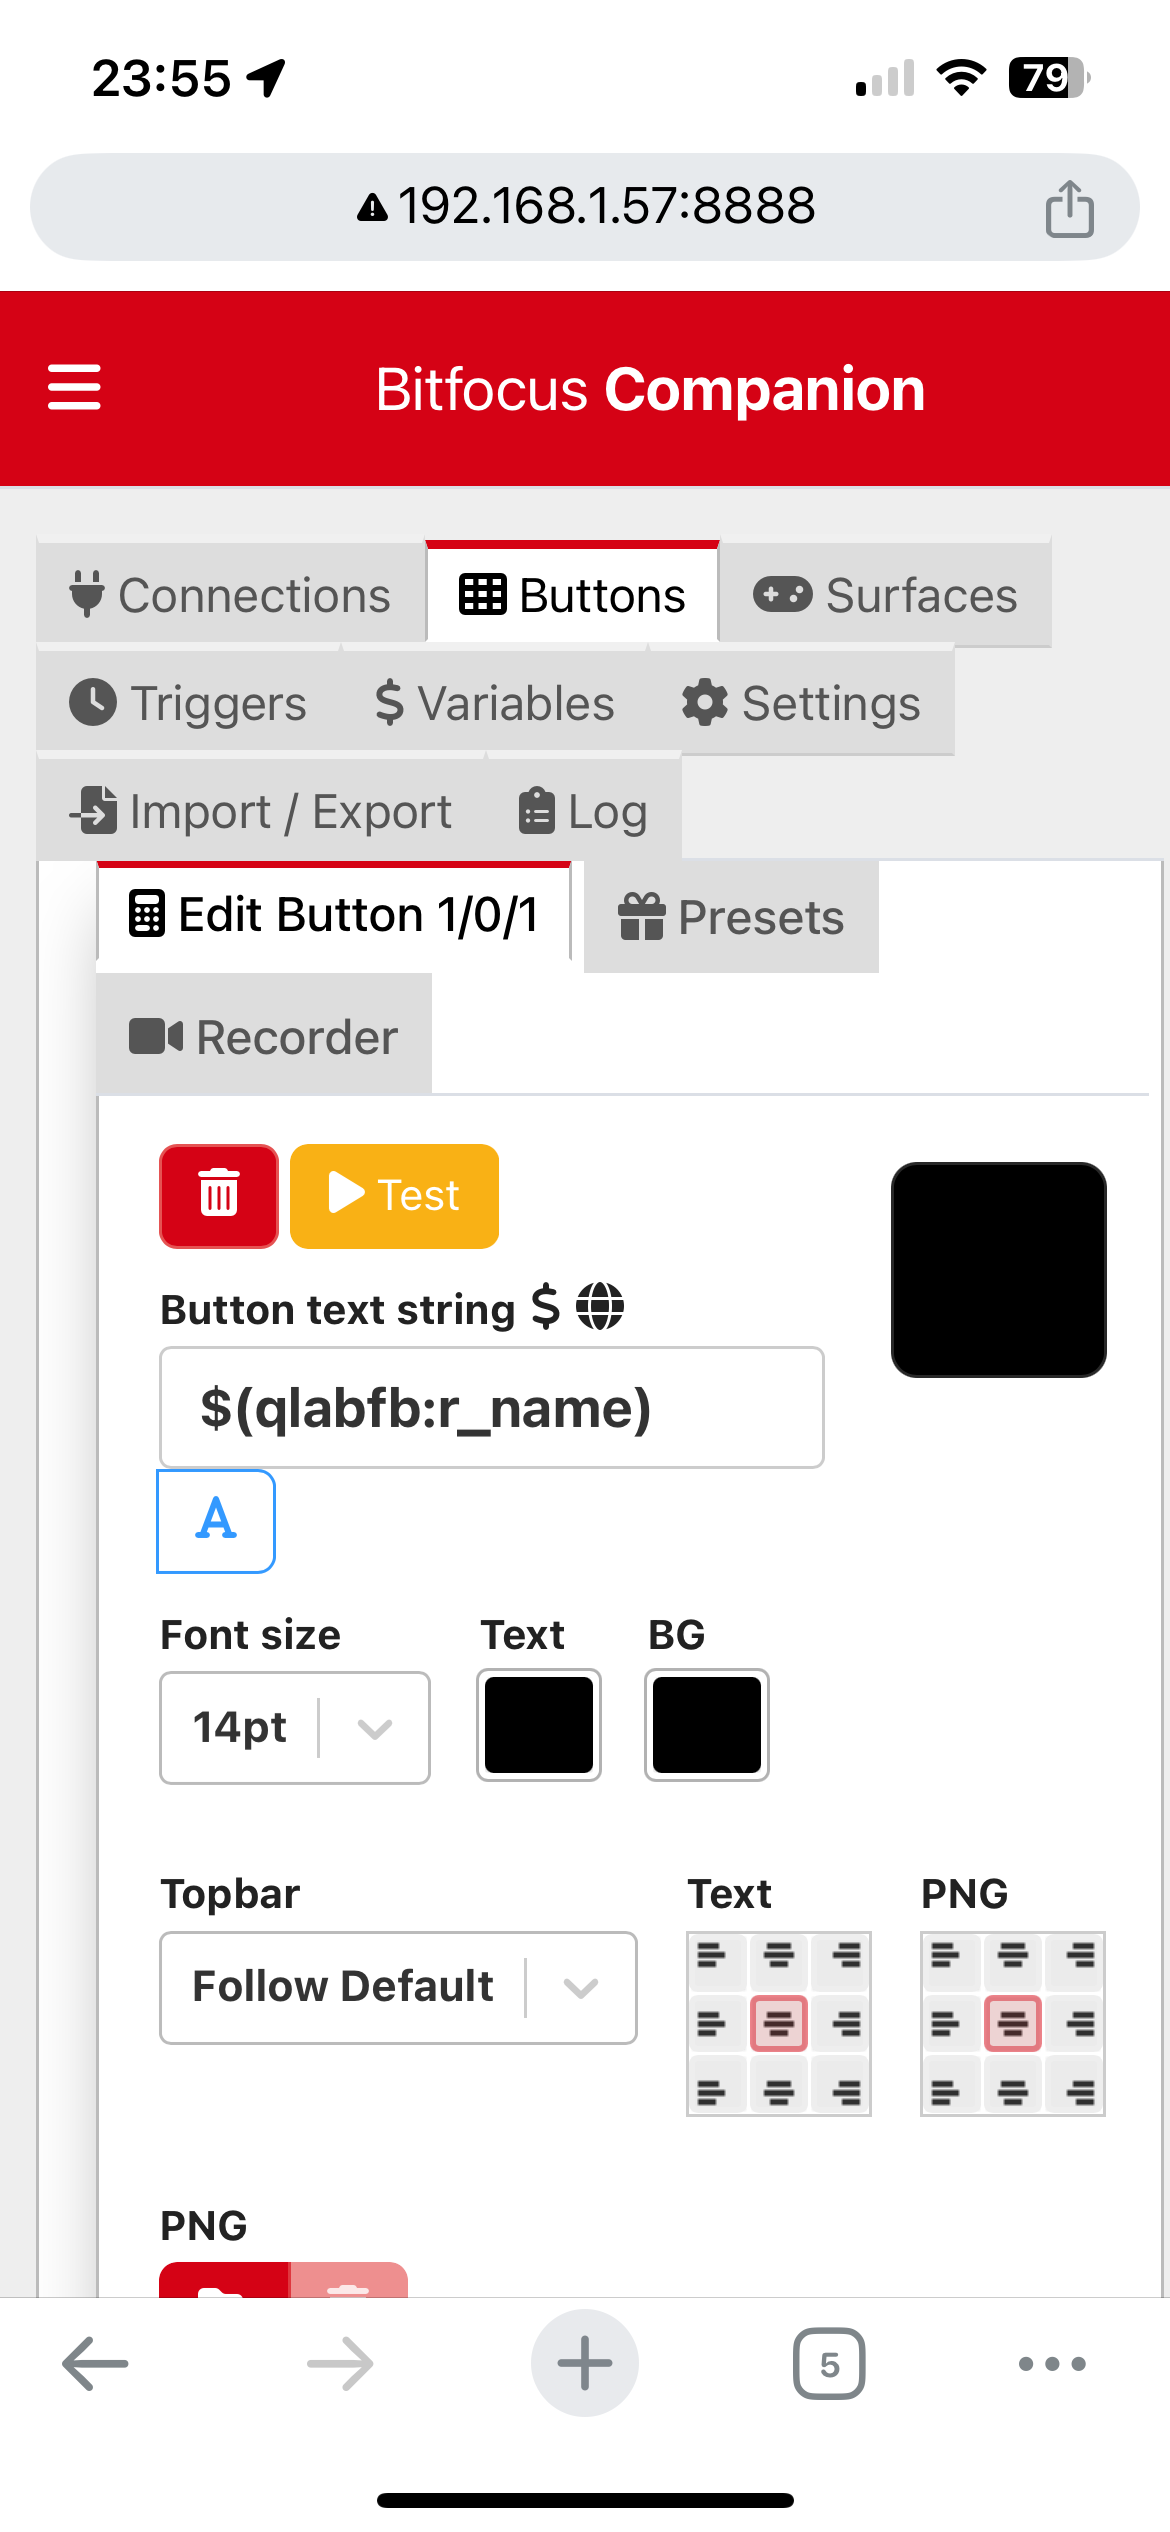
We have seen that the GUI for Companion is just a web browser with the URL set to access the IP address and port of the Companion instance e.g. 192.168.1.57:8888. This means that Companion can be edited on any device that can connect to the IP address of Companion. Here’s a mobile phone editing a Companion button.
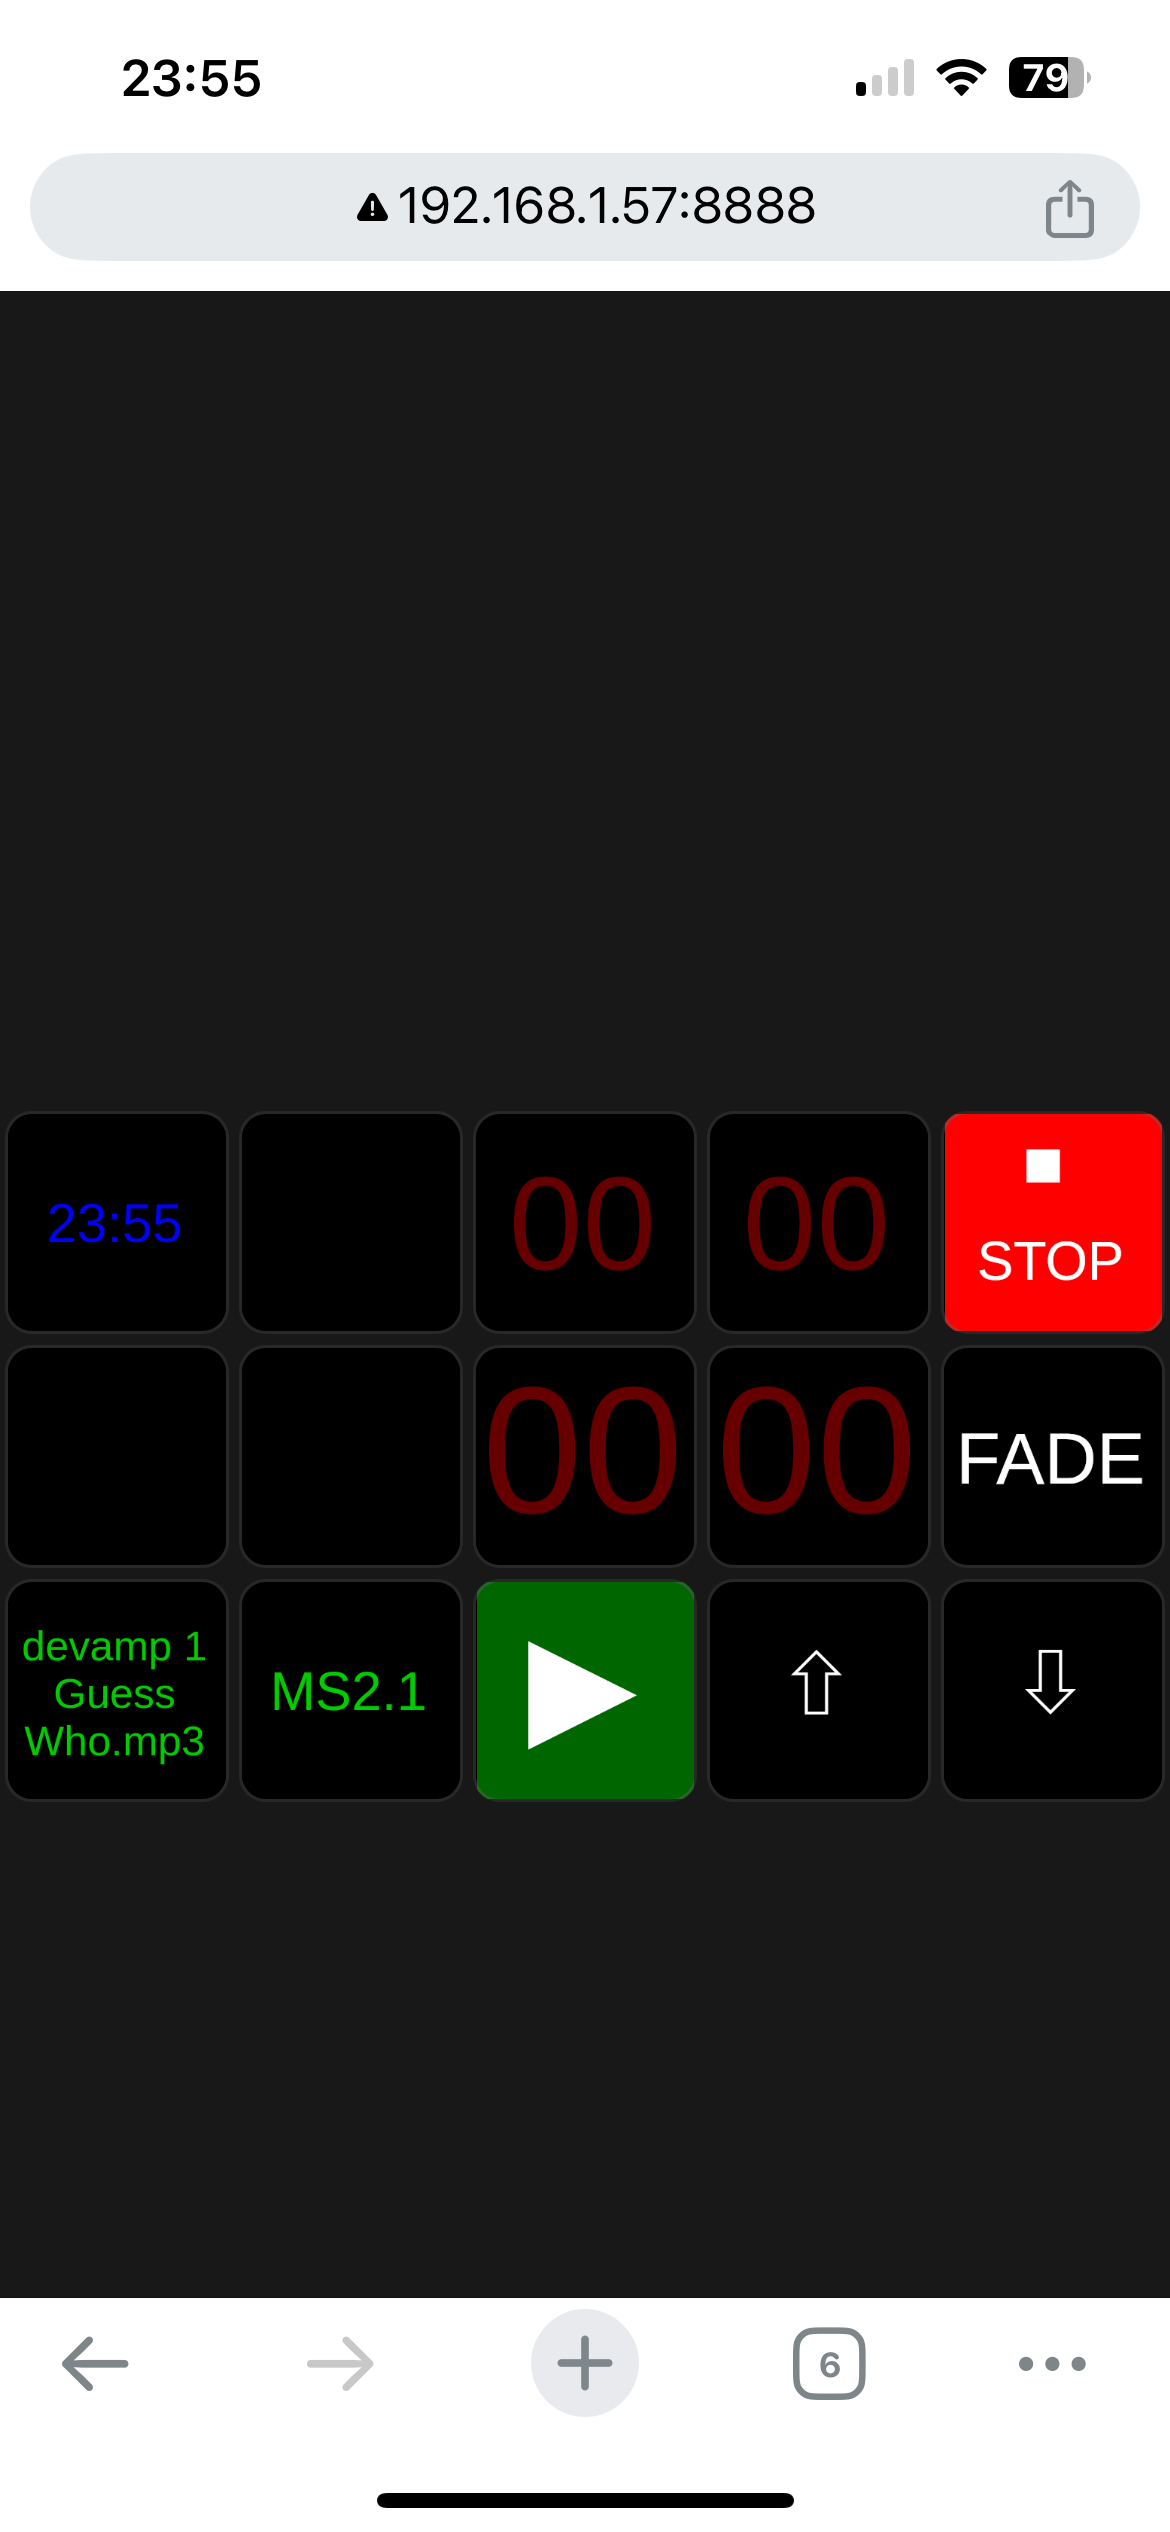
More usefully, this means that the emulator can also be selected from the menu at the top left of the page. This turns any device on the network capable of running a web browser into a Stream Deck control surface.
Moving the Stream Deck To a Remote Location
Now that we have a working system, we need to move the Stream Deck to the orchestra pit or band area. It is likely that this will be further away than the one meter long USB cable that comes with the Stream Deck and probably further than any reliable, simple USB extender will operate. Ideally, we want to connect the Stream Deck to QLab over a wired ethernet connection.
There are three main methods of doing this. Unpowered, very long USB cables are definitely not one of them!
USB extender CATx or Fiber
A USB extender consists of a transmitter and a receiver pair, which send USB signals over CAT5/6/7 or fibre cables. The Stream Deck end needs to be able to provide sufficient power for the Stream Deck to operate.
There are many devices available at prices ranging from $50 to $500 or more. Reliability is questionable on some devices, so it is important to test thoroughly with the cable length you are going to use, with perhaps an extra 20% to allow some headroom. Typical problems are communication failures, even though the Stream Deck appears to be online and displaying the correct buttons. Unplugging and replugging the Stream Deck usually brings the connection back.
There seems to be no clear consensus online as to whether this is a reliable method of extending USB over long distances. Generally, an extender that is just designed to carry a keyboard and mouse may well fall short with the complex and busy communication to and from a Stream Deck. If you have a reliable extender you use regularly for other complex usages then it may well work with Companion.
If you don’t, then it may require a long process of trial and error to get a system you have full confidence in.
Companion Satellite
If you already have a Mac or PC in use in the band area, such as for Live or Mainstage, or you just have access to a spare computer, you can install Bitfocus Companion Satellite on that computer. This is a lightweight app that allows a Stream Deck connected to a remote computer to make itself available to Companion running on your QLab computer as though it were directly connected.
You can have many instances of Companion Satellite running on a network, and while it’s not likely that you have your band area in another building or another nation, the magic of VPNs means you could still use Companion even if you did.
The main advantage of this method is that Companion is actually running on your QLab computer, so it is just as easy to configure and edit as before, and you only have to do it once, in one place, regardless of the number of computers running Companion Satellite you have connected.
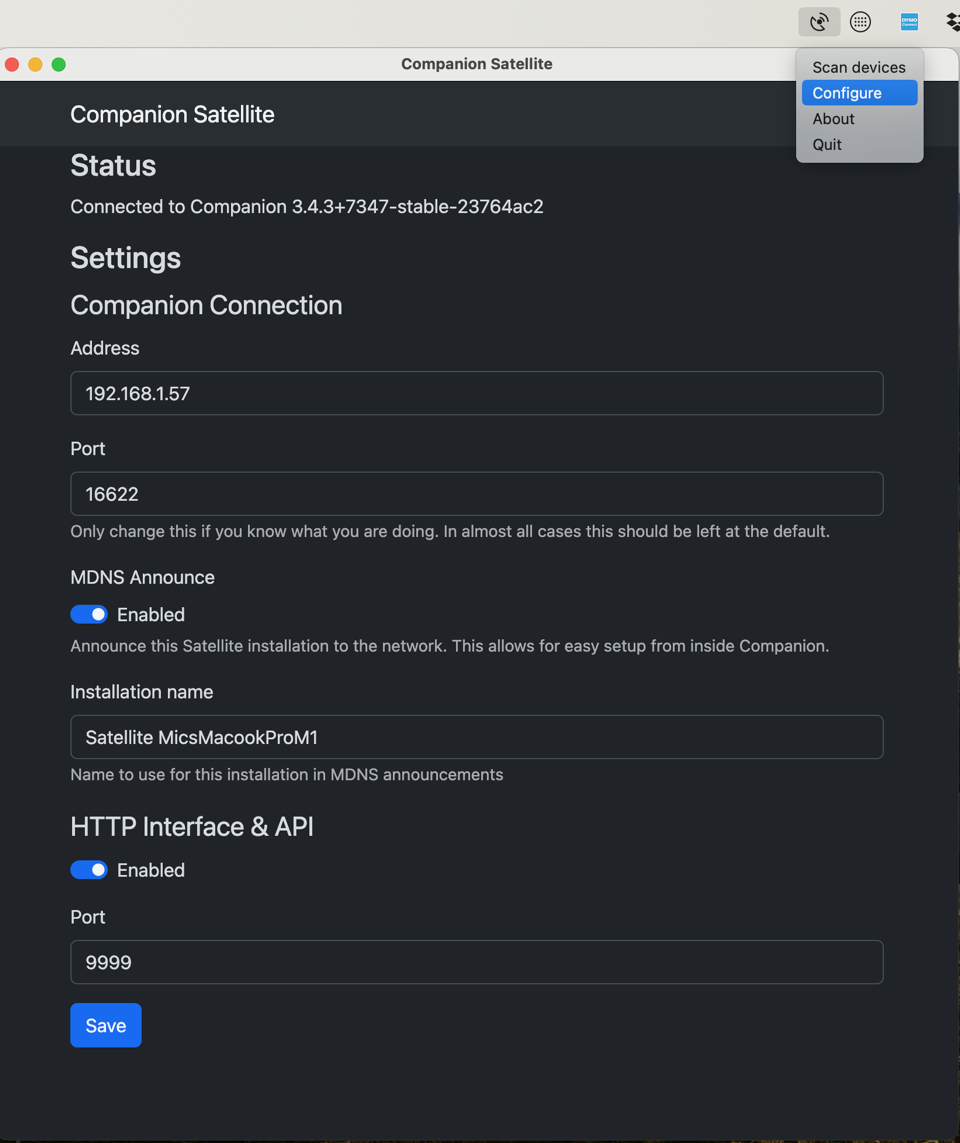
Once installed, Companion Satellite is accessed from an icon in the Mac’s menu bar. Enter the IP address of the computer that is running Companion and click Save.
Raspberry Pi
You can make an inexpensive stand-alone Stream Deck/Companion system by utilizing a Raspberry Pi 4 or 5. The Raspberry Pi is a small single-board computer. This can run headless, i.e. without a monitor, meaning the only hardware required at the remote end is the Stream Deck, connected to the Raspberry Pi by a short cable. You can even get cases (often 3D printed) which combine a holder for the Stream Deck with an internal slot for the Raspberry Pi to make a completely self-contained system that only requires network and power to be connected to a single box.
The advantage of this method is that you do not need to have Companion running on the QLab computer. You can connect to Companion running on the Raspberry Pi using any web browser and edit and configure Companion. The Raspberry Pi can be accessed remotely via SSH (secure shell.) In practical terms, this means that you can do everything from the QLab Mac: using a web browser to edit Companion on the Pi, and using Terminal to establish an SSH connection to the Pi in order to configure its settings.
Bitfocus makes this easy to set up by providing a ready-made Raspberry Pi system image file with a Linux operating system and the Companion app pre-installed. This can be flashed to a Micro SD card and installed in the Micro SD slot of the Raspberry Pi. The card should be rated either A1 or A2; A2 is better. A 16 GB card is sufficient, although you may find it easier to buy cards with larger capacities these days.
Here are simple step-by-step instructions for installation and configuration:
First, download a copy of CompanionPi from the Bitfocus Website. It downloads as a compressed ZIP file; expand it.
Next, download and install the Raspberry Pi Imager app.
Connect a class A1 or A2 SD card to your computer.
Open Raspberry Pi Imager.
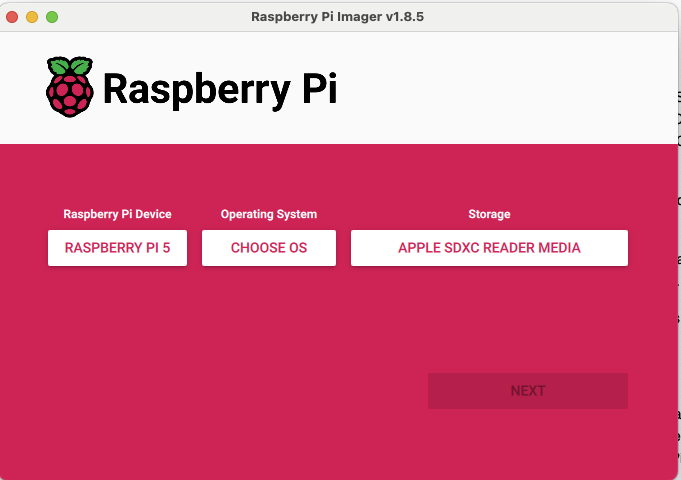
Select your model of Raspberry Pi device and your SD card. From the Operating System pop-up menu, select Use Custom and choose the companion-pi-stable-v3....img file.
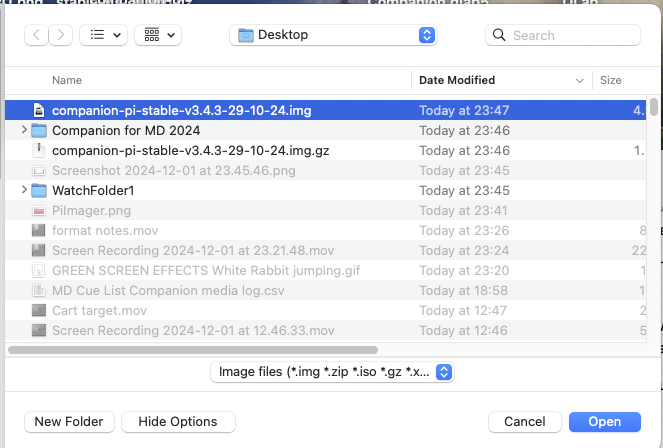
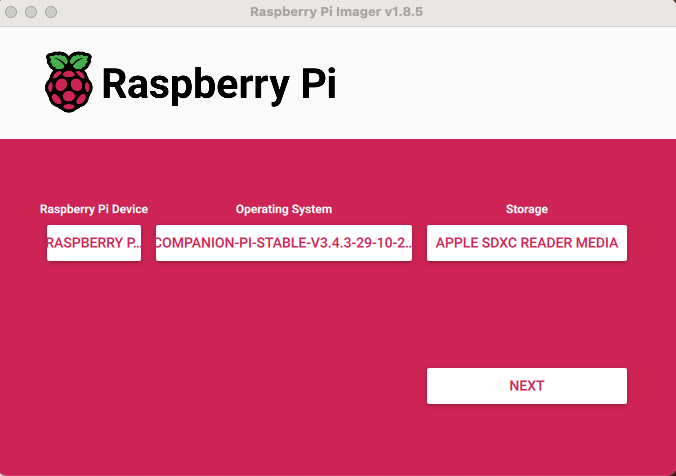
Click Next and select Edit OS Customization.
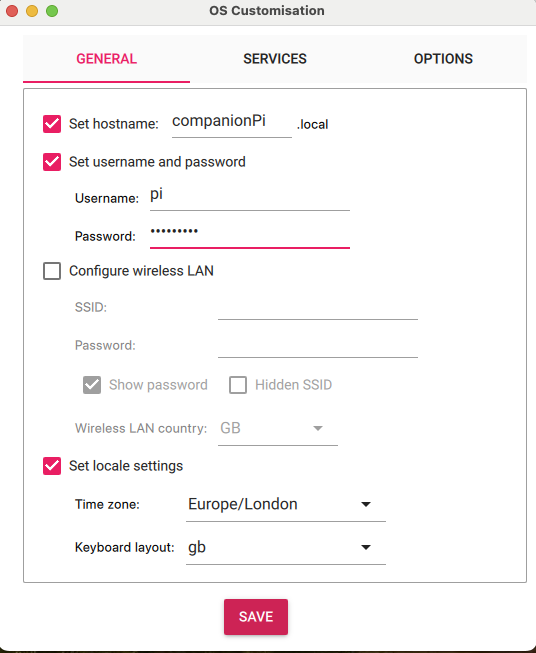
It’s best to keep things simple with regard to naming and passwords on this page. “raspberry” serves well as an easily remembered password. If you have security concerns, then by all means choose your own username and secure password, but be sure to make a note of them somewhere!
In the Services tab, check the box labeled Enable SSH and select Use Password.

Click Save then click Yes and Yes again. You will probably need to enter the login password for your Mac at this point.
The Micro SD card will now have the OS transferred to it and will verify.
Remove the Micro SD card from the Mac and place it in the SD slot of the Raspberry Pi.
Connect the Raspberry Pi to your network with an ethernet cable and turn it on.
The first time you boot up, you’ll need to wait a couple of minutes for the Pi go through some initialization routines. If you have a monitor connected, you will be able to see what’s happening from the command line interface; otherwise, just wait two minutes or so.
Then, open Terminal on your Mac and type:
ssh pi@companionPi
If you changed the username from pi and/or the hostname from companionPi you should of course use the names you chose.
Enter your password for the Raspberry Pi; ‘raspberry’ or whatever you used.
The prompt will change to pi@companionPi (or your custom names.)
If you want to leave the Raspberry Pi connecting to the network using DHCP, then you can use SSH from Terminal to find its IP address by typing
ifconfig
If you want to set a manually assigned IP address, follow these steps:
Find the name of the connection you want to set a static IP address for by typing
sudo nmcli -p connection show
which will return something like:

This shows us that the name of the ethernet connection is “Wired Connection 1.”
To change to a static IP address of 192.168.1.39 with router and DNS servers at 192.168.1.1 type:
sudo nmcli c mod "Wired connection 1" ipv4.addresses 192.168.1.39/24 ipv4.method manual
followed by:
sudo nmcli con mod "Wired connection 1" ipv4.gateway 192.168.1.1
and then:
sudo nmcli con mod "Wired connection 1" ipv4.dns 192.168.1.1
then cycle the connection by typing:
sudo nmcli c down "Wired connection 1" && sudo nmcli c up "Wired connection 1"
To return to using DHCP, type:
sudo nmcli con modify "Wired connection 1" ipv4.method auto
then cycle the connection by typing:
sudo nmcli c down "Wired connection 1" && sudo nmcli c up "Wired connection 1"
If the Pi uses DHCP, log in with:
pi@companionPi
If it’s using a static address, login with:
pi@192.168.1.39 (or whatever IP address you set)
Quit Terminal.
Editing Companion on the Raspberry Pi
Connect your Stream Deck, if you have one, to the Raspberry Pi.
On your Mac (or any other connected network device) open a web browser and enter the IP address of your Raspberry Pi in the search bar followed by a colon and 8000 e.g. 192.168.1.57:8000
The Bitfocus Companion GUI should open. Remember you are editing Companion on the Raspberry Pi and not on the computer running the web browser.
From the Import/Export Tab of the Companion GUI, open the MD List.companionconfig file from the file downloads for this Chapter.

After importing, the set-up wizard will run.
From this point, you can follow the setup directions above.
You should now be able to control QLab from the Stream Deck connected to your Raspberry Pi.
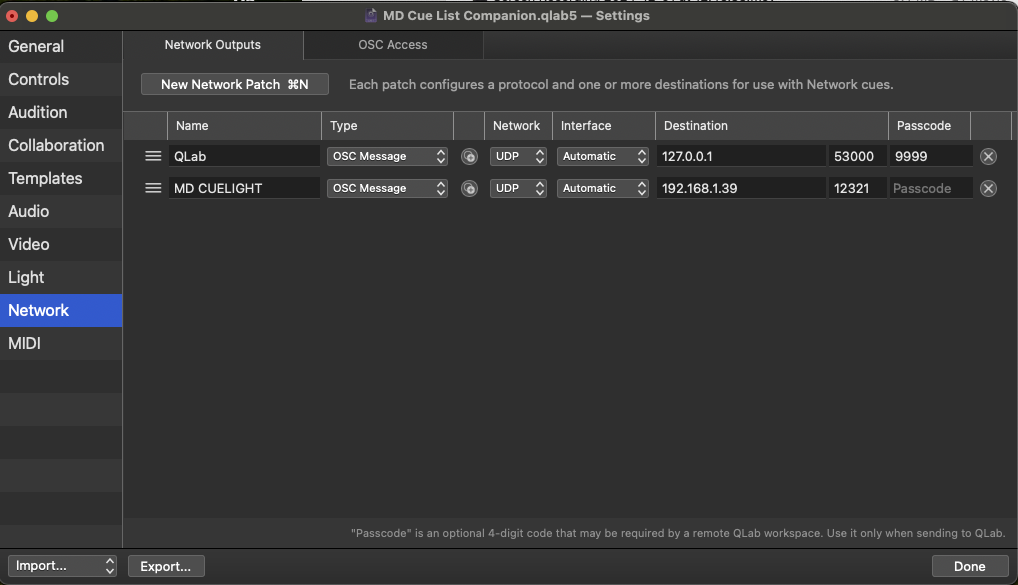
In order to communicate with the call light button on the Stream Deck (button 1/0/0) you will need to go into Workspace Settings → Network → Network Outputs and modify Patch 2 (MD Cuelight). Set its destination IP address to the IP address your Raspberry Pi.
Bitfocus Companion is an open-source product from Bitfocus AS.
The qlabfb module is included as a module in Companion. It is maintained on github.com.
Raspberry Pi is a product of Raspberry Pi, Ltd.
Stream Deck is a product of Elgato.
Music in the demo workspace by Kevin MacLeod. Licensed under Creative Commons: By Attribution 3.0
“Scarborough Fair”; traditional. Arranged and recorded by Mic Pool © All Rights Reserved.