Button Button, Who's Got The Button
The documentation for QLab’s official Stream Deck plugin can be found here.
In this article we’ll explore a few ways to create advanced physical controls with QLab. The first example uses an Elgato Stream Deck with a free program called Bitfocus Companion. Companion also works as a touch app on an iOS device, or via a web browser on any computer, so you can experiment with this article even if you don’t have a Stream Deck.
The second example will use a MIDI keyboard. We used a Novation LaunchKey Mini, but any MIDI keyboard will do.
Stream Deck with Companion
The concept behind Companion is that it allows you to create a configuration which connects a button on your device (or on an iOS screen, or a web page) to one or more actions. Those actions can then interact with other software via MIDI and OSC. These configurations are a ton of fun as they don’t require anything to be added to your QLab workspace; the fancy programming happens in Companion and relies on QLab’s built-in OSC dictionary.
Companion offers a large library of “connections” which are like modules for different remote-controllable devices and programs. There is a QLab connection for Companion, but we aren’t using that here. We are using the “Generic OSC” connection which allows us complete flexibility to send QLab exactly the messages we want to send.
Companion Setup - Import
After installing and starting Companion, click the Launch GUI button to open the settings and configuration interface in a web browser. Click on the Import / Export tab, then click the Import button and select the Button Button.companionconfig file included in the example download.
Companion Setup - Connections
Next, click the Connections tab, which will looks like this:
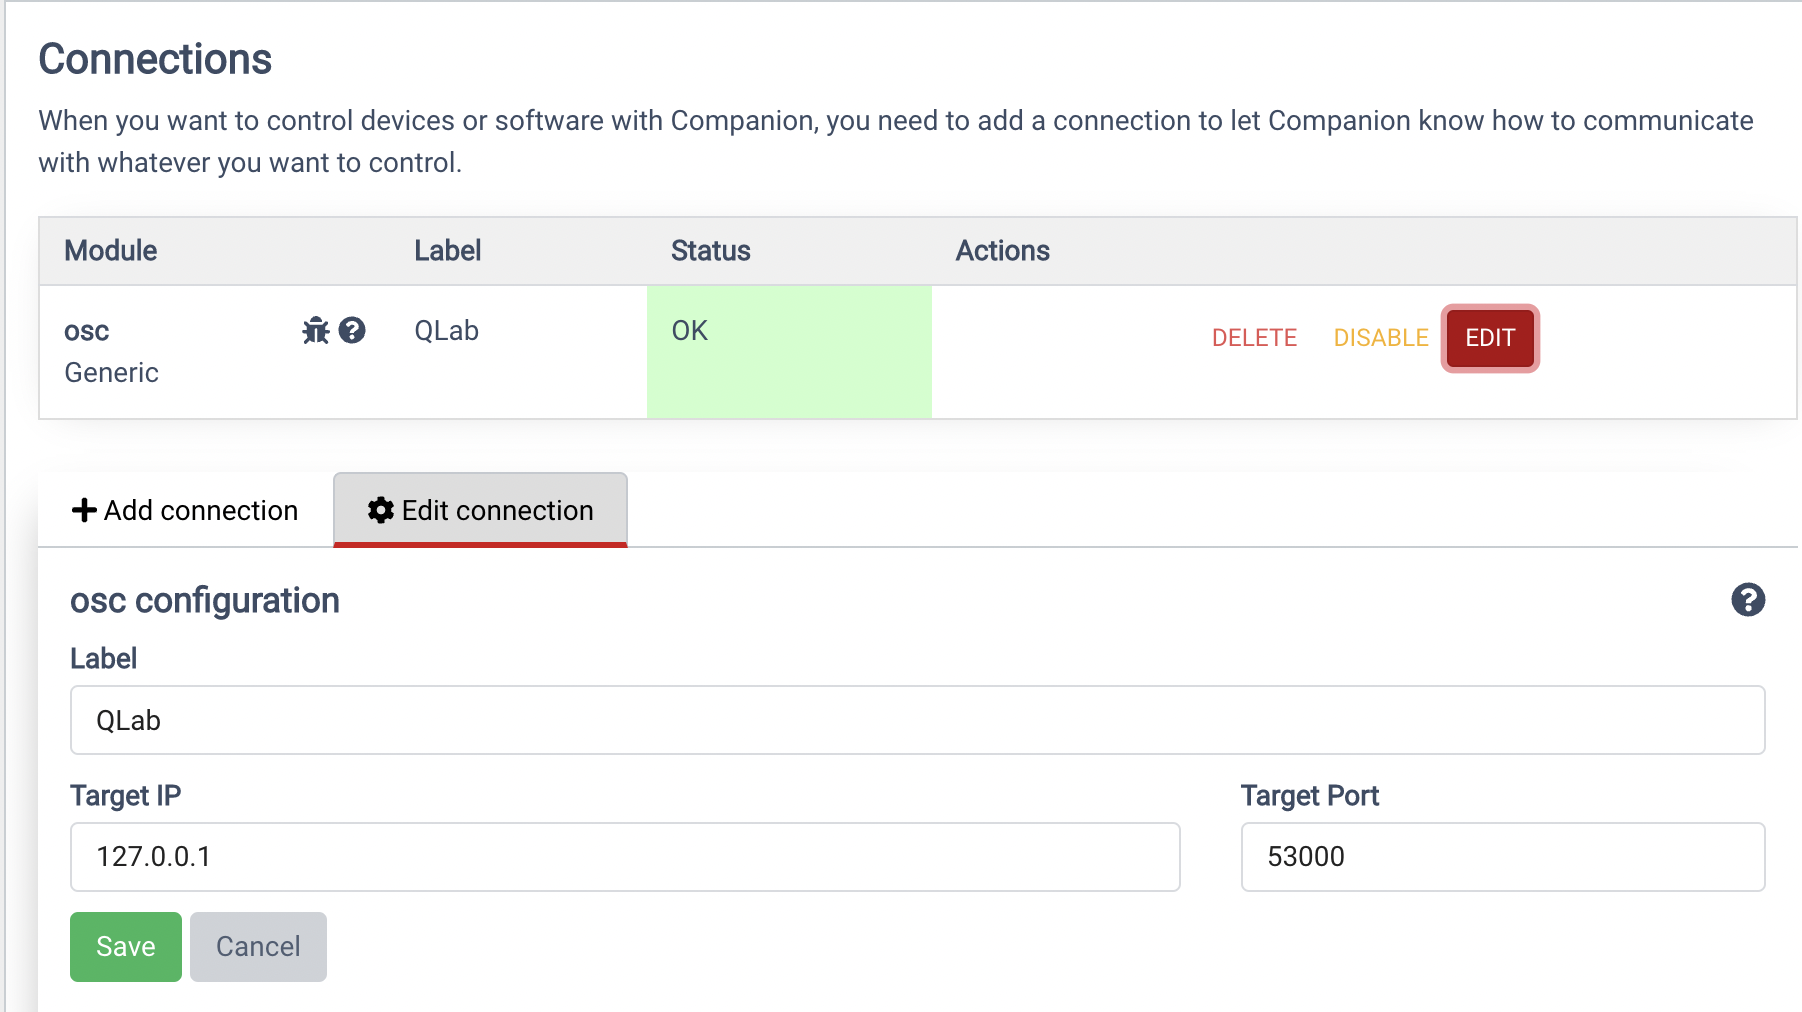
Click the EDIT button on the far right here. If you’re running Companion on the same Mac as QLab, set Target IP to 127.0.0.1. If Companion is running on a separate computer, controlling QLab on another Mac on the network, enter the IP address of the QLab computer here.
Unless you’ve configured QLab otherwise, set Target Port to 53000. It is possible to use a custom port for each workspace in QLab 5, but it’s not necessary.
Companion Setup - Buttons
Now, click the Buttons tab in the menu at the top of the screen. You’ll see a visual representation of the Stream Deck XL, which is the larger model with an 8×4 grid of buttons. We’ll be restricting our setup to the 5×3 grid of the regular Stream Deck, but you can feel free to add more if you’ve got the larger Stream Deck or if you’re using an iOS device or web browser as your control surface. If you’re using the Stream Deck + or the Stream Deck Mini, you’ll have fewer buttons available so you’ll need to decide which controls you want to include in your setup.

You’ll see a page of buttons which contains some handy transport controls for QLab.
Companion uses the metaphor of pages in its configuration; each device can have up to 99 pages of buttons, and you can configure buttons to jump between pages. The button in the upper left corner, numbered 1.1 and labeled Menu, is one of those - tapping it jumps to page 99, which is a menu of buttons that will allow you to jump to other pages.
Below the Menu button are buttons which move the selection of the workspace up and down (1.9 and 1.17).
On the bottom row you’ll see buttons to move the playhead by sequence (1.18 and 1.19), allowing for speedy navigation in large workspaces. The Preview button (1.20) previews the selected cue(s), and a nice big green GO button (1.21) tells QLab to GO.
The buttons in the second and third rows, in columns two through five, let you arm and disarm the selected cues (1.2 and 1.10), load (1.3) or stop (1.11) them, flag/unflag (1.4) them, or pause (1.12) and resume (1.13) the workspace. Of course there is a big red button (1.5) that lets you panic the whole workspace as well.
These buttons are all built the same way. You can select one to see how they’re built.

Some buttons, like the Menu button, have text set in the Button text field. Others have images set using the Browse button. The Go and Panic buttons also have background colors, which can be set just below the Font size field.
The Press actions section is where you tell Companion what should happen when the button is pressed. Our buttons each send an OSC message using the generic OSC connection. Some buttons send integer values, like the Arm button shown above. It sends the cue message /cue/selected/armed with a value of 1 to arm the selected cue or cues.
Other buttons send cue messages without arguments, like Load or Preview.
Go and Panic use workspace messages. So that they can work with any workspace, they don’t specify a workspace name or ID. They just send /go and /panic, and QLab passes those messages to whatever workspace is open.
Other Pages
On page 99, which you can navigate to by pressing the Menu button on the Stream Deck (or iOS device or web browser,) you’ll find a menu allowing you choose another page.
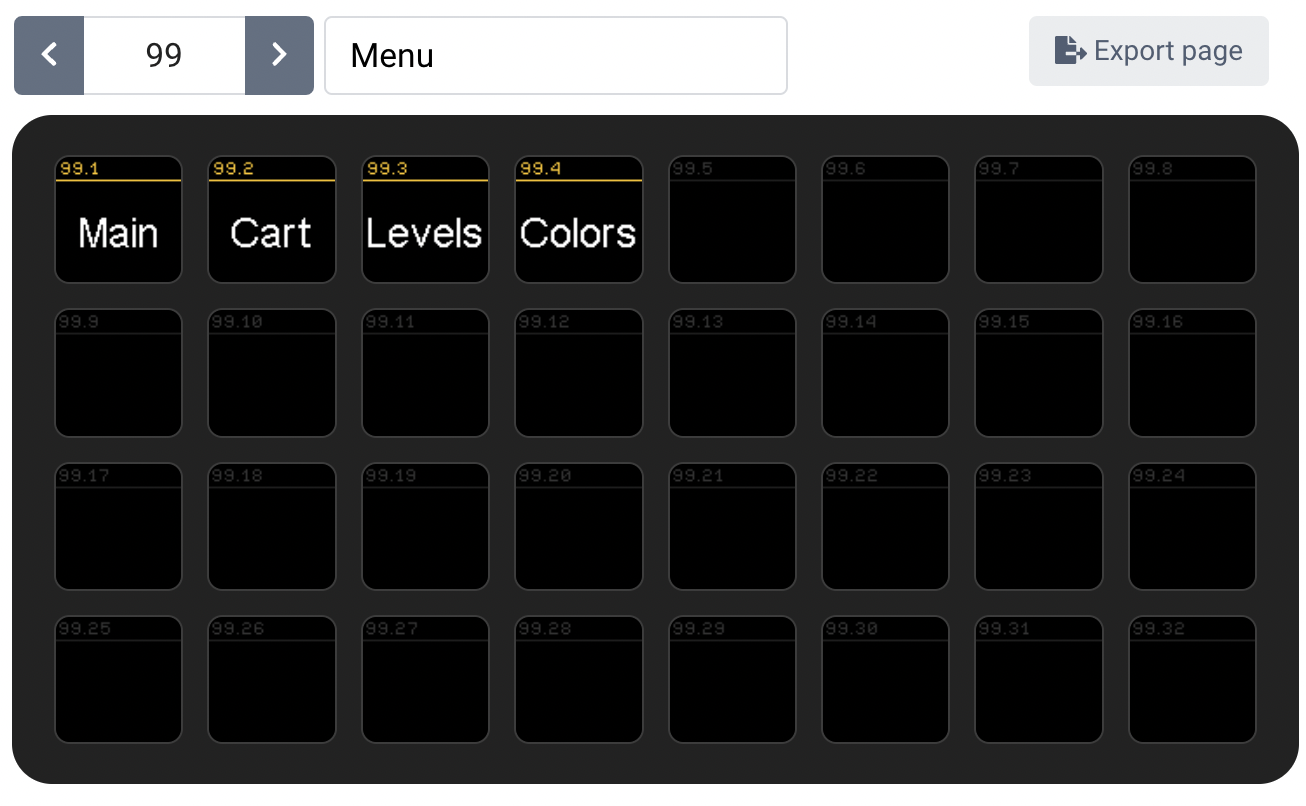
Main is where we just were.
The Cart page contains a batch of buttons which trigger a set of 12 cues with cue numbers C1 through C12. A setup like this can be handy for improvisation, or for shows with events in an uncertain order, but it can also be useful as a way of avoiding having to shout things to the cast and crew. The downloadable example includes the author’s set of usual tech announcements here which you may find to be handy.

All of the cart buttons use the same message, /cue/number/start with a different cue number in place of the word “number”.
While the example workspace has been set up to work with these buttons, it’s important to note that they’ll work with any cues in any workspace, as long as the workspace contains cues whose cue numbers match the buttons.
The Cart page also includes a Panic button and a Pause All button in case you need to quickly stop whatever is playing.
The Levels page is a showcase of QLab’s relative editing powers. Each of the four columns allows you to increment or decrement a parameter, or set it to a base level.

The first column adjusts the Main level slider in the Levels tab of any selected cues that have audio levels. The top button raises the level by 1 dB using this message:
/cue/selected/level/0/0/+ 1
The middle button lowers the level by 1 dB using this message:
/cue/selected/level/0/0/- 1
The bottom button sets the level to -199; lower than the lowest possible minimum volume level and therefore, effectively, -inf:
/cue/selected/level/0/0 -199
The next column does this same thing for the opacity of a Video, Camera, or Text cue (or a Fade cue that targets one of those cues) bringing it up or down by 1% (.01), or setting it to 0 opacity.
The final two columns adjust times, either the pre-wait or the duration. The pre-wait buttons work on all cue types. The duration buttons only work on cues whose durations can be set manually, such as Fade cues, Light cues, Network cues, or Video cues that target still images.
The Colors page makes it easy for you to quickly set cues to one of a few colors, including both the standard cue colors as well as a few extra ones. These buttons use the “Send String” action with a message like /cue/selected/colorName "purple"

The buttons have background colors that are similar to the color they’ll set in QLab, but the Stream Deck’s color rendering isn’t nearly as good as a computer monitor so it probably won’t match what you see on the screen.
The Levels and Colors pages also include buttons to move the selection up and down, so that you can work your way around your cue list while editing levels or colors.
Conclusion
You can do much more than this with a Stream Deck and QLab. Hopefully this is a good first taste of what is possible.
MIDI control with LaunchKey Mini
This example is a demonstration of what is possible using a good old fashioned MIDI keyboard of moderate complexity. If you’re implementing something like this yourself, you’ll need to modify your approach to suit the model of MIDI controller that you have. The LaunchKey Mini is a good example device because it has several types of inputs… some piano keys, some knobs, some buttons. It’s also very inexpensive for what you get, so it’s a good value if you’re in the market for your first keyboard controller.
Here, the intelligence rests in QLab, specifically in the QLab workspace that’s included in the example download. Companion is not used at all. The controller sends the MIDI voice messages shown below using MIDI channel 1 and channel 10. The controls which send fixed velocity values have those values listed, but the ones which send variable velocities have nothing listed. Those send a range of 0 to 127, as usual.
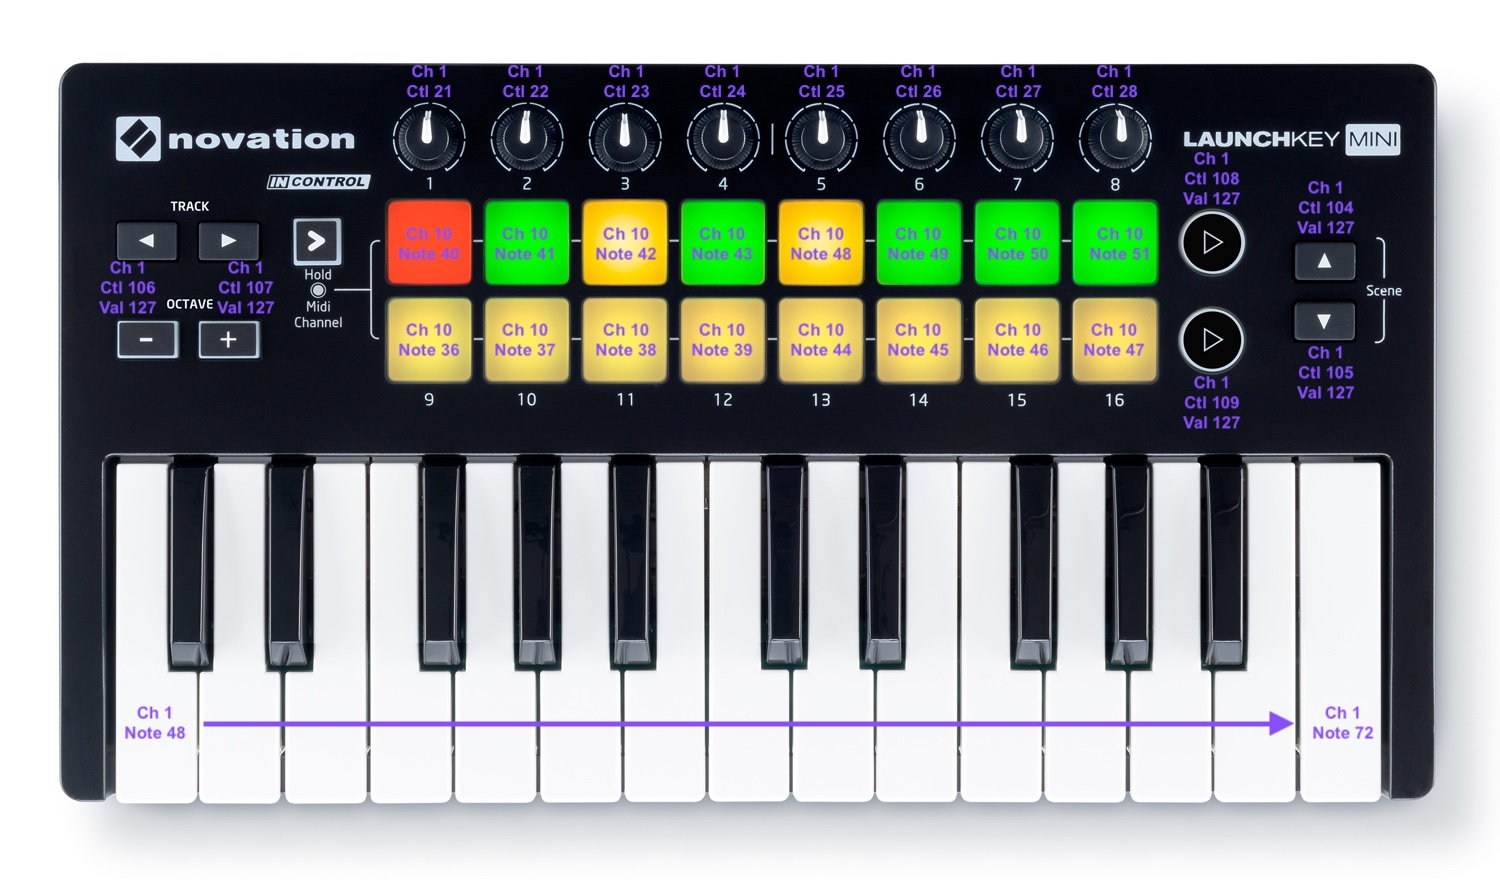
Using MIDI to trigger OSC messages to control QLab
This is quite a bit simpler than the heading suggests.
Rather than using the built in MIDI controls, we will use incoming MIDI messages from the keyboard as MIDI triggers for individual Network cues, and those cues will send OSC messages to QLab to tell it to do things. This approach requires more setup, but allows for more flexibility.
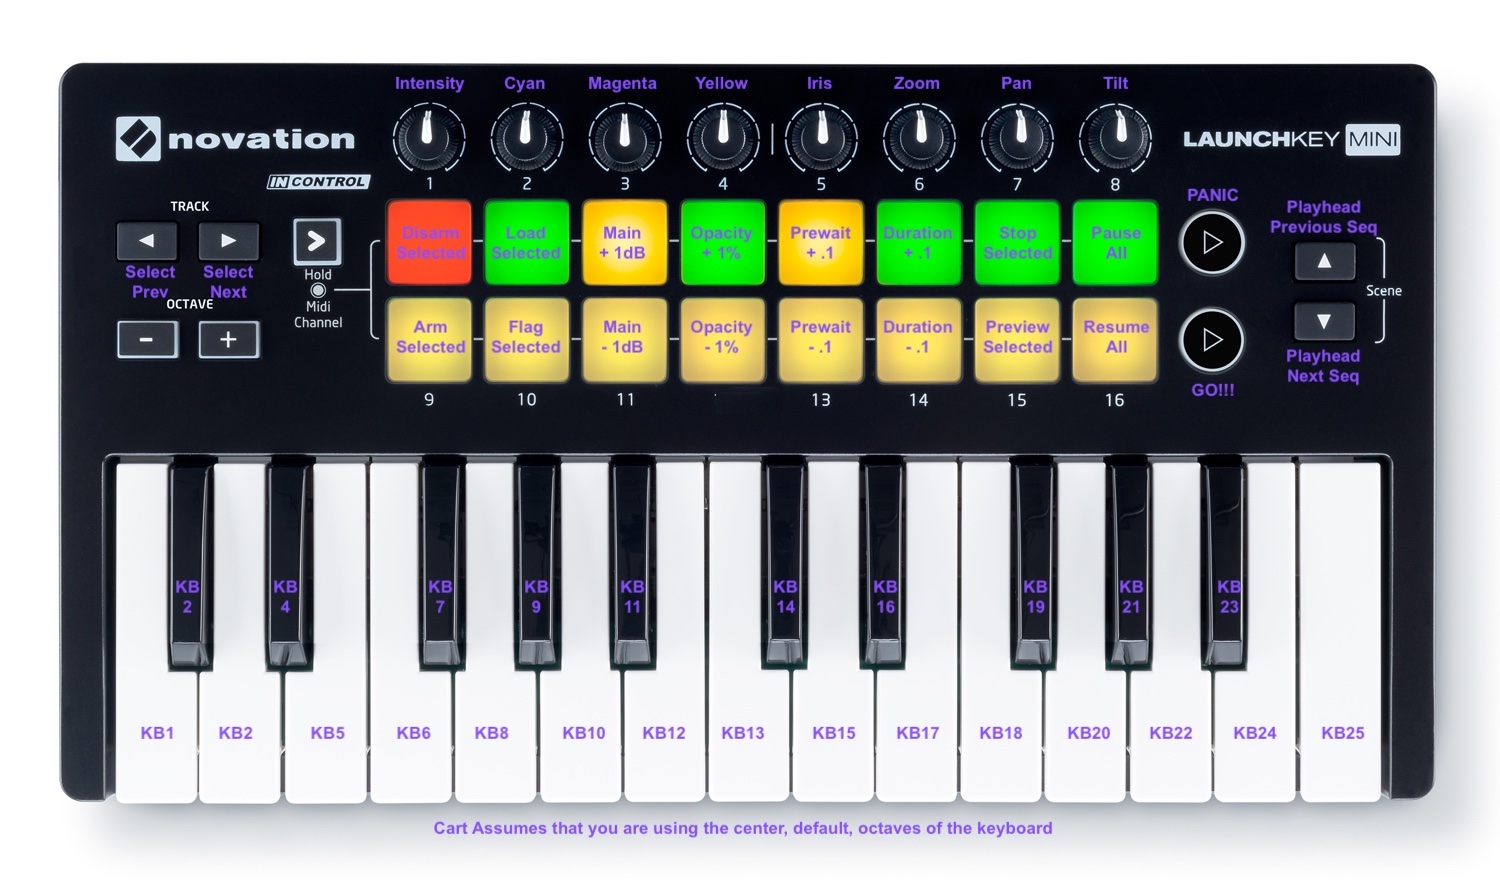
Every button on the LaunchKey that is not labeled with “KB” triggers a Network cue which sends a message from QLab’s OSC dictionary, to the default “localhost” patch. That routes the message back into to QLab.
Setting this up requires two different approaches because the LaunchKey has two kinds of buttons. All the arrow buttons, for example, send a single control change message which is exactly the same every time you press the button. To assign this message to a cue’s MIDI trigger, you simply select the cue, go to the Triggers tab in the inspector, and press the Capture button next to the MIDI trigger. Then, press the button on the LaunchKey to send the message, and QLab will record that message as the MIDI trigger for the selected cue. Then, check the box on the left to enable the trigger, and you’re all set.
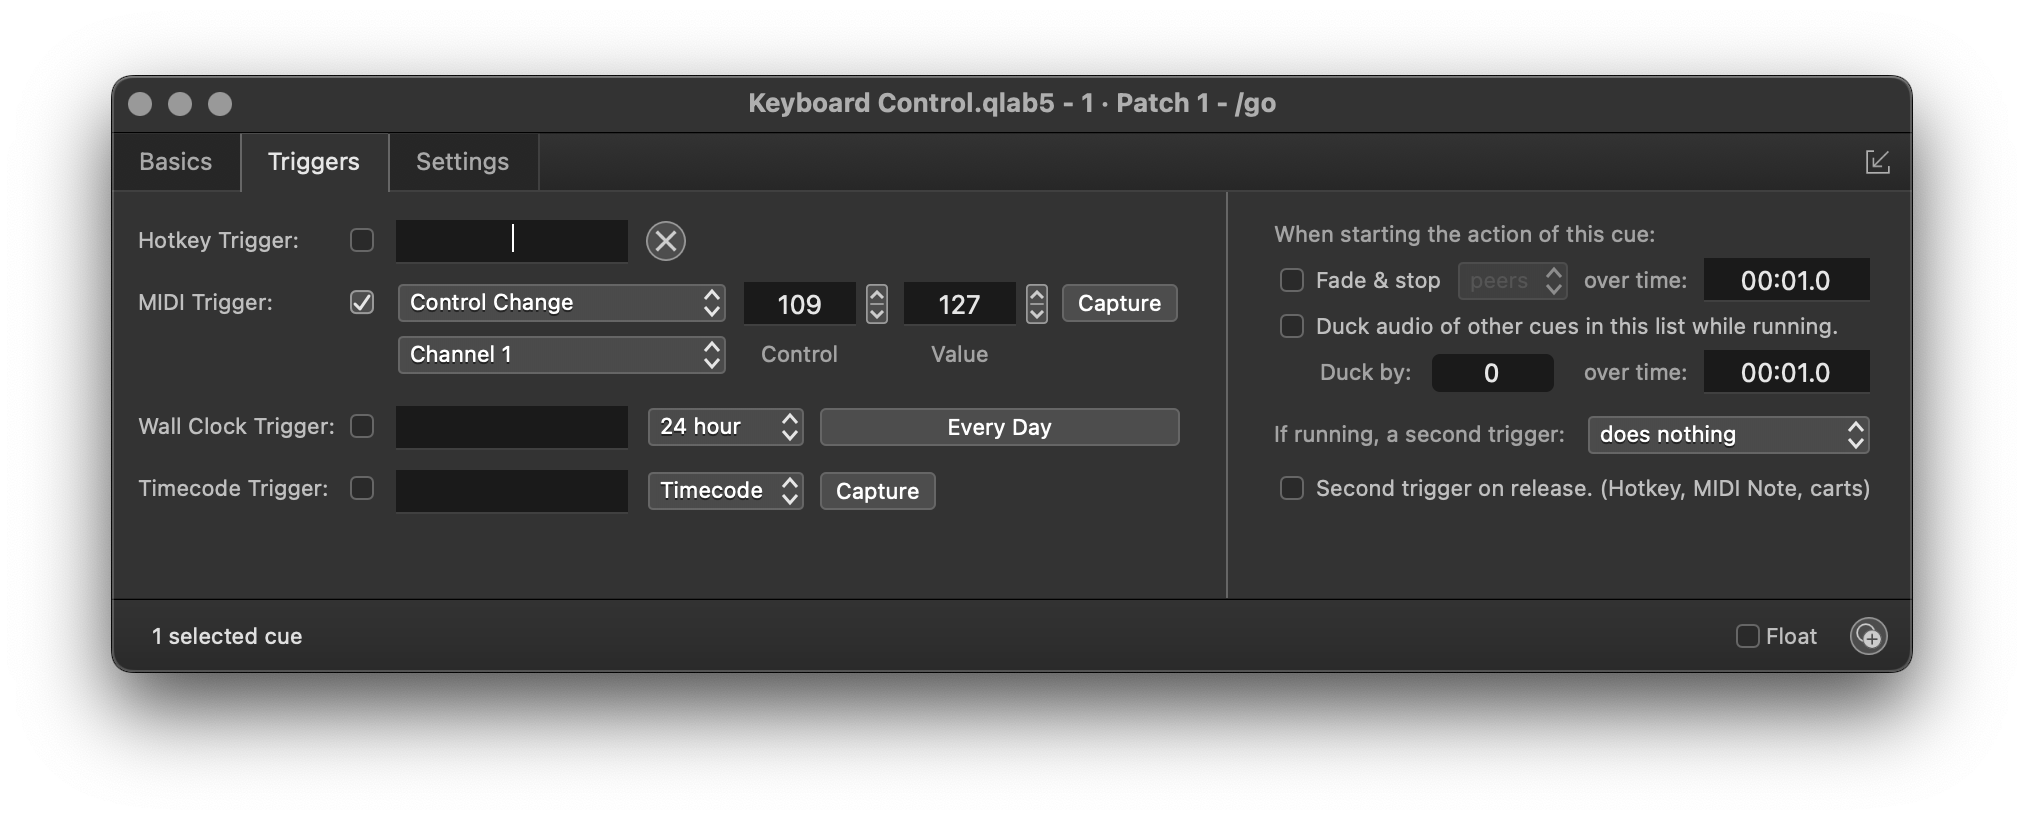
Things are a little trickier with the piano keys and pads which send note values, because the velocity changes depending on how hard you strike the key or pad. To avoid having to develop perfect finger drumming technique and hit with the exact same velocity each time, you can set a range in the Velocity field of the cue’s MIDI trigger.
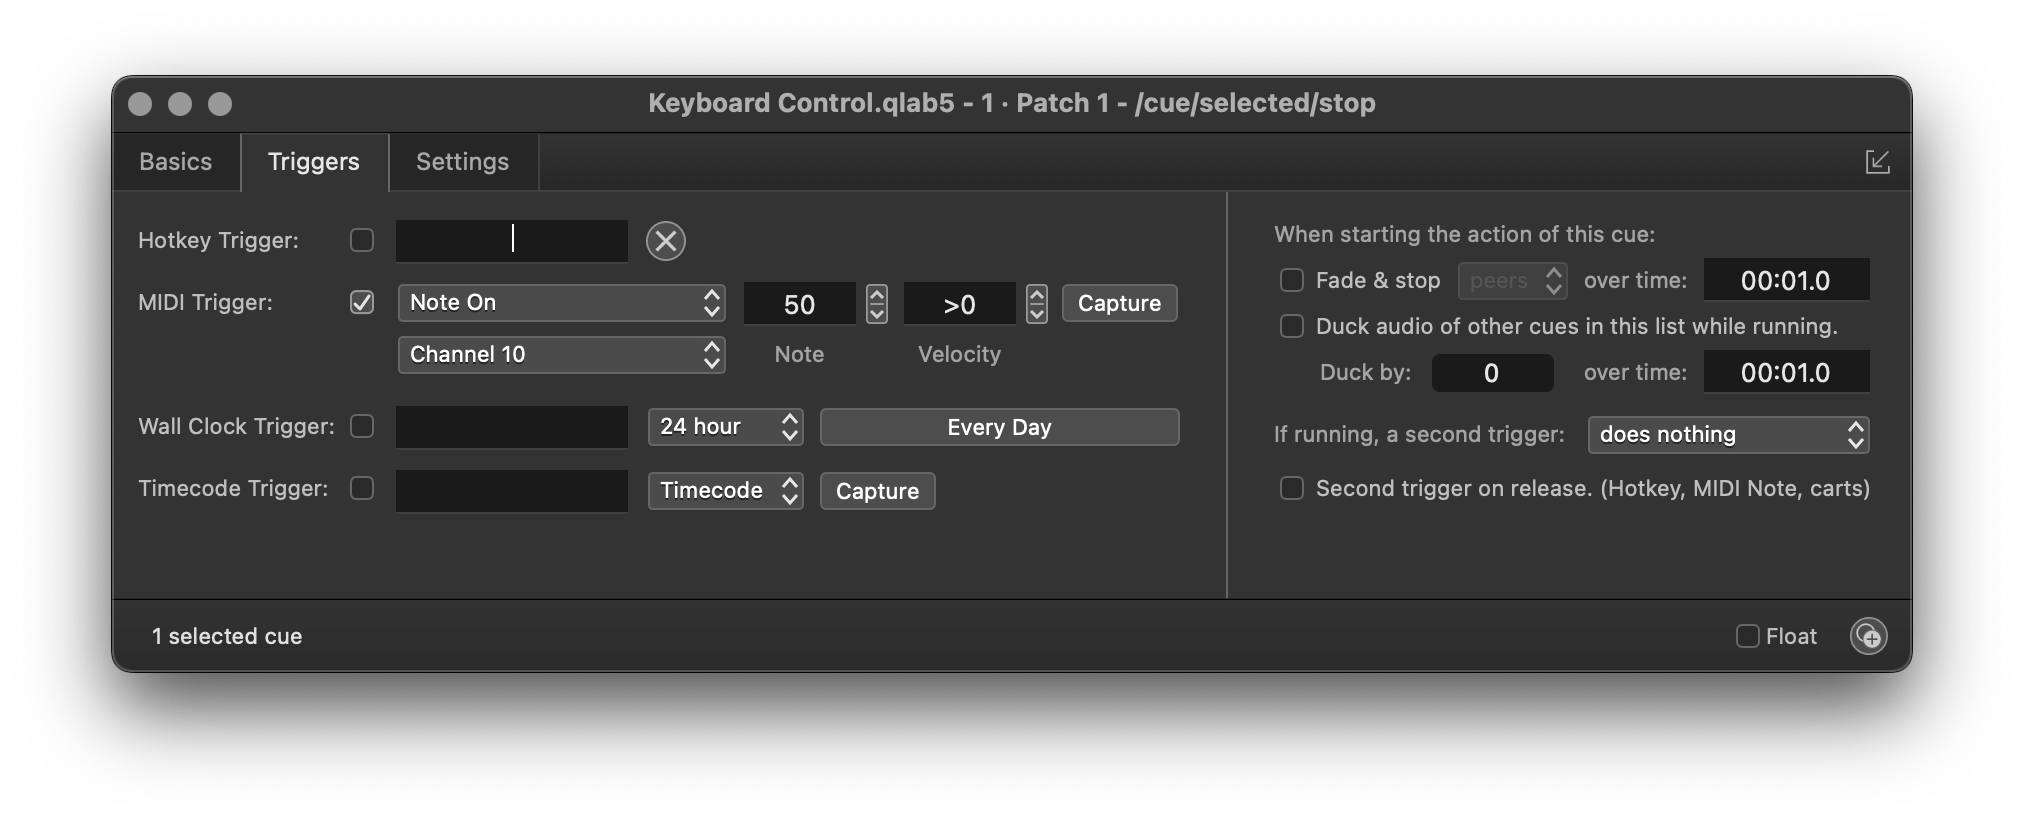
Here, the trigger is set to respond to any velocity greater than zero, which means no matter how you press, the cue will trigger. Please note that the channel here is different. If you look at the first image of the keyboard above, you’ll notice that some of the piano keys and drum pads send the same note, but on separate channels. Because we want to maximize the number of different things we can do with this controller, we can differentiate between them by filtering the MIDI trigger by channel.
Light Dashboard MIDI control
The knobs at the top of the keyboard are perfect for controlling lighting parameters, so the example workspace maps them to various parameters for the selected instrument(s). This is done in Workspace Settings → Light → Light Dashboard MIDI.
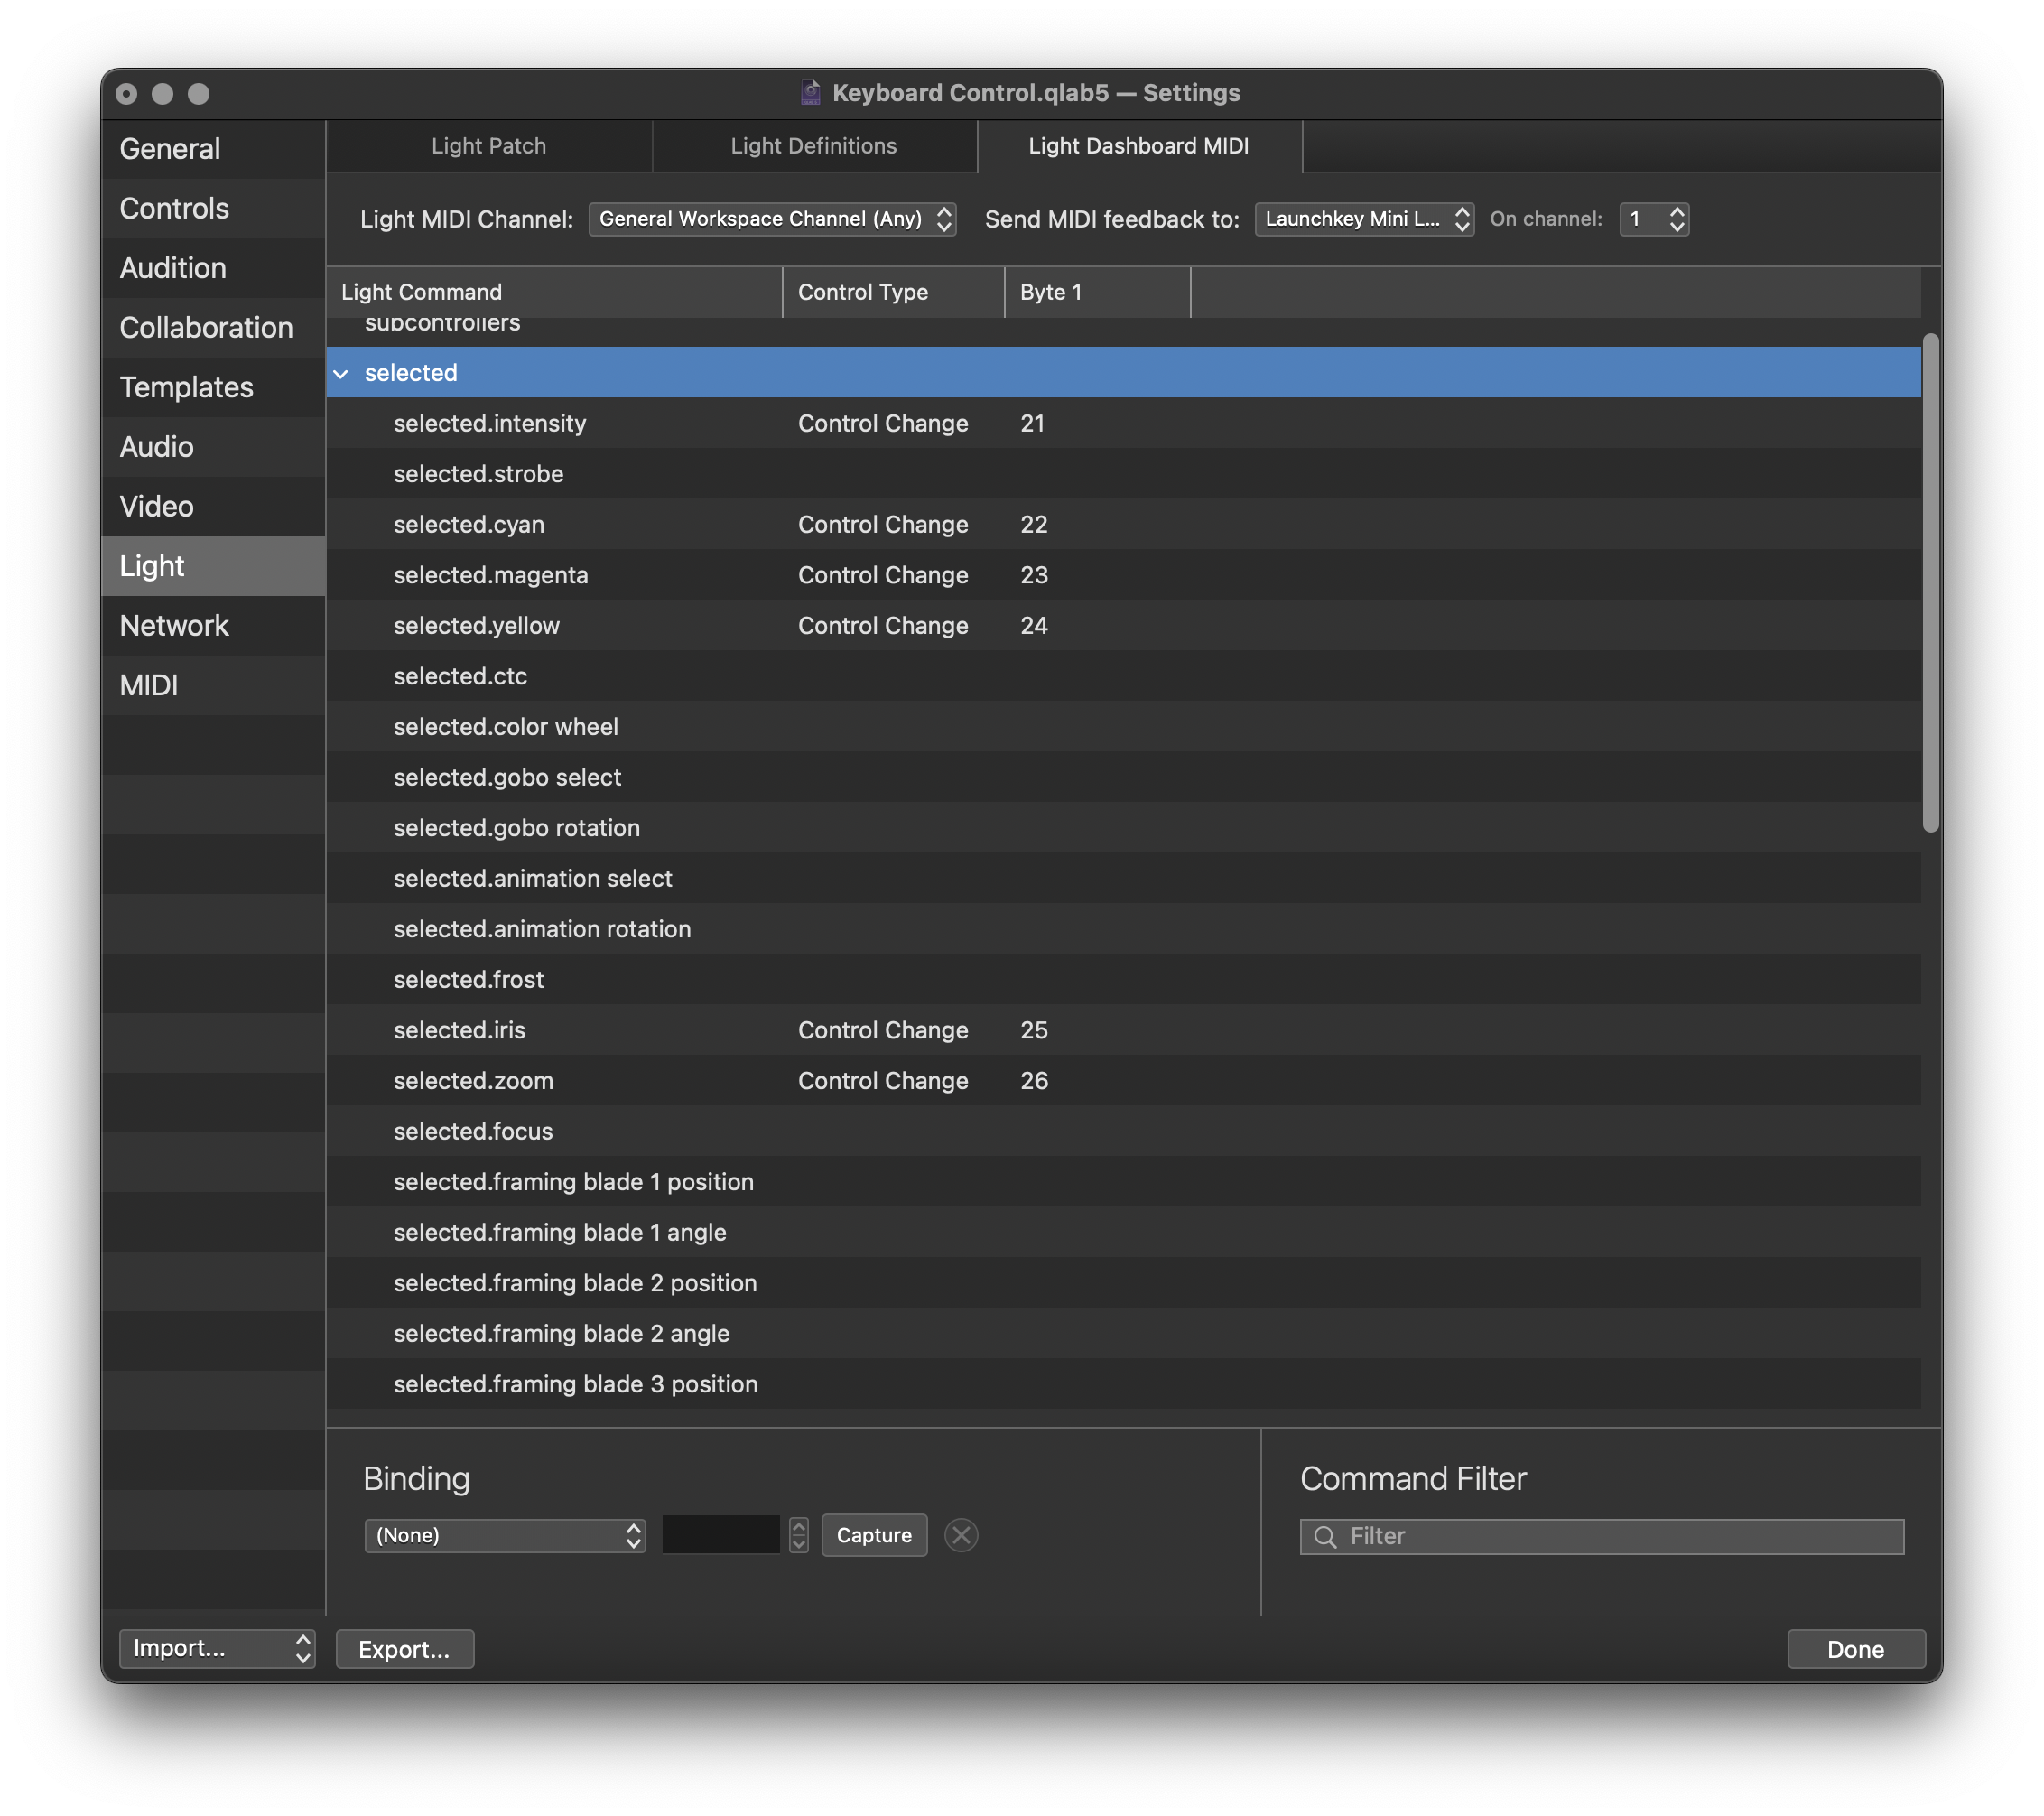
The knobs are assigned to intensity, cyan, magenta, yellow, iris, zoom, pan, and tilt. If you had a control surface with more knobs, you could address even more parameters or map knobs to specific instruments rather than to the currently selected ones. Needless to say, if you are using lights with RGB color mixing instead of CMY color mixing, you could assign those parameters instead.
Keys to the Cart
The example also contains a cart full of cues with MIDI triggers. These cues play the same announcements as the Stream Deck example as well a few other sound cues, just for fun. The twenty five piano keys trigger these cues.
Bonus Download
Besides the usual example workspace, we have a downloadable collection of icons for you to use in your projects. Please note that these icons are for personal use only, and only in a context like the one described in this article. They may not, for example, be included in software that you create and distribute, whether for free or for profit.
Conclusion
If you’re able to spend the time setting things up to suit the way you work, tactile control over QLab can be both workflow-enhancing and enjoyable. From MIDI keyboards to button boxes, there is almost certainly a control surface out there which fits your needs nicely.