MIDI Mixer Manipulation
This chapter explores controlling external mixers using MIDI. These examples use mixers in software digital audio workstations (DAWs) that users are likely to have access to, but the same techniques can be used with hardware mixing consoles that have MIDI control implementations.
DAWs and consoles’ external control features can be divided broadly into three groups; those whose faders and other controls can be easily controlled using MIDI controllers, those where they can be controlled but some bridging software is required, and those where MIDI control is difficult or impossible.
DAWs that can be easily controlled typically have some means of binding MIDI controls to DAW controls, either by putting a control into learn mode and capturing the next MIDI data received (similar to the way QLab captures MIDI triggers for cues) or by entering MIDI bindings manually. This tutorial contains detailed instructions for several DAWs in this category, including ProTools 2023 and earlier, Ableton Live, Logic Pro, and Reaper.
ProTools 2024 and later falls into the second category (possible with translation) as it is now only MIDI-controllable using HUI protocols. This chapter described a method of fader control using Bome MIDI translator Pro to convert MIDI messages from QLab into HUI instructions. ProTools versions prior to 2024 this can use the M-Audio protocol, which allows easy, direct MIDI control of faders. With both these methods, controlling more than eight channels of ProTools can be cumbersome; for higher channel counts, alternative DAWs may be much easier to control.
There are many hardware consoles that allow MIDI control of individual parameters, either through user-editable tables, fixed tables, or NRPN controls. NRPN stands for “non-registered parameter number” which is a type of MIDI message used to transmit control data for parameters that are not part of the standard MIDI specification. Again, bridging software will probably be required to avoid very cumbersome programming within QLab.
Controlling an external fader with QLab MIDI cues
We’ll begin by using MIDI cues to control a fader that is set up to respond to MIDI CC 1.
The fader is currently at 0 dB and we want to set it to -6 dB. We create a MIDI cue set to send a MIDI CC value, and guess that -6 dB might equate to a MIDI CC value of 50. We set that value and use the Send Message button to transmit it. Wrong guess! Let’s try 70.
That took quite a long time, but we are still not at the required value and we are only dealing with one fader. We could speed things up by opening QLab’s Workspace Status window and enabling MIDI input in the Log tab. Now we can move the fader on the mixer and see the equivalent MIDI CC value in the log. 76 will give us 6 dB, so we can enter that as the value.
The next problem is that there is nothing in the cue list which gives any clue as to what that cue is doing. We need to edit the cue name to indicate what the cue does, e.g Fader 1 -6dB 0secs
We’ll now create a second cue to move fader 1 to -25 in 3 seconds. We duplicate the cue, move the mixer fader, get the value for -25 db from the log, enter the value (36) in the Fade to value field of the MIDI cue, enable the fade over duration, set it to 3 seconds, and edit the cue name to describe what the cue does.
We now find that the level we set for the first cue is a bit quiet so we increase the level in this cue to -2 dB (a CC value of 96.) Unfortunately, when we now use the second cue to decrease the level to -25, the fader snaps to -6 before beginning a fade to -25. This is because MIDI fade in QLab requires a start and end value. This also means that we can’t copy and paste that cue the next time a fade to -25 dB is required, as the preceding cue might be at a different level.
This is already getting complicated, and if we intend to control multiple faders things are going to get rapidly unmanageable. Often, we can avoid controlling faders individually by recording all the fader settings and timings as a scene or snapshot in the mixing console or DAW, but sometimes this facility doesn’t exist, there are limited numbers of scenes or snapshots, or there may be many other reasons why individual fader control is preferable.
A Possible Solution
What would be useful is a fader bank in QLab with a slider for every fader we want to control that can continuously adjust the faders in the mixer or DAW, live as we move them by sending MIDI. It would be great if, at any point, we could create a new cue or update an existing cue with the current levels of the sliders. It would be a real bonus if a cue just moved the faders from their current values to the new values, and cues could contain the levels of all faders or only a few of them, leaving the other faders where they are. Finally, extra points would be awarded if we could move the faders in the DAW or on the mixing console, and the QLab sliders would move to match.
That’s quite a feature request,! But it seems QLab already has this MIDI functionality for at least 16 faders, regardless of license, built into its Light Dashboard. A little bit of lateral thinking should enable some channels of the Dashboard to be repurposed to control audio faders.
Let’s continue with our one fader example and create a slider on the Light Dashboard to control it.
We can see that both the fader on the mixing console and the slider in the Light Dashboard are now bi-directionally synced. If we move the slider in the Light Dashboard, the mixer’s fader changes level, and moving the mixer fader changes QLab’s slider.
This means that we can just record the current state of the QLab Light Dashboard into Light cues, and, in theory, the fader will move from its current position to the level recorded in the light cue.
Except it often doesn’t! When the Light cue starts to move the fader, the fader sends its MIDI feedback, and this second source of MIDI data halts the cue. Although the MIDI feedback settings allow the bus and the channel used for sending to be set, the MIDI receive for the Light Dashboard listens on all devices; only the listen channel can be set.
If we set the receive channel to a different channel than the one used for MIDI feedback, then the Light cues can move the Dashboard slider, and therefore the mixer’s fader, but we no longer have bidirectional control from the mixer. This is fine as long as we remember only to change mixer levels from the Light Dashboard or use the levels recorded in Light cues. If we move the mixer fader directly, QLab’s Light Dashboard slider will be out of sync, and when a QLab Light cue is triggered, the level will instantly jump to the current Light Dashboard slider level, and the fade will continue from there.
Alternatively, if we know we will sometimes want the mixer faders to control the Light Dashboard, we can leave the Light Dashboard to listen on MIDI channel 1, switch Musical MIDI input off (using Override Controls) when we want QLab Light cues to control a mixer fader, and switch Musical MIDI back on when we want the mixer fader to control the Light Dashboard.
This may not be a problem when controlling hardware consoles. MIDI sent to the mixing console’s MIDI port won’t be picked up by the Light Dashboard in the same way. However, if bridging software is used via the IAC bus, or if the mixer sends MIDI data even when its faders are not being touched and are being remotely controlled, conflicting data may still end up being received by the Light Dashboard.
Controlling multiple faders
This section of the tutorial describes a method for controlling eight faders in various DAWs and hardware consoles using the Light Dashboard.
Example downloads are available for both QLab 4 and QLab 5 with different CC numbers appropriate for general use or for specific control surfaces. Most of the settings required in the DAWs are adjustable preferences and therefore not stored in the DAW project files. DAWs will usually need to have their MIDI inputs, MIDI control enable setting, and control surfaces set using the instructions provided below for each DAW. You should take note the current settings before changing anything so you can revert back to them if required.
Setting up QLab
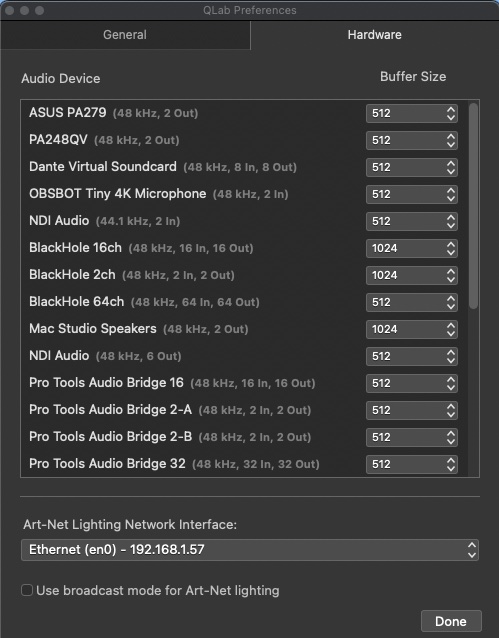
QLab must be connected to a network (or an approved USB DMX interface) for the Light Dashboard to function. The network doesn’t actually have to be connected to anything, but its presence is required. The network should be selected in QLab preferences:
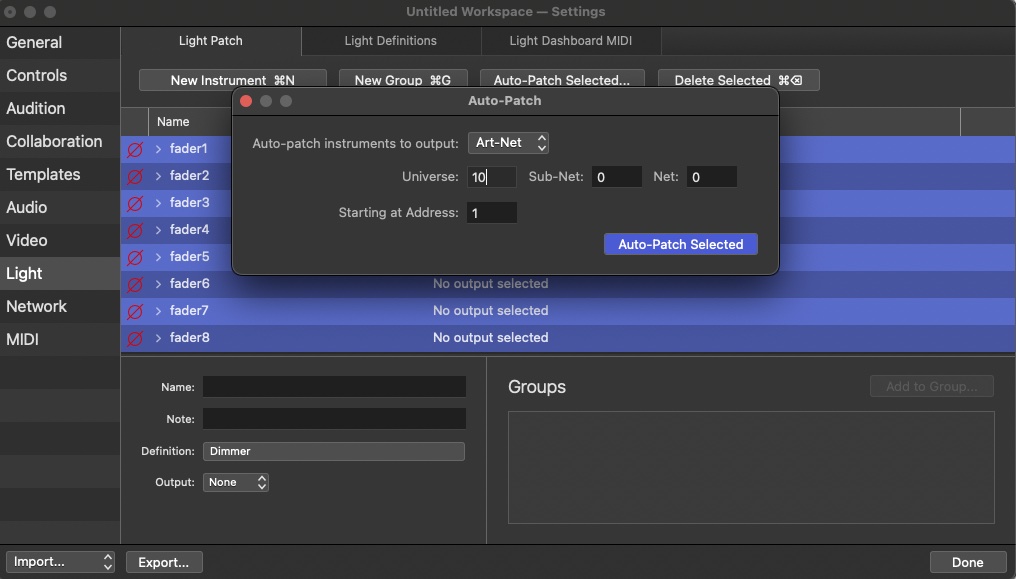
In Workspace Settings → Light → Patch, create eight new light instruments. You may wish to give them the prefix “fader” to differentiate them from other instruments.

Click Auto-Patch Selected… and select an unused universe. The example uses 10.
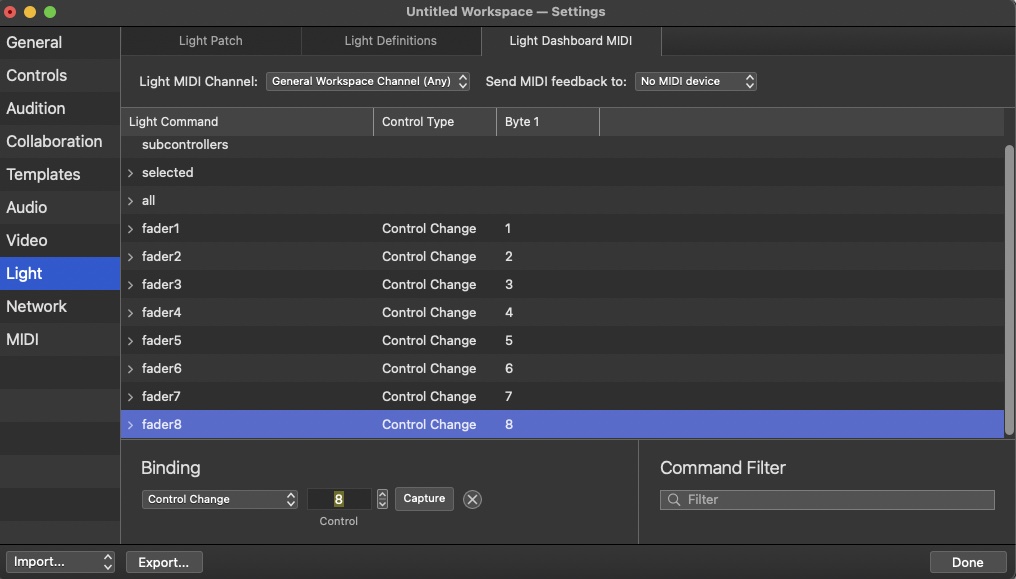
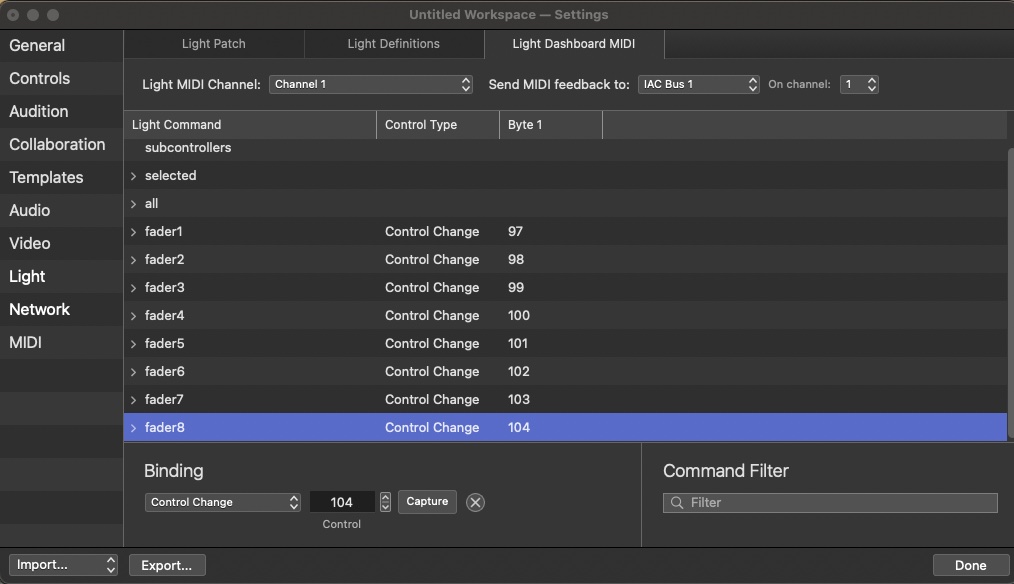
In the Light Dashboard MIDI tab, select all eight faders and change their binding to Control Change.
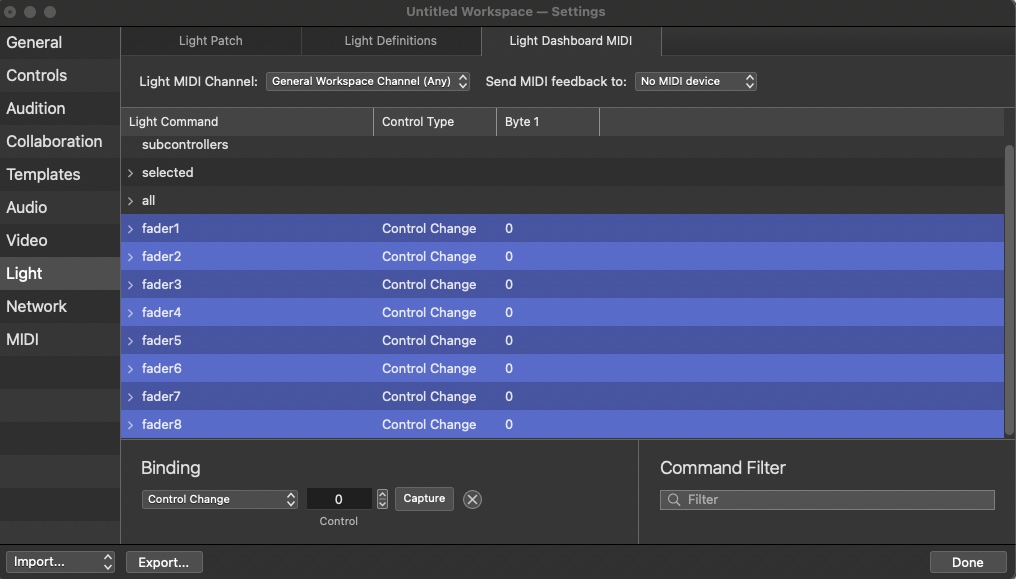
Set the control number for each fader sequentially from 1 to 8. The binding must be set on the instrument and not the intensity parameter.
Set the MIDI feedback device to IAC Bus 1 on channel 1 and the Light MIDI channel to 11, or really any channel other than the channel used for MIDI feedback.

Open the Light Dashboard from QLab’s Windows menu. Open Workspace Status from the same menu, go to the Logs tab, and check the box labeled MIDI Input.
Wiggle a few faders and observe the MIDI feedback being transmitted.
Setting up Reaper
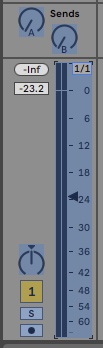
We’ll first look at controlling Reaper, mainly because it has bold fader graphics, which make it easy to see what is happening in screen recordings.
Reaper cannot provide MIDI feedback from its faders so all control will be from QLab’s Light Dashboard.
(Reaper can provide MIDI feedback if a MIDI control surface is assigned. Unfortunately, the only surface compatible with MIDI CC control from QLab is the BF2000 which uses multiple MIDI channels, so is limited using its main volume control and seven channel faders on MIDI channel 1, control change 81-88.)
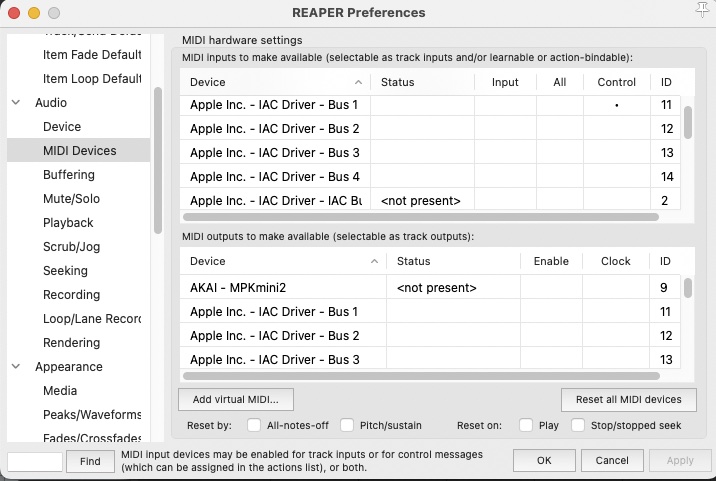
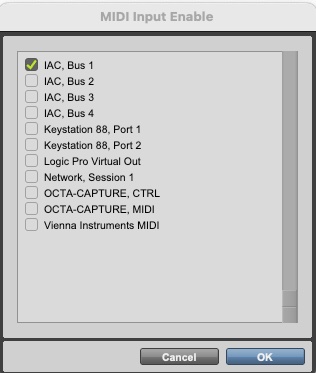
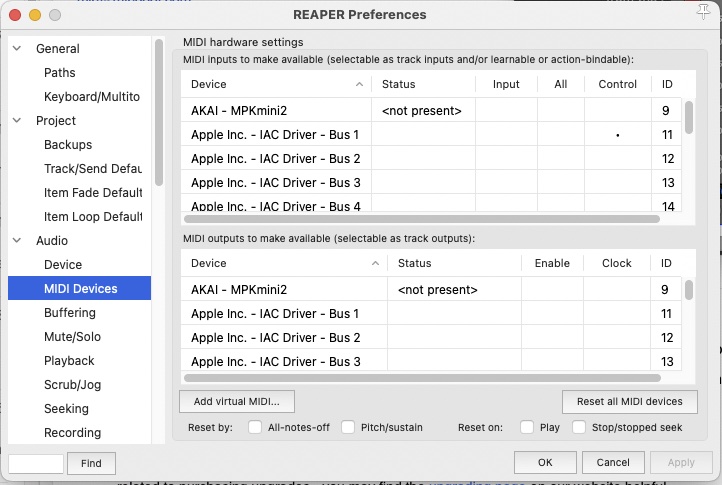
To enable MIDI in Reaper, go to Preferences, select MIDI Devices, and click in the control field for IAC Bus 1. A dot will appear indicating the input is enabled.
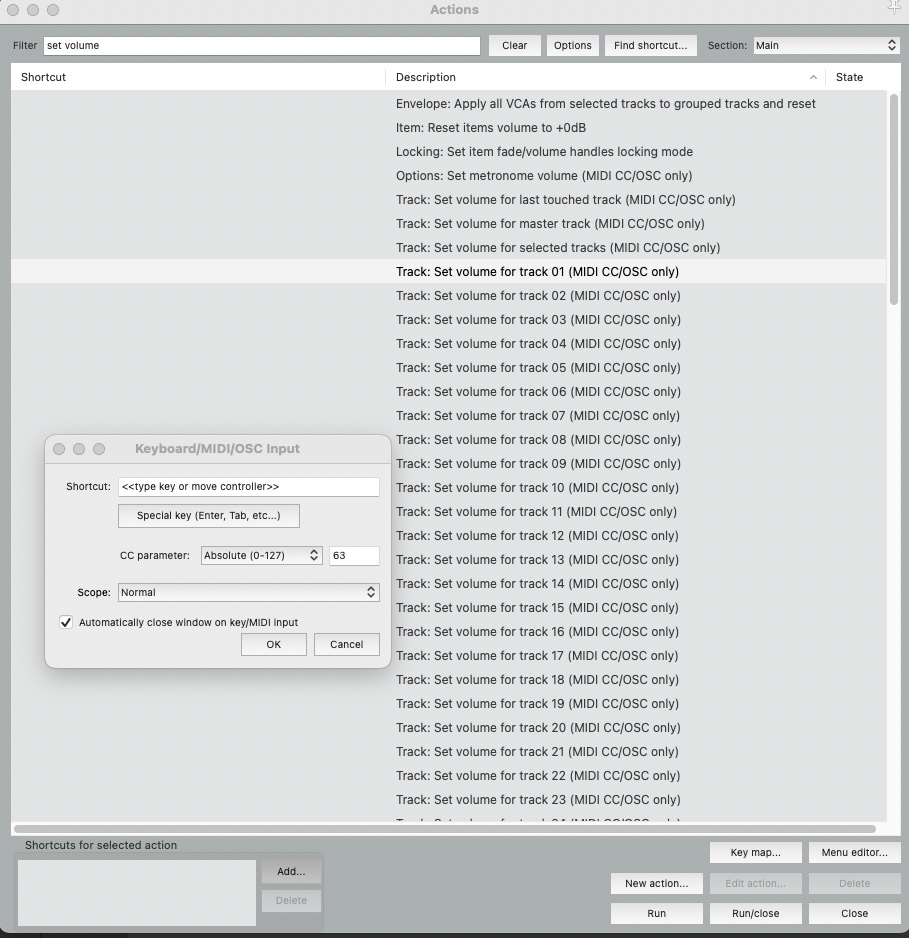
MIDI bindings in Reaper are set in the Actions pane, which is found by choosing Show action list… from the Reaper Actions menu.
To quickly find the required parameters to bind, type “set volume” into the filter.
Select Track: Set Volume for Track 1 and click the Add… button in the lower left corner of the window, under the label that says “Shortcuts for the selected action”.
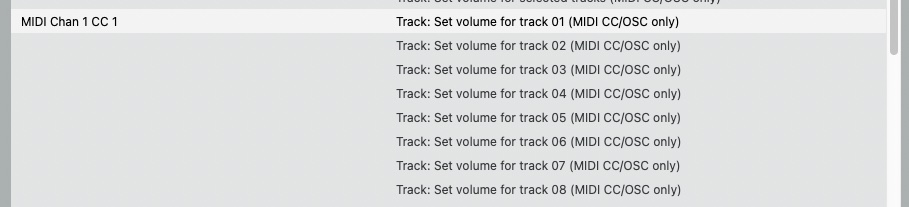
Wiggle the fader 1 slider in QLab’s Light Dashboard, and the control will be captured. The binding will appear in the Shortcut column.
Repeat for the other 7 faders.
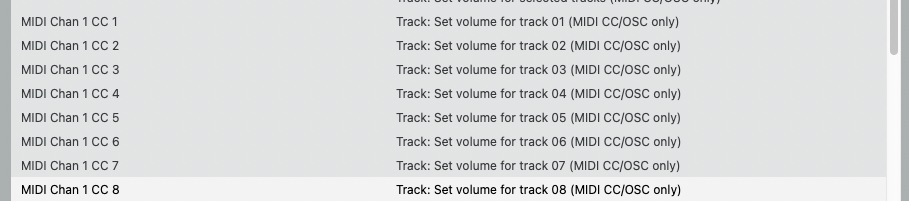
The faders in Reaper will now follow the movement of QLab’s Light Dashboard sliders.
Create some Light cues using the buttons in the Light Dashboard and then run them.
At this point, it will be worthwhile reading the Lighting section of QLab’s manual to fully explore what features might be useful for controlling audio faders in this manner.
Setting up Ableton Live
Ableton Live’s MIDI mappings are set by selecting Edit MIDI Map from the Options menu.

When you select this menu item, all the controls turn blue to indicate the change of mode. We can use the same set of bindings as were used in the Reaper example. To set the binding for channel 1, double click its fader track. You can then wiggle QLab’s fader 1 slider. A small indicator will appear in Ableton showing the binding. Ableton’s control graphics are a bit subtle. The fader level indicator is small, the indicators that show that a control is selected are tiny corner markers, and the binding indicator is sometimes difficult to read.
Here’s the channel 1 fader selected after receipt of the binding from QLab.
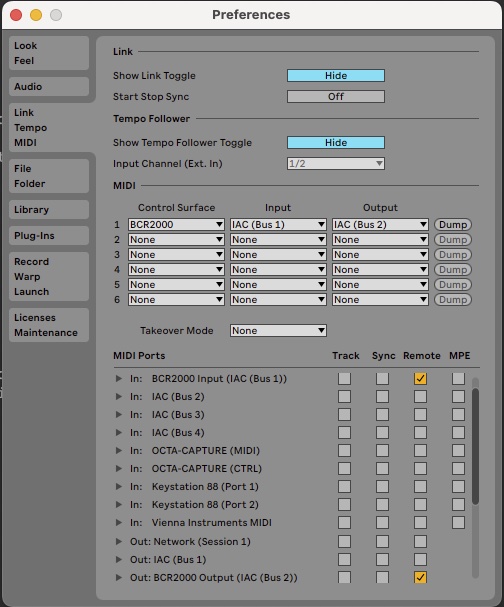
Ableton Live has a much greater choice of control surfaces, which means it is feasible to set up bidirectional control in Ableton Preferences → MIDI. The BCR2000 is a good choice for this, with input on IAC Bus 1 and output on IAC Bus 2. These ports also need to be ticked in the MIDI ports section of the preferences pane.
Any MIDI bindings previously set should be cleared.
BCR2000 uses MIDI channel 1, but the Control Numbers are 97-104 for channels 1-8. The control numbers in QLab’s Workspace Settings → Light → Light Dashboard need to be edited to match, and the Light MIDI channel needs to be set to Channel 1.
When using bidirectional controls, Musical MIDI input must be overridden in QLab when you want Ableton’s faders to respond to Light cues. If you require Musical MIDI input to be enabled for other purposes, the Light MIDI channel needs to be changed to a channel other than the channel used for MIDI feedback as in the Reaper example.
Here’s a demo of bidirectional control. Note that cues 4 and 5 only record the drums fader level on fader 1.
Setting up Logic Pro
Logic Pro has a very easy method for setting up MIDI bindings. Click on the first fader in Logic, press ⌘L, and move the corresponding slider in QLab’s Light Dashboard. Click on the next fader and wiggle the corresponding slider.
Continue until all Faders are mapped. You can use any of the example QLab Workspaces to set up the bindings.
Setting up ProTools (up to 2023)
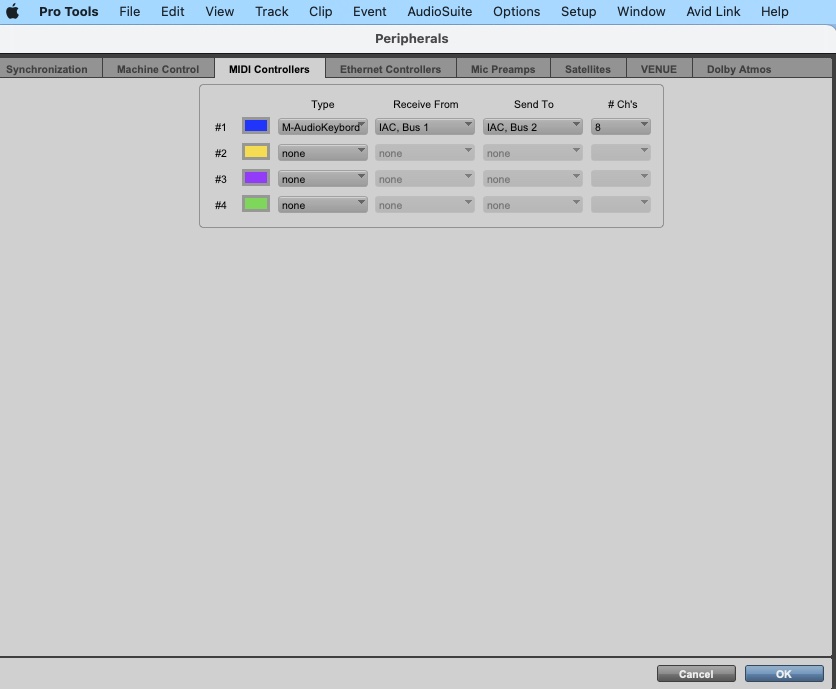
Versions of ProTools up to 2023 include a control surface named “M-Audio Keyboard” This uses CCs 33-40 on MIDI channel 1 for Faders 1-8. This can be set up from the MIDI Controller tab in Peripherals…, found in ProTools’ Setup menu.
This can be used for QLab control of ProTools faders, without feedback, by setting the Light MIDI channel to a channel other than that used for MIDI feedback, i.e., not channel 1.
You can also enable bidirectional control by setting the Light MIDI channel to 1, but Musical MIDI input must be overridden when you want ProTools’ faders to respond to Light cues. If you require Musical MIDI input to be enabled for other purposes, the Light MIDI listen channel needs to be changed to a channel other than the channel used for MIDI feedback.
Setting up ProTools (2024 and later)
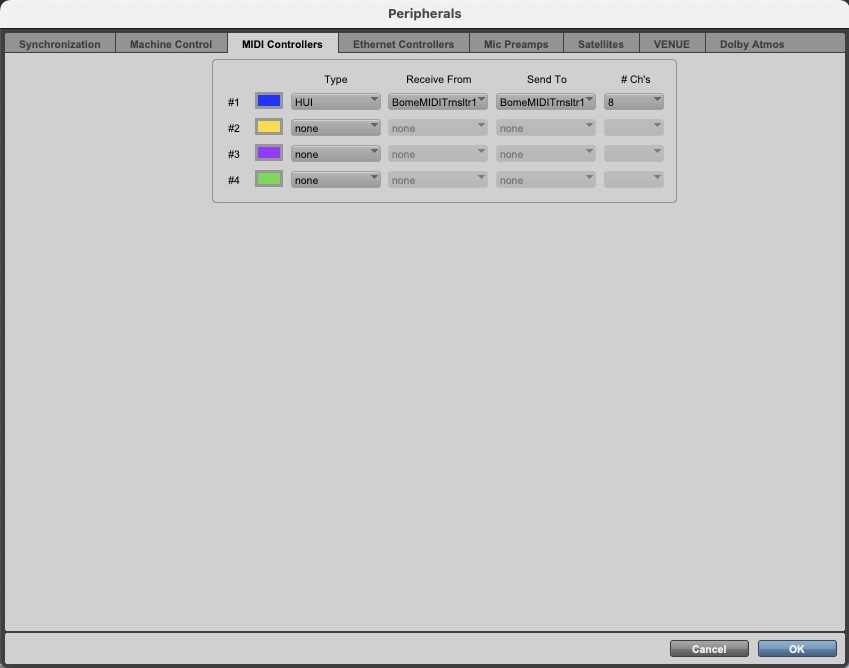
ProTools 2024 dropped support for the M-Audio keyboard surface. The only viable option for MIDI control from QLab is HUI. HUI is not supported by QLab, so some bridging software is required. The example in this chapter uses Bome MIDI Translator Pro with scripts written by Steve Caldwell at Bome Customer Care. The script allows BOME to accept a standard MIDI control change message and output it as a valid HUI command to ProTools. A script also maintains the connection by simulating the ping a real HUI surface sends at regular intervals. Bome scripting is way beyond the scope of this tutorial. A Bome file (CC to HUI.bmtp) is included in the relevant downloads. The script is set up to control eight channels using MIDI CC 1-8. It only offers control of ProTools’ faders from QLab sliders.
Here’s the ProTools Peripherals set up with the settings for HUI and Bome:
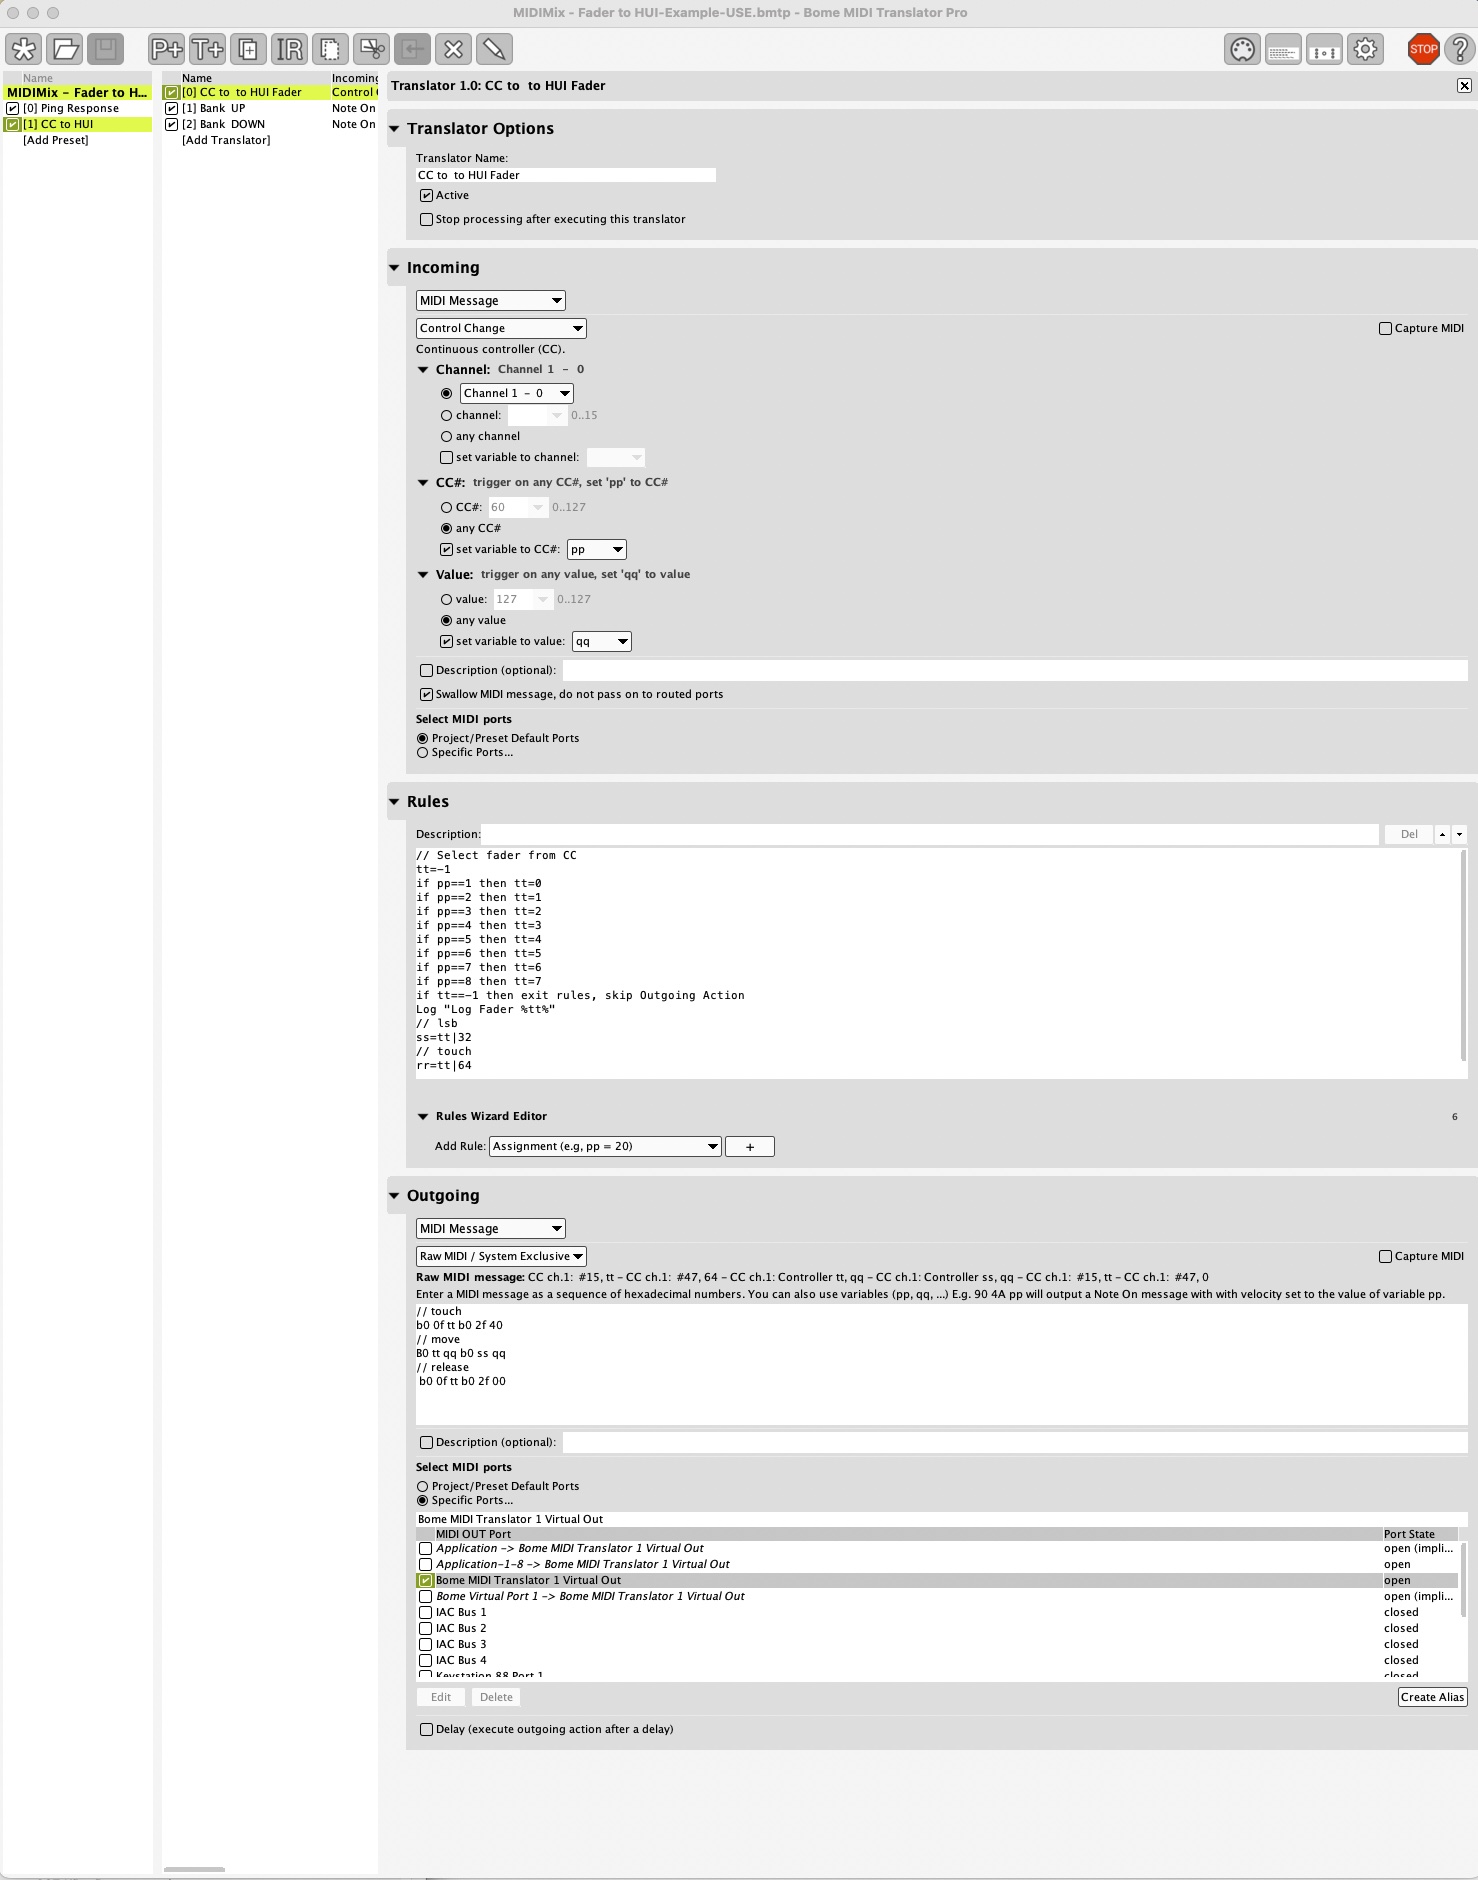
Here’s a screenshot of the MIDI Translator window which, if you read it carefully, shows how the CC to HUI translation is achieved. This configuration is all in the CC to HUI.bmtp file so there is no need to enter it manually.
Bearing in mind the limited control this allows and the complexity of this setup, unless you have an absolute need to use Protools 2024 or later, one of the other solutions is likely to be far easier and cheaper to implement. This particular solution is only really suitable for advanced users.
Hardware mixing consoles
Many hardware mixers can have faders and other parameters controlled by QLab using MIDI control change messages. Those that can will probably fall into three categories:
- Mixers that used a fixed MIDI protocol with assignments for all controllable functions. For example, a Behringer X32 or Midas M32 uses control change 0 - 31 on MIDI channel 1 to control faders 1 - 32.
- Mixers that use a user-editable table to assign control changes to parameters. For example, Yamaha QL and CL series consoles can use control change 1 – 31, 33 – 95, and 102 – 119 to control many parameters, including faders, mutes, pans, sends, and EQ.
- Mixers that use NRPN (Non-Registered Parameter Numbers), which are a special type of Control Change message. NRPNs use CC 99 and 98 to specify the MSB (Most Significant Byte) and LSB (Least Significant Byte) of a parameter number, and CC 6 (or 6 and 38) to specify the value of that parameter. The messages are sent sequentially, and as you can imagine they really must arrive in the proper order. As an example, on the Allen & Heath dLive, CC 99 04 followed by CC 98 23 sets fader 5 to a value set by a subsequent CC 6 message. This could be sent from QLab as three MIDI cues or alternatively via bridging software such as MidiPipe. If fading NRPN values is required, bridging software is probably essential.
In this screen recording MidiPipe is set up to receive the value of QLab’s slider 5 transmitted as CC 5 from IAC Bus 1 and output NRPN 0423 (04 17 Hex) to a hardware MIDI interface connected to a mixer. QLab slider 5 is set to 50% and the NRPN transmitted is CC 99 04 CC 23 04 CC 06 64. The value of CC 6 is then seen to change from 1 to 127 as the QLab slider travels from 0% to 100%.
MIDI control of mixers can be tricky and the quality and availability of necessary documentation required varies hugely from manufacturer to manufacturer. A good understanding of MIDI, the hexadecimal number system, and a lot of time and patience are required.
Bonus Tutorial: MMC
As much of this tutorial is demonstrated with DAWs, this bonus tutorial will show how to send MMC (MIDI Machine Control) Messages from QLab to control the transport of ProTools, Logic Pro, and Reaper.
MMC is a subset of MIDI System Exclusive messages. QLab can send MIDI SysEx messages from MIDI cues, so can therefore send MMC.
The MIDI SysEx message we’re going to send is F0 7F 7F 06 XX F7 In QLab, the starting F0 and the ending F7 automatically added, so leave them out when you enter the message.
The XX in the message is one of the following:
01= Stop02= Play44 06 01 HH MM SS FF ff= Goto (AKA Locate)
HH MM SS FF ff are in hex, so for instance 00 00 0A 00 00 is 10 seconds. 44 06 01 01 00 0A 00 00 is 1 Hour and 10 seconds.
Other commands may be available for your DAW; refer to the manufacturers documentation. In ProTools, if Quickpunch is enabled in the Options menu, 06 will initiate record from STOP or toggle Record Punch In/Punch Out from Play.
DAW Setup.
ProTools: go to Setup Menu → MIDI → MIDI Input Devices and check the box for the MIDI device that QLab is using to send messages.
Reaper: go to Preferences → Audio → MIDI Devices and ensure that the device that QLab is using to send MMC is enabled for control.
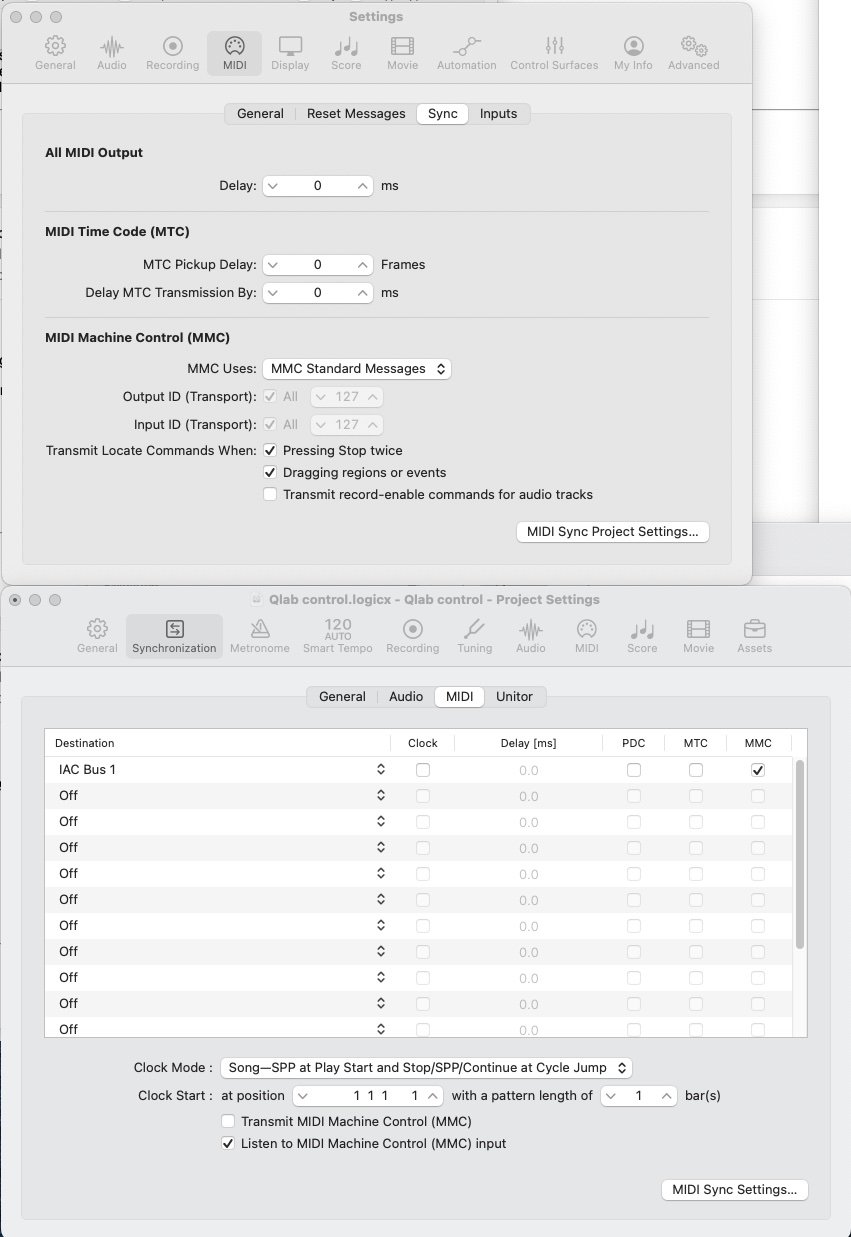
Logic: go to Settings → MIDI and set MMC Uses to “MMC Standard Messages”, click the MIDI Sync Project Settings… button and then check the box labeled MMC next to the device QLab is using to send MMC. Also check the box at the bottom of the window labeled Listen to MIDI Machine Control (MMC) input.
Scarborough Fair, traditional, arranged and performed by Mic Pool.
Logic Pro is a product and trademark of Apple, Inc.
Reaper is a product and trademark of Cockos, Inc.
ProTools is a product and trademark of Avid, Inc.
Ableton Live is a product and trademark of Ableton AG.
Bome MIDI Translator Pro is a product and trademark of Bome Software.
MidiPipe is freeware by SubtleSoft, copyright NICO WALD.
Chapter image by Mic Pool.