Syphon to MadMapper
This chapter discusses why and when you might want to use a standalone mapping program as your final video output from QLab to projectors, instead of using QLab’s built-in surface mapping abilities.
To explore this, we’ll be leaning on QLab’s use of an open source technology called Syphon. Syphon allows multiple programs running on the same computer to share rendered video with each other in real time without introducing additional processing load. When a program publishes video via Syphon, it’s referred to as a Syphon server. Other programs which share that video are called Syphon clients. QLab can function as as both a Syphon server and a Syphon client, so you can output video from QLab to Syphon, and also use other programs as an input source for QLab’s Camera cues.
This example uses MadMapper as the Syphon client. You can download a demo version here. MadMapper works in a fundamentally different way from QLab. It takes an input video source and displays it within defined geometric regions which can then be placed within the area of a projector. These regions can be individually transformed in MadMapper’s output stage to conform to the physical space which that area of the projector is projecting upon. A single video source playing into MadMapper’s input can be used on multiple regions, and therefore multiple areas of the projector output. This is in contrast to QLab where each video cue (even though it may use the same file as another) can only be routed to a single surface. In QLab, if you need one video to be displayed on three separate video surfaces, you need three Video cues. With MadMapper, you can define a single video surface whose output is copied to three different regions.
Mapping Cubes in QLab
Let’s look a simple mapping example. A stack of cubes arranged in a pyramid, four rows high, presents three visible faces of ten cubes to a projector:
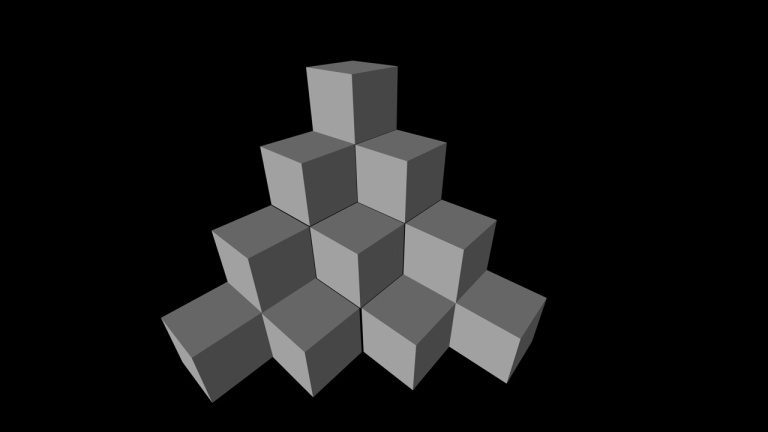
In this example, say we want to show a single video on the tops of all ten cubes, a second video on the left side visible faces, and a third video on the right side visible faces. We then want to crossfade all the videos to a different set of top, left, and right images. Let’s begin by mapping one cube in QLab. Here is a video of it in action, shown at double speed. The video will be clearer if viewed full screen.
Here are the steps followed in that video:
- Create a 300x300 surface and name it Top.
- Duplicate the surface and name it Left.
- Duplicate the surface and name it Right.
- Create three Video cues targeting the three videos you are going to use for the three visible faces.
- Put the cues in a Group cue set to “start all children simultaneously.”
- In the Time and Loops tab, set each Video cue to loop infinitely.
- In the Display and Geometry tab, assign each Video cue to one of the three surfaces.
- Start the Group cue.
- Edit the “Top” surface and use the corner pins to shape the video to a top cube face.
- Repeat for the “Left” surface.
- Repeat for the “Right” surface.
So we now have three video cues assigned to three surfaces. This video shows the next cube being mapped:
- Create duplicates of the three surfaces for the first cube.
- In the cue list, duplicate the Group cue with the three Video cues.
- Assign the Video cues in the duplicate group to the three duplicate surfaces.
- Start the duplicate Group cue.
- Edit the “Left copy” surface.
- A common mistake at this point is to try and move the origin of the surface by just dragging it across the screen. This doesn’t work! Moving the corner pins is the only way of shifting the position of the surface on the screen.
- Drag the corner pins of the surface to their new positions.
- Repeat for the “Top copy” and “Right copy” surfaces.
You now have six Video cues assigned to six surfaces.
The next video shows the state of affairs after six cubes are completed. There are now 18 Video cues assigned to 18 surfaces. Since we’re now playing 18 cues instead of just three, there are a lot of dropped frames. Completing the bottom row may not be an option unless we can get a more powerful Mac.
So, we’ll pass on the bottom row for now and just try our crossfade as planned above. We will create a second set of 18 cues targeting the second video, and try to crossfade between the first set and the second set.
- Create a Group cue set to “start all children simultaneously” and put the six-cube Group cues inside it.
- Duplicate this Group.
- Create a Fade cue targeting the first six-cube Group.
- Place this Fade cue inside the second six-cube Group.
- Set the layer of all the Video cues in the second six-cube Group to “bottom.”
- Retarget all the cues in the second six-cube Group to the new video files.
- Start the first Group.
- Start the second Group.
This is quite a lot of programming, and the re-targeting of many cues individually would have to be done every time we wanted the video images on the cubes to change. However, the more pressing problem is that the crossfade requires QLab to play 36 Video cues simultaneously on 18 surfaces. On most systems this will exceed all practical limits and, as in the example video, QLab will stutter, lock up, or freeze.
This degree of mapping is beyond QLab’s design goals, and needs a dedicated mapping program to sit between QLab and the projector output.
Mapping Cubes in MadMapper
In QLab, create a new empty surface, 1800x600, and assign Syphon as the screen.
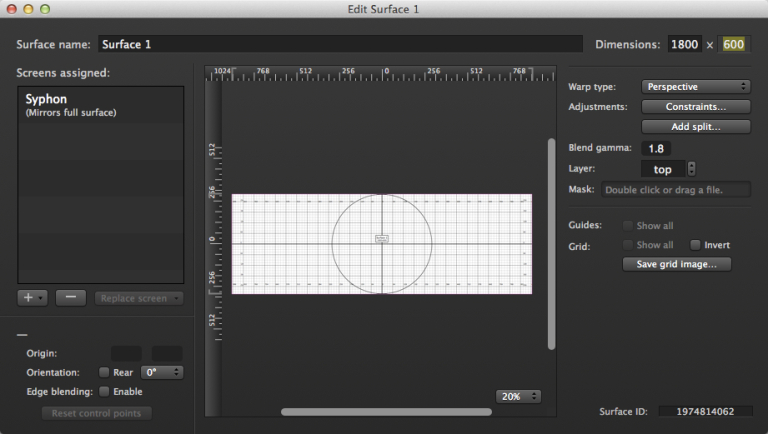
The Syphon server mirrors the entire surface pixel for pixel. There is no physical screen assigned to the surface, so the geometry controls are locked out.
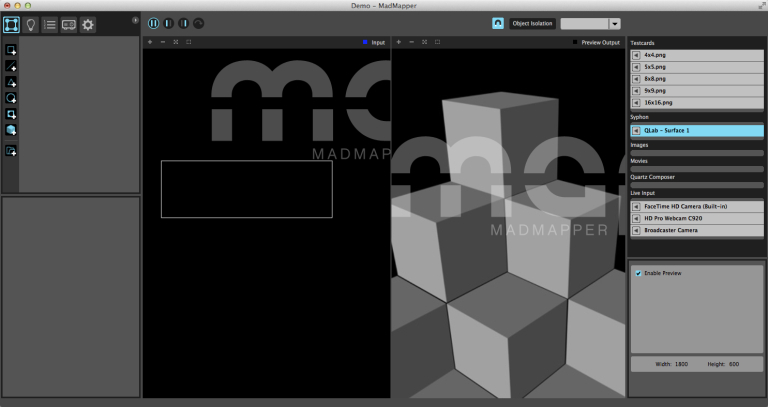
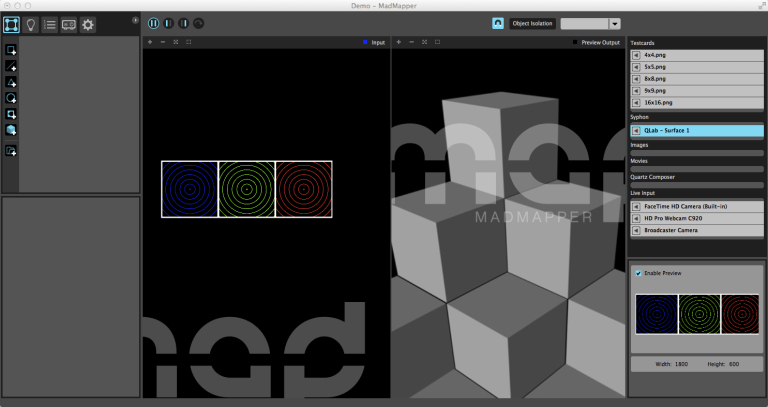
Open MadMapper, and you’ll see the name of the QLab surface selected in the sources list in the right column of MadMapper:
Back in QLab, create a single Video cue. In our example, this cue targets an 1800x600 video which is a composite of the three 600x600 moving images we used before. This was rendered in a separate video editor such as Final Cut Pro, Premiere, or Resolve.
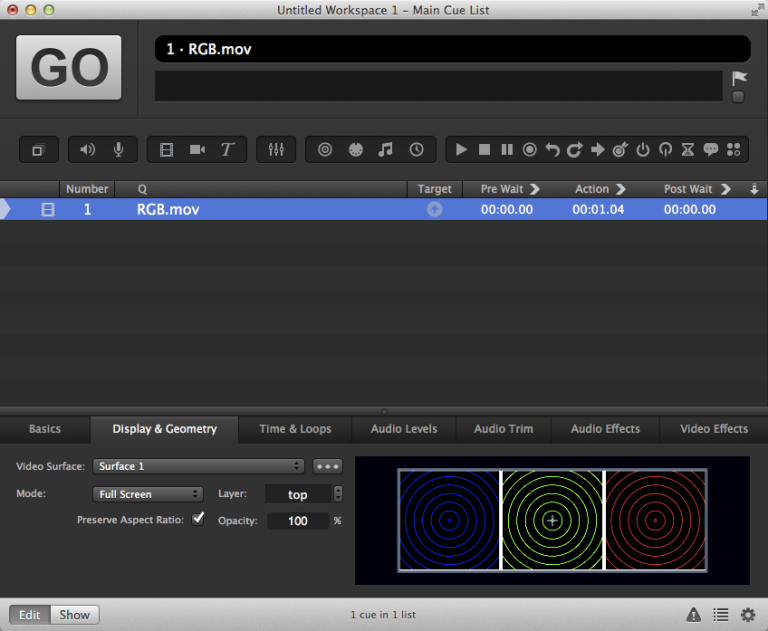
When we play this cue in QLab it appears in the source image window in MadMapper.
This video shows how to map that input to the first cube:
- Add a “quad” in the Manage Surface window of MadMapper.
- The quad is resized to enclose the region of the source video we want to use for the top of the cube.
- The quad is named “top”.
- A corresponding quad with corner pins appears on the output stage of MadMapper.
- The corner pins can be moved to map the quad onto the top surface of the first cube.
- Duplicate the quad and name the duplicate “Left.”
- Move the “Left” quad to enclose the second region of the source video.
- Move the corner pins of the quad on the output stage to map to the left surface of the cube.
- Repeat steps six, seven, and eight to map the last portion of the input video to the right surface of the cube.
In MadMapper you can select, duplicate, move, and rotate multiple regions simultaneously so you can quite rapidly map some more cubes:
and then complete the rest:
So, we now have all three surfaces on each of ten cubes playing smoothly; 30 surfaces in all. QLab is coasting along as it is only playing one Video cue. We can now set up crossfading to the new images. This is the equivalent of 60 Video cues playing simultaneously if we were attempting this only using QLab.
Here it is in action:
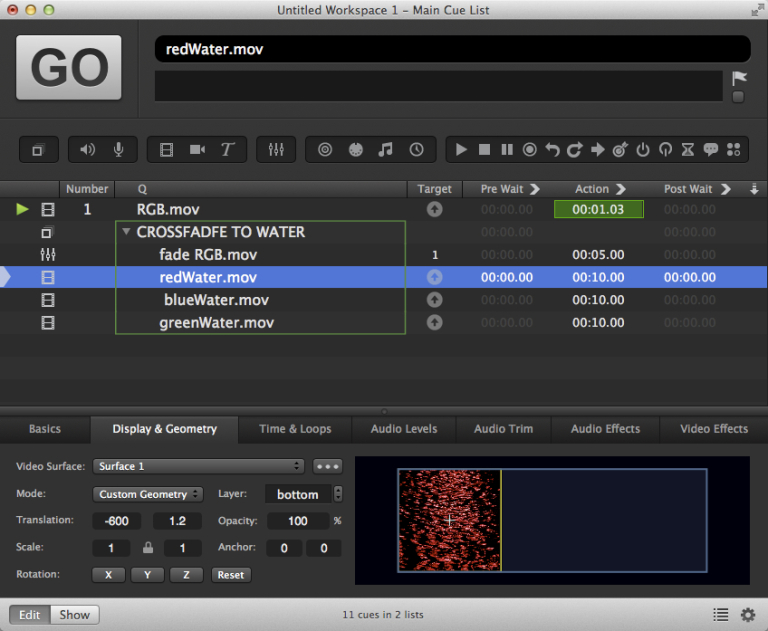
In this example, the second set of images are not composited into a single file. Instead, three individual files are used inside a Group cue. Each of these video cues is positioned on the 1800x600 Syphon surface using custom geometry so that the Syphon surface has three images side by side in the same layout as the composite cue.
Again, the playback performance is completely smooth since QLab only has to play four Video cues during the crossfade.
This only scratches the surface of the capabilities of QLab working in combination with MadMapper. Once you’ve mastered the basics of getting video piped from QLab to MadMapper, you can experiment with all the tools available. QLab and MadMapper are a very powerful and stable combination for all sorts of mapping tasks. The ability to move and rotate multiple surfaces simultaneously in a single window can really speed up many workflows. The simplest example of this would be if you set the block pyramid up in a new space and the projector was slightly out of line with the original set up. In a QLab-only mapping, you would have to move all the corner points, whereas with MadMapper as your mapping system you can just select all the quads on the output stage and move, scale and rotate them as a group, simultaneously.
MadMapper is a trademark of GarageCUBE and 1024 Architecture.