The Tools Menu
The Tools menu contains items related to assisting and managing your workflow, which is to say the process of building cues and cue sequences and operating QLab. The menu is context-sensitive, and can display different tools when different windows in QLab are active. When a cue list or cart window is active the Tools menu shows its default set of items.
Load To Time
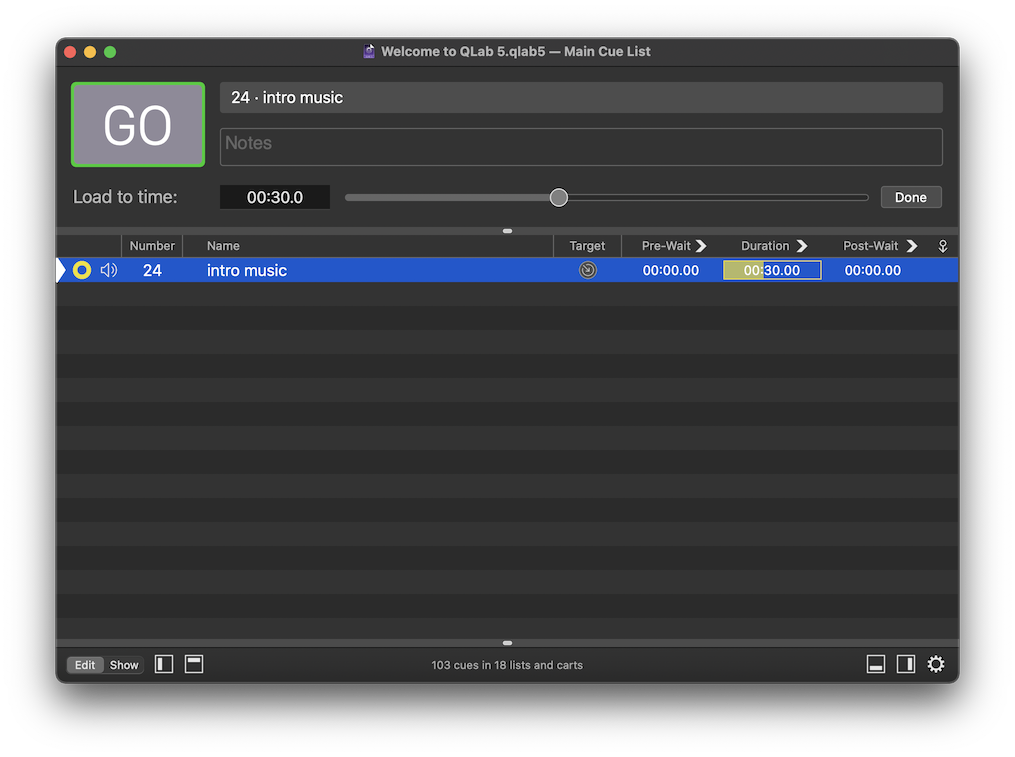
The Load to Time tool allows you to scrub through the standing-by cue (or cue sequence) to a particular time before starting the cue. When the cue or sequence is started after loading-to-time, it will begin playing from that time. For example, if you are rehearsing a bit of your show that happens thirty seconds into the start of a cue, you can load that cue to 0:30 and then start it right at the moment you want to rehearse.
To access this tool, select Load to Time from the Tools menu, or use the keyboard shortcut ⌘T. Load to Time is one of the tools that occupies the toolbar, and selecting the menu item or using the keyboard shortcut cycles the toolbar through three states:
- When the Load to Time tool isn’t displayed, the command will display it.
- When the Load to Time tool is displayed but the cursor isn’t in its text box, the command will move it there.
- When the Load to Time tool is displayed and the cursor is in the text box, the command will close the Load to Time tool and move focus back to the cue list.

To use the Load to Time tool, type a number into the text field or drag the slider to load the selected cue or cue sequence to your desired time.
Negative Times
If you type a negative value into the field, QLab will load to that amount of time back from the end of the cue or sequence, if possible. For example, if you type -10 into the field and press enter, QLab will load the selected cue to ten seconds before the end of the cue.
Cue Numbering
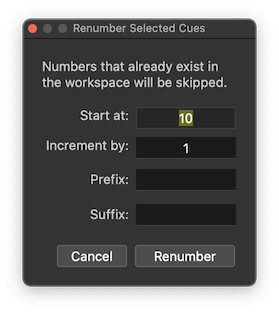
Renumber selected cues… (⌘R) will open a tool window that allows you to programmatically renumber all of the currently selected cues. There are four text fields in the renumber tool. The first two must be filled in, and the second two are optional.

- Start at is the first number you want QLab to use. Any whole or decimal number can be used here.
- Increment by is the amount you want QLab to add to create successive numbers. In the screen shot above, the selected cues will be renumbered to
10,11,12, and so on. Any whole or decimal number can be used here. - Prefix is optional. Any text entered here will be prefixed to the new cue numbers. If you entered
Test-in the screen shot above, the selected cues would be renumberedTest-10,Test-11,Test-12, and so on. - Suffix is optional. Any text entered here will be appended to the new cue numbers. If you entered
backupin the screen shot above, the selected cues would be renumbered10backup,11backup,12backup, and so on.
The renumber tool will skip over any existing cue numbers when it runs. Using the screen shot above as an example, if you selected three cues before using the renumber tool, they would be renumbered 10, 11, and 12. If there was already a cue 11 somewhere else in the workspace, however, the selected cues would be renumbered 10, 12, and 13.
Delete numbers of selected cues (⌘D) will, as stated, delete the cue numbers of all selected cues. This will not alter cue targets or anything else at all, just the cue numbers.
Jump
Jump to selected cues’ targets (⌥⌘J). When the cue or cues that are selected target other cues in the workspace, this will move the selection to those target cues.
A similar tool from QLab 4, Jump to cue, has been renamed Select cue… and moved to the View menu.
Record Cue Sequence…
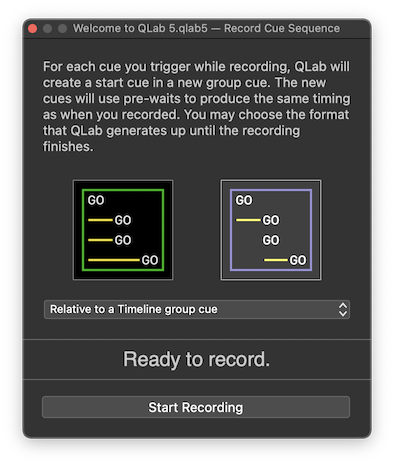
The sequence recorder tool allows you to play through cues by hand, and have QLab record your timing. When you stop recording, QLab will create a Group cue filled with Start cues which target the cues that you played while recording. The Start cues will have pre-wait times which exactly match your timing.
To use this tool, choose Record cue sequence… from the Tools menu. Then, choose whether you want to create a Timeline Group cue, with pre-waits on the Start cues relative to the beginning of the sequence, or a Start First Group cue with auto-continues on the Start cues and pre-waits relative to the previous Start cue. Then, click Start Recording and run the cues that you want to include in the sequence.

When you’re done running your cues, click Stop Recording. QLab will create the new Group cue, full of Start cues, below the selected cue. Your original cues remain untouched. If you want to re-record the sequence, simply delete the new Group cue and try the process again. If you like the sequence and want to use it in your show, you can move the original cues into another cue list to keep them out of the way. It’s important to remember that they cannot be deleted, however, since the sequence is made up of Start cues which target the original cues.
Always Audition
When always audition is turned on, clicking the button or using its keyboard shortcut (space by default) will behave as an audition instead of a regular . Likewise, previewing a cue by using the button in the Time & Loops tab or by using the keyboard shortcut (V by default) will behave as an audition preview instead of a regular preview.
Always audition has no effect on workspace MIDI controls or MSC messages, workspace OSC controls, or commands sent using OSC or AppleScript.
You can learn more about auditioning cues from the Auditioning Cues section of this manual.
Live Fade Preview
When live fade preview is turned on, any adjustments you make to a Fade cue or a Network cue in 2D Fade mode will be immediately reflected, as long as the target cue is playing. So, if you play an Audio cue, and then create a Fade cue targeting that Audio cue, any adjustments you make in the Fade cue will be audible.
When live fade preview is turned off, you can make adjustments to a Fade cue or a Network cue without hearing or seeing those changes until you run the cue. This can be helpful while building cues in rehearsal, to allow you to run an Audio or Video cue for the performers to work with, and then prepare a Fade cue for future use without disturbing them.
Beginning with QLab 5.4, live fade preview is a property of the workspace, not QLab as a whole. If you have multiple workspaces open at the same time, each will maintain its own live fade preview status.
Highlight Related Cues
When highlight related cues is turned on, QLab will highlight all cues which target or which are targeted by the selected cue. QLab uses a grey highlight for related cues, to distinguish from the regular highlight color as well as the yellow highlight color used by the Find tool.
Black Out and Restore Desktop Backgrounds
You can choose Black out desktop backgrounds from the Tools menu to have QLab set the desktop background of every screen connected to your Mac to plain black. This is, perhaps obviously, particularly helpful when working with Video cues. QLab will remember the existing desktop backgrounds before replacing them with black, and you can restore them by choosing Restore saved desktop backgrounds.
Tools for Group Cues
When a Group cue is selected, the Tools menu also shows a Group-specific item, Shuffle order of cues in Group. This item only operates on Playlist Group cues.
Tools for Audio and Video Cues
When an Audio or Video cue is selected, the Tools menu also shows the following file-target-specific items:
- Open target file in external editor. This will open the target media file of the selected cue in whichever application is designated as the default for that media type. For example, by default, .MP3 files will open in iTunes, .MOV files will open in QuickTime Player, and so forth. You can change these defaults by selecting a media file in the Finder, choosing Get Info from the File menu, and changing the assignment under the heading “Open with:”
- Reveal target file in Finder. This will open a window in the Finder showing the folder which contains the target media file of the selected cue.
- Open file target search tool. This will open a window that helps you address the problem of cues missing their file targets. This can happen when a workspace is moved from one computer to another, or when media files are reorganized on disk while the QLab workspace is closed. The search tool allows you to specify a folder which QLab will search inside of, looking for files that match the missing file targets of cues in the workspace. You can confirm or reject each match, and then have QLab automatically relink one or multiple cues automatically.
- Paste audio levels. This will bypass the Paste Cue Properties sheet and simply paste the audio levels of a previously copied cue, if possible.
- Paste integrated fade shape. This will bypass the Paste Cue Properties sheet and simply paste the integrated fade curve of a previously copied cue, if possible.
Tools for Fade Cues
When a Fade cue is selected, the Tools menu also shows the following fade-specific items:
- Paste audio levels. This will bypass the Paste Cue Properties sheet and simply paste the audio levels of a previously copied cue, if possible.
- Paste integrated fade shape. This will bypass the Paste Cue Properties sheet and simply paste the fade curve of a previously copied cue, if possible.
- Set Parameters From Target. This will display the Paste Cue Properties sheet, allowing you to choose properties of the Fade cue’s target cue to copy into the Fade cue.
- Set Audio Levels From Target (⇧⌘T). This will bypass the Paste Cue Properties sheet and simply copy the Audio Levels tab of the Fade cue’s target, if applicable.
- Set Video Geometry From Target (⌃⌥⌘V). This will bypass the Paste Cue Properties sheet and simply copy the Video Geometry tab of the Fade cue’s target, if applicable.
- Revert Fade Action (⇧⌘R). When this command is invoked after running a Fade cue, QLab reverts the levels of the target cue to whatever they were before the Fade cue ran except for levels which have been otherwise changed. That is to say, the only adjustments that are reverted are the ones that the selected Fade cue caused.
Tools for the Light Dashboard
When the Light Dashboard is the frontmost window, the contents of Tools menu is re-populated with items pertinent to lighting. You can learn about those items from the page on the Light Dashboard in the Lighting section of this documentation.
Tools for Light Settings (Patch menu)
When Workspace Settings → Light is being viewed, the Tools menu is replaced by the Patch menu, which contains the following light patch-specific items:
- Unpatch all unpatches all instruments in the workspace, removing all address and output assignments.
- Unpatch selected unpatches only the selected instruments, leaving the rest alone.
- Auto-patch all opens a dialog box which allows you to select the DMX output you want to use, as well as the starting address. If you select Art-net for output, you can also choose a starting universe, sub-net, and net. QLab then assigns addresses to all instruments according to those settings.
- Auto-patch selected behaves like auto-patch all, but only operates on the selected instruments.
- Select all instruments does precisely what it seems like it does. You can also select all instruments by using the keyboard shortcut ⌘A while viewing the light patch.
Still have a question?
Our support team is always happy to help.