The Inspector
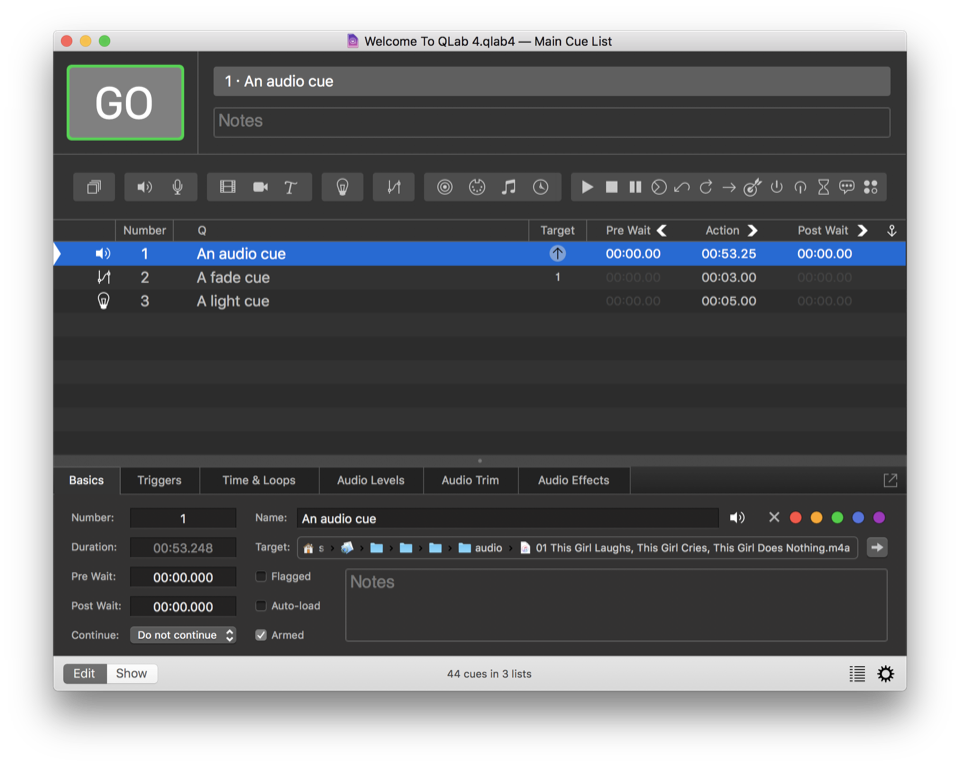
The inspector is a tabbed interface which lets you see and edit the attributes of the selected cue or cues. You can find it beneath the cue list, and it can be shown or hidden while in Edit Mode by selecting Inspector from the View menu or using the keyboard shortcut ⌘I. You can also pop the inspector out of the main window by clicking on the button on the right side of the inspector tab bar. The inspector is disabled when in Show Mode.
The tabs shown in the inspector vary depending on the type of cue or cues selected. All cue types, as well as cue lists and cue carts, have the Basics tab and Triggers tab which are described below. Other tabs will be described in the sections of the documentation that discuss the various cue types.
The Basics Tab
Perhaps unsurprisingly, the Basics tab shows basic properties of the cue. Many of these properties are also editable from the Cue list.
- Number. See the Cue List section of the Getting Started page for details.
- Duration. This field is not editable for all cue types, since some cues have no effective duration and others have durations that rely on targeted media files. If the duration of the selected cue is editable, you can do that here. If it is not editable, the duration will appear dimmed.
- Pre Wait. See the Cue List section of the Getting Started page for details.
- Post Wait. See the Cue List section of the Getting Started page for details.
- Continue. See the Cue List section of the Getting Started page for details.
- Name. See the Cue List section of the Getting Started page for details.
- Target. This field, only relevant when the selected cue has a target, shows either the name of the target cue, or the full path to the target file depending on what type of cue is selected. Clicking the arrow button next to the target field will show you the target, either by jumping the cue list to the target cue, or opening a Finder window to show the target file.
- Flagged. Flagging a cue is a way of marking it for later. You might, for example, flag cues during a run through of your show as a way of notating which ones need to be reviewed after the run through. Flagged cues are listed in the Warnings tab of the Status Window so you can quickly see all the flagged cues in your workspace. Flagged cues also show a flag icon on the left side of the cue list.
- Auto-load. If this box is checked, this cue will automatically be loaded after the previous cue is played. A global setting is available to set all new cues to auto-load by default.
- Armed. Cues are armed by default. When disarmed, cues will not execute their action, but an auto-continue or auto-follow will be triggered if present. Disarming a cue is useful, for example, for temporarily silencing a cue while allowing the surrounding cues to operate as-is.
- Color. The cue can be given a highlight color to make it stand out in the cue list. There are five colors to choose from; the X sets the cue to no highlight color. The color doesn’t alter the behavior of the cue in any way, so feel free to use color coding in whatever way is most useful to you.
- Notes. Text entered in this field is shown in the notes field up in the top portion of the workspace window whenever the selected cue is standing by, so it is the perfect place for notes or special instructions to your operator. Text in the Notes field can be searched using the Find feature.
The Triggers Tab
When a cue is given the signal to start, we say that the cue is triggered. The most straightforward way to trigger a cue is to press the GO button (or use the space bar) when the cue is standing by, but there are also several ways to directly trigger a cue even when it is not standing by.
The left side of the Triggers tab gives you access to four of those ways to directly trigger a cue. You can use these triggers in any combination. To activate a trigger, check the checkbox next to it. To deactivate a trigger, uncheck the box.
The right side of the Triggers tab gives you several options for shaping QLab’s behavior for the cue when it is triggered. Note that these right side options apply to the cue no matter how the cue is triggered, including when it’s triggered by the GO button.
Hotkey Trigger
Nearly any key on the keyboard that’s not being used for something else can be assigned to trigger a cue when pressed. The Esc key is permanently assigned to Panic/Stop all, so that’s out, and any keys that have already been assigned functions in Key Map Settings cannot be used as cue triggers. Beyond that, however, you’re free to choose any key you like.
To assign a hotkey trigger, check the box to enable the trigger, and then click in the text field and type the key or key combination that you want to assign to the selected cue. To clear the assignment, click on the X button to the right of the text field.
Hotkey triggers behave just like regular keyboard shortcuts for menu items; for example, by assigning the Hotkey J to a cue, any time you press J on the keyboard, that cue will start even if it is not currently standing by. Hotkeys may include modifier keys (option, control, function, and shift). Hotkeys are particularly useful for triggering scripts that act on selected cues.
MIDI Trigger
Cues can be triggered with external hardware or software using MIDI voice messages here.
To assign a MIDI trigger, check the box to enable the trigger and then either program in the message manually, or click the Capture button to record an incoming message.
MIDI trigger values can include > and < operators, or be set to “any”. This is particularly helpful for MIDI Note On messages, where a specific note velocity won’t necessarily be achieved with each press of the MIDI controller. If you set the velocity (byte 2) to “any”, QLab will respond to the specified MIDI note regardless of velocity.
Wall Clock Trigger
The wall clock trigger will trigger a cue at a specific time of day and, optionally, only on certain days of the week.
To assign a wall clock trigger, check the box to enable the trigger and then enter a time in the field. Be sure to enter the hours, minutes, and seconds; if you type “10:30” QLab will interpret that as ten minutes, thirty seconds past midnight, not as ten hours, thirty minutes, and no seconds. You can select either AM, PM, or 24-hour time as suits your preference, and you can click on the button labeled Every Day to select the days of the week on which you want the trigger to be active.
Please note that computer clocks will drift if left to their own devices, so if your show computer is offline or if you’ve disabled online clock setting, be sure to check your clock’s accuracy at least weekly.
Timecode Trigger
Cues can be triggered from incoming LTC (SMPTE) or MTC timecode, but only if timecode has been enabled for the enclosing cue list. You can enable timecode for a Cue List in the Timecode tab of the inspector when the cue list is selected.
To assign a timecode trigger, check the box to enable the trigger and then enter a time in the field. The drop-down menu to the right of the field lets you choose to enter the timecode trigger using either the timecode format of reel:minutes:seconds:frames or the real-time format of hours:minutes:seconds:decimals.
Fade & Stop Others Over Time
When this box is checked, triggering the cue will fade and stop other cues over the given time. The drop down menu lets you choose which other cues will be faded and stopped. You can choose amongst three options:
- Peers. When this option is selected, the cue’s peers will be faded and stopped. A cue’s peers are those at the same hierarchical level in the cue list. So, for a cue within a Group, the other cues within that same Group are its peers. For a cue within a cue list or cart, the other cues in that same list or cart are its peers.
- List or cart. When this option is selected, all other cues within the same list or cart will be faded and stopped.
- All. When this option is selected, all other cues within the entire workspace will be faded and stopped.
Duck/Boost Audio of Other Cues In This List While Running
When this box is checked, all other cues in the same cue list or cart that have audio will be ducked or boosted by the given level, fading over the given time.
If this cue has a pre-wait time, the duck or boost begins after the pre-wait has elapsed.
Second Triggers
When a cue is triggered while it is already running, it can be set to behave in one of five ways:
- Second trigger does nothing. The cue will ignore all triggers while it’s running. This is the default setting, and it’s the way previous versions of QLab always behaved.
- Second trigger panics. The cue will panic (fade out and stop) when it receives a second trigger.
- Second trigger stops. The cue will stop when it receives a second trigger.
- Second trigger hard stops. The cue will hard stop (stop, and also immediately stop any audio effects on the cue) when it receives a second trigger.
- Second trigger hard stops & restarts. The cue will hard stop and then immediately restart when it receives a second trigger.
The checkbox marked Also perform second trigger when releasing trigger pertains only when a hotkey trigger, a MIDI trigger, or both are assigned to the cue. If so, and this box is checked, then QLab responds to the release of the trigger as though it’s a second trigger. This is a straightforward way to get sampler-like behavior out of QLab. If you assign a hotkey to a cue, set that cue to stop or panic on a second trigger, and check this box, then pressing the hotkey will start the cue, and releasing the hotkey will stop it.
Secondary Inspectors
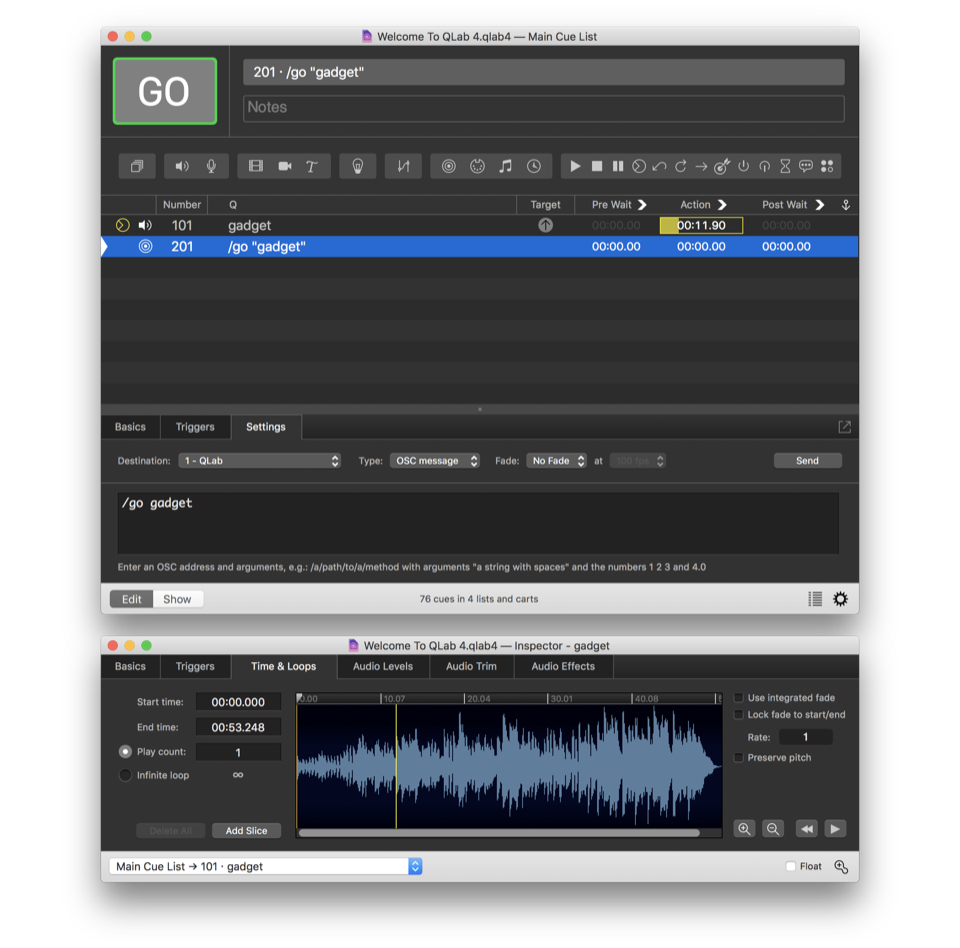
QLab 4.4 and later allows you to open multiple inspector windows, each of which can be independently assigned to inspect a specific cue.
In the screen shot above, the main inspector is showing properties of the selected cue, cue 201, and a secondary inspector has been opened which is showing the Time & Loops tab of cue 101.
You can open secondary inspector windows by choosing Inspector for Selected Cue from the View menu, or by using the keyboard shortcut ⇧⌘I.
If you have multiple cues selected, QLab will open one inspector window for each cue.
Unlike the main inspector, which always inspects the selected cue in the main workspace window, secondary inspector windows do not automatically change which cue they’re inspecting. You can manually select which cue a secondary inspector is inspecting by using the drop-down menu in the footer of the window. You can also open a new secondary inspector window for the same cue by clicking the button.
To keep a secondary inspector window floating on top of all other windows, check the box marked Float.
Inspector Inspector
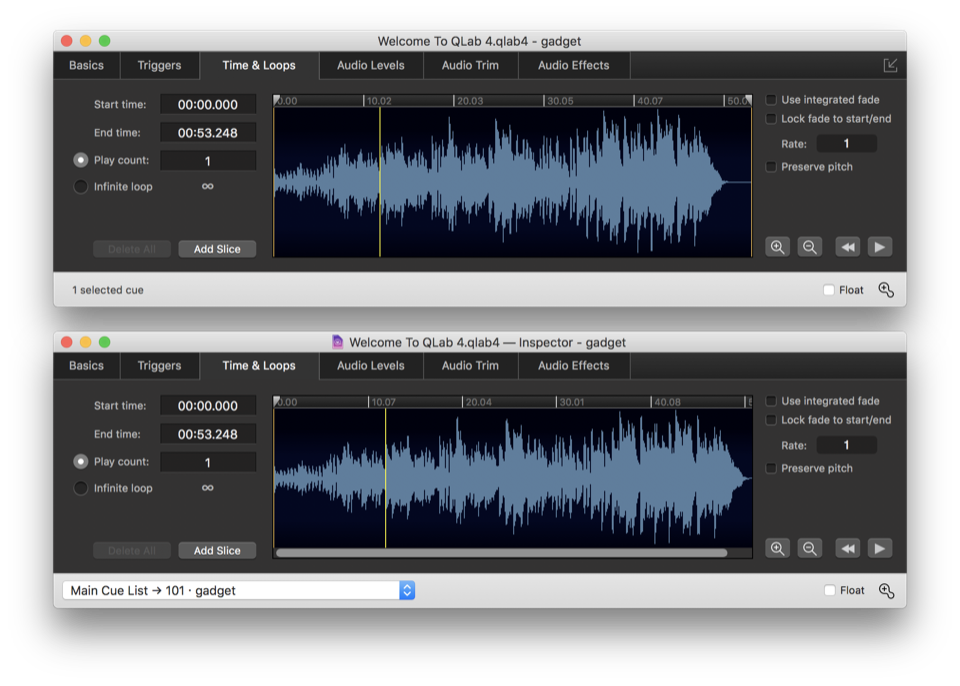
When the main inspector is popped out, it can be difficult to distinguish from secondary inspectors.
The screen shot above shows the main inspector on top and a secondary inspector below it. There are three clues to help you identify which is which:
- The main inspector window shows the name of the workspace and the selected cue; the secondary window shows the name of the workspace, the word “inspector,” and the name of the cue being inspected.
- The main inspector window has a button to pop it back in to the main workspace window; secondary inspectors do not have this button.
- The main inspector window shows the number of selected cues in the lower left corner; secondary inspectors show the cue selection drop-down menu.
Still have a question?
Our support team is always happy to help.


