Getting Started With QLab
Welcome to the workspace
When you first open QLab, you’re presented with a new, fresh document. QLab documents are referred to as workspaces. A workspace contains one or more cue lists and/or carts which each contain cues.
Detailed descriptions of the various cue types and cue lists can be found in their respective sections of the documentation; for now we will focus on what you see when you first look at a workspace, and how to get started building your show.
A note on style
On this page, every time a new tool, interface item, or concept that we feel is particularly essential is mentioned, it will appear in bold text. This is meant to help you notice that you’re being introduced to a new idea. Thereafter, and throughout the rest of this documentation, bold text will be used for emphasis, to highlight keyboard shortcuts (like ⌘S), and for indicating a menu name (such as the File menu.)
The Masthead
The GO Button
Prominently located in the top left corner of the workspace, the GO button starts, or triggers, the cue which is currently standing by at the playhead. The playhead then advances to the next cue, which will then be standing by, displayed in the standby indicator and ready to GO. The default keyboard shortcut for the GO button is the space bar. You can change this shortcut in Workspace Settings.
The Standby Indicator
Located at the very top of the workspace across most of the width of the window, the standby indicator displays the cue number and cue name of the cue at the playhead. In other words, it tells you what cue will play the next time the cue list is triggered. When a cue is standing by, it will also appear highlighted in the cue list, with a small indicator arrow against the left edge of the workspace.
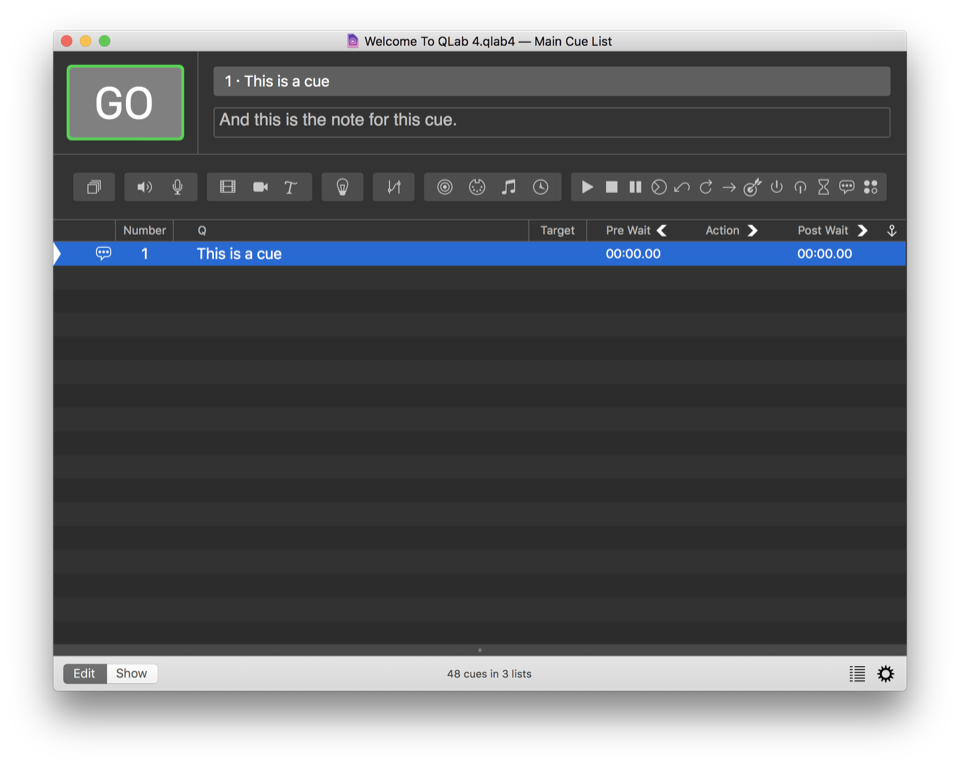
The Notes Field
Beneath the standby indicator and to the right of the GO button is the Notes field. Text entered in this field is connected to the currently standing by cue, and is visible whenever that cue is standing by, so it is the perfect place for notes or special instructions to your operator. Text in the Notes field is searchable using the find feature. You can also edit a cue’s notes in the Basics tab of the inspector.
The Toolbar
The toolbar, found underneath the Notes field, is a ribbon of icons for each of the different cue types available in QLab. Clicking any of these icons will create a new cue of that type. Explanations of the different cue types can be found later in this documentation.
The Cue List
Beneath the toolbar is the cue list, which is the heart of your workspace. Cues are listed here in the order that they will play during your show, top to bottom. The columns in the cue list show essential information about each cue.
Cue Status
The left-most column displays the status of the cue.
The playhead (a right-facing triangular pointer) shows you which cue is standing by.
Each cue might also display any of the following icons:
- A green triangle means the cue is active.
- A yellow triangle within a circle means the cue is loaded and is ready to be triggered.
- A grey slope means the cue has been stopped, but has an effect that is tailing out.
- A red X means the cue is broken and cannot be played. Hovering the mouse over the red X will show you a tooltip with a brief explanation of the problem.
- A red circle with a slash through it means that an override is blocking the cue’s output. You can learn more about overrides in the Override Controls section of the documentation.
- A flag indicates that the cue is flagged.
- No icon means… well, it means that none of the above is true.
This column also displays an icon depicting the cue’s type; these icons match the cue icons in the toolbar.
Cue Number
A cue number may be any text string, or may be empty. All cue numbers in a given workspace must be unique. Cue numbers do not need to be consecutive, nor do they need to be digits. Acceptable cue numbers could be 1, 1.5, A, AA, A.5, Preshow Music, or Steve. Change the number of a cue by double clicking in the cue’s number column, or by selecting the cue and using the keyboard shortcut N.
It’s important to realize that since cue numbers are text strings, 1, 1.0, and 1.00 qualify as three different unique cue numbers in QLab.
Reordering cues in the list does not automatically renumber them.
Renumbering Selected Cues
You can automatically assign new cue number to each currently selected cue by selecting Renumber Selected Cues in the Tools menu, or using the keyboard shortcut ⌘R. Since cue numbers must be unique within the workspace, the renumber tool will automatically skip over numbers that already exist within the workspace.
Cue Name
A cue name may be any text string, or may be empty. The name of a cue will default to reflect the name of its target; for Audio and Video cues, that is the name of the target file. For Fade cues, it will be the word “fade” plus the name of the cue that the Fade targets. Other types of cues have their own, hopefully logical, default names. You can change the name of a cue by double clicking in the cue’s name column, or by selecting the cue and using the keyboard shortcut Q. Unlike cue numbers, cue names do not have to be unique.
Note that changing the name of a cue will also change the name of any cues that target it (for example, Fade cues), if those cues are using their default names.
Target
A key concept in QLab is that some types of cues have a target which is the recipient of the action of that cue. For example, Audio and Video cues have targets which are media files. When an Audio cue is triggered, the target file is played. Fade cues have targets, which are other cues which have fade-able parameters, such as audio levels or video display geometry. When a Fade cue is triggered, the parameters of the target cue are faded. For cues that require a target, they must have one and only one target.
Since different types of cues have different types of targets, the target column can show different information for different cues.
For Audio and Video cues, the Target column displays a round button that looks like an upwards-pointing arrow inside a circle. Clicking this arrow will open a Finder window in which you can select the file you wish to target. You can also set the target of an Audio or Video cue by dragging and dropping an appropriate file onto the cue from the Finder.
Cues which target other cues, such as Fade cues and Stop cues, will display the cue number of their target cue. If the target cue has no number, the cue name will be displayed instead. If the cue lacks a target, the target column will display a question mark. You can assign a target to these sorts of cues by typing a cue number into the Target column, by dragging and dropping the cue onto its intended target, or by dragging and dropping the intended target cue onto the cue.
The default keyboard shortcut for changing the selected cue’s target is T.
Cues which do not require a target will show nothing in this column.
Pre-wait
Pre-wait is the amount of time that QLab waits between receiving a trigger for a cue and starting the action of that cue. For example, an Audio cue with a pre-wait of 3 would start playing sound three seconds after being triggered.
The pre-wait of a cue can be edited by double clicking and typing in the pre-wait column, or by using the keyboard shortcut E.
Action
The action of a cue tells you how long it takes for the cue to complete, not counting pre-wait. Action is often used interchangeably with “duration” conversationally. They are one and the same. The action of some cues cannot be edited directly, but for those that can, they can be edited by double clicking and typing in the action column, or by using the keyboard shortcut D.
Post-wait
The post-wait of a cue is meaningful only in combination with an as-yet-un-discussed feature: auto-continue. When a cue is set to auto-continue, it triggers the next cue in the cue list when it is itself triggered. If the first cue has a post-wait time, QLab waits for the post-wait to elapse and then triggers the second cue.
The post-wait of a cue can be edited by double clicking and typing in the post-wait column, or by using the keyboard shortcut W.
Notes about pre-wait, action, and post-wait.
The pre-wait, action, and post-wait columns display seconds with two decimal places, but QLab is actually accurate to three decimal places.
When a cue is not playing, these columns will always display the total duration of the cue or its wait. When a cue is playing, you can toggle between viewing time elapsed or time remaining by clicking the arrows in the column headers.
It’s also important to remember that in the interest of keeping QLab’s interface from using too much processing power, QLab sometimes updates times as infrequently as once per second, which means that the times displayed may appear to be wrong by as much as one second. This does not indicate that the actual behavior of QLab is off by a second, only the display. A paused cue will always display exact times.
Auto-follow and Auto-continue
The final column, labeled with a downwards-pointing arrow in the column header, displays icons indicating whether a cue has been set to auto-continue or auto-follow.
If a cue is set to auto-continue (), as soon as the cue is triggered the next cue in the cue list will trigger as well. If the cue has a post-wait as well as an auto-continue, the post-wait will be honored before the next cue is triggered.
If a cue is set to auto-follow (), then the next cue will be triggered as soon as the first cue completes. When you set a cue to auto-follow, QLab will automatically show a post-wait time equal to the action of the cue. This cannot be edited, and serves as a visual reminder of the auto-follow.
Cues which are connected with auto-follows or auto-continues, or with a combination of both, are called cue sequences. You can learn more about creating cue sequences in the appropriately named cue sequences section of the documentation.
The Toolbox
The toolbox can be shown or hidden by selecting Toolbox from the View menu or by using the keyboard shortcut ⌘K. The toolbox provides an alternative view of the toolbar; the two are very nearly identical.
However, you can re-order cues in the toolbox. This lets you keep the cue types that you use most often close at hand. If you re-order the cues, notice that the ⌘-number keyboard shortcuts remain assigned to the first ten cues. In this way, you can assign ⌘-number keyboard shortcuts to the cues you prefer.
Reordering cues in the toolbox will reorder them in the Cues menu, but not in the toolbar.
The Inspector
The inspector is located beneath the cue list and and can be shown or hidden by selecting Inspector from the View menu or by using the keyboard shortcut ⌘I. The inspector is a set of tabs which let you see and edit the attributes of the selected cue or cues.
More information about the inspector can be found here.
The Workspace Footer
Edit Mode and Show Mode
On the left side of the workspace window footer, two buttons allow you to toggle between Edit mode and Show mode. When a workspace is in show mode, the following functions of QLab are disabled:
- The inspector
- The toolbar
- Load-to-time
- Find
- Adding, deleting, or reordering cues
- Editing any cue properties (name, number, target, times, etc.)
- Copy and paste levels
- Copy and paste geometry
- Copy and paste fade shape
Just as important is the list of things which are not disabled in show mode:
- The Audition window
- Opening, closing, and saving workspaces
- Use of the ESC key
- Showing or hiding the sidebar
- Viewing and changing workspace settings
Show mode is a safety mechanism designed to prevent accidental changes to a workspace, not a security mechanism to prevent deliberate changes.
When a workspace is in show mode, QLab will ask for confirmation before closing the workspace or quitting.
Cue and Cue List Count
The center of the footer displays the number of cues in the workspace and the number of cue lists into which they are divided. Useful for bragging about the complexity of your show.
Warnings
The Warnings icon () will appear in the bottom right corner of the workspace window when (and only when) the workspace contains flagged or broken cues. Clicking this icon opens the Warnings tab of the Status Window, which shows a list of the cues in question and explains why they’re listed there. You can learn more about this in the Workflow Tools section of this documentation.
Sidebar
Click the Sidebar button () in the bottom right corner of the workspace window to show or hide the sidebar. You can learn more about this in the Workflow Tools section of this documentation.
The Status Window
Click the Status Window button () in the bottom right corner of the workspace window to show or hide the Status Window. You can learn more about this in the Workflow Tools section of this documentation.
Workspace Settings
Click the Workspace Settings button () in the bottom right corner of the workspace window to open the Workspace Settings window. You can learn more about this in the Workspace Settings section of this documentation.
Making cues
There are several ways to make a cue in QLab:
- Click on one of the cue type icons in the toolbar.
- Drag a cue type icon from the toolbar into the cue list.
- Double-click on a cue type in the toolbox.
- Drag a cue type from the toolbar into the cue list.
- Select a cue type from the Cues menu.
- Use one of the ⌘-number keyboard shortcuts for the first ten cue types.
- Drag a compatible audio or video file from the Finder into the cue list.
- (new in 4.2) Hold down the option key while dragging a cue in the cue list to make a copy of it.
There are also ways to make cues using OSC and AppleScript, which you can learn more about in the OSC Dictionary and AppleScript Dictionary sections of this documentation.
Targeting Audio and Video cues
Audio and Video cues require a target which is a file containing the relevant type of media. There are several ways to assign a target to an Audio or Video cue:
- Click the target button for the cue in the cue list.
- Select the cue and type the target hotkey, T by default.
- Double-click in the target field in the Basics tab of the inspector.
- Drag and drop a file from the Finder onto the cue in the cue list.
- Drag and drop a file from the Finder into the target field in the Basics tab of the inspector.
Targeting other cues
Cues which target another cue include Fade, Start, Stop, Pause, Load, Reset, Devamp, GoTo, Target, Arm and Disarm. There are several ways to assign a target to these cues:
- Double-click in the target column in the cue list.
- Select the cue and type the target hotkey, T by default.
- Double-click in the target field in the Basics tab of the inspector.
- Drag and drop the intended target cue onto the cue in the cue list.
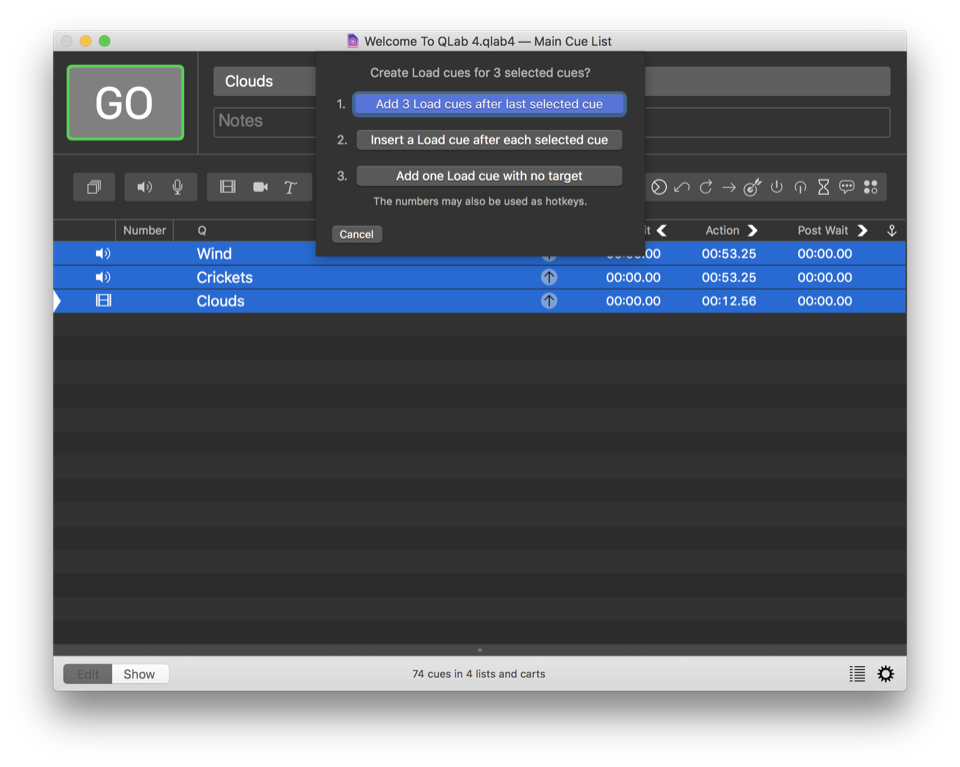
Additionally, starting with QLab 4.4, QLab behaves slightly differently when you create cues of any of these types depending upon what other cues are selected. When you create a new Fade, Start, Stop, Pause, Load, Reset, Devamp, GoTo, Target, Arm, or Disarm cue:
- If no cues are selected, then the new cue is created without a target.
- If one cue is selected, then the new cue is created targeting the selected cue.
- If more than one cue is selected, QLab asks you whether you want to create multiple targeted cues, one after each selected cue; multiple targeted cues all after the last selected cue, or only one single new cue.
Rules for cues
Once started, cues continue to play until they reach the end of their programmed action, or until they’re told to stop. For an Audio or Video cue, a cue’s action is the duration of the media file which it targets unless you program it otherwise. For a Fade cue, the default duration is five seconds, although you can change the default in the Fade cue’s cue template.
When you start a cue, the playback position will advance to the next cue. On the next press of the GO button or space bar, the next cue will start. If you’re accustomed to using a non-theatrical playback program such as iTunes, this behavior can be disorienting at first. Fear not, for this is how QLab is meant to work.
Rules for control
QLab can be told to GO, which is to say, to trigger the cue or cue sequence that is currently standing by, and advance the playhead to the next cue or cue sequence, in a number of ways. You can:
- Click on the GO button with the mouse.
- Press
space(or whichever keyboard shortcut you assigned to GO.) - Send an OSC
/gocommand to QLab from another program or an external device. - Send another OSC command that you assigned to GO in OSC Controls.
- Send an MSC
Gocommand to QLab from another program or an external device. - Send a MIDI message that you assigned to GO in MIDI Controls.
- Run an AppleScript which sends the
gocommand to QLab.
There are similar options for other commands such as stop, panic, pause, and so forth. The purpose of this plurality is to accommodate the myriad situations and possibilities that QLab might encounter in the world, and make it easier for you to use QLab in the way that suits your needs or your style.
Still have a question?
Our support team is always happy to help.