Wipes & Transitions Metal Edition
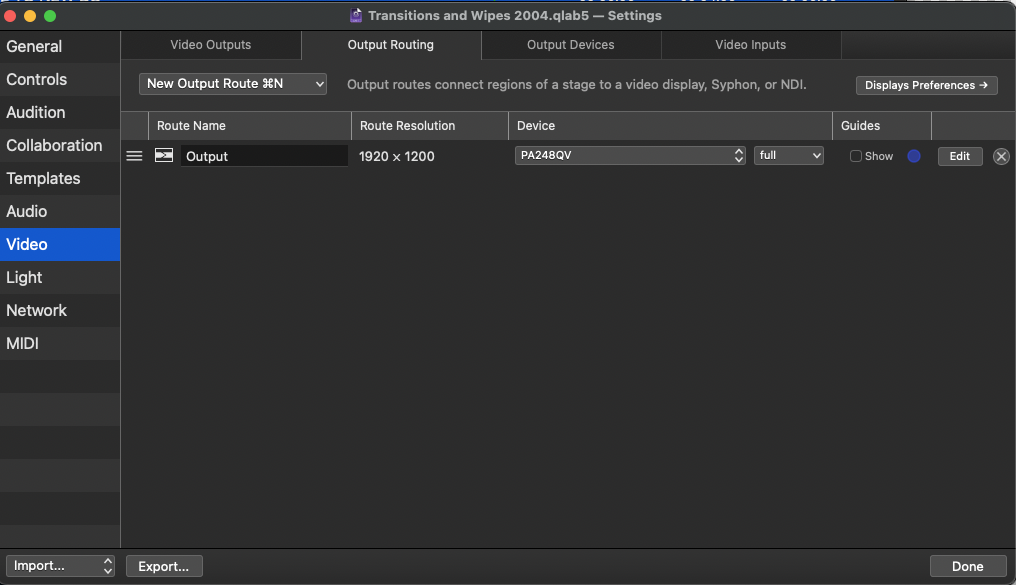
All the examples in this chapter are contained in a single downloadable workspace for QLab 5. To use this workspace on your system, you should just need to change one item in Workspace Settings → Video → Output Routing. Change the output route to use your display.
Shutter Wipes
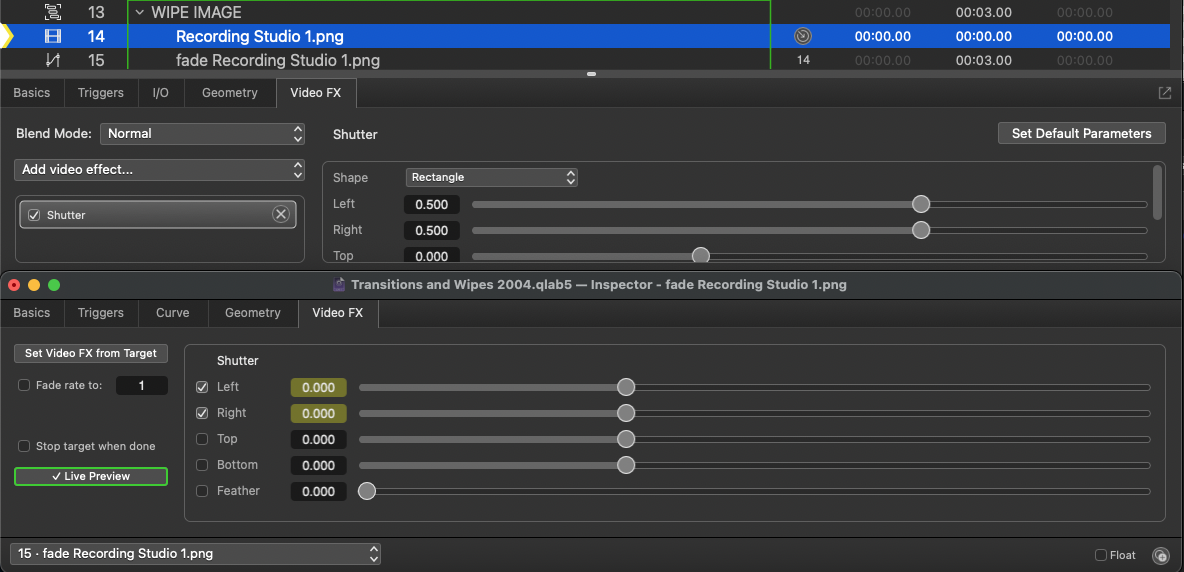
All the transitions in this section are achieved using a single video stage. Every Video cue is set to the top layer, and has a shutter video effect applied. The transitions are achieved by animating the parameters of this video effect.
In Cue 13 there is a “Curtains Opening” transition. In that Video cue’s shutter effect, the left and right shutters begin fully closed, allowing the previous image to remain displayed. A Fade cue then animates the left and right shutters to move off the screen over 3 seconds.
Shutter wipes are simple and useful, but are limited to transitions involving straight lines parallel to the edges of the frame.
Source Atop Blend Mode
In order to program more complex shapes in transitions to make diagonal wipes or wipes with irregular edges we can use one of QLab’s blend modes: Source Atop.
This is a very useful blend mode but it is not immediately obvious how it works or how to use it when compositing images for transitions.
The manual states: “Source Atop Compositing uses foreground pixels only, but displays them only where the background has pixels as well. This lets you use the background cue as a key and the foreground cue as a fill.”
This screen recording demonstrates this in action:
Cue 28 is a Video cue with its blend mode set to Source Atop and its layer set to top.
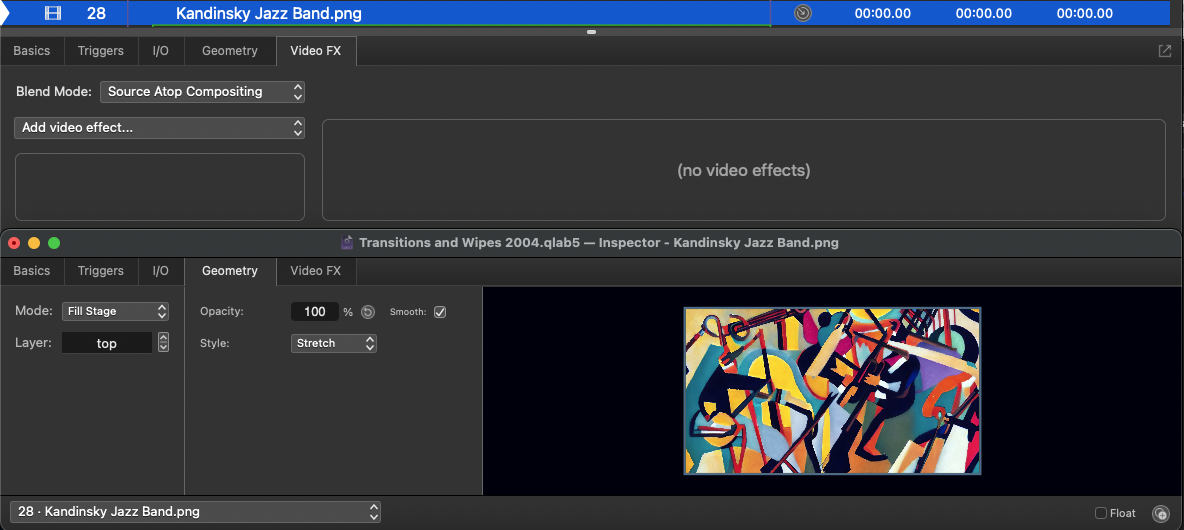
When it plays, no image is seen because the background has no pixels. In this context, the background is any cue on any layer below this cue’s layer, and ‘no pixels’ means that no pixels behind this video cue have an alpha value above 0%.
Cue 29 is a Video cue with an image of a white circle set to bottom layer and normal blend mode. When this cue plays, the area of cue 28, which sits on top of the white circle pixels, becomes visible. The color of the circle is irrelevant. The only value that is being read is the alpha value of the pixels making the circle. The circle could be any color, including black, and the result would be the same.
So essentially, cue 29 is acting as a matte for cue 28.
When cue 32 is played, again set to the bottom layer and with normal blend, (meaning it is now below both the white circle and the image with the Source Atop blend,) the result may not be what is expected. Users of traditional video compositing tools, like Adobe After Effects or Apple Motion, are probably used to mattes only applying to the layers they are adjacent to, so in those programs, we might expect to see the full-screen background image behind the circular image made from the Source Atop image sitting on top of the white circle. In QLab, however, we just see the Source Atop image, full screen. This is because the alpha value of all the pixels on layers below the cue set to Source Atop are used to determine the visibility of pixels in the top-layer cue set to Source Atop.
Luckily, matting effect is constrained to a single stage. In order to sit the round image on top of a background image, we can duplicate the stage and set the duplicated video stage to a lower stage layer. Then, we can assign any background images to this new lower-layered stage. You can see this happen in cue 33, which stops the previous background image and routes a new cue to the duplicated stage.
Here are the settings for the two stages:
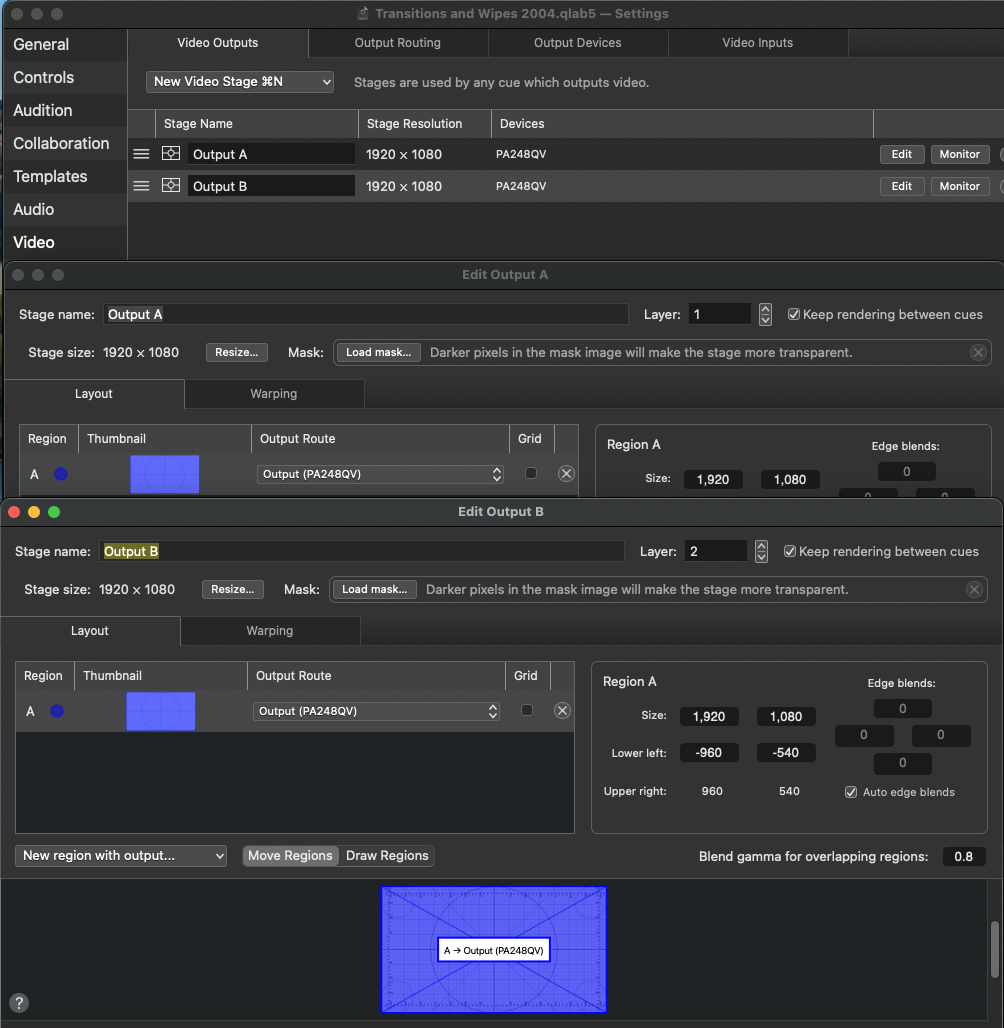
The stage named “Output A” on stage layer 1 is the stage we will use for any background images. The stage named “Output B” on stage layer 2 is the layer we will use for Source Atop compositions. All the following examples will use this setup. It’s important to note that stages have their own layer hierarchy, so a Video cue set to the top layer playing on a stage set to the bottom stage layer will appear behind a Video cue set to the bottom layer playing on a stage set to the top stage layer.
Source Atop Wipes
In this series of transitions, base images are always on stage Output A, and are changed when Output A is not visible because it is obscured by compositions on stage Output B.
All the animated transitions are achieved on stage Output B using Video cues set to Source Atop and played in front of white geometric shapes on lower layers.
This is one of the few chapters in the cookbook in which every cue is numbered. It really makes things clearer if every cue has a cue number that can appear in the target column of Fade cues and Stop cues, so you can keep track of which cues are which when programming.
Cue 41 fades in a Video cue routed to Stage A (the bottom stage.)
Cue 44 is a Timeline Group containing the following cues, all of which are routed to Stage B (the top stage.)
Cue 45 is a bottom-layer image of a white rectangle rotated diagonally to the frame with an initial out-of-frame position at the lower left corner.
Cue 46 fades the translation of Cue 45 so the white area moves to fill the frame.
Cue 47 is the Video cue set to Source Atop on the top layer, which is revealed by the movement of cue 45.
In subsequent cues, a new white geometric shape or shapes can be started and the old shapes stopped. To wipe to the foreground image, these new shapes are started out of frame and moved into frame. To wipe to the background, the new cues start fully in frame and move out of frame.
The final cue in the sequence (Cue 95) fades up a full frame black image to achieve a clean fade to black. When you have lots of layers with blends or mixed opacities, this is the best way of avoiding fading through sludgy grey tones as each individual cue fades independently. Think of it as fading in a curtain on top of everything.
Text Fills With Background
This shows another use of the Source Atop blend mode to place images inside text. Combining this with the duplicate Stage approach allows the composition to be placed on a background image.
Zoom Transitions.
The final section of the example workspace is a set of slideshow transitions which zoom in and out with a bit of a bounce. It uses circular images or rectangular images with rounded corners and matching border images. It is easily adapted for any other geometric shapes you might want to use.
Again, the background image is on stage Output A, and all the Source Atop compositing and borders are on stage Output B.
The artwork for these transitions could have been prepared with rounded corners or circular masking on a transparent background, with a matching border frame image. One of the advantages of this compositing technique is that it lets you quickly use any image without first editing it to match the desired style.
It is still necessary for the image to be scaled to match the size of a template shape in order to maintain registration when the Timeline Group containing them all has its scale faded, but the advantage of this method is that the only editing required of images to be inserted into the template is a crop and resize. This can easily be achieved on any Mac using the Preview, which is guaranteed to be installed with the OS, rather than complex masking and saving as a PNG with transparency, which would require a more advanced app and skill set.
The layers used in this example are (from back to front):
A full-screen image routed to stage Output A. This image can remain constant or can change independently of the foreground images.
And the following images contained in a Timeline Group:
A template shape (on a transparent background), routed to stage Output B with its scale initially set to 0.01.
An image routed to stage Output B with its scale initially set to 0.01, and its blend mode set to Source Atop.

A template border frame (on a transparent background), routed to stage Output B with its scale initially set to 0.01.
A Fade cue targets this Timeline Group and uses a relative fade to bring all the cues in the Timeline Group to the desired size, maintaining registration throughout the fade.
Further Exploration
There are a few other useful techniques in this chapter which might be interesting for you to explore further.
The squeegee wiper graphic used in cues 17 and 61 is a simple animation achieved with an image on a transparent background and fades, which, once synchronized with the timing of the other elements (pay particular attention to fade curves), can be a useful addition to wipe transitions, or a tedious frivolity; you decide!
The Drop Shadow video effect, applied to the border images in the “Zoom Transitions” section, subtly enhances the depth.
And finally, if you really want to master Source Atop compositing, there is one further thing to experiment with. If you change the opacity of the shape layer, the opacity of the image with the Source Atop blend will also change to match. If, however, you directly change the opacity of the cue set to Source Atop, you will reveal the white shape layer beneath, which is generally not what you want to do.
All images in this chapter generated using Photoshop’s Generative Fill or Stable Diffusion.