Q Many Knobs
Modular synthesizers are amazing tools from a deep, complex world. They can be used to generate immensely complex sounds with some aspects of random behavior and a difficult-to-describe realistic quality. Modular synthesizers are made up of interconnected modules which might be a sound generator, an effect, a VCA, a filter, or something else. Modules are controlled and interconnected using control voltage which can be generated from scratch or derived from re-routing and looping back the output of other modules. The power of a modular synth lies in the fact that there is no one right way to do things. Inputs and outputs of any module can be routed and patch any which way. Because of this, they’re a fantastic way to create a unique performance. There are times, however, when you might want to apply carefully timed, specific control to your modular synth project, and that is something at which QLab excels.
This chapter looks at two ways to integrate control a virtual modular synthesizer with QLab. The first example shows how to use audio files in QLab to emulate control voltage (CV), using QLab’s levels, rate, and integrated fade controls to modulate the synth’s pitch, LFO, and envelope.
The second example uses MIDI messages to control entire scenes’ worth of settings.
For this chapter, the role of the modular synthesizer will be played by the excellent (and free) virtual modular synth VCV Rack 2. VCV requires you to create an account to download and install the software, and then individual modules can be installed through their web library. Several modules are included in the base installation, others are available for purchase, and still others are free. These examples use a few of the free extra modules. If you’re following along, you’ll want to install those modules first. A list of the modules can be found at the end of this chapter.
Setup 1 - “CV” Control
This video shows QLab acting as a “Voltage” source for VCV. This is achieved by using Audio cues to play WAV files which contain extremely low frequency waves and DC voltage. Please do not play these files to speakers at high volumes! The audio output device in QLab is Blackhole which is a sort of virtual audio interface. Blackhole can be installed with varying numbers of channels; this example requires at least the 16-channel version.
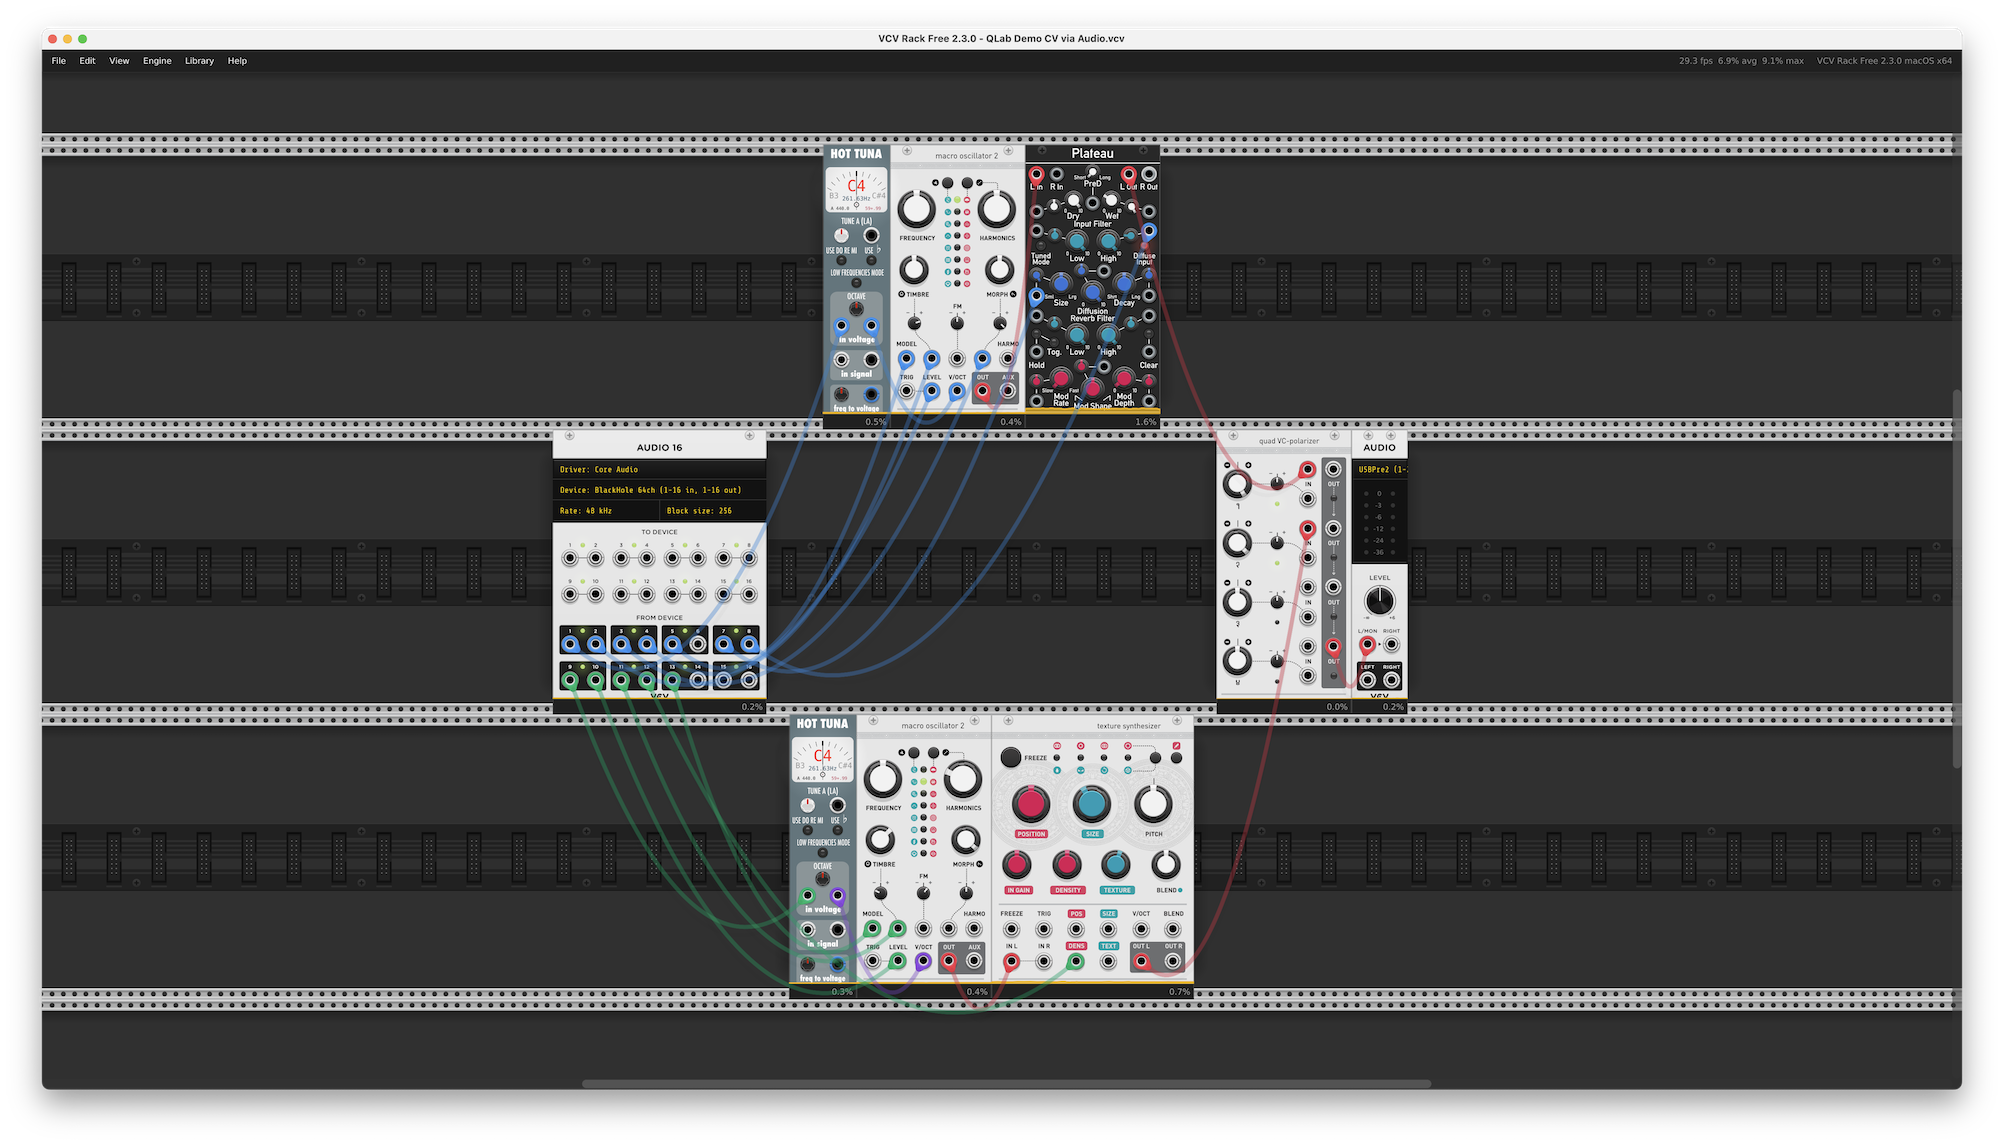
The downloadable version of this VCV setup has been tidied up a bit to make it a little easier to see what’s going on:

The middle row of this VCV setup starts with an Audio16 module which can route up to sixteen channels of audio into and out of VCV. It should be set to use the Blackhole device. If you’ve installed a version of Blackhole with more than 16 channels, choose the (1-16 in, 1-16 out) option when selecting the device. We won’t be using the outputs of this module (labeled “to device”); we’re only using it to bring audio into VCV.
The colors of the patch cables in VCV don’t have specific meanings. In this example, blue cables route audio from the input module to the various control inputs related to the first voice of our synthesizer. Green cables route audio to the control inputs of the second voice. Red cables route audio output from each voice towards the final audio output of VCV.
The top row of modules create the first voice of our synthesizer. It starts with a tuner (Hot Tuna) to help us find specific pitches. Then comes a Macro Oscillator module which generates the actual audio. The oscillator’s pitch, level, model, timbre, and morph controls are all modulated by the “control voltage” signals coming from QLab. The output of the oscillator goes to the Plateau reverb effect. The size and input filter parameters of the reverb are also modulated by QLab.
The bottom row creates a similar voice, only this has a texture synthesizer instead of a reverb module. The density parameter of the texture module is controlled by QLab as well.
The audio outputs of both of these voices are routed to a mixer, called quad VC-polarizer, which is routed to a two-channel audio output module. You should set this module to use your headphones or speakers, or whatever audio device you’re using to listen to audio from your Mac.
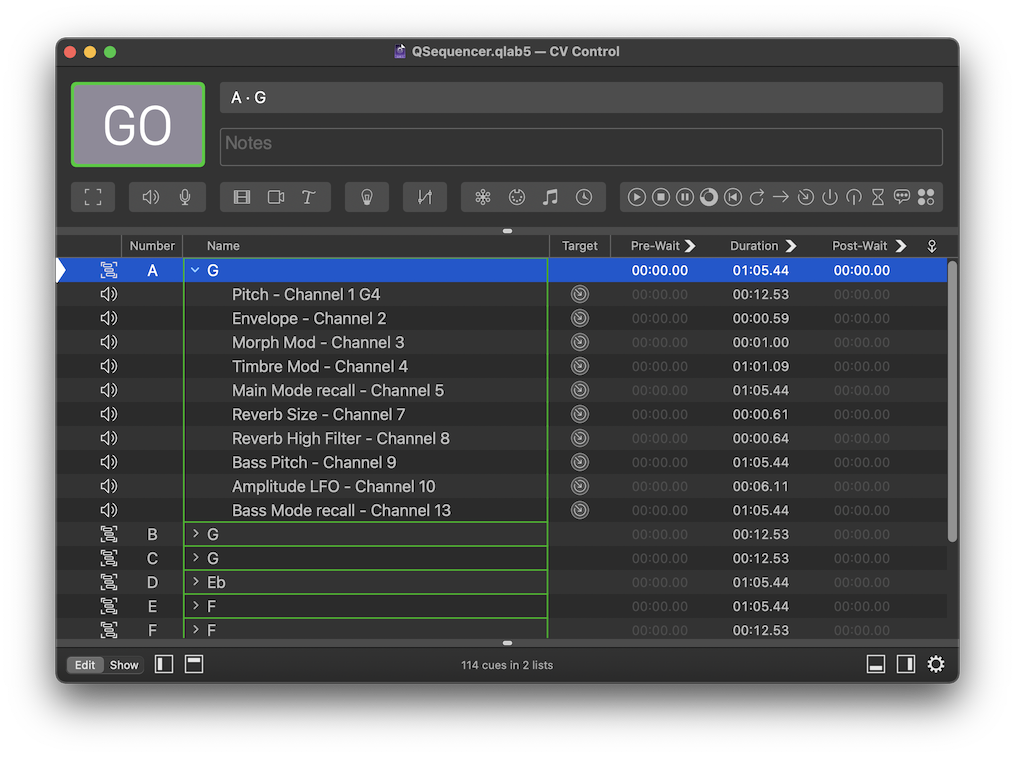
In QLab, the CV Control cue list contains a series of Group cues, each of which sends a collection of related instructions to VCV.

The Groups contain Audio cues and Start cues. Most of the Audio cues here are playing back a VERY boring audio file - a constant level direct current that will make no sound if played to a speaker (although which could plausibly damage a speaker if played very loudly… so don’t do that.) Varying the level of this direct current audio file effectively changes the voltage being sent to VCV.
Let’s walk through Group A, which contains ten Audio cues that together cause VCV to play a “G” note using both voices.
- The first Audio cue uses cue output 1. If you adjust the level of output 1 in this cue, you’ll change the pitch of the “top row” voice in VCV. By moving the slider for output 1 in QLab while watching the upper
Hot Tuna, you can find an exact note. - The second Audio cue uses cue output 2 to control an envelope in VCV, opening the VCA in the
Macro Oscillatorto allow a note to be played. The envelope is created from that same constant voltage audio file, using the integrated fade to draw an envelope. In this case it is a fairly standard looking attack, decay, sustain, release shape, but you can use the fade editor to create wilder envelopes. - The third cue uses cue output 3. It modulates the morph control and demonstrates this weirder envelope.
- The fourth cue uses cue output 4. It modulates the timbre by playing a recording of a wave-folded low-frequency oscillator at a very low rate. The wave itself is lower than can be heard, but it’s ideal for control voltage. You can attenuate it by adjusting the gain in the Levels tab.
- The fifth cue uses cue output 5 to recall the mode of the “top row” voice.
- The sixth cue uses cue output 7 to modulate the reverb size. It plays an audio file of a recorded envelope. The rate control of the cue lets you match the desired tempo, in this case by raising it to 2.5.
- The seventh cue uses cue output 8 to modulate the high filter on the reverb, again with an integrated fade in QLab creating an envelope. This cue plays a recording of a sine wave and uses the rate control to adjust the pitch of the wave.
- The eighth cue uses cue output 9 to generate a bass pitch in the “bottom row” voice. The target audio file here is an inverted DC signal. QLab does not have an easy way to invert the polarity of a signal, so we simply use an alternate sound file.
- The ninth cue uses cue output 10 to modulate the VCA of the “bottom row” voice. It’s target audio file is a triangle wave at a very low frequency.
- The tenth cue uses cue output 13 to recall the mode of the “bottom row” voice.
Group B and Group C contain only information for the top row voice. They also contain Stop cues so that the next pitch doesn’t play until the cue sending the previous one is stopped. Otherwise, both will play and you’ll get a really interesting, but perhaps undesirable pitch.
Group D adjusts everything, including cue outputs 11 and 12 which modify the timbre of the bottom row voice and add some grains from the texture synthesizer.
Group cues E, F, G and H do it all again, with different pitches and changing modes.
By playing all eight of those Group cue, one after the other, QLab has effectively become a 13-voice, 8-step CV sequencer! While this example has eight steps, QLab could easily have as many steps as you want by simply adding more Group cues. You could also raise the number of adjustable parameters from 13 up to as many as 64 per audio patch.
You could program a whole symphony this way if you’d care to.
Setup 2 - MIDI Control
Setup two is both a little bit more practical and a little bit more complicated. It’s a great way to use QLab in combination with either VCV or a hardware modular synthesizer. The patch plays itself while QLab remote-controls it via MIDI, allowing us to create “scenes” and switch between them in a smooth and organic way.
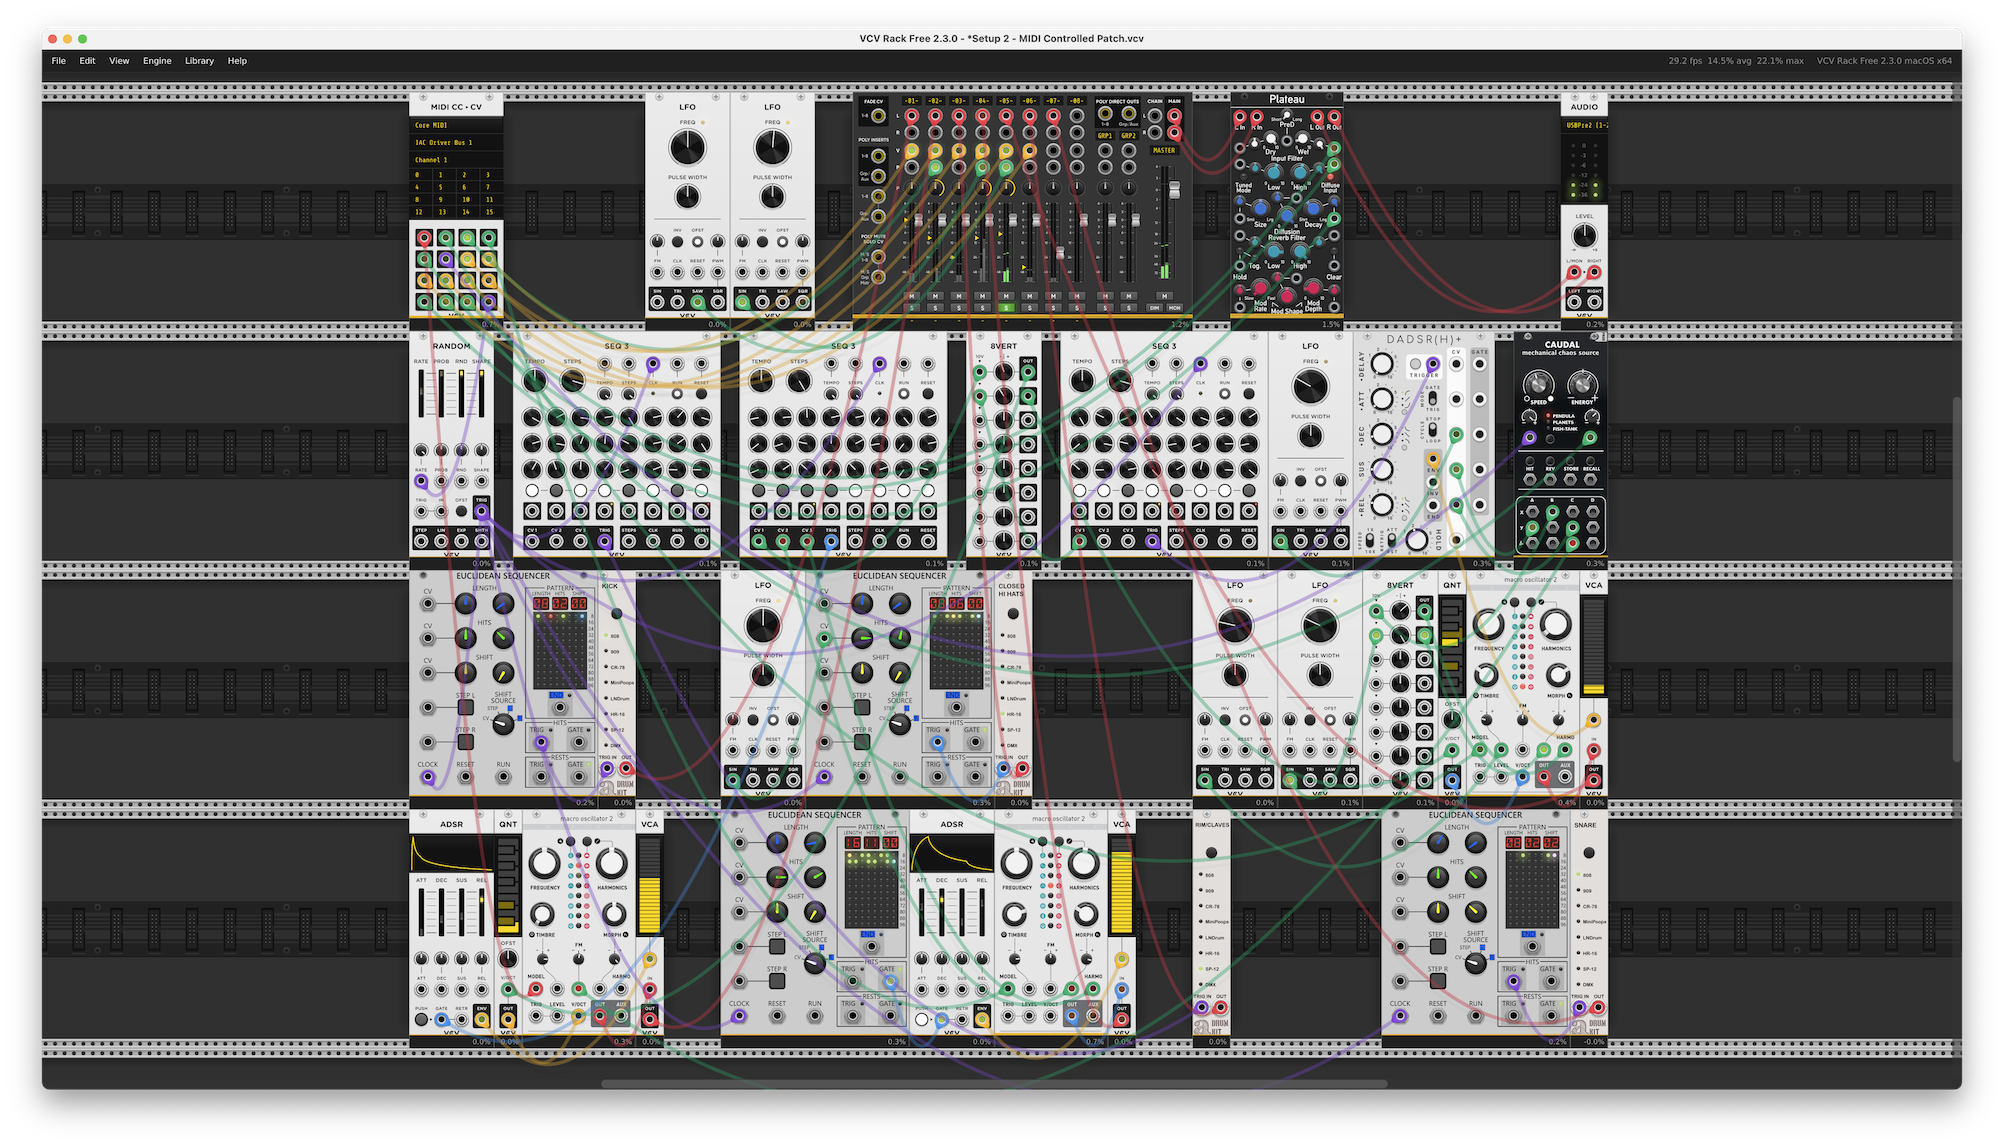
The downloadable version of this VCV setup has also been tidied up a bit to make it a little easier to see what’s going on:

Again, patch cord colors in VCV are not inherently important, but here they’ve been organized by basic function (parameter control, envelope control, trigger/clock, and audio) to try to make it easier to follow the flow of things.
The top row is dedicated to input and output. The second row is dedicated to sequence and pattern generators. The third and fourth rows contain groups of modules that create voices. The output of those voices routes to the mixer in the center of the top row.
Before you can hear anything, you’ll need to open the “Setup 2” VCV patch and set the Audio 8 module, which is on the right side of the top row, to your audio device of choice.
To allow MIDI messages to pass between QLab and VCV, you’ll need to set up what’s called an “inter-application communication bus”, or IAC bus, on your Mac. Apple has written a handy how-to guide which you can find by clicking here.
Once you’ve got an IAC bus set up, tell VCV to use it by navigating to the left-most module in the top row of the VCV setup, called MIDI CC > CV, and selecting it just below where it says “Core MIDI.”
In QLab, open workspace settings, select MIDI from the list on the left, and set the “To VCV” patch to use the IAC bus by using the pop-up menu in the “MIDI Destination” column. Once that’s done, you can close workspace settings and navigate to the “MIDI Control” cue list.
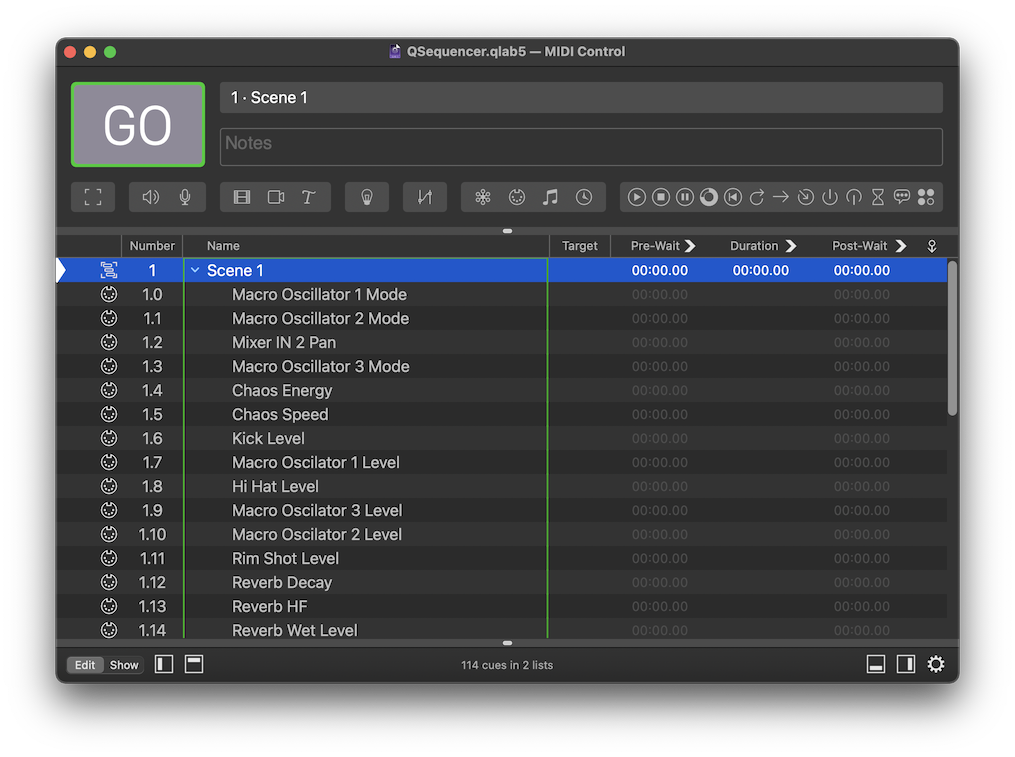
This list contains three Timeline Groups cues which each contain several MIDI cues. The MIDI messages from these cues are sent to VCV through the IAC bus, and are routed inside VCV by channel.

The individual MIDI cues in each Group cue are named according to the parameters they control in VCV.
Start “Scene 1” and you’ll hear the VCV setup immediately shift. Note that none of these MIDI cues has a duration.
When you start “Scene 2,” you’ll hear the VCV setup change again. This time, though, some of the MIDI cues contain fades which shift the nature of the patch (dramatically!) over time.
“Scene 3” creates another shift.
With a setup like this, you could create a generative musical patch in VCV and adjust it to match the mood and tempo of each scene in a play, or slowly modulate background music in an installation, museum, airport, or elevator. The possibilities are quite endless.
VCV modules used in Setup 1
- Audible Instruments Macro Oscillator 2
- NSYNTHII Hot Tuna
- Valley Plateau
- Audible Instruments Texture Synthesizer
- Audible Instruments quad VC-polarizer
- Valley Plateau
VCV modules used in Setup 2
- Audible Instruments Macro Oscillator 2
- Bogaudio DADSR(H)+
- Count Modular Euclidean Sequencer
- Autodafe Drums Closed Hats, Snare, Kick and Rim/Claves
- Vult Caudal (Free)
- Valley Plateau
- Mindmeld MixMasterJr