Flicker, Glitch, and Ballyhoo
This tutorial describes a method for using “non-curved” fade curves to create flickering lights, glitching video effects, and lighting ballyhoos. Flickering lights, whether for candles, firelight, or to generally animate light levels, are a common lighting need, as is the requirement to glitch visual elements in video presentations. Ballyhoos, the iconic Hollywood-style searchlight effect, are among the oldest lighting tropes and remain a staple in many productions today.
These effects are often programmed in QLab with a long series of sequential Light cues or Video cue geometry fades, all set to different values and arranged in Group cues. However, it is much easier to program these by carefully using the Curve tab, which can achieve the same effect with only two cues.
This tutorial uses QLab 5, but except where noted, the technique works equally well in QLab 4 and 5. Downloadable examples are provided for both QLab 4 and QLab 5.
Here it is in action:
Cue 1 fades in a sidelight PAR.
Cue 2 flickers the PAR between the levels set in Light cues HI1 and LO1. Note that if the levels are changed while this sequence is running, the new levels aren’t apparent until the LO or HI cue is re-triggered, so the flicker may take up to four seconds to respond to the new levels.
Cue 3 is a Text cue (but could be a Video or Camera cue) with a looped series of different glitch effects every few seconds.
Cue 4 adds a downlight from a moving light.
Cue 5 starts a ballyhoo sequence using the moving light’s pan, tilt, magenta, amber, and iris channels.
Cue 6 fades all.
Because the lighting visualization program used in the screen recording (and included in the downloads) does not display video feeds, the combined lighting and video output has been composited in post-production to simulate what the combined results might look like on a actual stage.
The Flicker Effect
The flicker is animated using the fade curves of two identical copies of a Light cue.

If you’re using QLab 5, the changes can be made sharper by switching the curve type to Linear.

When any Light cue is run, the value of the parameters included in that cue fade from their current level to the level set in the cue following the curve. Rising values follow the left side curve, and falling values follow the right side curve. On the left side, the bottom of the curve’s Y axis represents the current level of each parameter, and the top of the Y axis represents the final level of each parameter, set in the Levels tab of the cue. On the right side, the top of the Y axis represents the current levels, and the bottom represents the final levels.
While a typical Light cue will show a straight line, or a single curved line, we achieve a flicker effect by drawing a very wiggly curve. The number of wiggles dictates the frequency of changes within the duration of the cue. In the demo, each cue runs for 2 seconds and has around 20 points along the curve. If you want a more or less active flicker, you can achieve that by making the cue longer or shorter, or by increasing or reducing the number of wiggles in the curve.
So that this effect can be used for both increasing and decreasing values, both the upfade and downfade curves have been drawn equally wiggly. In QLab 5.4 and later, you can lock the two fades together so that you only have to edit one side, and the other side will produce a mirror image curve.
Because we want to loop the effect indefinitely, we need to follow the first Light cue, HI with another Light cue, LO, which will fade the values to a lower level. If multiple lights are used in the flicker, then some lights can have low values set in the HI Cue and high values in the LO Cue. The only requirement is that there is a difference between the current level and the level set in the cue. Significant differences will cause a large strobe-like flicker, and minor differences will result in a more subtle flicker more suitable for candle and firelight simulations.
The HI and LO cues are put in a Timeline Group cue along with a Start cue targeting the Group. This as the effect of looping the Group. In QLab 5, you could also use a Playlist Group cue instead of a Timeline Group with a Start cue. The duration of the Light cues is half the time of the loop, and the loop time is the pre-wait of the Start cue.
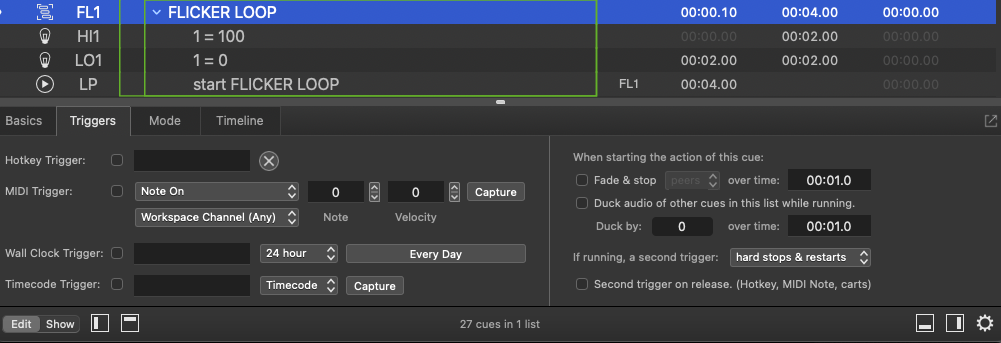
In the Triggers tab of the Group cue, the second trigger action is set to hard stop & restart. This ensures that the Start cue will re-trigger when the Group restarts. This lets us guarantee that the delay between loops is as short as possible.
The Glitch Effect
This effect also uses a pair of cues, in this case Fade cues. The first Fade cue defines the limits of the glitchy variations in various geometry and video effect parameters of a Video cue, and the second Fade cue returns these parameters to their starting state before the glitch.
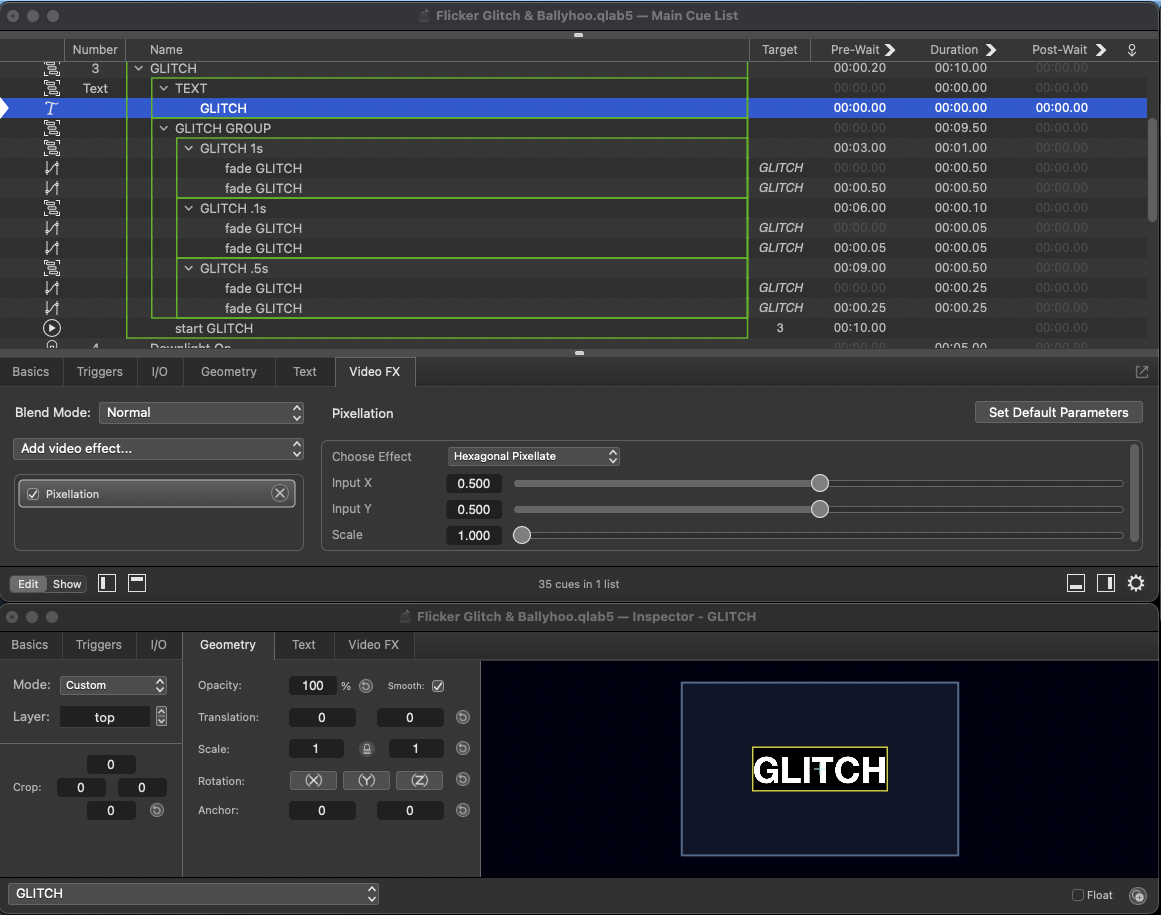
Cue 3 is a Text cue (but could be a Video or Camera cue) which has a Hexagonal Pixellate video effect applied. The starting point for the scale parameter of this effect is 1, which turns the effect off.
The first Fade cue in a GLITCH Timeline Group sets the opacity and Y-axis translation values which will be reached at the end of the Cue’s duration.
It also changes the scale of the pixellate effect.
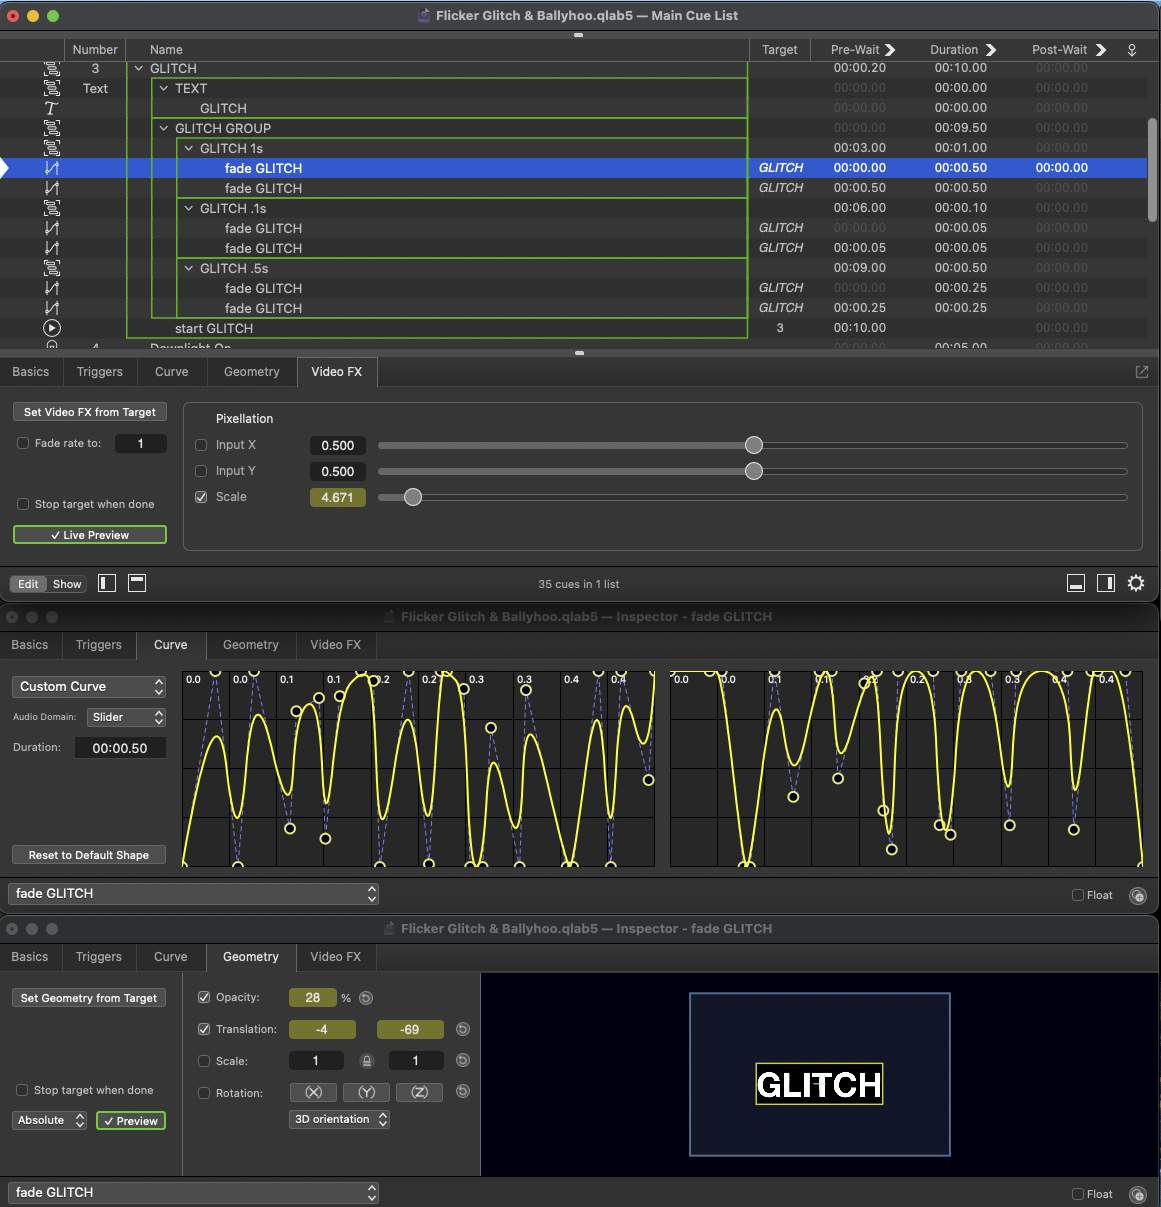
For the duration of the Fade, the hexagonal pixellate scale, opacity, and translation values of the target cue fluctuate wildly as they follow the curve.
The second Fade cue restores the values of those parameters to the starting values set in the Text cue.
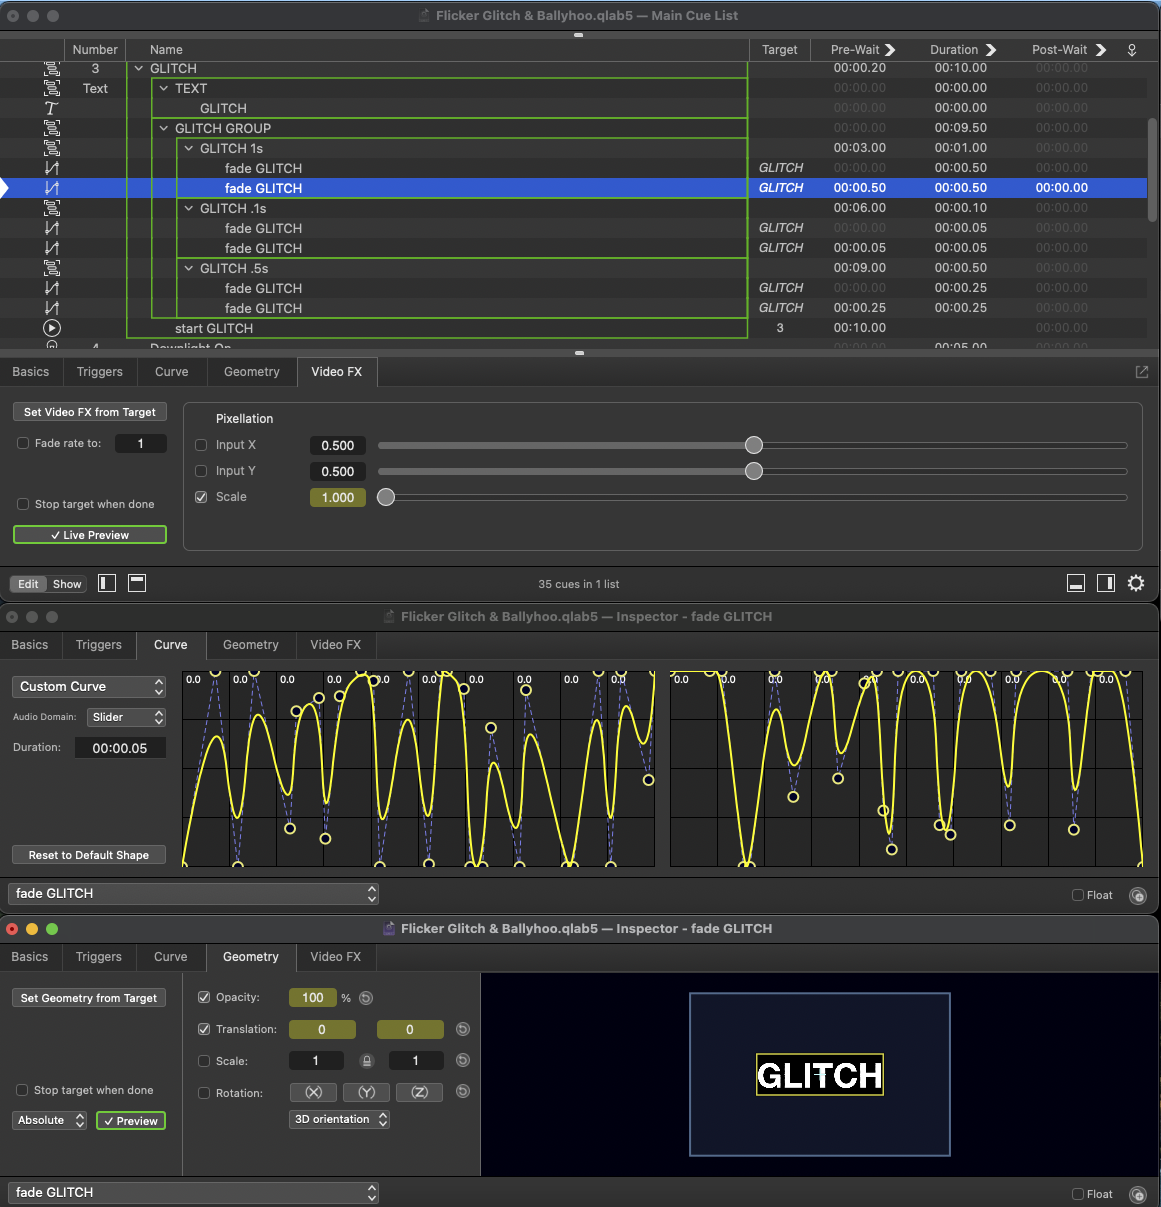
The “GLITCH GROUP” contains three pairs of Fade cues, each of which provides a different variation on the effect.
The Ballyhoo Effect
Instead of using Fade cues, as in the previous examples, the ballyhoo effect uses curves in Network cues which use OSC messages to control levels in the Light Dashboard.
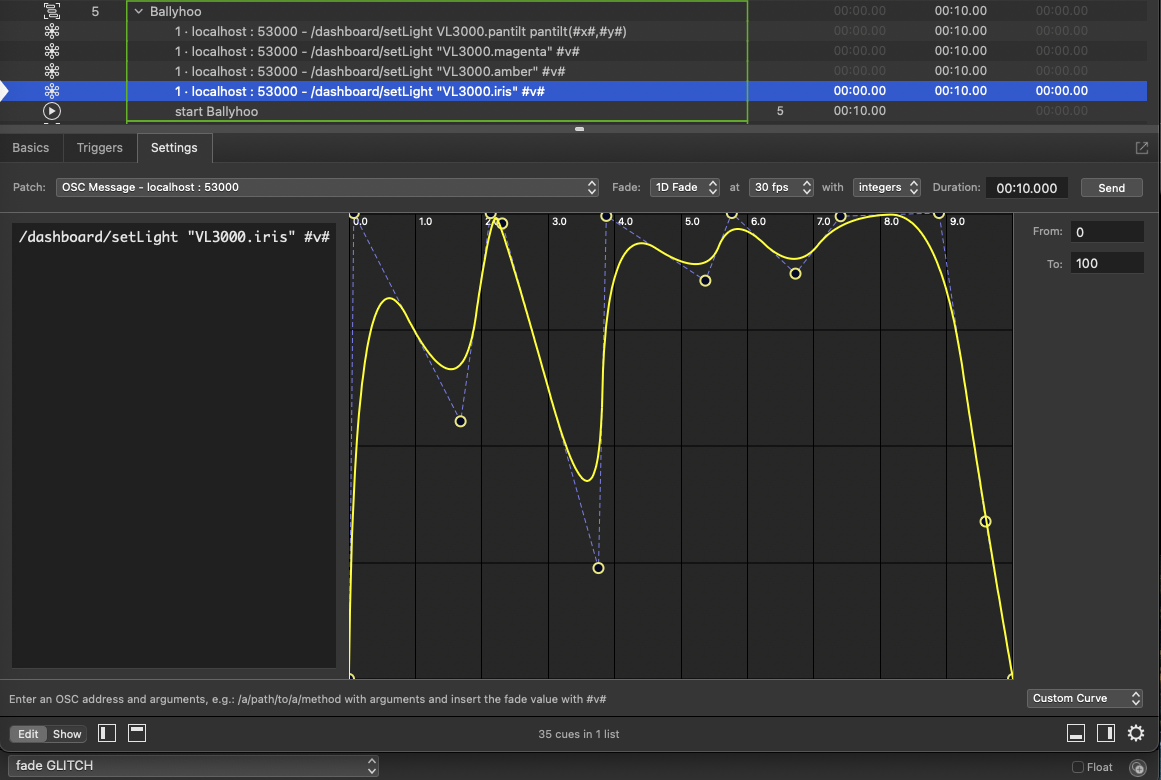
The iris, magenta and amber parameters of a VL3000 spotlight are modulated using a 1D fade. In a 1D Fade, the range of the Y axis of the curve is set in the From and To fields on the right side of the inspector. Since the parameters we’re working with use a range of 0 to 100, so does the Network cue.
In general, the OSC message to control the live value of the iris channel of a light is:
/dashboard/setLight "{name of light}.iris" {number}
In this case, the light is named “VL3000” and we’re using a 1D fade to vary the number that’s sent, so the message in this cue is written as:
/dashboard/setLight "VL3000.iris" #v#
Because the Network cue has a duration, it sends its message repeatedly as long as it runs according to the FPS pop-up menu. In this case, the cue is set to 30 frames per second. The #v# in the OSC message is a token which is replaced, 30 times per second, with the value derived from the curve.
Because fades in Network cues can have their beginning and end set to the same value, we can use a single cue instead of the pairs of cues required in the other two effects.
The magenta and amber parameters are also effected using similarly configured network cues.
Network cues can also use 2D fades. In the demo workspace, the pan and tilt channels of the moving light are combined into a single virtual parameter.
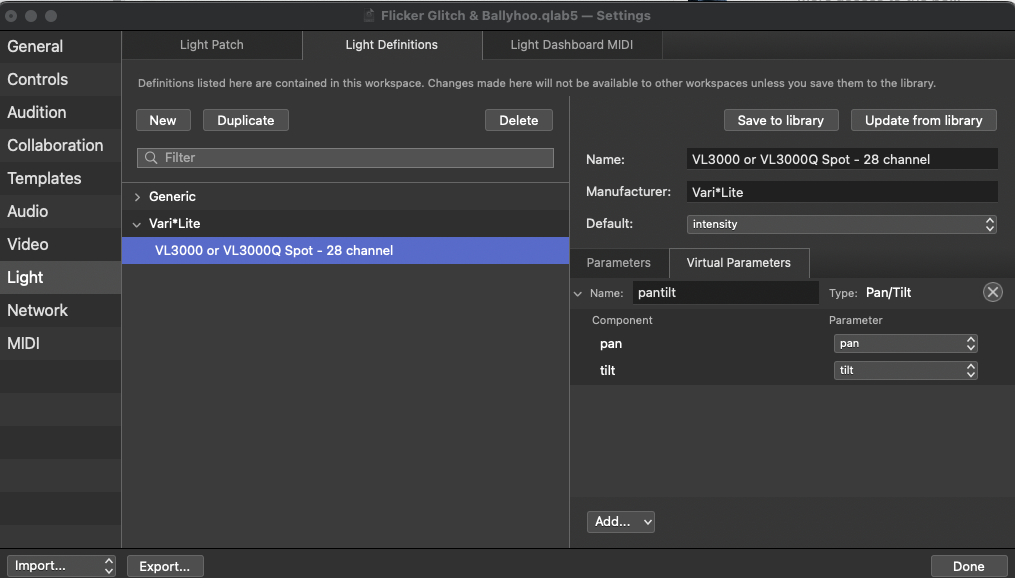
This allows the pan and tilt to be faded using a 2D fade in a single Network cue with this OSC message:
/dashboard/setLight VL3000.pantilt pantilt(#x#,#y#)
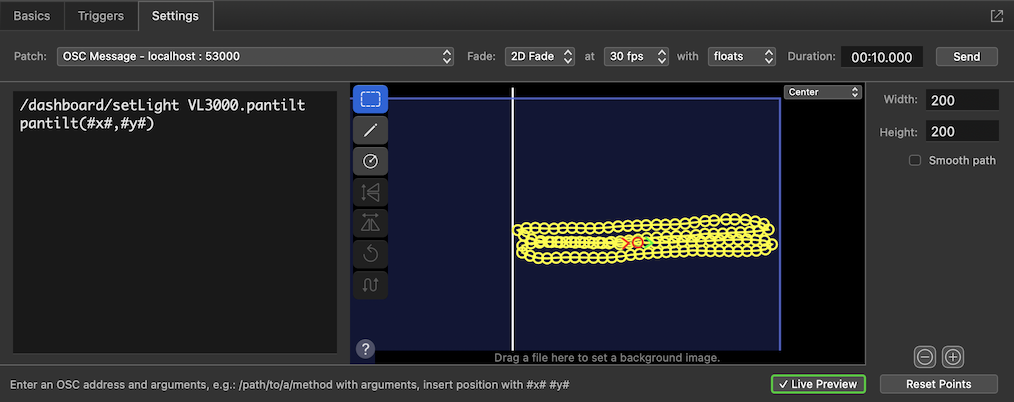
Pan is on the X axis, tilt is on the Y axis, and time is equally distributed along the path.
If you draw the fade while live fade preview is turned on, then the path of the spotlight beam can be drawn live, as you see the resulting position of the spotlight.
In QLab 5.4 and later versions, there are more drawing tool options which enable far greater accuracy in drawing and editing 2D fade curves.