A Plug In Primer
Before we get into a detailed forensic examination of the use of plug-ins in QLab, including some fairly sticky problems, let us start with a few fireworks showing what is achievable with a large number of complex plug-ins used in an optimum configuration.
Here is a screen recording of a fully pimped-out QLab 3 installation with probably more cue output and device output plug-ins than are sensible. View this full screen!
With version 3, QLab opened itself up to the world of third-party AudioUnit plug-ins. The advantages this brings can be immensely useful, as it may mean that for a few simple effects on microphones or Audio cues, or some simple time alignment of loudspeaker systems, you may be able to avoid using outboard effects processors, loudspeaker processors, or digital consoles, and can thus save some of your budget by using just a simple analog console, or no console at all.
The downside of allowing third-party plug-ins to directly interface with QLab is that some plug-ins will work better than others, and some will not work at all, and it can be difficult to discern the reasons. It should also be noted that the way QLab uses plug-ins on cues is somewhat more complex than when plug-ins are used in a DAW. In the DAW they are generally loaded when a session is opened, either as channel inserts or on aux busses, and stay loaded. With QLab, when used within cues, they are loaded and unloaded with the cues, which comes with a unique set of benefits and drawbacks.
The best policy is to use the simplest plug-in that will do the job you want at the quality you require. For EQ, Apple’s AUFilter gives you a five-band parametric EQ with variable Q and 20dB cut and boost which works with any number of input channels and which is installed as part of macOS. Some plug-ins require very high CPU loads which can affect the performance of your workspaces. Some will cause very nasty clicks and bangs on output. Exercise caution when using any plug-ins you haven’t tried before, and test really thoroughly before using them in critical show applications. This example workspace demonstrates some things that work, some that don’t, things to watch out for to determine compatibility, and where to place the plug-in in the signal chain. There are a lot of repetitive examples, but if you work through them you will potentially save yourself hours of frustration in trying to work out why plug-ins are not working as you expect.
The examples, where possible, use the stock Apple AU plug-ins supplied with macOS. In situations where the Apple plug-ins don’t work, free or demo versions of third-party plug-ins are used and a link to download them is provided. All plug-ins in QLab must be 64-bit AudioUnit (AU) plug-ins. VST, MAS, AAX, and 32-bit AUs are not compatible with QLab.
Before we get to the examples, there are few overall caveats and warnings.
Waves Plug-ins
QLab is not a supported DAW for Waves Audio products. What this means is that Waves cannot guarantee their plug-ins will function correctly in QLab, and if they don’t work or cease working, Waves will not provide support. (This is not unique to Waves. Other plug-in manufacturers have similar lists of supported DAWs). If you intend using Waves plug-ins (and many users of QLab do) then it is recommended that you authorize your Waves licenses to a USB key. If you are authorized to a USB key (as opposed to a computer) then, according to Waves’ tech support, your computer can be offline, as the plug-in will only seek the license on the local USB key. Using Waves plug-ins requires QLab version 3.1.23 or later, and Waves version 9 or later.
Metering in Plug-ins
Audio plug-ins in cues have no metering capabilities regardless of what meters are built into the plug-in. If you need meters, then insert the plug-ins in cue or device outputs (as explained in Example 8 below.)
Plug-in Windows
If you don’t close a plug-in window after working with it, it will reopen the next time the cue is selected (even if the cue is not set to autoload). More often than not, this will result in this window stealing keyboard focus, meaning the keyboard will no longer operate QLab. Clicking twice on the selected cue will give keyboard focus back to QLab.
Audio Effects on Cues
In the screen recordings in the examples on the following pages, some vital details are quite small. It’s worth viewing them full screen by clicking on the expand arrows to the right of the video controller bar.
Example 1: Apple AUMatrixReverb With a Stereo Audio Cue
AUMatrixReverb is the reverb effect included with macOS. It is a good general purpose reverb. Here it is in QLab applied as an audio effect on an audio cue:
The first thing to note is what happens if you stop the cue by panicking the workspace. Look for the little hollow grey triangle to the left of the cue (in QLab 4, the icon looks like this: ) This is the “tail-out” indicator, and it means that the plug-in is reporting to QLab that it is still playing the tail of the effect. While it is present you can’t play the cue again, in the same way that you can’t play any cue that is already running. When working with plug-ins you may have to press the escape key twice in rapid succession to stop Audio cues with effects applied.
QLab 4.1 and later allows re-triggering of cues during tail-out.
The next screen recording shows what happens when this cue is played to the end:
At the end of the audio, the cue stays active with the tail-out indicator present for ten seconds or so, even though the reverb tail is only about two seconds. This could be problematic. Some effects never report their tails as finished or take minutes to do so, and in these cases a programmed intervention is often beneficial.
In the next example, an OSC command has been added to hard stop the cue after the actual tail-out time:
Example 2: Audio Ease Altiverb
Altiverb is a very popular top end reverb. It has a feature-laden interface and is relatively resource-intensive in use. Because of this, there are a few issues when applied to QLab cues. On lower spec machines, the initial load time when applying the plug-in may be very long and this may cause some operations to become less responsive.
Here it is in action:
You will notice that when the cue is played, it takes a few hundred milliseconds for the effect to be heard while Altiverb is loading. The second time the cue is played in the video it is pre-loaded, and there is no delay. When the cue is halted with a Stop cue, the tail-out indicator remains on. Altiverb will keep this on for minutes, hence the example above with an OSC cue.
Example 3: Eventide Blackhole
Blackhole is an infinite reverb type processor that is wonderful for making drones and beds, and for really rich non-linear reverbs. It suffers from the same problems as other complex plug-ins with regard to response times:
At the beginning of the video, there are several seconds where QLab is completely unresponsive around this cue. When played, the application of the effect is delayed, and in this case, pre-loading the cue is no help. When the Audio cue is halted with a Stop cue, the sound cuts immediately and no tail is played. This is less common than the overlong tail reporting, but the dead stop behavior is found in a lot of plug-ins. If the plug-in you prefer behaves this way, the simplest solution is to simply extend the length of your audio sample with some silence at the end.
In QLab 4.1 and later, Blackhole and other complex reverbs behave much better. There is still an issue at the beginning of Audio cues, where the effect doesn’t appear to be applied for around a second.
Example 4: Apple AUMatrixReverb with a mono Audio cue
AUMatrixReverb worked well in our previous example so our next example uses it again with a mono (single channel) audio cue:
AUMatrixReverb is clearly incompatible with mono audio files. In this case, this manifests itself as a pass-through of the original audio; no error, but no reverb either. Other incompatible plug-ins may not pass any audio at all. If you are restricted to the standard AU plug-ins, it is simple to convert the mono file to stereo in an audio editor.
Example 5: Stop with reverb tail using AUMatrixReverb
The final example of audio effects in Audio cues is the classic “stop with reverb tail” effect. This is a quick way of cutting off music cues cleanly, on cue, at any point in their length without using more advanced techniques like devamping. Here’s a screen recording of a cue stopped in various places:
At the start, the Audio cue has a little reverb applied. When the STOP AND REVERB cue is triggered, the Audio cue is stopped and a Fade cue snaps up the “dry/wet” mix of the Audio cue’s reverb. This trick uses the ability of Fade cues to fade parameters of plug-ins on their target cues. Finally, the Audio cue is manually hard stopped, using an OSC cue delayed by the length of the reverb tail.
Example 6: Mic cues using reverb
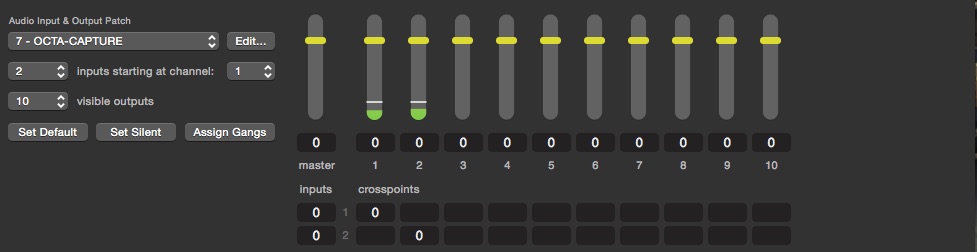
A Mic cue must use the same audio device for both input and output. The patches and defaults for Mic cues have their own page and are independent of the settings for Audio cues. Here are a couple of Mic cues set up with two reverbs, AU Matrix Reverb and a freeware plug-in:
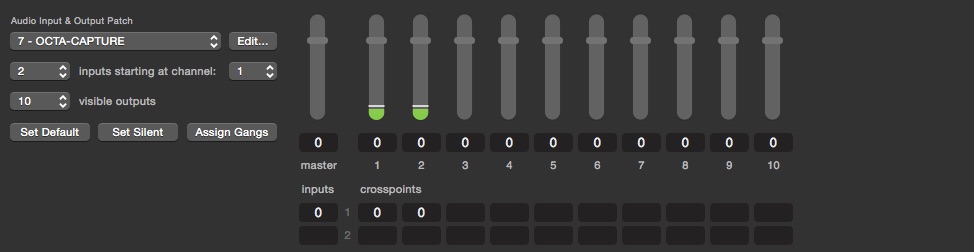
Both plug-ins fail to apply an effect to the audio. The shareware reverb passes no audio, and AUMatrixVerb just passes the original audio. This is because the effects are now presented with a multichannel input, equivalent to the number of hardware input channels on your interface. Very few reverb plug-ins will work in this configuration, which is unfortunate, as putting some reverb on a mic is a common use for QLab’s audio effects feature. Here is a shareware reverb again, but this time the Mic cue is using an Avid MBox2 interface which has two inputs, instead of the ten-input Octacapture used in the original example:
With a two-input interface, these plug-ins both work as expected. This variation between interfaces is the cause of some confusion. One user may recommend a plug-in that another user can’t get to work, and the reason may only be that they are using interfaces with different numbers of input channels.
In QLab 4.1 or later, you can set the number of channels a Mic cue uses to match the number of channels the plug-in will work with. It is therefore possible to use AUMatrixReverb on a single channel. If you don’t need to use all your interface’s inputs, you can use odd numbered inputs only to get a mono to stereo reverb. (Although it may sound slightly different to when it is used with both inputs driven.) It is important to ensure that even numbered channels have their gains set to minimum so that you do not feed preamp noise into the unused channel.
If you need to use all your inputs, you can get a mono reverb using these settings.
Testing Plug-ins for Audio and Mic Cues
Generally, if a plug-in will work with a given number of physical inputs on an interface with a Mic cue, it will also work with an Audio cue targeting an audio file with an equivalent number of tracks. Plug-ins can, therefore, be tested easily using multitrack audio files. You can download a set created for this purpose in the downloads for this chapter. The files consist of spoken numbers on each track identifying the track number. They are intended to be looped.
Example 7: AUPitch and effects fades
Here is a plug-in that will interface with high channel counts, either as multichannel audio tracks or interfaces with lots of microphone inputs:
Tracks 1 and 24 of a 24-channel WAV are audible, with a pitch shift plug-in on the cue’s Audio Effects tab. When the Fade cue is triggered, the pitch parameter of the plug-in is faded to a new value, and the audio levels matrix crossfades, reversing the sides of the 1 and 24 track announcements.
Recap: Gotchas with plug-ins in cues’ Audio Effects tab
- Plug-ins may not report their tail times, and may either cut off abruptly or not release their cues without being explicitly hard stopped.
- Plug-ins may only work with a specific number of inputs, either as tracks in an Audio cue, or as inputs to a Mic cue on a hardware interface.
- Cues with audio effects that play perfectly on a system that uses an interface with a small number of input channels may not play at all on a system with a more complex interface with a higher input count.
- Plug-ins that do not work may produce no audio output, or may just pass through the original audio unaffected.
- Plug-ins may be slow to load, and there may be a delay before the effect is heard on the Audio cue.
- Meters don’t work on plug-ins used in cues’ Audio Effects tab.
Audio Effects on Outputs
Many of the above problems can be avoided by inserting plug-ins on cue outputs or on device outputs. There, they behave far more like plug-ins in a DAW, or effects on aux buses in a mixer, insofar as they are loaded when the workspace is opened and stay unchanged until the workspace is closed.
There are some disadvantages: plug-ins on outputs are beyond the control of Fade cues, so their parameters can’t be faded or changed. So, for instance, if you need a long and short reverb, you will have to create two separate reverbs.
The outputs of the effects are permanently live to the outputs of the system. This precludes the use of effects with, for instance, simulation of 50/60Hz mains hum, vinyl surface noise, or integral sample playback (unless you really do want those things playing at all times.)
However, one great advantage is that meters work on effects used on outputs, so it is even possible to have spectrum analyzers on output inserts, as well as having proper visual feedback when setting up multiband dynamics units, etc. What follows is a step by step guide to setting up the inserts, and some examples of the plug-ins in use.
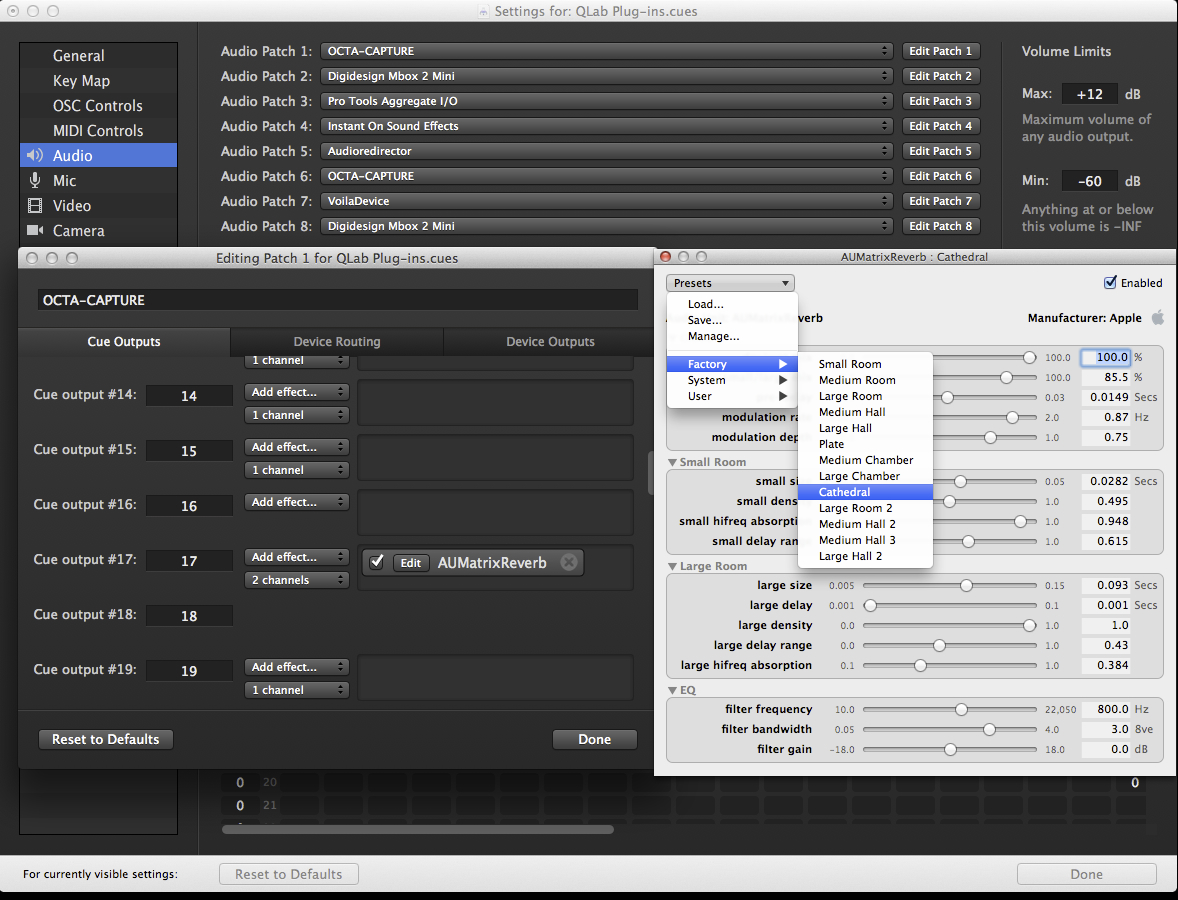
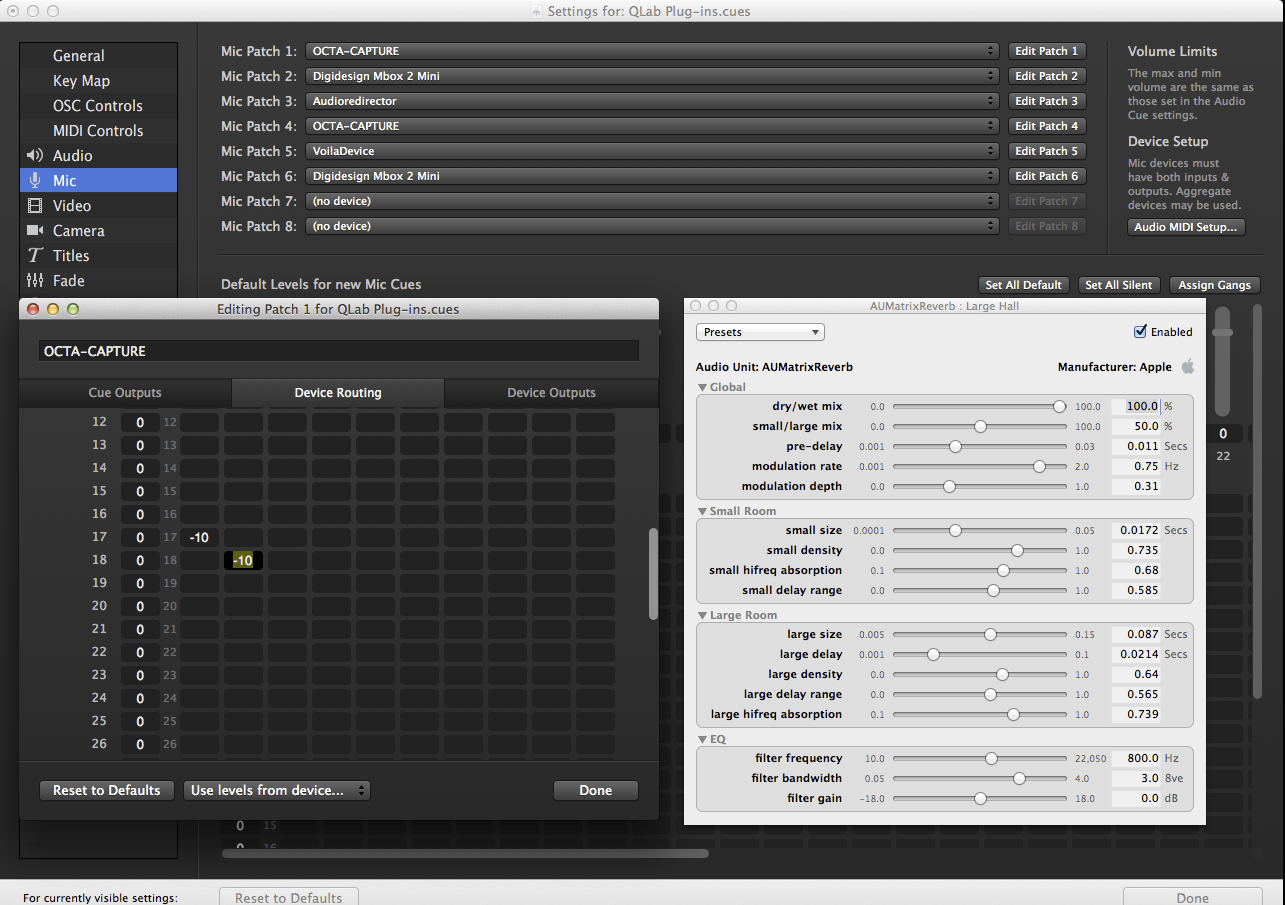
Example 8: AUMatrixReverb on a stereo cue output
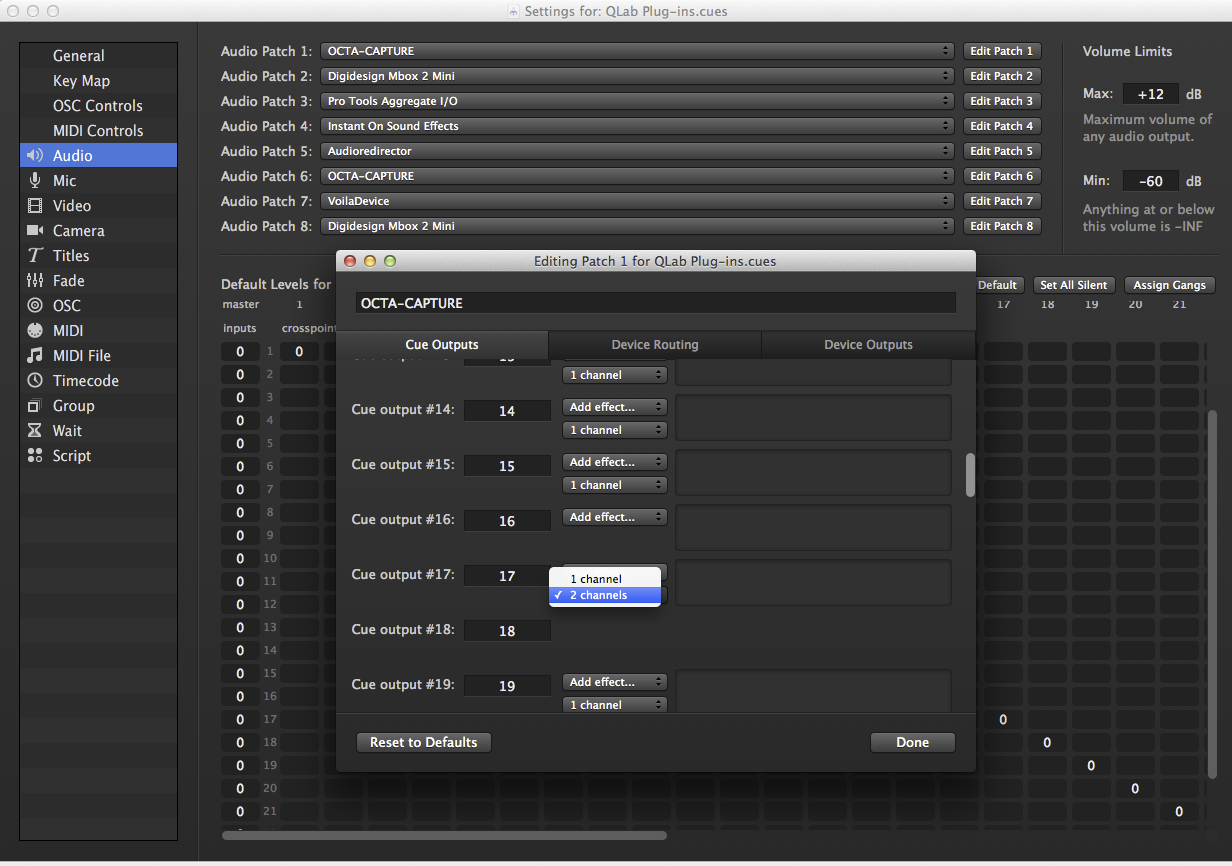
This example inserts a stereo reverb on some high numbered cue outputs, beyond the range of actual physical outputs in use (in this case cue outputs 17 and 18), and routes the output of that reverb to audio outputs using the device matrix.
First, go to Workspace Settings → Audio → Edit Patch → Cue Outputs and select “2 channels” from the pop-up menu for cue output 17:
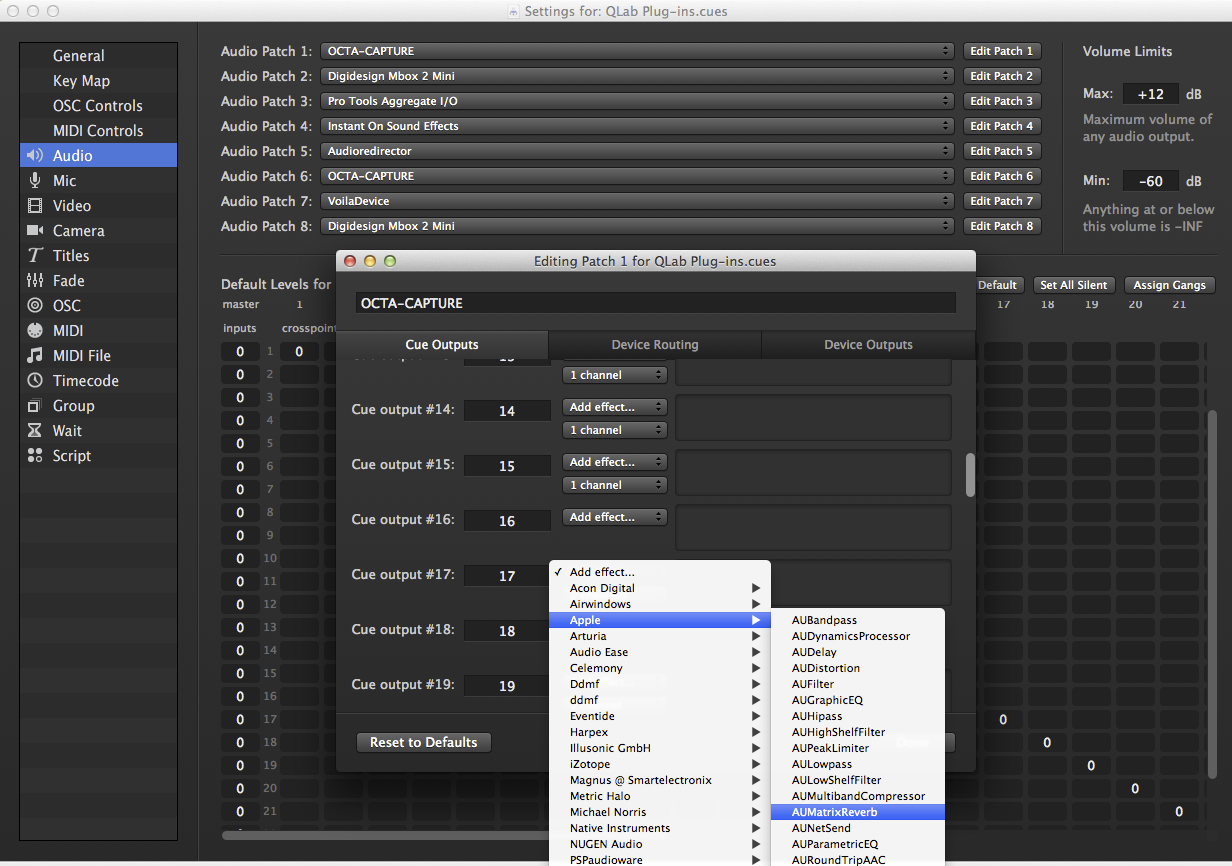
Click “Add Effect…” and choose Apple → AUMatrixReverb:
Click “Presets” in the plug-in window and choose a preset:
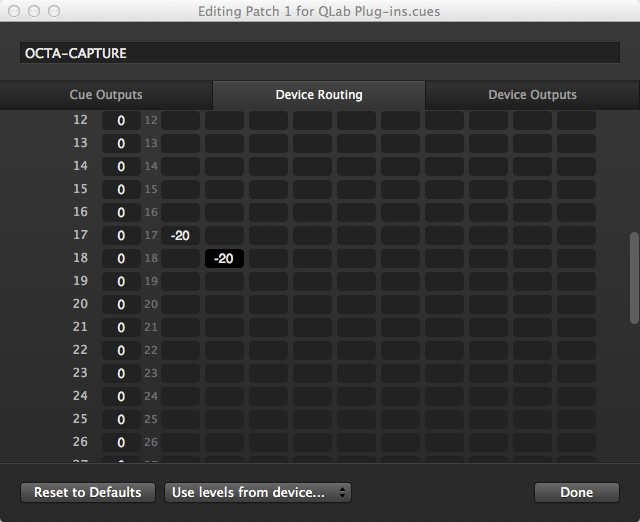
Close the plug-in window and navigate to the Device Routing tab of the audio output editor. Dial up cue outputs 17 and 18 into the required device outputs. In the example, device outputs 1 and 2 are used so that the reverb goes to the main audio outputs. For a reverb, -20 is a good starting level to try:
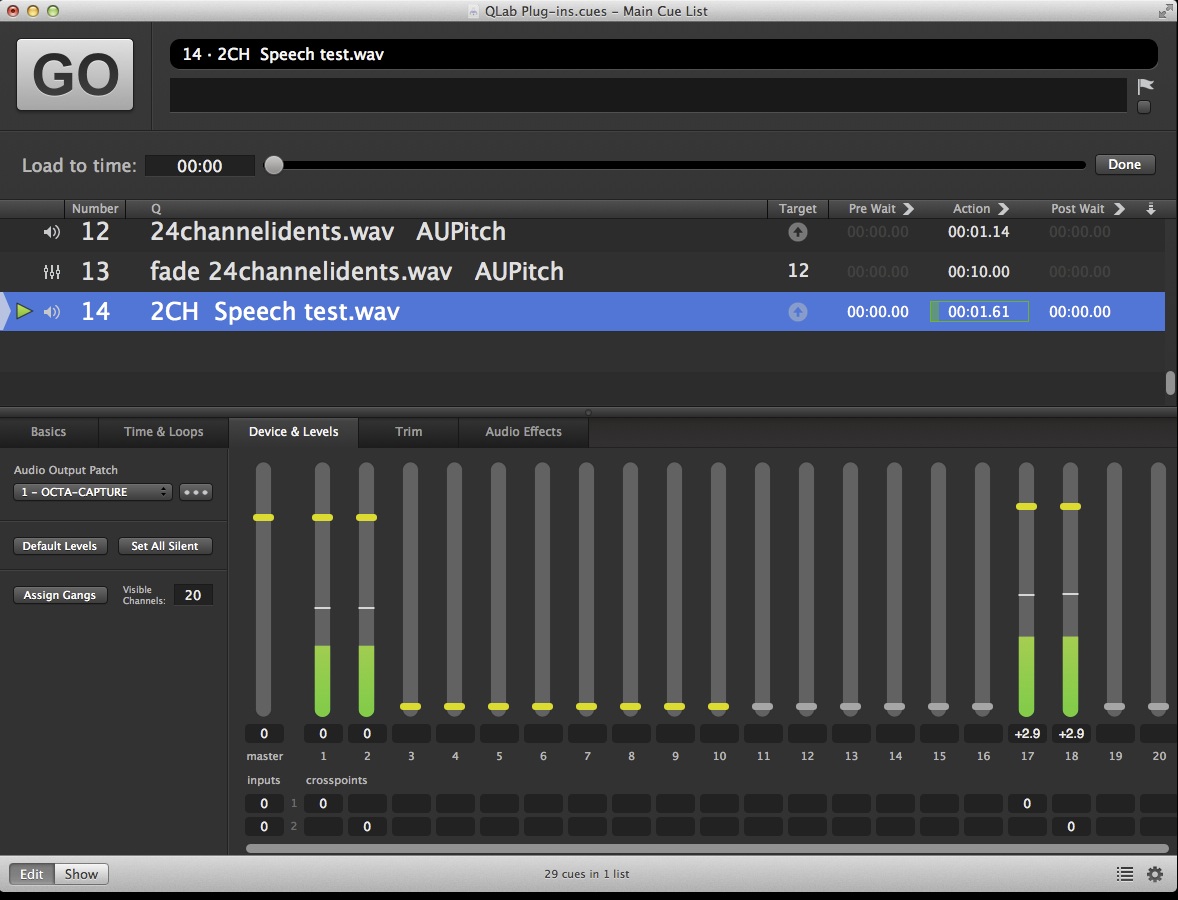
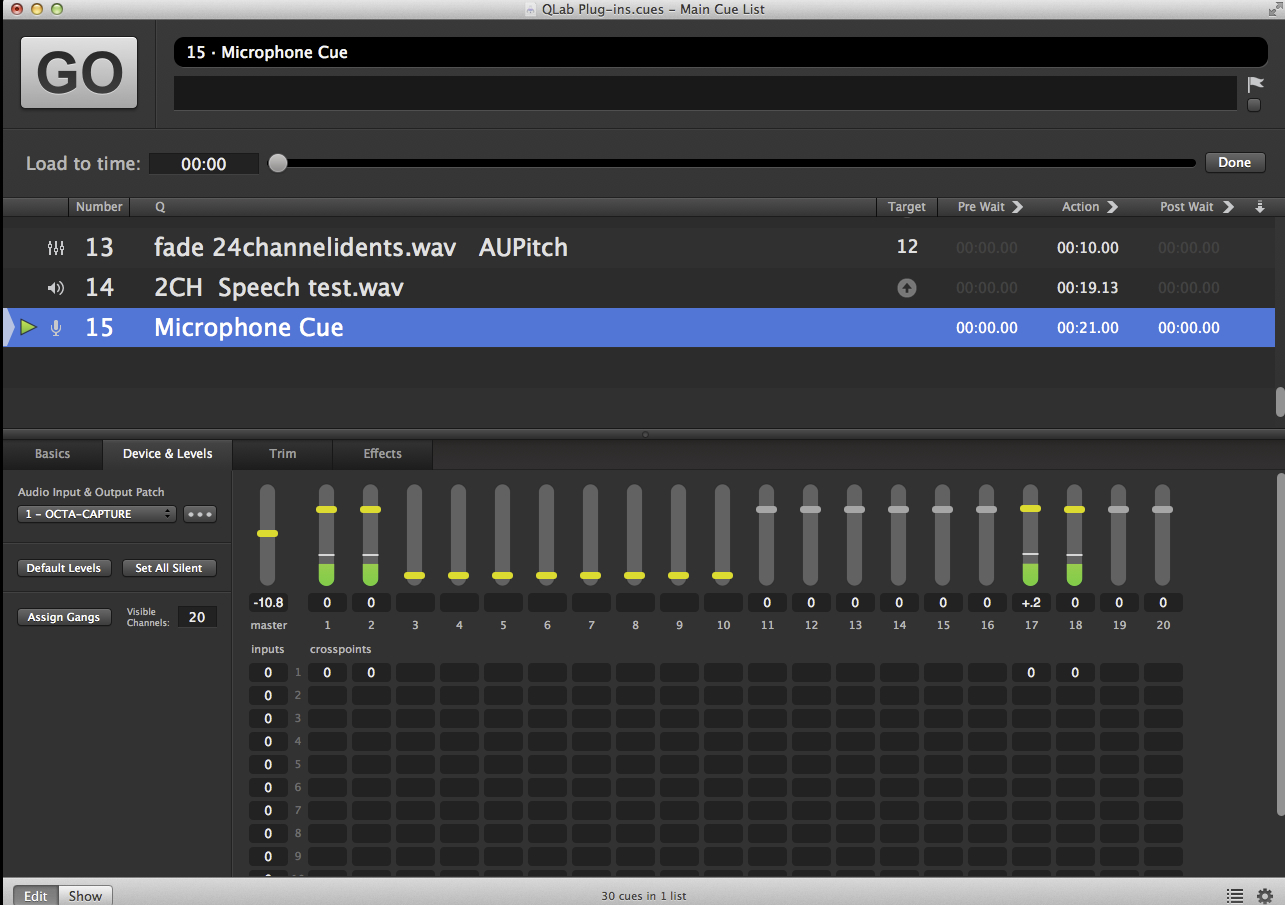
Return to the cue list and create an Audio cue. In the Device & Levels tab, dial up the crosspoints to send audio to outputs 17 and 18:

Preview the cue (select it and press “V”) and adjust the reverb send levels using the sliders for outputs 17 and 18:
Now create a Mic cue. You will probably notice that sliders 17 and 18 are inactive and greyed out. This is because, as discussed above, the output patch for Mic cues is entirely independent of the output patch for Audio cues. Visit Workspace Settings → Mic (in QLab 3) or Workspace Settings → Audio (in QLab 4) and click the “Edit Patch” button for the Mic patch you’re using. Repeat the steps above to pair cue outputs 17 and 18, insert AUMatrixReverb, and choose a preset for the reverb:
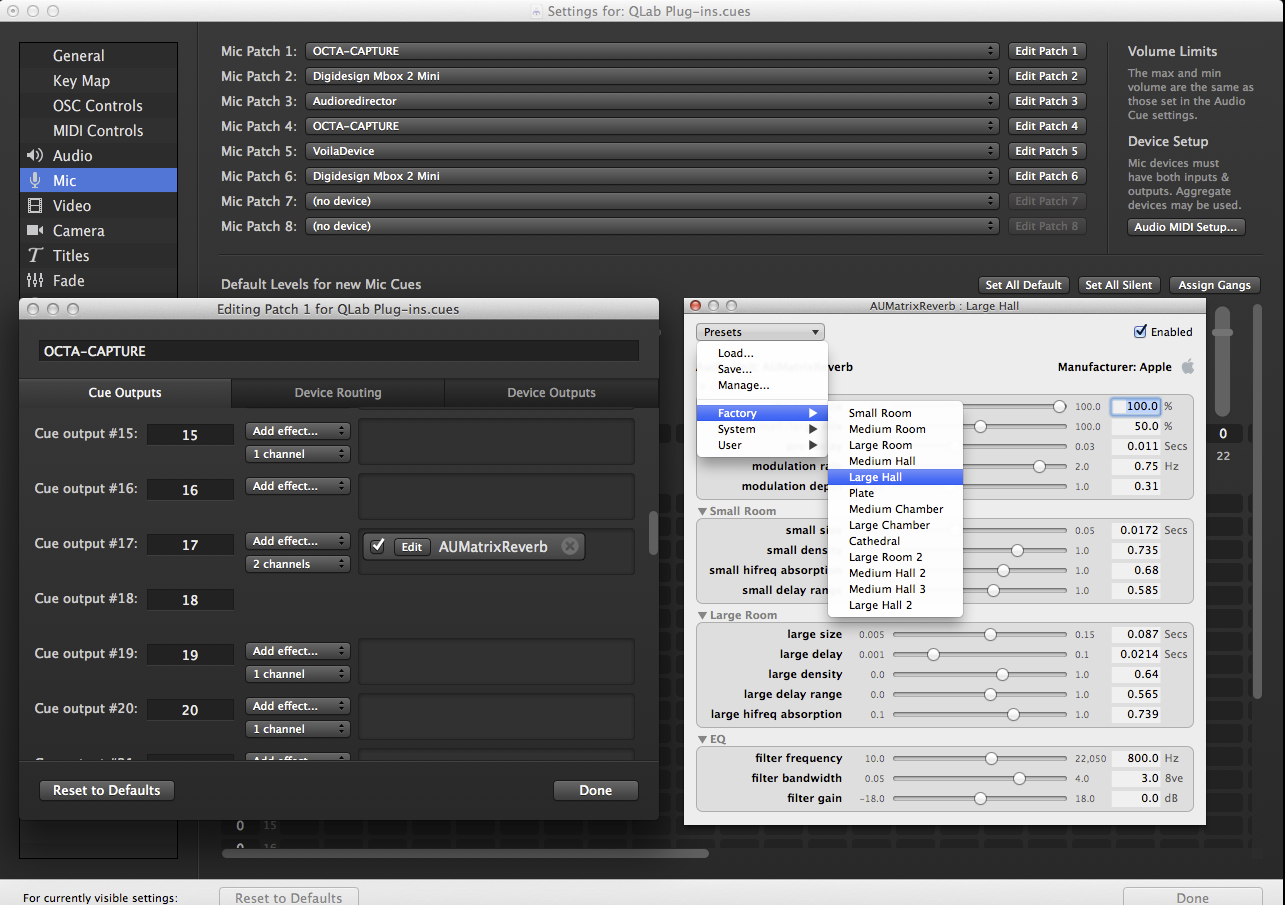
Then route those cue outputs to audio outputs 1 and 2 in the Device Routing tab:
Return to the cue list, preview the microphone cue (select it and press “V”), and adjust the reverb send levels using the sliders for outputs 17 and 18:
You now have functioning reverb send within QLab that is free of most of the problems associated with plug-ins directly inserted on Audio or Mic cues.
Example 9: Inserting delay on Device Outputs
It is often desirable to time delay certain loudspeakers in a sound system. This can achieve far greater realism for performers wearing lavaliere microphones, by ensuring the direct sound from the performer’s mouth reaches the audience very slightly before the reinforced sound from the loudspeakers. For recorded sound, it is a very powerful tool, as it can alter the perceived location of the source of the sound. At its simplest, it can prevent audience members sitting close to speakers on the proscenium arch from being aware of sound coming from the loudspeaker itself. For example, if the audio is played through the proscenium speakers and also through speakers at the rear of the stage, introducing 20ms of delay on the proscenium speakers can move their apparent position to an on-stage position while maintaining the clarity of a loudspeaker in the auditorium.
In this example, we will insert a time delay and a graphic EQ to allow delay and EQ of the loudspeakers being fed by Device Outputs 1 and 2.
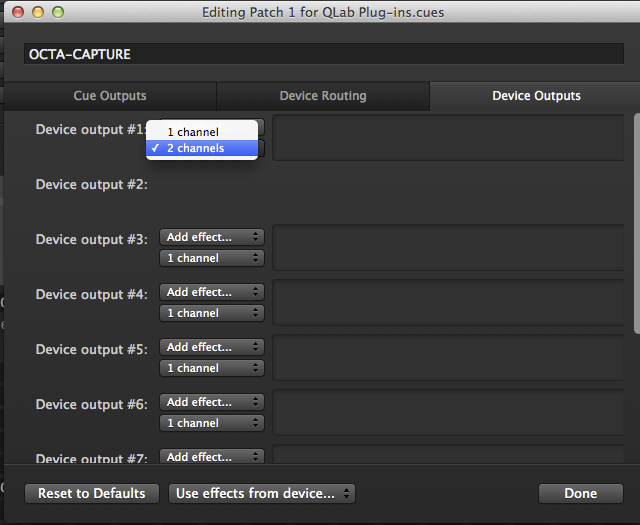
First, go to Workspace Settings → Audio → Edit Patch → Device Outputs and select “2 channels” from the pop-up menu for cue output 1:
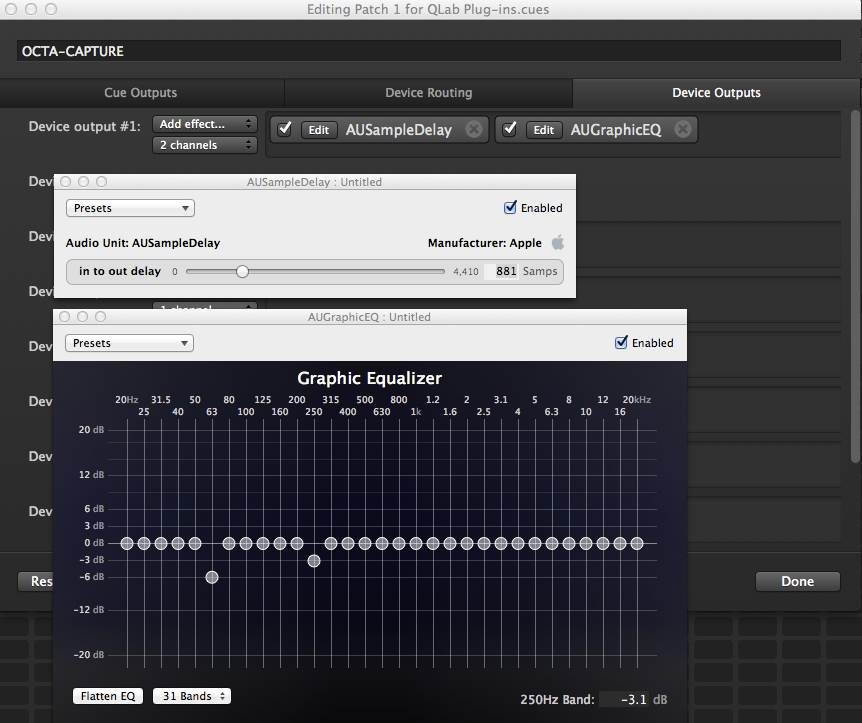
Insert an AUSampleDelay and an AUGraphicEQ plug-in to outputs 1+2. In our example, the sample delay is set to 882 samples which equates to 20ms at 44.1 kHz. If your sound system is operating at 48 kHz, set the delay to 960 samples in order to get 20ms of delay. 20ms is roughly the time it takes sound to travel 16 feet or a bit under 5 meters.
On the graphic EQ, a couple of troublesome frequencies are adjusted a little. Needless to say, your system is likely to have different troublesome frequencies.
Now, all audio that comes out of QLab via outputs 1 and 2 of the interface will be processed by these two plug-ins. It’s important to understand that this processing is actually considerably upstream of the actual physical device outputs. You’ll still need to set this up separately for Audio cues and Mic cues (which could be an advantage if you want different settings for each), and if you’re using other software on the same Mac, its output will not be altered by these effects.
Music in demo video and example workspace: “Protofunk” by Kevin MacLeod (incompetech.com), licensed under a Creative Commons Attribution 3.0 Unported License.
