Video cues allow you to play video and still images files with precise control over timing, opacity, scale, position on screen, and 3D rotation, and with a full suite of effects and blending tools. Video cues must have a file target, which is a video or image file on your computer, and must be assigned to a stage, which connects QLab to a video output destination such as a projector, screen, LED wall, or a virtual output device such as Syphon or NDI. When a Video cue has a still image as a target, it will run indefinitely (until they are stopped, of course) unless you give it a finite duration.
Unlike audio files, video files have two attributes that determine whether they are compatible with QLab. The first attribute is the codec used by the file. Codec is short for either "compressor/decompressor" or "code/decode" and it describes the way that video data is encoded in the file. The second attribute is the container format used by the file. The container is like an envelope which contains the video, its audio tracks, and metadata about the media.
The following codecs are compatible with QLab 5 for moving images:
While all those codecs technically work with the underlying video frameworks that power QLab 5, the following codecs give the best performance in QLab for moving images without transparency (listed in preferential order):
If you require better picture quality, you can also use ProRes 422 or ProRes 422 HQ. These codecs provide sharper images at the cost of greater processing power, and require exceptionally good video output equipment and viewing conditions to be worthwhile.
For moving images with transparency, we recommend one of the following codecs (listed in preferential order):
If you require better picture quality with transparency, you can use ProRes 4444 XQ. The same disclaimer applies; ProRes 4444 HQ provides superlative picture quality, requires dramatically more processing power, and is not worth it unless you have absolutely top-quality equipment and viewing conditions.
Videos with transparency, also called alpha channel support, must be rendered with premultiplied alpha to work properly in QLab. Premultiplying alpha is a rendering option in all video editing and compositing software, and is what allows partially transparent areas to accurately composite within QLab.
We strongly recommend against using Adobe Media Encoder, because it does not reliably produce files that play nicely with QLab. If you edit in Adobe Premiere or After Effects, use the built-in export tools from those programs. In After Effects, the composition's background color must be set to black for premultiplied alpha output to look correct.
Apple's Compressor is the best tool for transcoding pre-existing videos.
The following codecs generally work well, but perform especially poorly when sped up, slowed down, or when scrubbing forward or back:
All other compatible video formats are not recommended, even though they may work, or appear to work, with QLab 5.
The following containers are recommended for use with QLab 5 for moving images:
Other container formats may work, but are not recommended because they are more likely to contain incompatible codecs or other data.
Most still image formats work with QLab 5, but we recommend PNG and JPG files. QLab 5 does not support PSD or PDF formats.
When a Video cue is selected, the inspector shows the Basics tab and Triggers tab, used by all cues, as well as the following tabs:
The I/O tab lets you assign a target video file and video output, and view details about them as well.
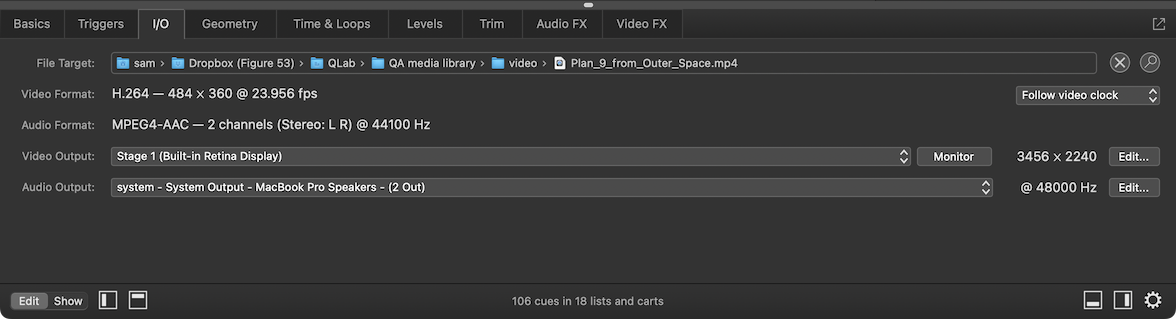
File Target. If a target video file is assigned, this field shows the path to that file. You can double-click on the field to select a file target, or you can drag and drop a file in from the Finder.
Clicking the button removes the file target from the cue (though it does not delete the file itself, of course.)
Clicking the button reveals the file target in the Finder.
These controls are also visible in the Basics tab; you can use either one or both interchangeably.
Video Format displays the type of codec, pixel dimensions, and frame rate of the video in the file target.
Clock. This pop-up menu allows you to select the clock that will be used to set the timing for the playback of this cue.
Audio Format displays the codec, number of channels, and sample rate of the audio encoded within the video file. If you are using a video file with multiple video tracks, a pop-up menu appears here allowing you to select which audio track you'd like to use.

Each item in the menu displays the codec, number of channels, channel layout2, and sample rate of the audio encoded in each track.
Video Output. This pop-up menu allows you to assign the cue to a stage, which is QLab's video output mechanism. Every Video cue must be assigned to exactly one stage, and the way that the stage is configured defines how the imagery will ultimately be displayed. You can learn more about stages from the Video Output section of this manual. Clicking on the menu allows you to select one of the stages already configured in the workspace, or (unpatched) if you want to ensure that the cue does not play when started. You can also choose Open Video Settings to edit stage list... to quickly get to Workspace Settings → Video → Video Outputs, or choose New stage with video route to quickly generate a new stage and select it for use.
The button opens the monitor window for the selected stage.
To the right of that button, QLab displays the pixel dimensions of the selected stage. QLab always displays the actual pixel dimensions, not the effective point size, so for Retina displays, these numbers may be considerably higher than the resolution reported in System Preferences.
To the right of that, the button opens the video stage editor for the currently selected stage.
Audio Output. This pop-up menu allows you to select an audio output patch for the cue to use. Clicking on the menu allows you to select one of the audio output patches already configured in the workspace, or (unpatched) if you want to ensure that the cue does not play when started. You can also choose Open Audio Settings to edit patch list... to quickly get to Workspace Settings → Audio → Audio Outputs, or choose New patch with audio device to quickly generate a new audio output patch and select it for use.
To the right of that menu, QLab displays the sample rate of the audio device associated with the audio output patch.
To the right of that, the button opens the audio output patch editor for the currently selected audio output patch.
The Geometry tab lets you adjust the basic visible parameters of the cue. There are two forms the Geometry tab can take, depending upon the mode of the cue.
If the Mode pop-up menu is set to Fill Stage, the Geometry tab looks like this. Cues set to Fill Stage can be displayed in one of three styles, which can be set using the Style pop-up menu just to the right and below the Mode pop-up menu. The three styles are Fit, Fill, and Stretch.

A cue using the Fit style will be symmetrically scaled as large as possible to display the entire image without changing the aspect ratio of the cue's file target. If the aspect ratio of the cue's file target is different than the aspect ratio of the stage, there will be blank space to the sides or above and below. QLab does not fill this space with black pixels; if there is a cue on a lower layer that truly fills the stage, it will be seen in these empty spaces.

A cue using the Fill style will be symmetrically scaled to fill every pixel of the stage without changing the aspect ratio of the cue's file target. If the aspect ratio of the cue's file target is different than the aspect ratio of the stage, either the sides or the top and bottom of the image will fall outside the bounds of the stage, and will therefore not be displayed.

A cue using the Stretch style will be asymmetrically scaled to fill every pixel of the stage. If the aspect ratio of the cue's file target is different than the aspect ratio of the stage, the image will be stretched either horizontally or vertically.
Opacity sets the opacity of the cue on a scale of 0%, meaning fully transparent, to 100%, meaning fully opaque. Transparency in the target media is not altered by this control; if a cue's target has transparent pixels, they remain transparent when the cue is set to 100% opacity. The button resets the cue's opacity to its default value.
The Smooth checkbox determines whether the cue will be drawn using smooth anti-aliased scaling or nearest-neighbor scaling. Leaving the box checked will smooth out the jagged edges that can appear when images are scaled up. Unchecking the box will keep the sharp edges, which can sometimes be preferable depending upon your aesthetic goals.
Layer sets the stacking order of the cue relative to other cues assigned to the same stage.
QLab has 1001 layers: top is the layer closest to the viewer. Layer 999 is directly beneath, then layers continue downwards to 1, then bottom. Any cues assigned to the top layer will play on top of all other currently running cues. Any cues assigned to the bottom layer will play beneath all other currently running cues. Cues assigned to the same layer as each other will stack in the order in which they are started. So, for example, if you have three cues assigned to layer 10, whichever cue is started last will appear on top of the other two, but any cue assigned to layer 11 (or higher) will appear on top of all three cues on layer 10, regardless of the order in which those cues are started. Similarly, any cue on layer 9 (or lower) will appear beneath all three of the cues on layer 10.

If the Mode pop-up menu is set to Custom, the Geometry tab looks like this. Cues display at their natural pixel dimensions, and several more controls appear to allow you to customize the appearance of the cue. To the right, a thumbnail of the cue appears within a blue box. The blue box represents the stage that the cue is assigned to.
Crop. The four text fields of the crop parameter allow you to trim or shutter in from the four sides of the cue. Each text field represents one edge (top, bottom, left, right), and the number is the number of pixels to crop off counting from the edge towards the center of the cue. The button resets the cue's crop to its default value. Note: the crop parameter is not fade-able. If you want to fade the crop of a cue, use the Shutter or Window video effect instead.
Translation is the position of the cue on the stage, measured in pixels relative to the center of the surface. A translation of (0, 0) is centered, negative values are down and to the left, and positive values are up and to the right. You can also adjust the translation by clicking and dragging the thumbnail of the cue. The button resets the cue's translation to its default value.
Scale is the size of the cue relative to its natural pixel dimensions, expressed as a multiplier. 1.0 represents the natural size, 0.5 is half the natural size, 2.0 is double, and so on. If the lock icon between the scale fields is closed, the aspect ratio of the video will be preserved while scaling. You can click the lock to unlock it and adjust the height and width independently. You can also adjust scale by vertically scrolling on the thumbnail of the cue using your mouse, trackpad, or other pointing device. The button resets the cue's scale to its default value.
Rotation is the attitude of the cue in a virtual 3D space. You can click and drag on the , , and buttons to manipulate the cue's rotation around the desired axis, or click on each and type values into the text field that appears. The button resets the cue's rotation to its default value.
A Word About Quaternions: QLab uses quaternion math to handle rotation of Video cues in 3D space. The advantage to quaternions is that when fading a cue from one position to another, QLab will always produce smooth, natural motion. The tradeoff is that there is no useful way to numerically display the current rotational position of a cue. Therefore, when you adjust the rotation of a cue, you'll see numbers in the pop-up which represent the degrees of single-axis rotation since you started this particular adjustment, not any sort of absolute measure.
Anchor is the point around which a Video cue rotates, translates, and scales. The default anchor point is (0, 0), which is the center of the cue. Adjusting the anchor will change the way the cue moves when you adjust other geometry parameters. You can also adjust the anchor by clicking and dragging the light blue cross in the thumbnail of the cue. The button resets the cue's anchor to its default value.
The Time & Loops tab behaves the same as the Time & Loops tab for Audio cues, with one small but important additional control.
Underneath the waveform view, towards the right side of the window, is a checkbox labeled Hold at end. If this box is checked, when the Video cue plays and reaches its final frame, that final frame will remain visible and the cue will remain active until stopped.
If the Hold at end box is not checked, the cue will stop itself after it reaches its last frame.
The Levels tab only appears if the file target of the cue contains an audio track. If so, this tab behaves the same as the Levels tab for Audio cues.
If the target video file contains channel layout metadata, that metadata will be used to name the input channels in the mixer. For example, the video file targeted by the cue in the screen shot below has a 5.1 surround track, with channels for left, right, center, low frequency element (subwoofer), left surround, and right surround.
These names can be edited using the button. Editing the names will only change the names inside QLab; the metadata in the video file will not be changed.

The Objects tab only appears if the file target of the cue contains an audio track. If so, this tab behaves the same as the Objects tab for Audio cues.
The Trim tab only appears if the file target of the cue contains an audio track. If so, this tab behaves the same as the Trim tab for Audio cues.
The Audio FX tab only appears if the file target of the cue contains an audio track. If so, this tab behaves the same as the Audio FX tab for Audio cues.
The Video FX tab lets you set the blend mode of the cue and add live video effects to the cue.
The blend mode of a Video cue, selected using the Blend Mode pop-up menu, dictates the way that the cue interacts and combines with other Video cues that occupy the same space on the stage. Blend modes are best understood as a per-pixel mathematical operation which combines the values of each channel of a given pixel in the "foreground", which is a cue on a higher layer, with the values from the pixel in the same position in the "background", or a cue on a lower layer. In this context, channel values are represented on a scale from 0.0 to 1.0 in which 0.0 is off, and 1.0 is full brightness. A pure red pixel would be represented as (1.0, 0.0, 0,0). A pure white pixel would be (1.0, 1.0, 1.0).
The Blend Mode page of this manual contains descriptions and reference videos demonstrating the effects of the various blend modes available in QLab 5. The Blend Mode Demo tutorial is a downloadable, hands-on copy of the workspace which was used to create those reference videos.
The Add video effect... pop-up menu allows you to add a video effect to the cue. QLab 5 supports multiple video effects on a single cue, and effects are rendered in the order in which they appear in the list. Video effects are "live", meaning that they are rendered on the spot, in realtime.
Please note that video effects can be extremely processor-intensive and can cause visible performance problems, sometimes even on powerful Macs. Please take time to experiment with video effects and learn their idiosyncrasies before using them in a production environment. That said, the underpinnings of the QLab 5 video system affords very good video effects performance, particularly on Apple Silicon-based Macs.
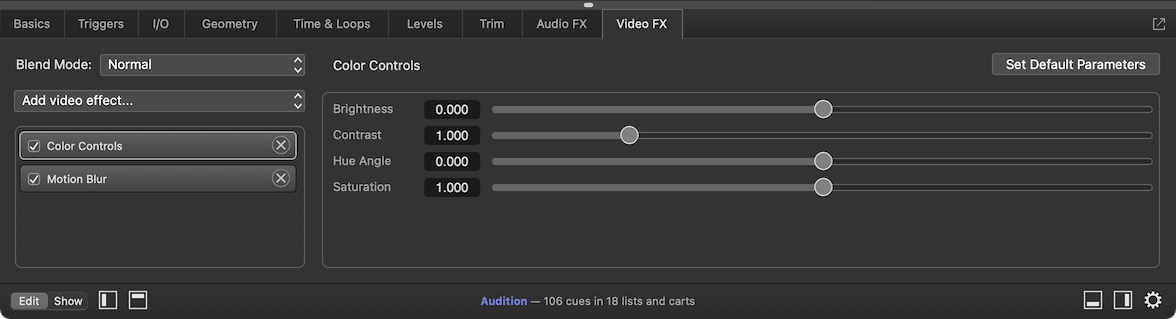
When a video effect is selected, it is highlighted with a light grey border and its controls become visible on the right side of the inspector. Each video effect has its own parameters which can be adjusted either by typing into their text fields or clicking and dragging their sliders. Some video effect parameters use color swatch selectors which require a click to start editing.
Clicking will reset the currently visible video effect to its default state. Other video effects will not be altered.
To remove a video effect from a cue, click the button next to its name.
A full list of available video effects and their parameters can be found in the Parameter Reference section of this manual.
Video cues can become broken for the following reasons:
The cue has no target, and Video cues require a video or image file as a target. Select an appropriate file as the target of this cue to clear this warning.
The cue had a file target assigned, but that file is missing. Perhaps the file was on a removable drive or network drive which is not currently connected. Re-locate the file, or assign a new file target to clear this warning.
The cue's file target is in the Trash, and files in the Trash cannot be used. Either move the file target out of the Trash, or assign a new file target to clear this warning.
This is a bit of a bizarre error that is technically possible, but very unusual. If the file target lacks read permissions, it cannot be used. Since it cannot be used, though, it probably could not have been selected as a target in the first place. Despite this seeming paradox, it still is technically possible that this could happen, and so QLab tries to handle it. Fix the file target's permissions, or assign a new file target to clear this warning.
This is error is exceedingly unlikely, since QLab prevents you from choosing a file target which isn't compatible. Still, it is technically possible. Choose a new file target with a compatible codec to clear this warning.
The cue's file target has a width or height greater than 16,000 pixels. Choose a file target with both a width and height of 16,000 pixels or smaller to clear this warning.
The cue has no video output stage assigned. Assign the cue to a stage to clear this warning.
The cue is assigned to a stage, but the stage is incompletely configured. Visit the Video Stage Editor to complete the configuration of the stage and clear this warning.
The file target has audio, but no audio output patch is assigned to the cue. Assign an audio output patch to clear this warning.
The cue has an audio output patch assigned, but something is wrong with it. The audio output patch will have warnings of its own, listed in the Warnings tab of the Workspace Status window, which you can use to figure out what's wrong with it. Either fix the audio output patch or select a new audio output patch to clear this warning.
The cue is assigned to an audio output patch which uses an NDI device, but that NDI device has no audio channels. To add audio channels to the NDI device, go to Workspace Settings → Video → Output Devices, click the button next to the NDI device you're using, and adjust the number of audio channels included in the NDI output. Alternately, assign a different audio output patch.
The cue has an audio effect assigned, but that AudioUnit is not installed. Either remove the audio effect from the cue or install the missing AudioUnit to clear this warning.
The cue is sliced, and all slices have a play count of 0. This means that no part of the file target will be played, which means the cue effectively does nothing. Either set at least one slice to a play count greater than zero, or delete this cue that does nothing anyway to clear this warning.
A video license is required to use custom geometry, blend modes, video effects, audio effects, or Timecode triggers. Install a video license or adjust the cue to avoid using licensed features to clear this warning.
When a Video cue is assigned to a stage that goes to only one output, QLab will use the clock associated with that output. When a Video cue is assigned to a stage that goes to more than one output, QLab follows a slightly complex heuristic: if one output has a higher refresh rate than all the others, QLab will use that output's clock. If two or more outputs are tied for highest refresh rate, QLab will prioritize clocks belonging to physical outputs (screens and projectors) over virtual outputs (NDI and Syphon.) If two or more outputs are still tied for best candidate, QLab picks one effectively at random. ↩
The channel layout is provided by metadata within the video file, and may not always be available. ↩