- The GO Button
- Cue Sequences
- Cue Carts
- How To Use A Mac
- Moving Workspaces
- Trigger QLab With Timecode
- Live-stream With QLab
- Step 1: Download and install Open Broadcaster Software
- Step 2: Download and install Soundflower
- Step 3: Set up QLab video output
- Step 4: Set up QLab audio output
- Step 5: Set up OBS video input
- Step 6: Set up OBS audio input
- Step 7: OBS master settings
- Step 8: Lay out your outputs
- Step 9: The camera
- Step 10: Go live
- Conclusion
- QLab Zoom Guide
- Sound Check
- Sam's Toolbox
- Basic Networking
- Intro to Audio Cues
- Intro to Fading Audio
- Rate & Pitch
- Crossfading
- Fading Pre-show Music
- Offline Audio Interfaces
- Intro to Video Cues
- Intro to Text Cues
- Intro to Fading Video
- Fading In Several Videos
- Replacing Projectors
- Setting Up For Lighting
- Adding Lights and Making Cues
- Intro to Light Cues
- Intro to Pull From Cue
- Intro to Network Cues
- Intro to Control Cues
- Start, Stop, and Pause Cues
- Intro to Devamp Cues
How to Live-stream With QLab
Live-streaming theater is a bit of a hot topic for many people and many organizations. Producers, creators, and labor unions have all struggled with when, how, and how much to incorporate streaming technology into theatrical performances. Figure 53 does not condone live-streaming of any event without the express permission of all relevant parties, and simultaneously we encourage all relevant parties to learn more about live-streaming to see if it’s a good tool for them.
Live-streaming a theatrical event can be as simple as pointing a webcam at the stage and starting your show, or it can be a sophisticated broadcast event with multiple cameras and sources of video and audio. Depending on the nature of the production and the level of detail in the sound and projection design, it can be desirable to route the output of QLab directly to the live-stream for the highest fidelity. This document will walk you through the steps needed to achieve that, and point out some software, devices, and services which make it possible.
The methods and tools used here were chosen because they’re known to work, are free or as inexpensive as possible, and are relatively straightforward. There is no partnership between Figure 53 and any of these tools or services.
There are a lot of little steps to this process, but once the fundamental setup is complete, it’s very easy to operate. As always, feel free to contact support@figure53.com anytime if you have any questions, comments, if you want help, or if you just want to talk something out.
Before you begin, you need to have an account set up with a service that allows live streaming, such as YouTube, Vimeo, Twitch, or one of a zillion other services. You’ll need to have your stream key ready to make full use of this tutorial, but you can do everything except actually broadcast live without the key, so there’s no need to go get that set up first.
Please note that to live-stream with YouTube, your account needs to be verified. Verification takes 24 hours, so if you want to stream tomorrow, verify your account today.
Step 1: Download and install Open Broadcaster Software
Open Broadcaster Software Studio, or OBS Studio, is a free and open source program which takes audio and video from various sources and transmits it to online streaming video services. This will serve as our “control room.”
Download OBS Studio here and install it by opening the downloaded disk image and dragging the OBS app into your Applications folder.
For the purposes of this project, we recommend running OBS Studio on the same Mac that runs QLab. If you have separate Macs running QLab for audio and video, use the video Mac for OBS Studio. It’s much easier to pipe audio in from a separate Mac than video.
When you first launch OBS Studio, it will offer to walk you through the setup process, wizard-style. You can certainly do that if you like, although after going through it once and then trying again manually, we found that using the wizard didn’t save much time or energy. Either way, the setup looks a little complex but is actually quite simple.
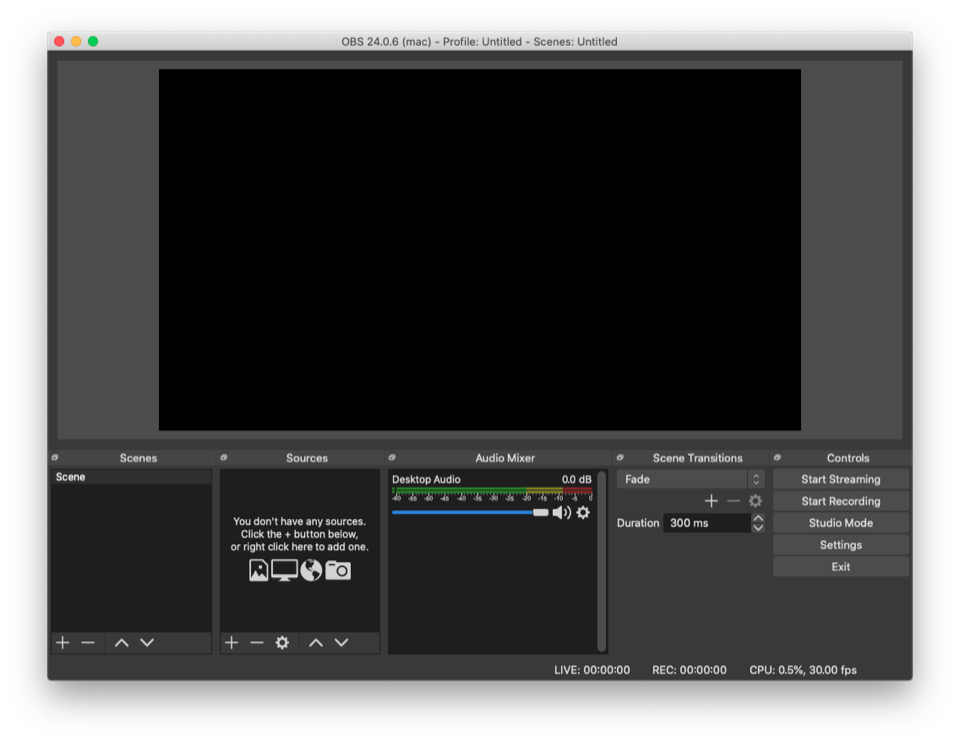
Here’s the main window of OBS Studio:
The large black rectangle taking up most of the window is called the canvas and it shows the video coming into OBS and allows you to arrange video inputs physically. It’s rather like QLab’s video surface editor.
Across the bottom of the window are five docked palettes: Scenes, Sources, Audio Mixer, Scene Transitions, and Controls.
- Scenes are essentially collections of settings which can be recalled at any time, much like scenes on an audio console. We won’t spend any time with scenes in this document.
- Sources are pathways for getting signals into OBS. We’ll set up one source for each video surface, one source for audio, etc. in just a moment.
- Audio Mixer is where you can view and adjust the mix between the various audio sources in your OBS setup. One source, “Desktop Audio,” is present in the mixer even though it’s not on the Sources list.
- Scene Transitions manage how OBS moves between scenes. By default there are options to cut, which is a film and broadcast term for a zero-count fade, and to fade which means what you think it means. Since this document does not focus on using scenes, we won’t be spending time on transitions either.
- Controls contains buttons for starting and stopping the stream, entering studio mode (which we’re not going to use here), accessing settings, and exiting OBS. This last button is worth worrying about a little: click it, and OBS quits. So… don’t click it during your show.
One word of warning; if your Mac goes to sleep while OBS is running, OBS will crash when the Mac wakes up.
Now that we’ve met OBS Studio, we need to take a detour and set up another piece of software that will make it possible to route audio from QLab to OBS Studio.
Step 2: Download and install Soundflower
Skip this step if you’re not planning to stream audio out of QLab, or if you already have Soundflower installed.
Soundflower is a free program which creates a virtual audio interface inside your Mac that can be used to route audio from one program to another. It was created long ago, presumably by someone who had run a cable from the headphone jack of their Mac to the microphone jack and felt that was silly.
It’s important to understand this: installing Soundflower requires you to momentarily bypass some of the safeguards on your Mac which protect against malware. Be assured that as long as you download Soundflower from the following link, and follow the directions there, nothing bad will happen and you are not opening the door to bad things happening in the future. This is not risky, but macOS’s warnings will make it seem risky. Fear not.
Here is the link to download Soundflower. You’ll see some directions labeled “PLEASE READ!” and you should read those directions. Underneath them is a link which will be named Soundflower-(some version number).dmg. Click that link to download the disk image.
Once downloaded, open the disk image and right-click on the Soundflower.pkg installer ad choose “Open.” This is not the normal way to open items on a Mac; it’s true.
If you’re using macOS Mojave or later, you’ll get a warning about malware; do not worry about this! Click “Open” and refer to the bravery statement above if you need encouragement. We’re with you! This is going to work!
Do the installation. When it’s done, nothing will seem different. This is OK. You’ve done well.
Step 3: Set up QLab video output
Skip this step if you’re not planning to stream video out of QLab.
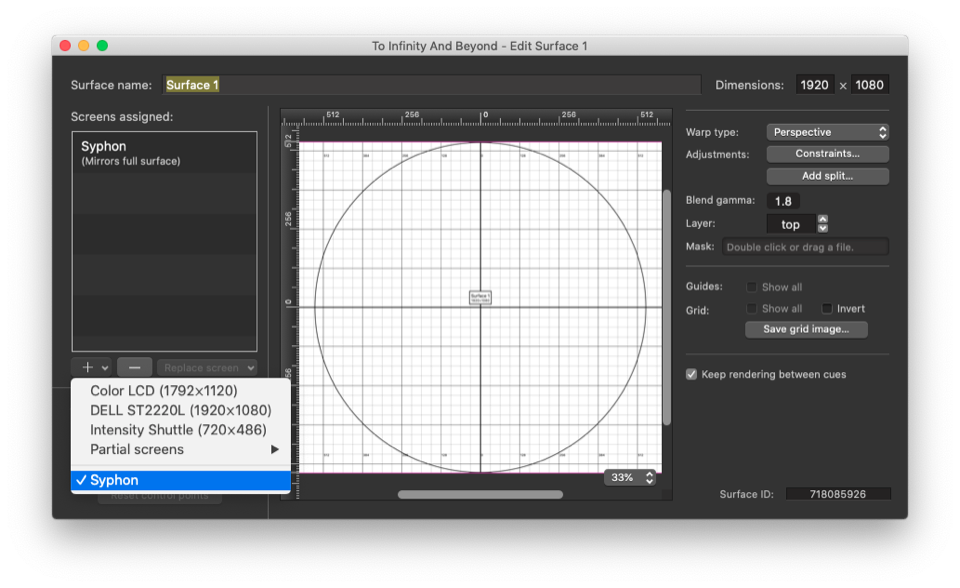
Launch QLab and open your workspace. Then, go to Workspace Settings → Video and click on the Edit… button next to the first video surface that you want to stream. In the video surface editor, click on the + button on the left side of the window, and select “Syphon” from the bottom of the list. This will tell QLab to publish the entire surface as a Syphon video stream which OBS will be able to receive.
Repeat this step for each video surface that you want to stream.
Step 4: Set up QLab audio output
Skip this step if you’re not planning to stream audio out of QLab.
Most of the time, QLab uses either the built-in audio output or an external audio interface to send sound out to the speakers in your theater. What we need to do here is additionally route the audio to OBS. We’ll achieve this through yet another complex-but-not-very-difficult bit of wizardry called aggregate audio devices. In short, an aggregate audio device glues two audio devices together and makes them seem like one big one.
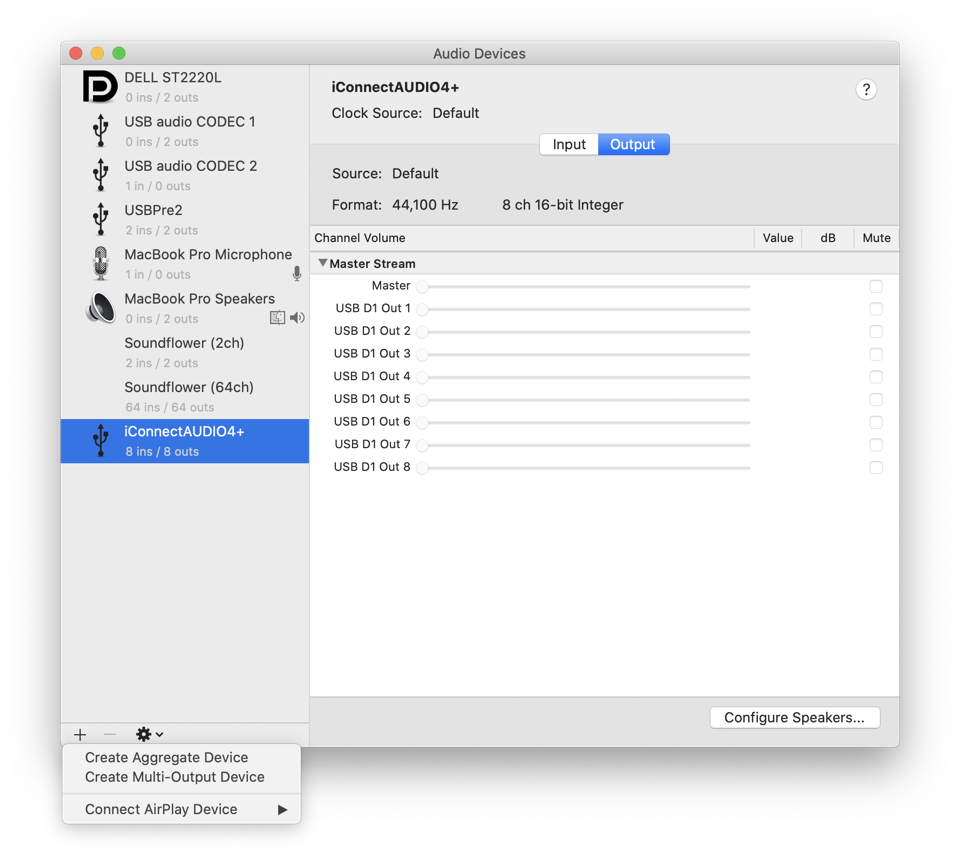
To set up an aggregate audio device, first quit QLab and make sure your audio interface (if you use one) is connected and powered up, then open Audio MIDI Setup which can be found in the /Applications/Utilities folder.
Once there, click on the + button in the lower left corner and select Create Aggregate Device.
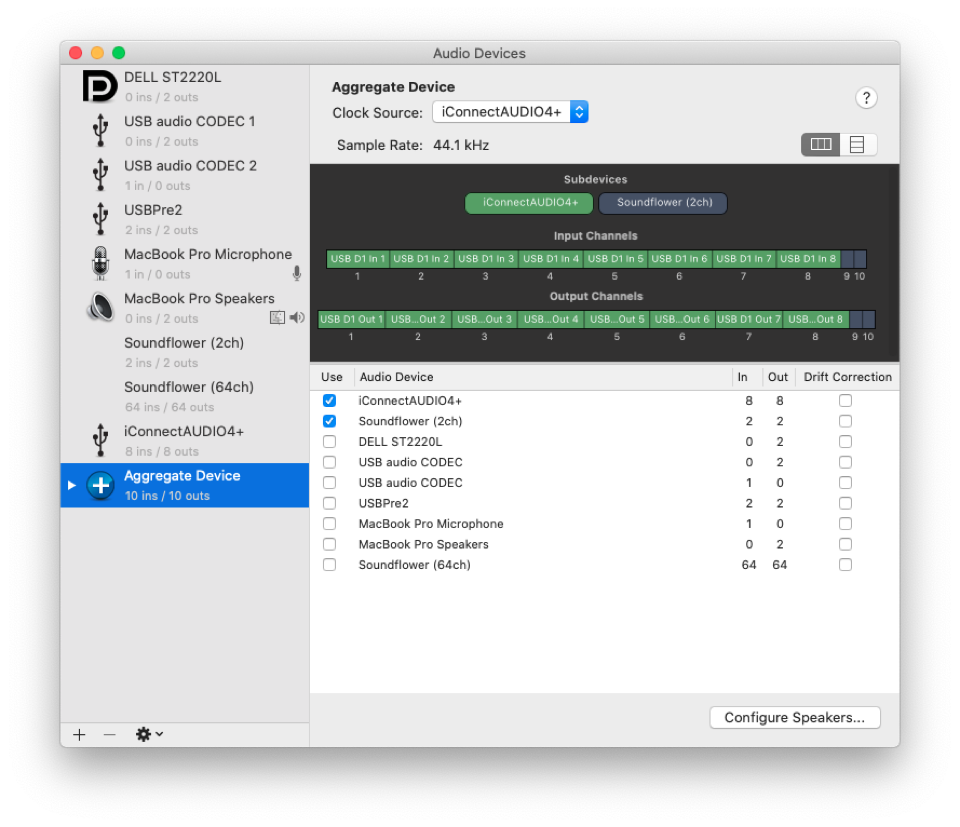
Double-click on the name of the aggregate device in the list to rename it, or leave it alone. Then, on the right side, check the box next to the name of your audio interface. In the screen shots here, the audio interface being used is an iConnectivity iConnectAUDIO4+ which has eight outputs; yours might have more outputs or fewer.
After you check the box for your interface, check the box for “Soundflower (2ch).” It is in fact quite important that you check the box for the interface first, and then check the box for Soundflower (2ch) second.
Finally, if “Drift Correction” box is checked for any device, uncheck it. The short explanation for this is that it prevents clicks and pops at the expense of a looser sync time between the devices. Since one of the devices will be streaming over the internet instead of being audible inside the theater, the looser sync will be unnoticeable.
Once everything is set up, it should look something like this:
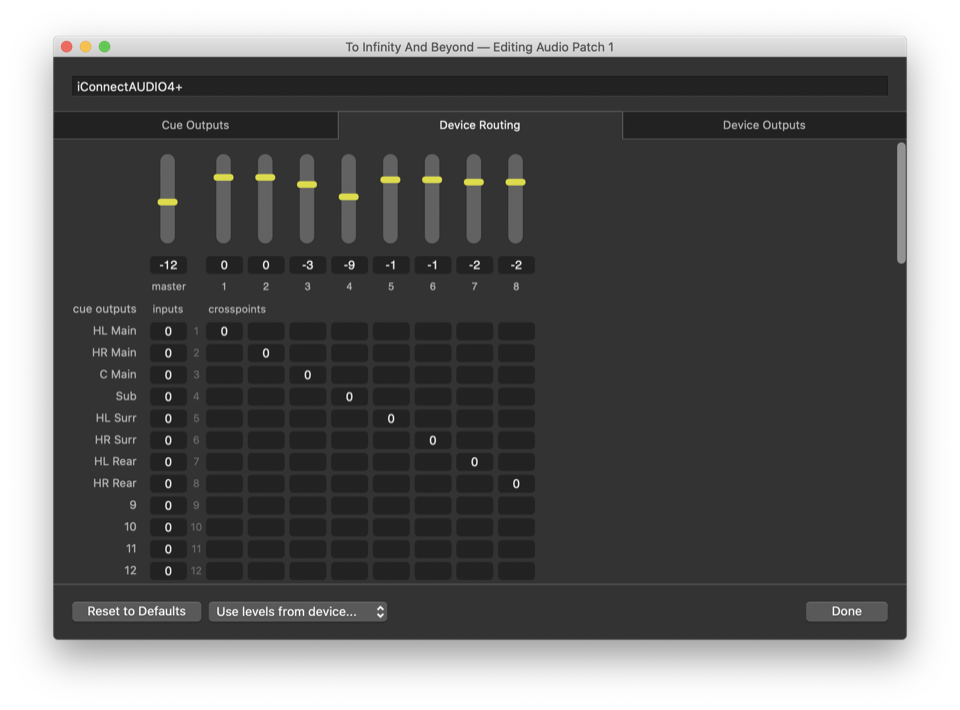
You can now quit Audio MIDI Setup, relaunch QLab, and reopen your workspace. There, go to Workspace Settings → Audio. Most likely, you’ll be using Audio Patch 1 for audio output from your cues. If you click the Edit button next to the audio patch, and then click the Device Routing tab, you’ll see something like this:
Again, your setup will almost certainly be different, but the basic idea is that there are some number of cue outputs, which are the rows in this matrix, routed to some number of device outputs, which are the columns in this matrix. The example shows a fairly typical eight-channel setup with some level adjustments on the device outputs to balance the desired relative levels of the various outputs.
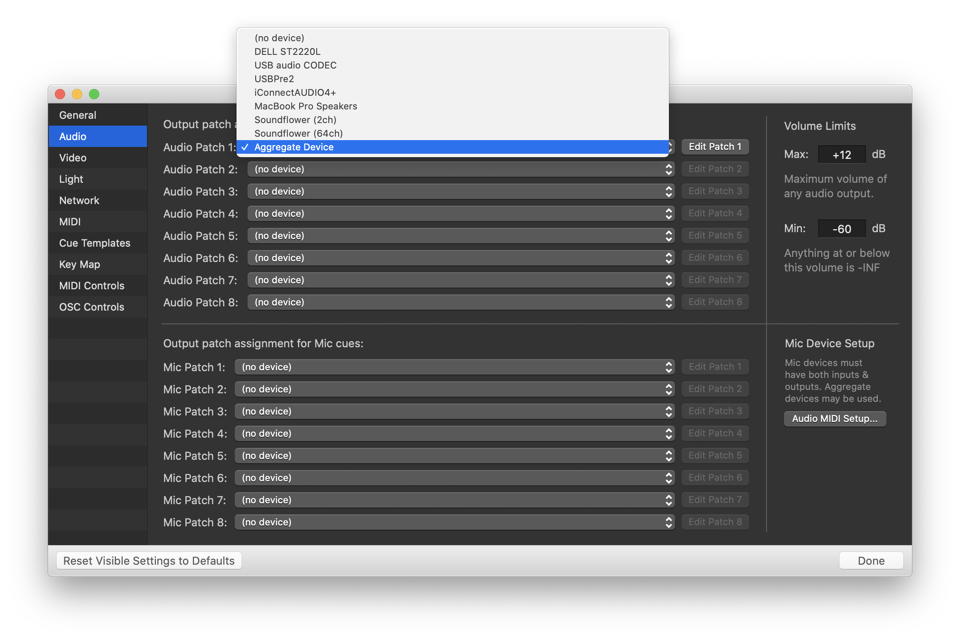
Close this window, if you’ve opened it, and then change the audio patch from using your audio device to using the new aggregate audio device:
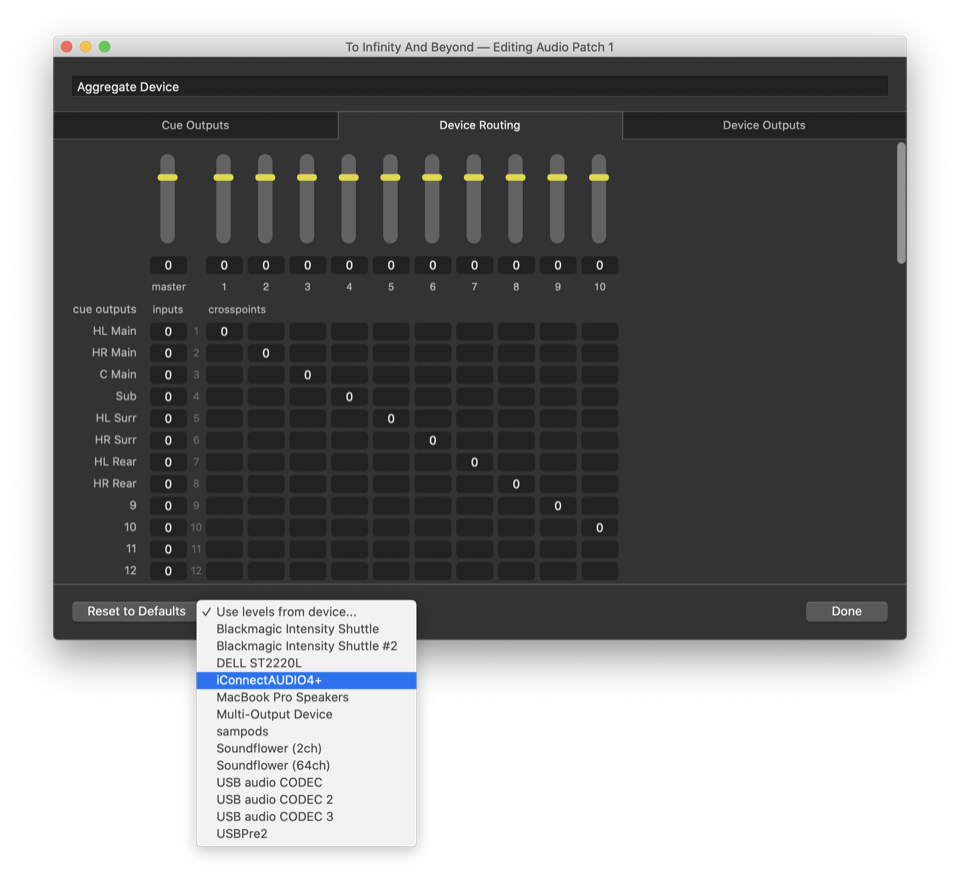
Now we need to teach QLab that this new device is really basically just like the old device. To do this, click the Edit button and select the Device Routing tab. There, click on the Use levels from device… dropdown menu and choose your audio device from the list.
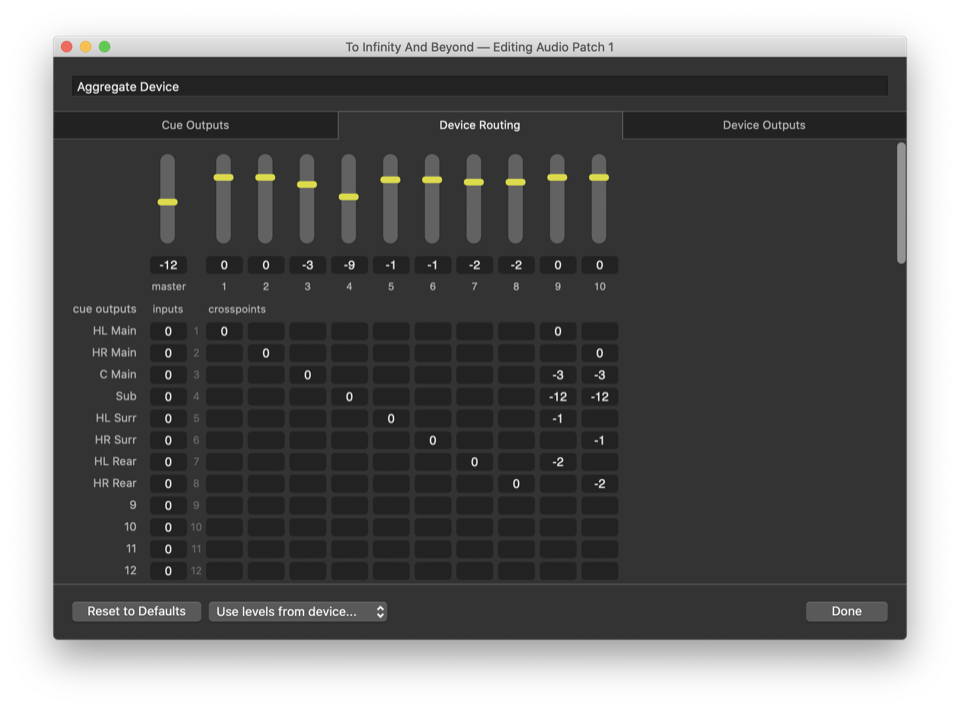
This will copy the routing of cue outputs to device outputs that you had set up for your audio interface. Next comes the clever part: you’ll notice that when the aggregate device is being used, the routing matrix has two additional columns. These two columns represent the two channels of output to Soundflower. So now we need to route each cue output to one or both of these columns in addition to wherever they were going before. In effect, you’re creating a stereo mixdown of your whole QLab audio output situation. It will look something like this:
It may take some tinkering to get the balance just the way you like it, but with that aside, you are now done with the hardest part.
Step 5: Set up OBS video input
Skip this step if you’re not planning to stream video out of QLab.
Return to OBS and turn your attention to the Sources palette. When you click the + button, you’ll get a pop-up menu of all the types of inputs that OBS can accept. Let’s start with video. We’ll create one OBS input for each video surface in your QLab workspace.
Click the + button and choose Syphon Client from the list. A sheet will appear with “Create new” selected. Give the input a name which corresponds to the name of the video surface in QLab. For example, if your video surface is called “Surface 1” or “Upstage Scrim”, you could call the client “Surface 1 input” or “OBS Upstage Scrim Input.”
When you click OK, the input is created, and a new window opens to allow you to set up the properties for the input.
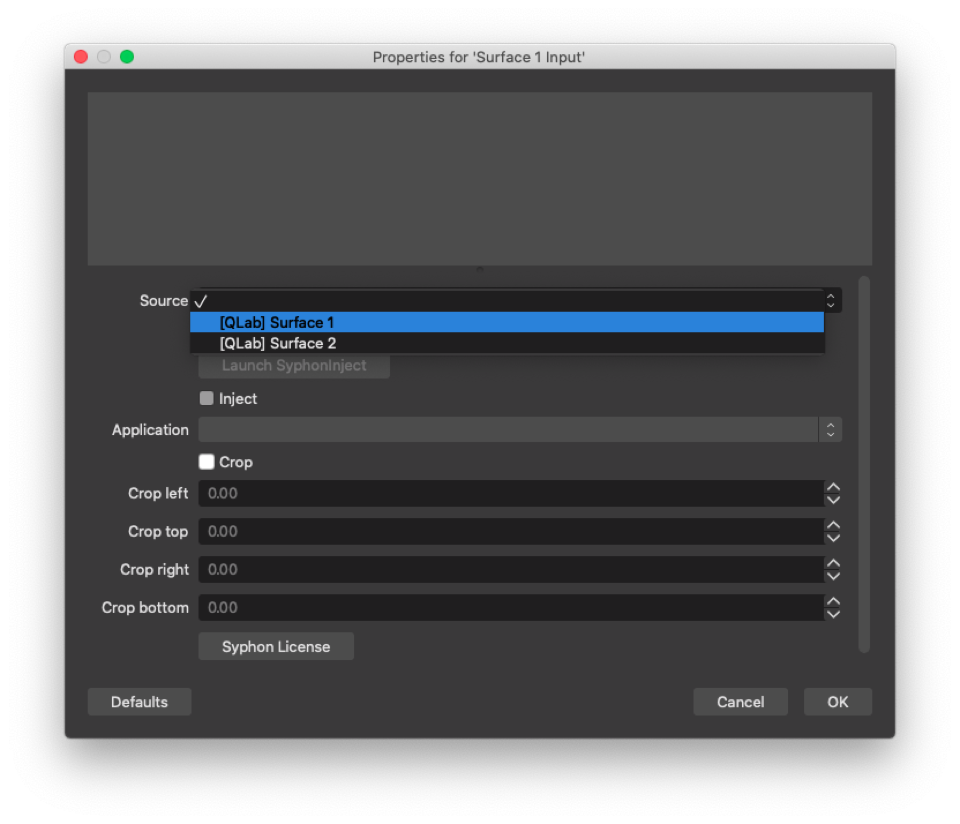
There are a lot of controls here, but the only one that matters to us is the “Source” dropdown menu. When you click that, you’ll see a list containing every video surface that QLab is publishing to Syphon. If you don’t see what you’re expecting, make sure your workspace is open and then double check the settings from step 3.
If you are using multiple surfaces which overlap on top of each other and have cues with transparency, check the box labeled “Allow Transparency.”
Assuming you do see what you’re expecting, choose the video surface that corresponds to the name you set for this input.
Repeat this step for each video surface that you want to stream.
Step 6: Set up OBS audio input
Skip this step if you’re not planning to stream audio out of QLab.
Back at the Sources palette, click the + button again and this time choose Audio Input Capture from the list. A sheet will appear with “Create new” selected. Give the input a new like “Audio from QLab” or something similar, then click OK. A window will appear with only one decision to make. Click on the dropdown menu and choose Soundflower (2ch) then click OK at the bottom.
This means that OBS will listen to the audio coming down the pipe from Soundflower which is the audio we’re sending from QLab thanks to the aggregate audio device. It’s all starting to come together.
Step 7: OBS master settings
In OBS, click the Settings button in the lower right corner to bring up the main settings window. You can safely ignore most of the settings, or investigate to your own level of interest, but there are a few settings that are necessary:
- In Stream, choose the streaming service that you’re using and enter the stream key provided by your service. See below for some additional information about how to do this with YouTube.
- In Audio, set Desktop Audio to disabled.
- If you are using a room mic or a console mix to capture actors’ voices for the stream, and you’re feeding that audio into your audio interface, set Mic/Auxiliary Audio to your audio interface.
- In Video set Base Resolution and Output Resolution to 1920 x 1080. If you have a poor-to-middling internet connection, consider setting Output Resolution to 1280 x 720 instead.
Once you’re finished here, click OK in the lower right corner to save the settings and close the window.
Step 8: Lay out your outputs
Skip this step if you have zero or only one video surface.
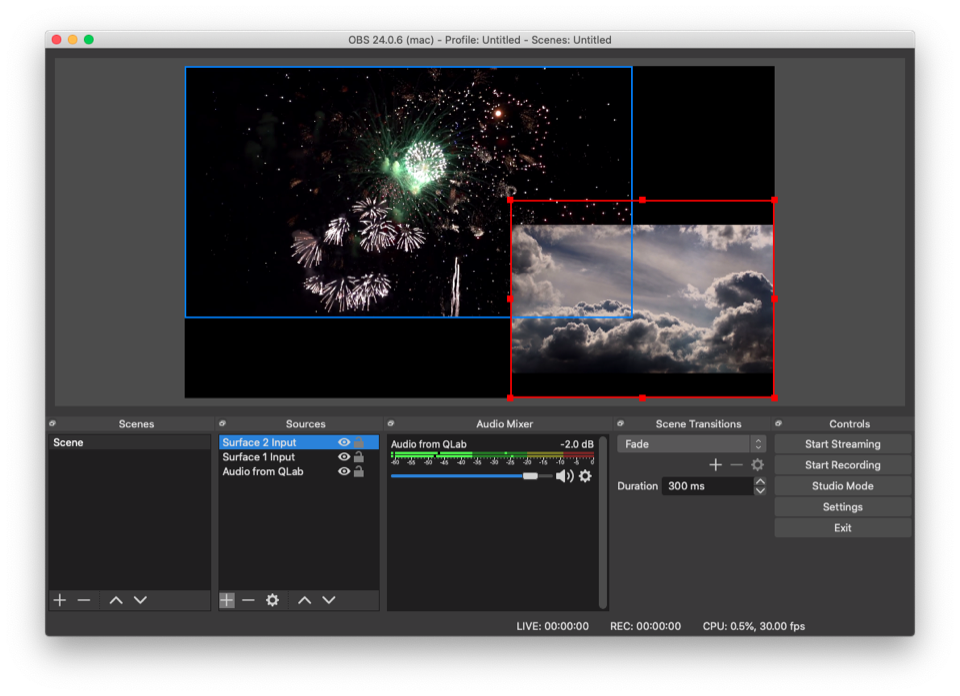
If you’re using more than one video surface, you’ll need to create a physical layout that works for your show. To do that, select one of your video inputs from the Sources list, and then use the mouse to move and scale that input on the canvas. Here’s one way to lay out two video surfaces of different dimensions:
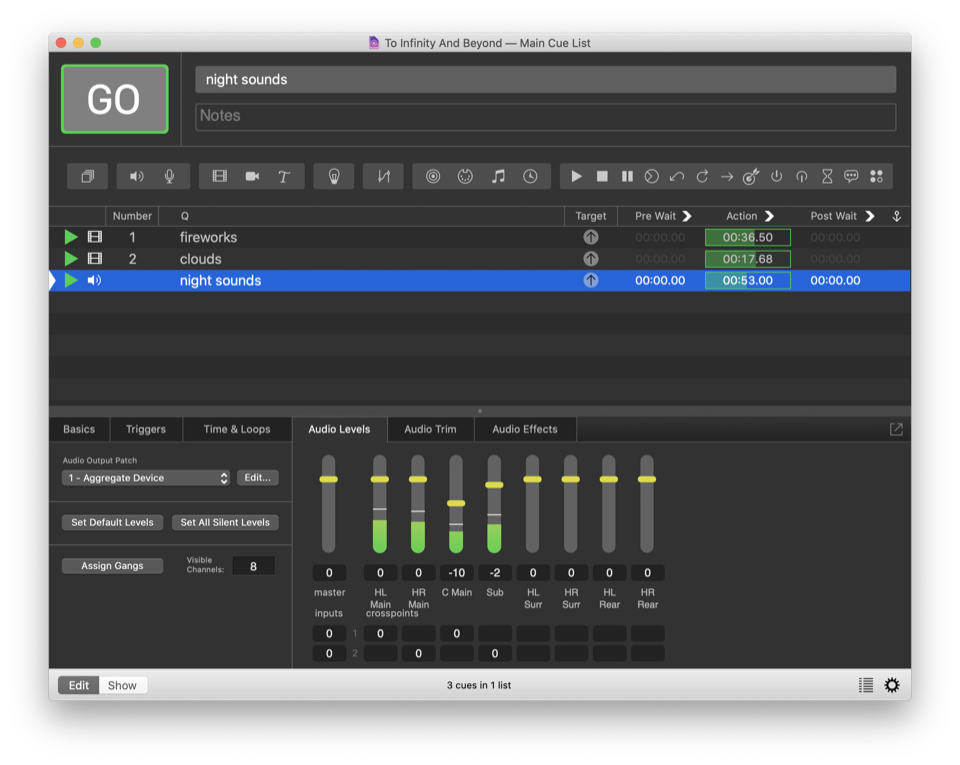
And here’s what QLab looks like at that same moment:
Note that the order of items in the Sources list corresponds to their stacking order on the canvas: the item at the top of the list is on top, the item at the bottom of the list is on bottom, etc.
Step 9: The camera
In some ways, the most important part of a live stream has almost nothing to do with anything discussed above; it’s the camera that shows the performance. The various options for this are far too many to enumerate here, but we can summarize thusly: a high-quality camera feeding a high-quality video capture device will look best, and a mediocre camera with a mediocre video capture device is still much better than no camera at all.
Whatever your devices, the process to add them to the live-stream should be familiar by now: connect the device, click the + button in the Sources palette in OBS, and choose the appropriate item from the list; either “Blackmagic Device” if you’re using a Blackmagic Design device, or “Video Capture Device” if you’re using something else, like the built-in FaceTime camera on your laptop:
Step 10: Go live
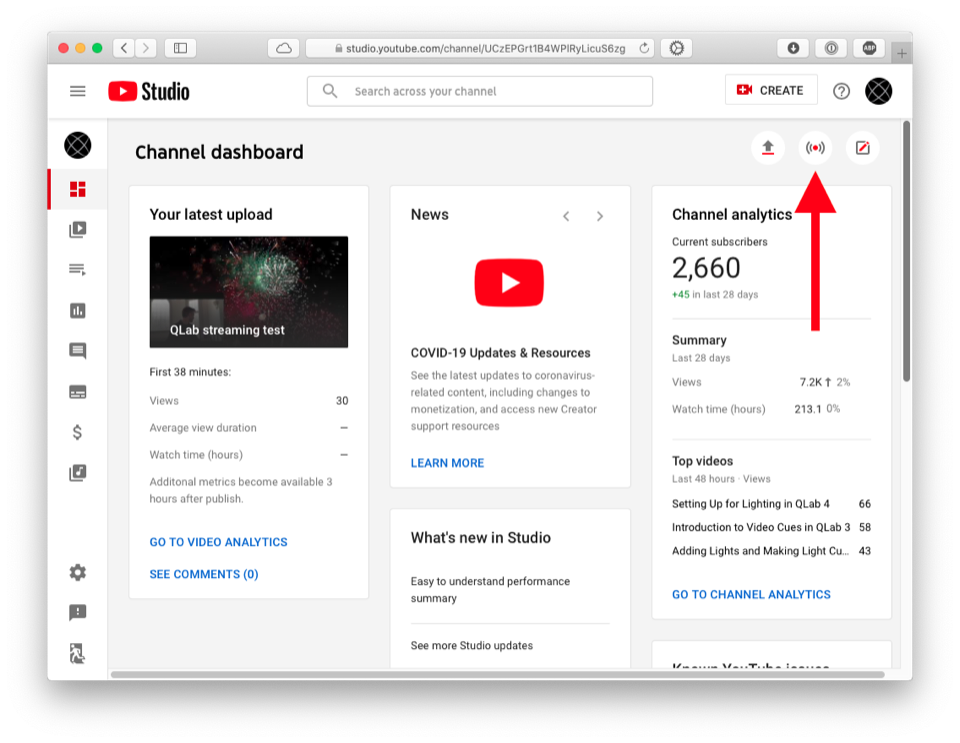
If you’re using YouTube, go to studio.youtube.com and click the Go live button. Don’t worry; it doesn’t immediately start broadcasting.
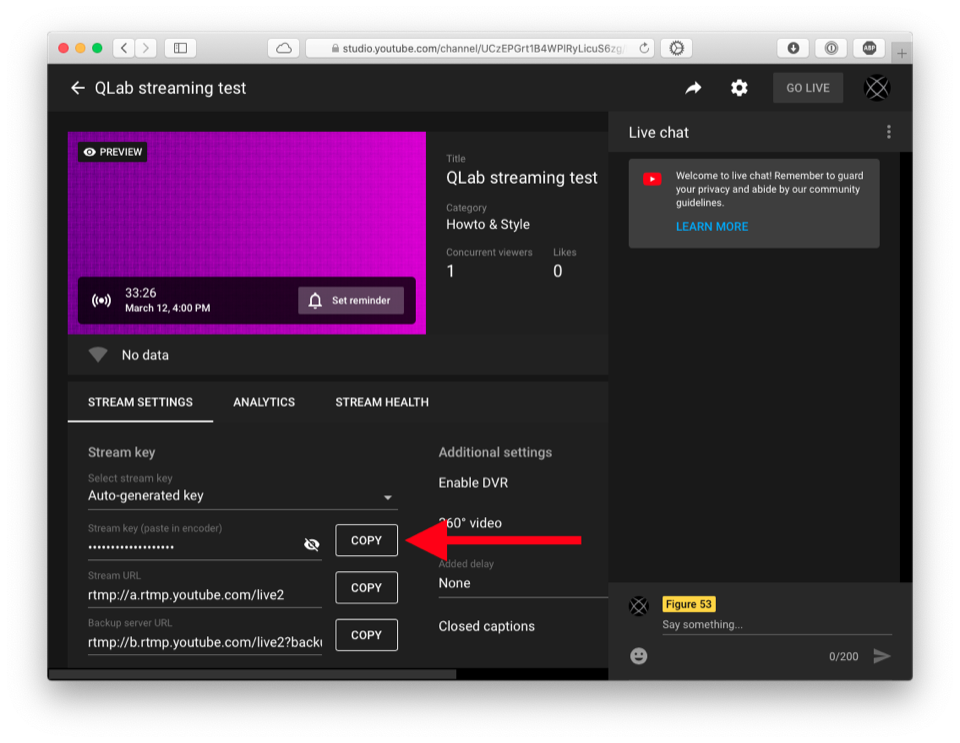
You’ll be asked to fill in some details, and then confirm your choices, then you’ll be looking at the streaming management page. Here is where you find the stream key to paste into OBS:
Once that’s filled in, click Start streaming in the lower right corner of OBS, and after a few seconds you’ll see your video streaming into the YouTube page. Once you do, there’s a blue “GO LIVE” button in the upper right corner. When you click that button, you really are broadcasting live to the world.
Conclusion
As was stated at the beginning, this is a very convoluted setup though hopefully not a very difficult one. Once the initial configuration is complete, the same approach can be used rather simply in new workspaces and for new projects. If you discover anything useful while exploring this topic, or if you create anything that you’re excited to share, please write to us and let us know. We love hearing about folks doing cool things with QLab.
Still have a question?
Our support team is always happy to help.
