Audio Cues
Audio cues allow you to play sound files with precise control over timing, levels, and routing. Audio cues must have a target, which is a sound file on your computer, and an output patch, which is a sound output destination such as your computers’ speakers, headphone jack, or an audio interface.
When an Audio cue is triggered, it begins playing its target file. All Audio cues within a sequence play in sample-accurate sync as long as they’re assigned to the same output patch.
Audio cues may target any file type supported by Core Audio, Apple’s audio framework, but we recommend the following types:
- AIFF
- WAV
- CAF
- AAC
- MP4
- M4A
- MP3 (Because MP3s have inherent timing problems, we do not recommend using them.)
When an Audio cue is selected, six tabs will appear in the Inspector:
- Basics
- Triggers
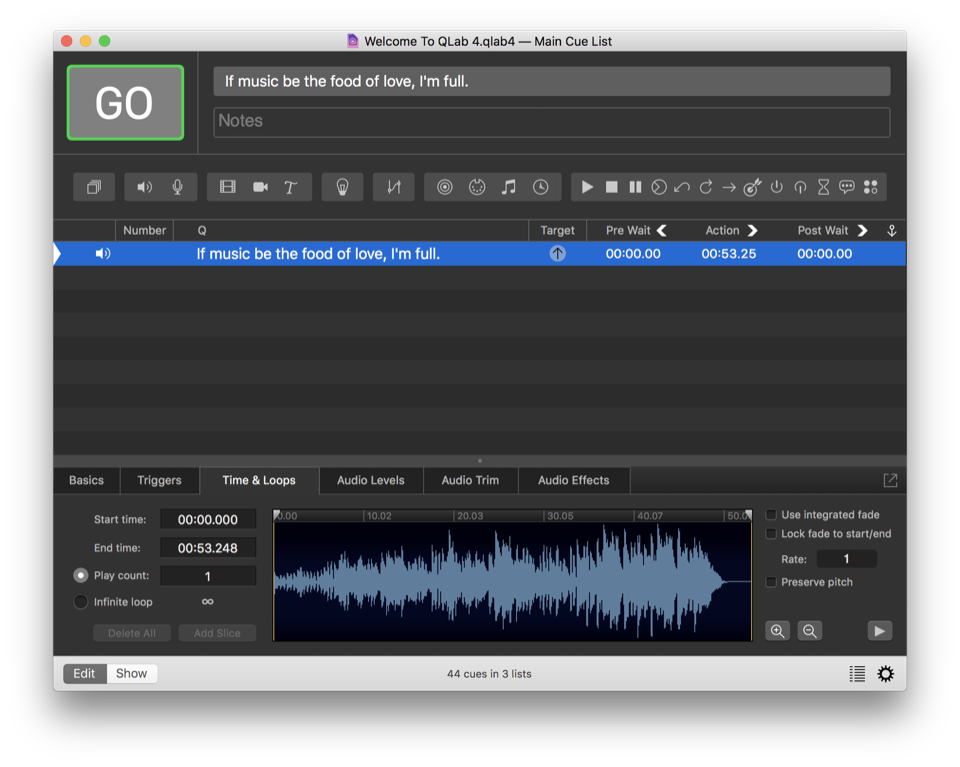
- Time & Loops
- Audio Levels
- Audio Trim
- Audio Effects
The Basics and Triggers tabs are the same for all cue types, and you can learn more about them from the page on the Inspector in the General section of this documentation.
Time & Loops
Start time and end time
You can set the start and end times in three ways:
- You can type values into the start time and end time text fields.
- You can drag the start and end time markers, which are downward-pointing grey triangles at either end of the waveform view.
- You can click in waveform view, or preview the cue and then pause it, and then use the keyboard shortcut ⇧I (“I for in”) to set the start time, or ⇧O (“O for out”) to set the end time.
Play count and infinite loops
Play count is the number of times that the sound file will be played when the cue is run. The default is 1, meaning that the sound file will play once through and then stop. You can change the play count to any whole number to loop the sound file that number of times. Alternately, you can select Infinite loop, right below Play count, to loop the sound indefinitely. Starting with QLab 4.1, these options are available whether or not the cue contains slices.
Slices and the waveform view
The center of the Time & Loops tab shows a waveform view of the target audio file. You can zoom in and out using the + and - buttons to the right of the waveform, or by scrolling vertically.
The Play count and Infinite loop options can loop the entire sound file, but QLab can also loop specific sections of the file. To do this, you create slices within the cue and set each slice to loop as needed.
To create a slice, click in the waveform view and then click the Add Slice button to the left of the waveform, or use the keyboard shortcut M. A green marker, called a slice marker, will appear. A section of the cue between two slice markers, or between a marker and the start or end of the cue, is a slice. The green numbers which appear along the bottom of the waveform view are play counts for each slice. The play count will default to 1, but you can easily edit the count of an individual slice by double-clicking the number at the bottom of the slice and entering a value. To loop a slice infinitely, type 0, inf, or in fact any text that is not a whole number.
You can click the handle at the top of the slice marker and slide it left and right along the waveform to adjust its position, or click on the handle and then enter a value manually in the text field that appears on the left. Note that slice markers cannot be closer together than .05 seconds.
You can also click and drag within the waveform to highlight and select a section of the track, which will cause the Add Slice button to place slice markers on both sides of the selection.
If you set an Audio cue to target an AIFF or WAV file with preexisting markers, those markers will automatically appear in QLab as slice markers. Markers closer together than .05 seconds will be discarded by QLab, though the markers in your file will remain untouched.
To delete a selected slice, select it and hit delete on the keyboard, or drag its slice handle upwards out of the waveform view.
ProTools users will find that markers from ProTools projects will not be included in bounced files, making QLab’s automatic importing of makers somewhat less valuable. Fortunately, there is a workaround as long as you have a two-track editor that allows importing markers (such as TwistedWave):
- Bounce or export your audio as usual.
- In ProTools, choose Export… from the File menu and export your session info as text.
- Open your audio file in your two-track editor and import the text file you created from ProTools. Et voila!
Vamping and Devamping
Looping and slicing cues starts to get really interesting when used in combination with the Devamp cue, which allows you to dynamically exit loops while cues are playing. To learn more about this, visit the section on Devamp cues in this documentation.
Integrated fade envelope
The integrated fade envelope allows you to adjust the overall volume of the cue graphically over its duration. This can be useful for evening out dramatic volume differences, or modulating volume for creative effect.
To use the integrated fade envelope, check the box marked Use integrated fade to the right of the waveform view. A yellow line will appear along the top of the waveform view, and you can click and drag along the line to create fade points. QLab creates a smooth fade between points, but you can make sharper changes by adding points close together.
Note that if you edit the envelope while the cue is playing, you won’t hear your changes until you stop and restart the cue.
You can check the box marked Lock fade to start/end to automatically stretch the integrated fade curve to fit within the start and end time of the cue. If you leave the box unchecked, the integrated fade curve will remain locked to the natural start and end time of the sound file, regardless of the start and end times of the cue.
Rate and pitch
You can adjust the playback rate of the Audio cue by typing a value in the Rate text field to the right of the waveform, or by clicking in that field and dragging up or down. By default, adjusting the rate will adjust pitch as well in a manner similar to changing the playback speed of analogue tape. If you check the Preserve pitch box, the pitch will not be changed along with the rate.
- Rate 1 = 100% (normal speed) - no pitch shift
- Rate .5 = 50% (half speed) - pitched down one octave
- Rate 2 = 200% (double speed) - pitched up on octave
The minimum rate is 0.03, and the maximum rate is 33.
It is worth noting that checking the Preserve pitch box requires slightly more processor power than leaving the box unchecked.
Preview
In the lower right corner of the Time & Loops tab is the Preview button which is labeled with a right-pointing triangle. Clicking this button starts playing the cue without advancing the playhead or triggering any auto-follow or auto-continue. The default keyboard shortcut for previewing a cue is V. While playing, this button changes to a pause button.
Audio Levels
Audio Output Patch
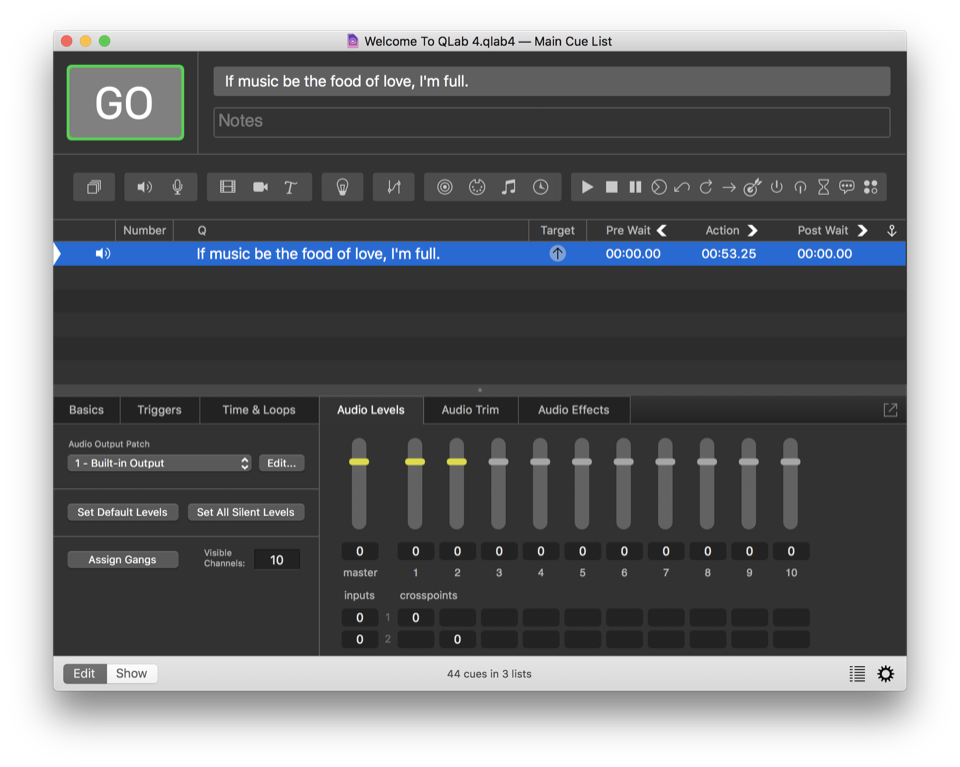
Choose your output patch from the drop-down menu in the top-left corner of the Audio Levels tab. The Edit button directly to its right is a shortcut to the Audio Patch Editor for the selected patch. Generally, you won’t need to touch this much after you set it up for your show. You can learn more about the Audio Patch Editor in its section of this documentation.
Level shortcuts
Default Levels. This button sets all levels in the current Audio cue to match the Audio cue template, which can be found and adjusted to suit your needs in the Cue Templates section of Workspace Settings.
Set all silent. This button does exactly what it seems: it sets all levels for the current Audio cue to -inf.
Gangs
When you click Assign Gangs, all audio levels will be hidden and the mixer will switch to gang assignment mode. In this mode, you can type anything (for example, a single letter) into any level field. All fields which receive the same text will become part of the same gang, or level group. When you click Assign Gangs again, the mixer will switch back to its regular view, and ganged fields will be shown with matching colored backgrounds so you can tell at a glance which fields are ganged. Then, you can simply click and drag one control to adjust every level in that gang by the same amount.
If you gang levels together while they’re at different starting points and start moving them up or down, one level might reach its maximum or minimum level before another. Then and only then will the levels be adjusted disproportionately with one movement. Once the levels catch up to each other at their maximum or minimum, they will all move together.
Visible channels. This control allows you to set the number of output channels currently visible in the mixer. Outputs which are not displayed are not disabled, they’re simply hidden from view. This is only relevant if you have a Pro Audio or Pro Bundle license, since the free version of QLab only permits a maximum of two outputs. The maximum number of outputs available with a Pro Audio or Pro Bundle license is 64.
The Matrix Mixer
The matrix mixer is a grid made of rows and columns, like a spreadsheet. The master output level for the cue is the on the top left, the cue outputs are the column headers, and channels in the audio file are the rows. Typically, there will be two rows besides the header: one for the left channel and one for the right, but QLab supports audio files of up to 24 channels with a Pro Audio or Pro Bundle license.
Crosspoints are the level controls for routing a given input (row) to a given output (column).
Levels can be typed in to each control, or you can click in a field and drag up or down. QLab won’t allow you to drag above 0 dB as a safety measure, but you can type in any level above 0 manually, limited by the maximum level set in audio settings. Since the majority of levels set are below 0 db, QLab will interpret a number entered without a + or - sign as a negative number.
Audio Trim
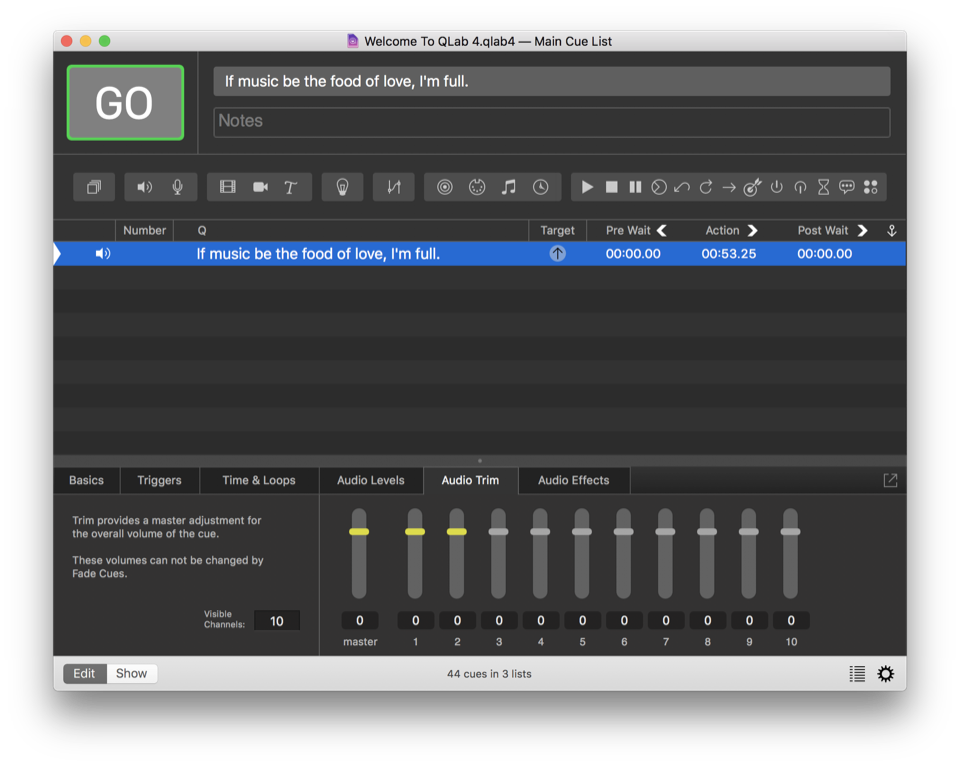
The trim tab is similar to trim on an audio mixer: it provides a master adjustment for the overall volume of the cue. These volumes can not be affected by Fade Cues.
If you make a cue sequence with a bunch of fades and lots of intricate level movement, and then afterwards you decide that one output is too loud throughout the whole sequence, you can adjust the trim in the audio cue instead of adjusting that output in each and every fade cue; just one adjustment and you’re done.
Audio Effects
With a Pro Audio or Pro Bundle license installed, QLab can use AudioUnit effects installed on your Mac to process sound dynamically in realtime. For an AudioUnit to work in QLab, it must be 64-bit, must be defined as an effect (i.e. MIDI synthesizers won’t be available in QLab because they are generators, not effects), and must report a “tail time” (for example, a reverb’s decay time.)
Additionally, the number of channels on your audio file needs to match the number of channels supported by the AudioUnit. If there is a mismatch in channel count, some AudioUnits will pass audio without rendering, and others won’t pass any audio at all. A good example of this behavior is exhibited by Apple’s AUMatrixReverb, which requires a two-channel (stereo) source. If you use AUMatrixReverb on a mono audio track, the audio will pass through the AudioUnit unchanged.
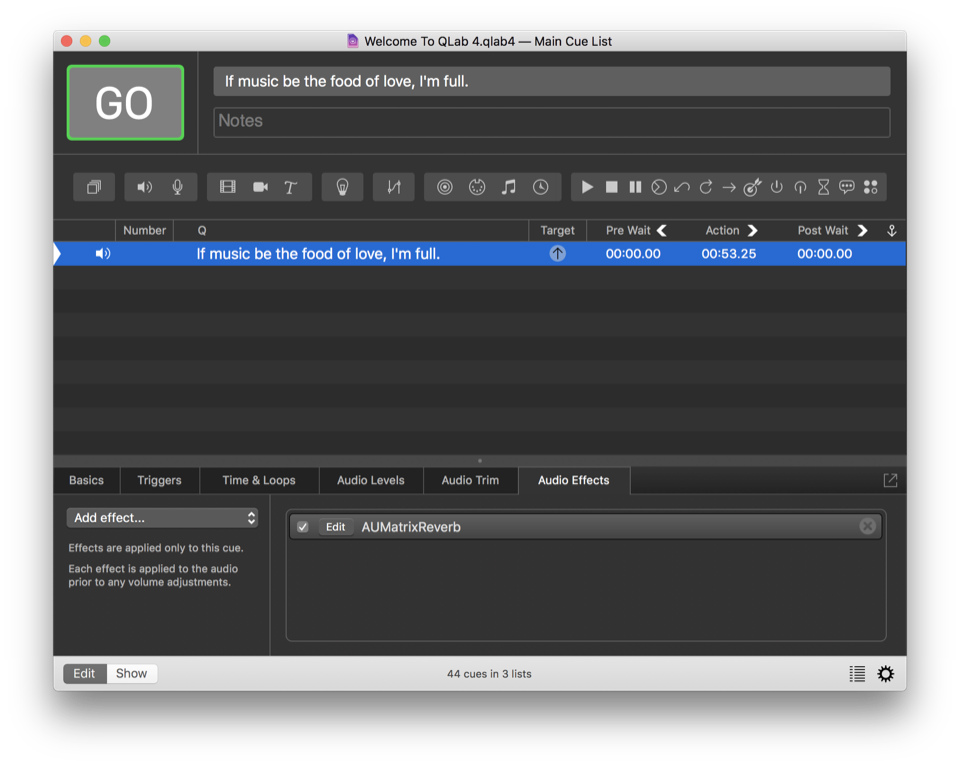
To apply an effect to an Audio cue, select it from the drop-down menu labeled Add Effect… When you select an effect, it will appear in the list to the right of the menu, and an AudioUnit editor window will open automatically. You may close the window and access it again easily anytime by clicking Edit next to the name of the effect in the list. The editor window looks different for each AudioUnit, because each effect requires different controls. QLab uses the built-in interface created by the designer of the AudioUnit, which means the look and feel (as well as quality and usability) of AudioUnits can vary widely.
Please note that meters in AudioUnits used in Audio cues do not render at this time.
You can bypass effects by unchecking the box to the left side of the effect, and you can remove effects by clicking the X to the right side. If the AudioUnit editor window is open, you can also turn the effect on or off by checking or unchecking Enabled in the top right corner of the effect window.
Effects will be applied to the cue in the order in which they appear in the effects list. To change this order, simply click on an effect and drag it up or down within the list.
You can also insert AudioUnits on cue outputs and device outputs. You can find out more about using AudioUnits on outputs in the Audio Patch Editor section of this documentation.
Broken Cues
Audio cues can become broken for the following reasons:
Invalid Audio File
Either the file is missing or damaged, or it’s not one of the supported audio file types.
No audio device. Select one in the “Audio Levels” tab.
You may also need to visit the Audio section of Workspace Settings and connect an audio device to the desired patch.
One or more audio effects in this cue are missing.
This typically happens when a workspace that uses audio effects is moved from one computer to another, and the new computer does not have the necessary AudioUnit installed. Either choose a different audio effect, or install the necessary AudioUnit.
One or more audio effects on the cue outputs are missing.
This typically happens when a workspace that uses audio effects is moved from one computer to another, and the new computer does not have the necessary AudioUnit installed. Either choose a different audio effect, or install the necessary AudioUnit.
One or more audio effects on the device outputs are missing.
This typically happens when a workspace that uses audio effects is moved from one computer to another, and the new computer does not have the necessary AudioUnit installed. Either choose a different audio effect, or install the necessary AudioUnit.
A pro license is required to use audio effects.
You’ll need to either install a Pro Audio or Pro Bundle license, or remove the audio effects from this cue.
Timecode triggers require a Pro license.
You’ll need to either install a Pro Audio or Pro Bundle license, or remove the timecode trigger from this cue.
Still have a question?
Our support team is always happy to help.


