Fading Audio
A Fade cue can be used to adjust the volume levels and audio effect parameters of a targeted Audio or Mic cue. Fade cues can also target Video cues, Camera cues, and Titles cues; when a Fade cue is selected, the inspector will only show the tabs relevant to the type of cue that the Fade cue is targeting.
Fade cues require a target and a duration, and must adjust at least one level or audio effect parameter.
To learn how to set a target for a Fade cue, please refer to the section on targeting other cues in the Getting Started section of this documentation.
When a Fade cue which targets an Audio or Mic cue is selected, four tabs appear in the Inspector:
- Basics
- Curve Shape
- Levels
- Audio Effects
Basics
Please refer to the section on the inspector in the Getting Started section of this documentation.
Curve Shape
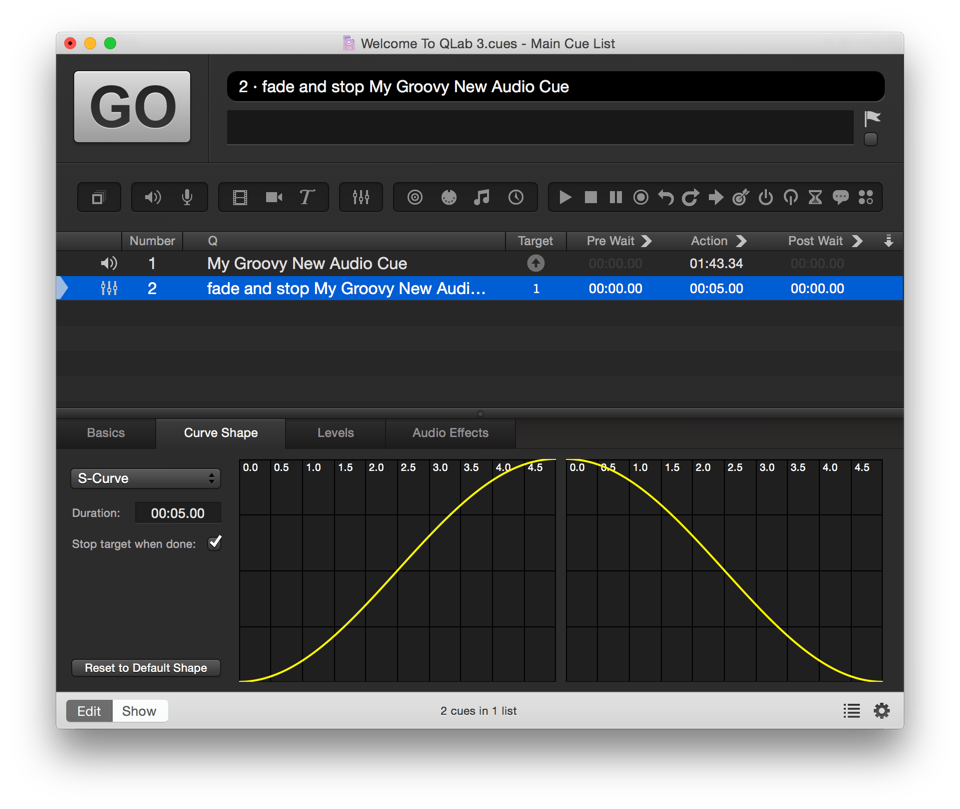
The curve shape determines the manner in which the parameter or parameters are adjusted over the course of the fade. QLab defaults to an S-curve, but any curve can be drawn in the Curve Shape tab by selecting Custom Curve from the drop-down menu in the top left corner of the tab. The curve is drawn in yellow on the right side of the tab. The curve on the left is the shape for levels which are increasing, and the curve on the right is for levels which are decreasing. Click anywhere along the yellow line and a yellow dot, called a control point, will appear. Drag it to change the shape of the curve. Clicking on the curve again to create more control points. The active point will be filled-in yellow circle, and others are yellow outlines. To delete one, click on it to select it and press the delete key on your keyboard. To start over entirely, click Reset to Default Shape in the bottom left corner of the tab.
Check or uncheck the Stop target when done box under the Duration text field depending on whether you would like the target cue to continue playing after the Fade cue is complete, or stop once the Fade is complete.
Levels
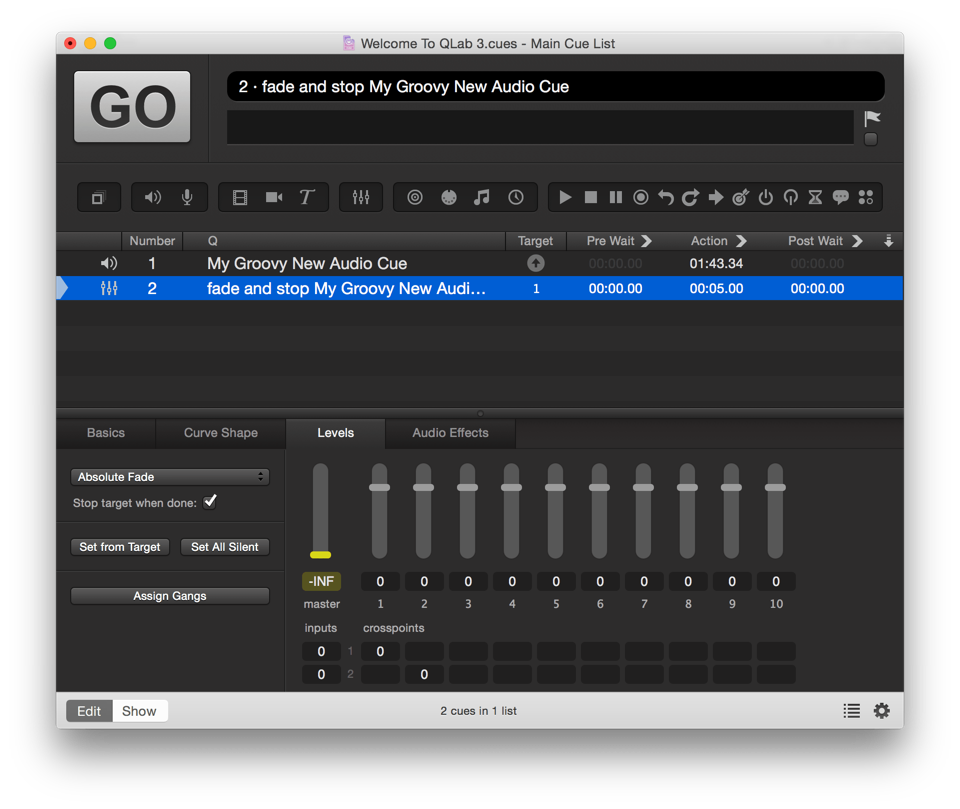
The Levels tab allows you to specify which audio levels you wish to fade, and what their final volume will be. You can specify a different volume for each level.
The right side of the Levels tab looks and behaves like the Matrix Mixer, and will only display as many input channels as exist in the target cue. Only “active” controls will actually be applied to the target cue when the fade cue is fired; this allows you to choose which channels of the sound you want to fade. You can activate or deactivate a control by clicking on it. It will turn yellow when it is active, and grey when it is not. Changing the volume of any slider or knob will automatically activate it.
(See that yellow slider there? That control is active. The rest are grey, and thus inactive.)
The volume of an audio level is specified in decibels (dBFS). The default range of volumes in QLab is +12 dB to -60 dB, which is treated by QLab as -∞, displayed as -INF. Those limits can be changed in Settings.
Click the Gangs button on the left side of the Levels tab to assign gangs to any of the level controls. Each channel in the same gang will be adjusted together when you change the volume of one member of the gang.
Click the Set from target button on the left side of the Levels tab, or use the keyboard shortcut ⇧⌘T, to snap all levels to the levels of the target cue, but keep them deactivated. This is a convenient way to keep track of the levels from which you will be fading.
Click the Set All Silent button on the left side of the Levels tab to return the fade to a pristine state.
There is a Stop Target When Done button in the Levels tab as well as in the Curve Shape tab. They are not different.
Audio Effects
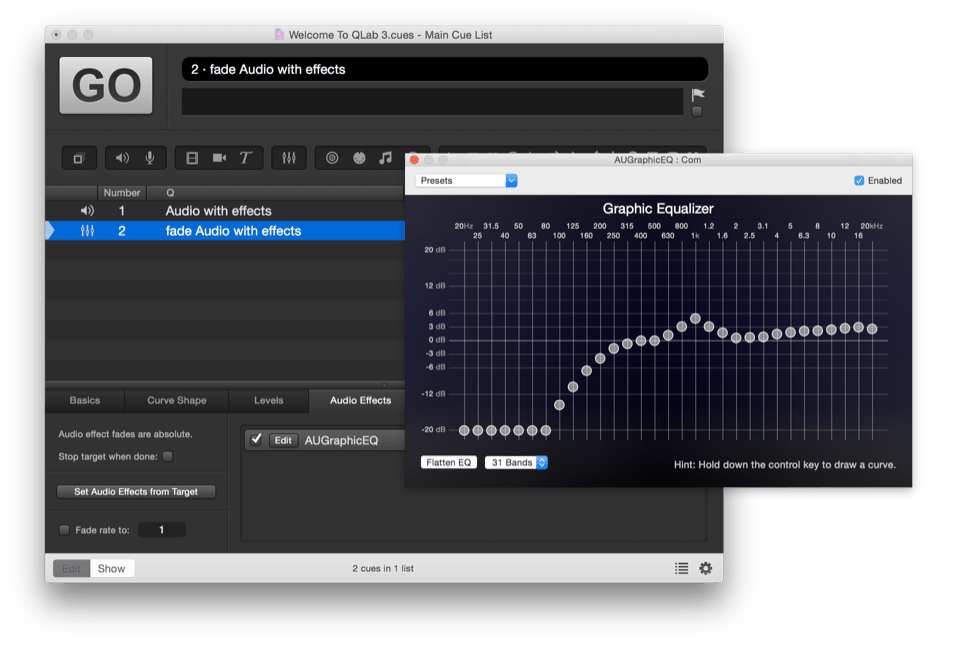
When you apply an effect to an Audio cue, any Fade cues that target that Audio cue will automatically recognize the effects you’ve applied, and they will be listed in the Audio Effects tab of the inspector for the Fade cue. By default, the checkbox next to an effect will be unchecked, meaning that the Fade cue will not adjust parameters of that effect. To control an effect with the Fade cue, just check box next to the effect.
Unlike fading audio levels, there is no way to activate or deactivate individual parameters of an audio effect in a fade. Thus, to avoid accidentally adjusting more parameters than you intend, you can click Set Audio Effects from Target to copy the levels of every parameter in the effect from the target cue, and paste them into the Fade cue. Otherwise, the levels in the Fade cue will default to the built-in default levels for that audio effect.
Once you’ve done that, or elected not to, you can click the Edit button for the effect to adjust the effect.
It’s important to understand that when you click Edit to view the effect, you’re not opening the same window as when you click Edit in the Audio cue. It can be difficult to keep track of which edit window belongs to which cue. Take your time and be sure that you’re making changes in the place you intend.
Make any adjustments you wish to the effect. This is a situation in which Live fade preview can be very helpful. It’s turned on by default, but if you’ve turned it off, consider turning it back on when adjusting audio effects in a Fade cue. That way, you can make adjustments in the Fade cue while the target Audio cue is running, so that you can hear those adjustments in real time.
When you’re done, close the editor window.
Now, when you run the Fade cue, the parameters you adjusted will smoothly fade from their initial values, set in the Audio cue, to the values you set in the Fade cue.
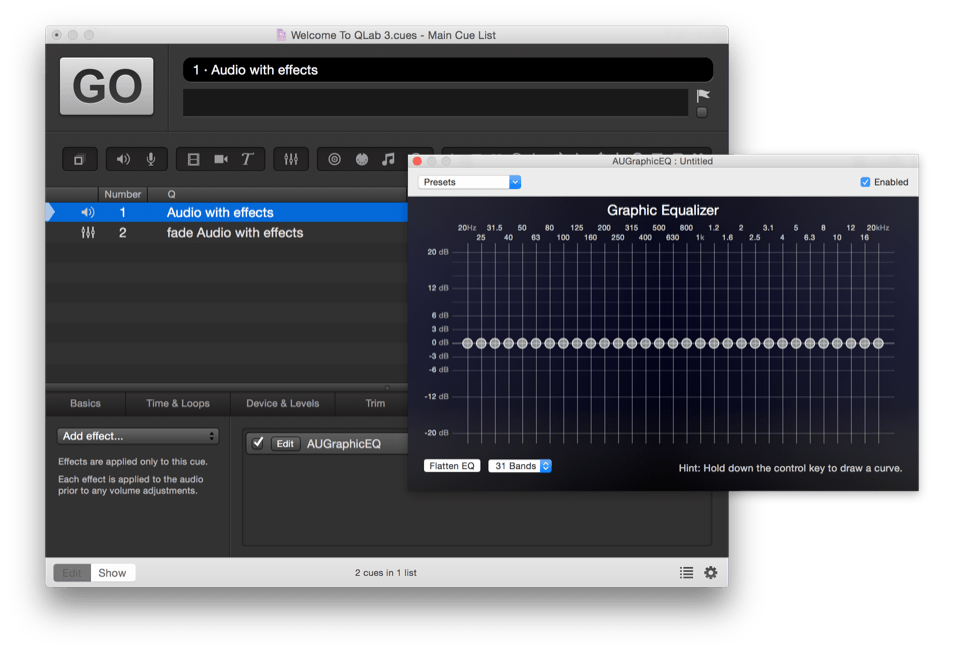
If you’re new to effects editing, try starting with the AUGraphicEQ effect. Create a new Audio cue with a piece of music, and add the AUGraphicEQ effect.
Then, create a Fade cue, target the Audio cue, click “Set Audio Effects from Target” and then open the effect editor for the Fade cue. Make a dramatic adjustment. Play the Audio cue, then the Fade cue.
AudioUnits can also be placed on Cue Outputs and on Device Outputs, but effects there cannot be the target of Fade Cues. To learn more about effects on outputs, see Settings.
Relative Audio Fades
By default, Fade cues are Absolute. This means that any parameters that you adjust with a Fade cue will arrive at their final levels regardless of their status before the Fade cue runs. If you use a Fade cue to set the master level of a target Audio cue to -12, then the master level of that Audio cue will end up at -12 after running the Fade no matter what the level was when the Audio cue started off.
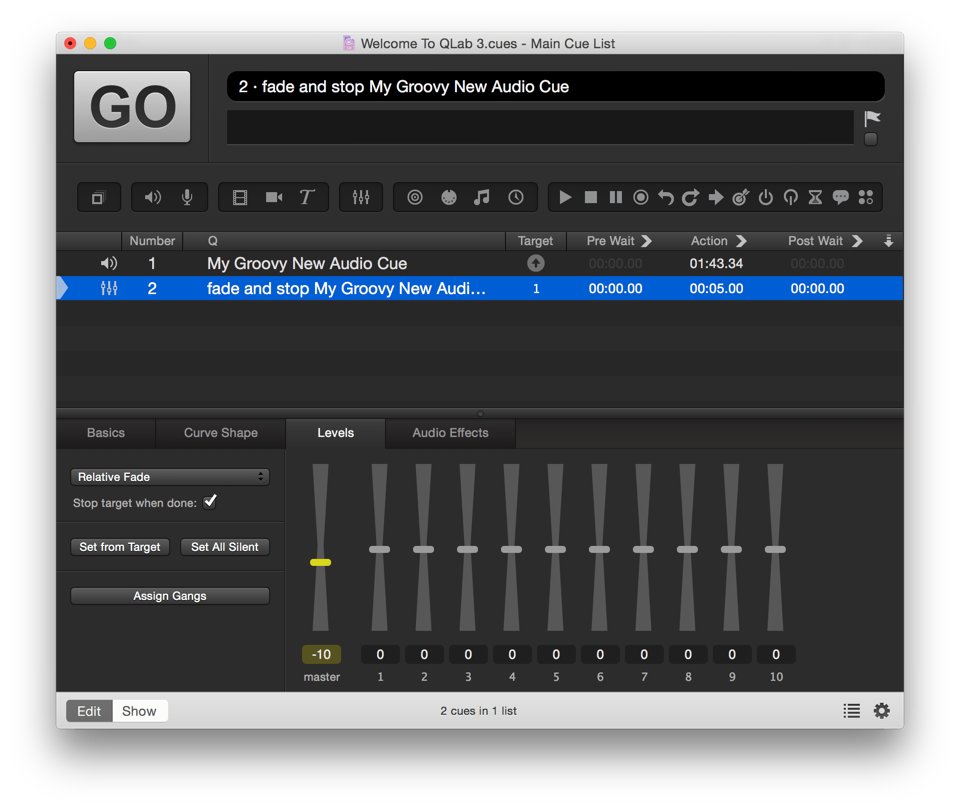
However, using the drop-down menu at the top left corner of the Levels tab, you can set a Fade cue to be a relative fade. Relative fades add or subtract a given amount to the active parameters, so the starting point of those parameters very much matters.
In this screen shot, the Fade cue reduces the master level of the target cue by 10 db. If you run the Fade cue twice, the master level of the target cue will end up -20 below its starting level.
Be very careful with relative fades that raise levels. If, for example, you were to create a relative Fade cue to raise the level of an Audio cue from a very soft level, say -50, up to -10. You’d set the Audio cue to -50, then create a relative Fade cue with a level change of +40. If you accidentally ran that Fade cue twice, QLab would attempt to fade the Audio cue to +30, which is rather loud!
To help protect you against this, QLab has a the maximum level set in the Audio section of Settings. By default, this is +12, meaning that in the example above, the Audio cue would end up at +12, not +30. Depending on the gain structure of your sound system, though, this might still be uncomfortably loud.
Routing and Panning
While fading in, fading out, and adjusting the overall volume of an Audio cue are probably the most common uses of a Fade cue, you can also use a Fade cue to pan an Audio cue amongst any pair or group of outputs.
The best way to understand this is to walk through a simple example. Let’s say you have an Audio cue that targets a mono track, and you want to pan it from one speaker to another. QLab will recognize the track has one channel, and one row will appear in the Device & Levels tab on the inspector for that Audio cue. In the Audio cue, set the level for the first speaker (cue output 1, the first column of the matrix) to 0, and set the level for the second speaker (cue output 2, the second column of the matrix) to -INF. (Note that QLab treats a blank field in this matrix as -INF.)
Next, create a Fade cue which targets the Audio cue, and reverse the levels: set the first output to -INF and the second output to 0. When you play the Audio cue, you will hear it exclusively from output 1. When you play the Fade cue, it will fade down in output 1 and fade up in output 2 over the same duration.
One fade cue can affect as many controls as you wish. If instead of a mono track you have a track with eight channels, and instead of two speakers you have ten, you can enter values in the matrix or adjust the sliders to have different channels come up or down in different outputs.
A key concept here is that if multiple Fade cues share a target, but each Fade cue has different active controls, then those Fade cues can run simultaneously without interfering with each other. Because of this, in the scenario with an eight-channel Audio cue fading amongst ten speakers, very complex fades can be achieved by using simultaneous Fade cues with different active controls, different curve shapes, and different durations.
Reverting Fades
QLab has a sort of special-case undo command that applies only to Fade cues, called Revert Fade Action. You can find this command under the Tools menu when a Fade cue is selected, or you can use the keyboard shortcut ⇧⌘R.
When Revery Fade Action is invoked on a Fade cue after that Fade cue has been run, QLab reverts the levels of the target of the selected Fade cue to whatever they were before the Fade ran except for levels which have been otherwise changed. That is to say, only the adjustments that the selected Fade cue caused are reverted.
Broken Cues
Fade cues can become broken for the following reasons:
No target cue.
Assign a target to the cue.
No fade parameters have been enabled; pick at least one thing to fade.
You can enable or disable an audio control by clicking in it; active controls will be highlighted in yellow. You can enable or disable a video control by checking or unchecking the box next to it.
One or more audio effects in this cue are missing or broken.
This typically happens when a workspace that uses audio effects is moved from one computer to another, and the new computer does not have the necessary AudioUnit installed. Either choose a different audio effect, or install the necessary AudioUnit.
A basic or pro video license is required to fade video geometry.
You’ll need to either install a Basic Video, Pro Video, or Pro Bundle license, or adjust the Fade cue to not fade video geometry parameters.
A pro license is required to fade the playback rate.
You’ll need to either install a Pro Audio, Pro Video, or Pro Bundle license, or adjust the Fade cue to not fade rate.
A pro audio license is required to fade audio effects.
You’ll need to either install a Pro Audio, Pro Video, or Pro Bundle license, or adjust the Fade cue to not fade audio effects.
Timecode triggers require a Pro license.
You’ll need to either install a Pro Audio or Pro Bundle license, or remove the timecode trigger from this cue.
Still have a question?
Our support team is always happy to help.
