- Audio Cues
- Basics
- Time & Loops
- Start time and end time
- Play count and infinite loops
- Slices and the waveform view
- Integrated fade envelope
- Rate and pitch
- Device & Levels
- The Matrix Mixer
- Trim
- Audio Effects
- Slices and Vamping
- Devamp and Continue
- Devamp and Start Next
- Devamp, Start Next, and Stop Target
- Thinking In Bars and Beats
- Audio Signal Flow
- Broken Cues
- Mic Cues
- Fading Audio
- Patch Editor
- Audio Cues
Audio Cues
Audio cues require a target, which must be a file containing sound. QLab can play sounds in most formats, including:
- AIFF
- WAV
- CAF
- AAC
- MP4
- MP3 (this is QLab’s least favorite format. Not only does it sound less than ideal, but it also has inherent timing problems that can interfere with critical timing in unpredictable ways.)
When a Audio cue is selected, five tabs will appear in the Inspector:
- Basics
- Time & Loops
- Device & Levels
- Trim
- Audio Effects
Basics
Please refer to the section on the inspector in the Getting Started section of this documentation.
Time & Loops
Start time and end time
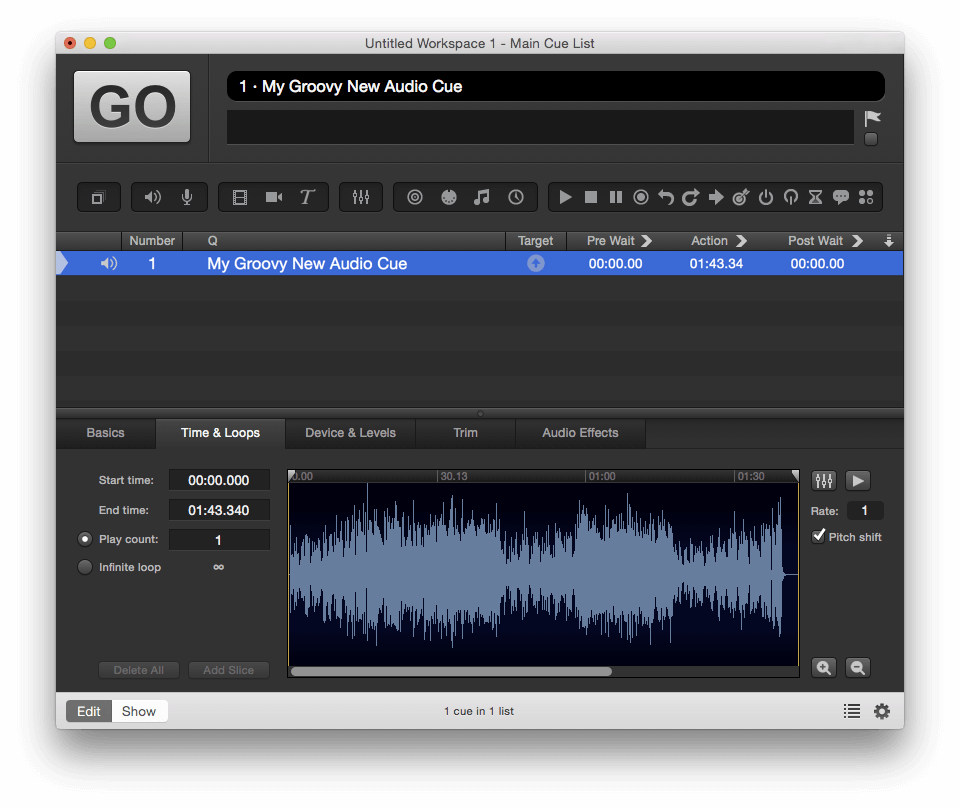
Set the start and end times either by typing values into their respective text fields, or by dragging the time handles (downward-pointing grey triangles) within the waveform viewer.
Play count and infinite loops
Play count defaults to 1, but can be changed to any whole number (X) to repeat the cue X number of times. Alternately, select Infinite loop below the play count field to repeat the cue indefinitely.
Slices and the waveform view
The blue waveform on the right side of the Time & Loops tab is a visual representation of the audio cue. Scroll up and down on the waveform view to zoom in and out, or use zoom buttons on the bottom-right side of the tab.
To loop specific sections of an audio cue, instead of the whole thing, you will need to divide the track into slices. To create a slice, click in the waveform view and then click the Add Slice button to the left of the waveform. A marker similar to the start and end handles will then appear delineating the slice; these markers are green as opposed to grey. Click the handle at the top of the slice marker and slide it back and forth along the waveform to adjust its position, or click on the handle and then enter a value manually in the text field that appears on the left. Note that slices cannot be closer together than .1 seconds.
You can also click and drag within the waveform to highlight and select a section of the track, which will cause the Add Slice button to place slice markers on both sides of the selection.
If you bring in an AIFF or WAV file with preexisting markers, those markers will automatically appear as slices. Markers closer together than .1 seconds will be discarded by QLab, though the markers in your file will remain untouched.
Slices each have their own play count, which is displayed in the bottom center of the slice. The play count will default to 1, but you can easily edit the count of an individual slice by double-clicking the number at the bottom of the slice and entering a value. To loop a slice infinitely, type 0, inf, or in fact any text that is not a whole number.
To delete a selected slice, select it and hit delete on the keyboard, or drag its slice handle upwards out of the waveform view.
ProTools users will find that markers from ProTools projects will not be included in bounced files, making QLab’s automatic importing of makers somewhat less valuable. Fortunately, there is a workaround as long as you have a two-track editor that allows importing markers (such as TwistedWave):
- Bounce or export your audio as usual.
- In ProTools, choose Export… from the File menu and export your session info as text.
- Open your audio file in your two-track editor and import the text file you created from ProTools. Et voila!
Integrated fade envelope
You can click the fader button to the right of the waveform to toggle the integrated fade envelope, which allows you to create a envelope that adjusts the overall volume over the course of the cue.
When the fade envelope is enabled, you can click and drag along the waveform to add fade points. Note that if you edit the envelope while the cue is playing, you won’t hear your changes until you stop and restart the cue.
Rate and pitch
You can adjust the playback rate of the audio cue by typing a value in the Rate text field to the right of the waveform, or by clicking in that field and dragging up or down. The Pitch shift option is checked by default, and will adjust the pitch correspondingly in a manner similar to changing the playback speed of tape.
- Rate 1 = 100% (normal speed) - no pitch shift
- Rate .5 = 50% (half speed) - pitched down one octave
- Rate 2 = 200% (double speed) - pitched up on octave
The minimum rate is 0.03, and the maximum rate is 33.
To keep the pitch the same independent of the rate, simply uncheck the Pitch shift checkbox. It is worth noting that this is (perhaps counterintuitively) slightly more processor-intensive than leaving the option checked.
Device & Levels
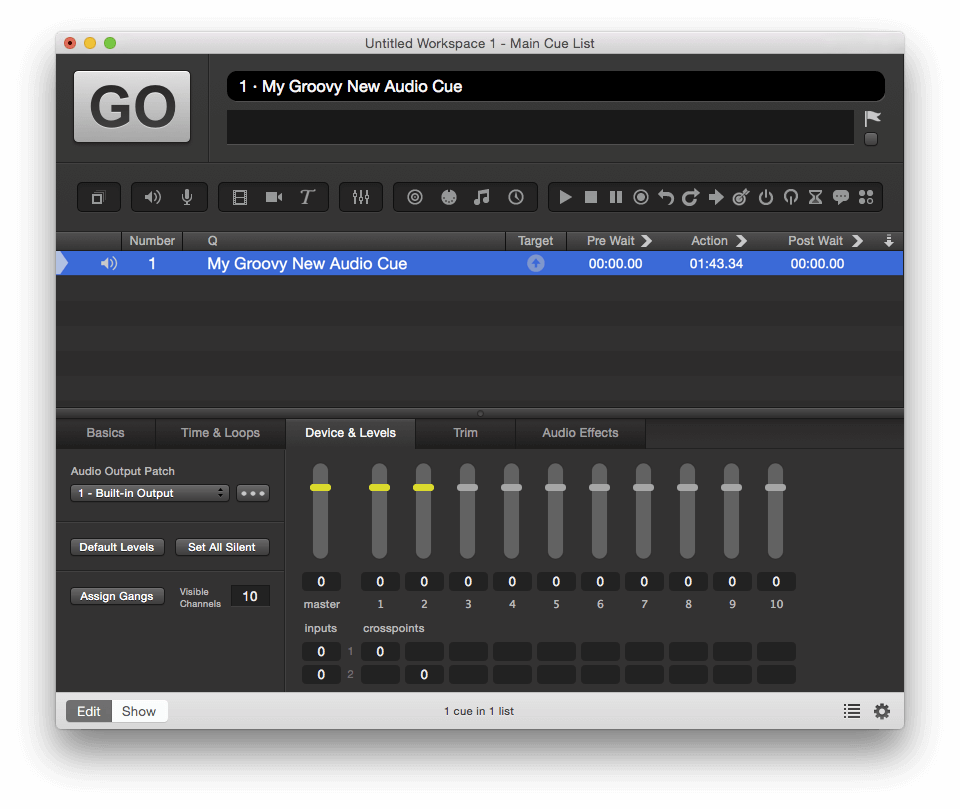
Audio Output Patch. Choose your output patch from the drop-down menu in the top-left corner of the Device and Levels tab. The ••• button directly to its right a shortcut to the Patch Editor for the selected patch. Generally, you won’t need to touch this after you set it up for your show. You can learn more about the Patch Editor in its section of this documentation.
Default Levels. This button sets all levels to the default levels, which can be set in the Audio section of Settings.
Set all silent. This button does exactly what you think it will.
Assign Gangs. When you click this button, all levels will become hidden; you then can type anything (for example, a single letter) into any or all of the levels fields. Any fields which you give the same text will become grouped together. When you click Assign Gangs again, ganged fields will appear with matching colored backgrounds so you can tell at a glance which fields are grouped. Then, you can simply click and drag one control to adjust every level in that group by the same amount.
If you gang levels that have different starting points, one level might reach its maximum or minimum level before another. Then and only then will the levels be adjusted disproportionately with one movement. Once the levels catch up to each other at their maximum or minimum, they will all move together.
Visible channels. This control allows you to set the number of output channels currently visible in the matrix mixer. Outputs which are not displayed are not disabled, they’re simply hidden from view. This is only relevant if you have a Basic Audio, Pro Audio, or Pro Bundle license. The maximum number of outputs available with a Basic Audio license is eight. The maximum number of outputs available with a Pro Audio or Pro Bundle license is 48.
The Matrix Mixer
The matrix mixer is a grid made of rows and columns, like a spreadsheet. The master output level for the cue is the on the left, the cue outputs are the column headers, and channels in the audio file are the rows. Typically, there will be two rows: one for the left channel and one for the right, but QLab supports audio files of up to eight channels with a Basic Audio license or 24 channels with a Pro Audio or Pro Bundle license.
Crosspoints are the level controls for routing a given input (row) to a given output (column).
Levels can be typed in, or you can click and drag in any level field. QLab won’t allow you to drag above 0 dB as a safety measure, but you can type in any level above 0 manually (to the limit of whatever maximum level you set in audio settings).
Trim
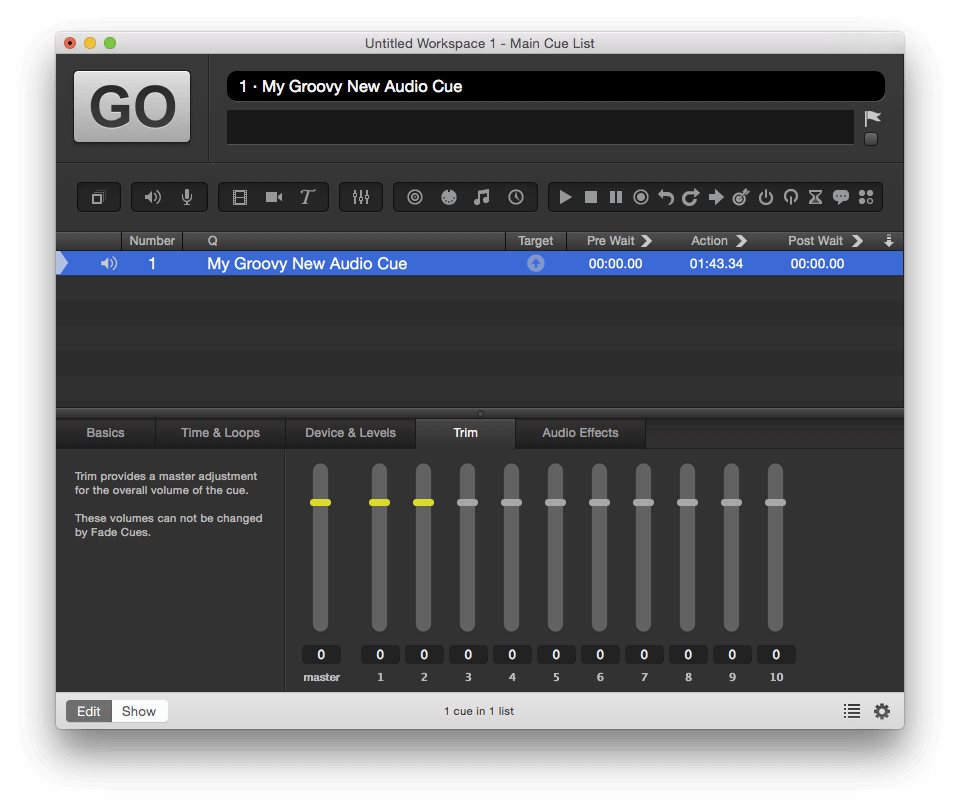
The trim tab is similar to trim on a mixer: it provides a master adjustment for the overall volume of the cue. These volumes will not be affected by Fade Cues, but rather set an overriding master level for the cue.
For example, if you make a cue sequence with a bunch of fades and lots of intricate level movement, and then afterwards you decide that one output is too loud throughout the whole sequence, you can adjust the trim in the audio cue instead of adjusting that output in each and every fade cue; just one adjustment and you’re done.
Audio Effects
QLab gives you the ability to add audio effects to your cues, enabling you to process them dynamically from in realtime. In order to work in QLab, AudioUnits must be 64-bit, must be defined as an effect (i.e. MIDI synthesizers won’t be available in QLab because they are generators, not effects), and must report a “tail time” (for example, a reverb’s decay time.)
Additionally, the number of channels on your audio file needs to match the number of channels supported by the AudioUnit; if it does not, some AudioUnits will pass audio without rendering, and others won’t pass any audio at all. A good example of this behavior is exhibited by Apple’s AUMatrixReverb, which requires a two-channel (stereo) source. If you use AUMatrixReverb on a mono audio track, the audio will pass through the AudioUnit unchanged.
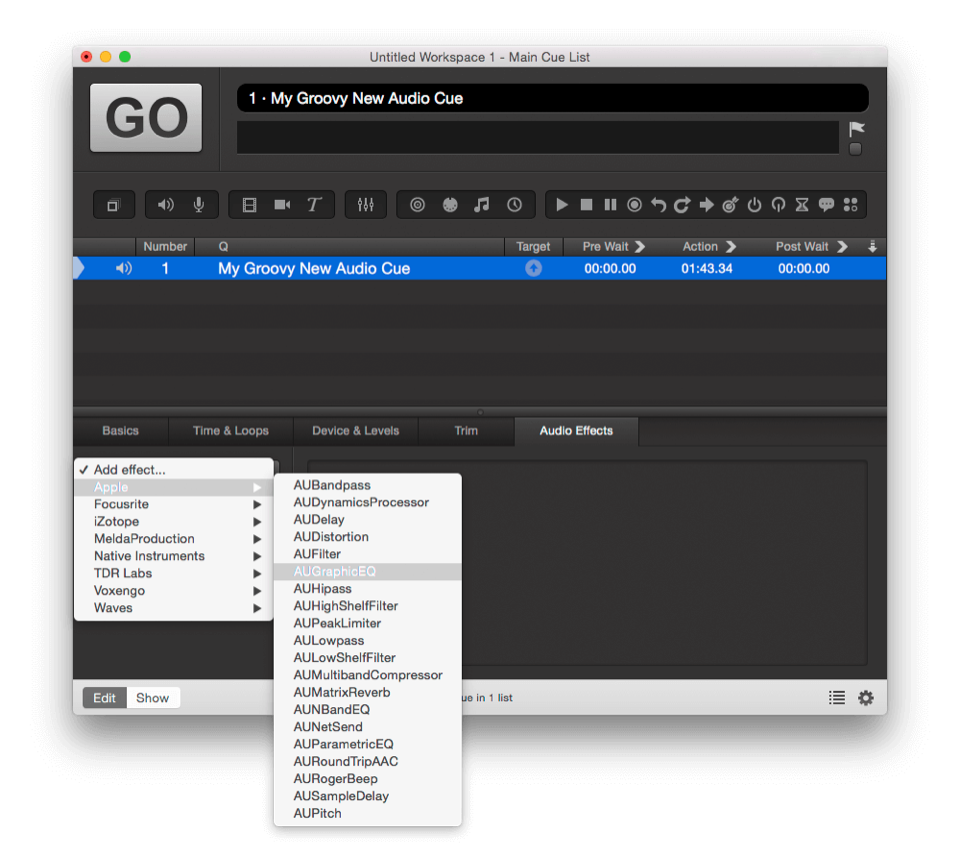
To apply an effect to an Audio cue, select it from the drop-down menu labeled Add Effect… When you select an effect, it will appear in the list to the right of the menu, and an AudioUnit editor window will open automatically. You may close the window and access it again easily anytime by clicking Edit next to the name of the effect in the list. The editor window looks different for each AudioUnit, as each effect requires different controls. QLab uses the built-in interface created by the designer of the AudioUnit, which means the look and feel (as well as quality and usability) of AudioUnits can vary widely.
Please note that meters in AudioUnits do not render at this time.
You can enable or disable effects by checking or unchecking the box to the left side of the effect, and you can delete effects by clicking the X to the right side. If the AudioUnit editor window is open, you can also turn the effect on or off by checking or unchecking Enabled.
Effects will be applied to the cue in the order in which they appear in the effects list. To change this order, simply click on an effect and drag it up or down within the list.
You can also insert AudioUnits on cue outputs and device outputs. You can find out more about using AudioUnits on outputs in the Patch Editor section of this documentation.
Slices and Vamping
Slices enable you to loop specific sections of an Audio cue or Video cue either a specific number of times, or an infinite number of times. If you set a loop in the middle of a cue, the Devamp cue gives you the ability to dynamically exit the loop and either continue to play through the cue, or trigger a following cue at the precise moment that the loop ends.
There are three ways to use a Devamp cue.
Devamp and Continue
First, create an Audio or Video cue with at least one slice towards the beginning of the cue, and set that slice to loop infinitely by double clicking the green slice count in the bottom of the waveform view, and typing 0 or inf. For the purposes of this example, it’s a good idea for the slice to be longer than a few seconds.
Next, create a Devamp cue and target the Audio or Video cue with the looping slice. Look in the Settings tab of the inspector, and you’ll see two checkboxes. Leave them unchecked.
Now, run the Audio or Video cue, and notice when it reaches the looping slice. It will keep repeating that slice indefinitely… until you run the Devamp cue. Run the Devamp, and then when the playback reaches the end of the slice, it will no longer loop, and instead proceed onwards.
If you have multiple looping slices in the Audio or Video cue, you can use multiple Devamp cues to pop out of each loop. Each Devamp cue will un-loop whichever slice is currently looping at the time the Devamp cue is triggered.
Devamp and Start Next
First, create an Audio or Video cue with at least one slice towards the beginning of the cue, and set that slice to loop infinitely by double clicking the green slice count in the bottom of the waveform view, and typing 0 or inf. For the purposes of this example, it’s a good idea for the slice to be longer than a few seconds.
Next, create a Devamp cue and target the Audio or Video cue with the looping slice. Look in the Settings tab of the inspector, and you’ll see two checkboxes. Check the box marked Start next cue when target reaches the end of the current slice.
Finally, create another Audio or Video cue directly after the Devamp cue.
Now, run the Audio or Video cue, and notice when it reaches the looping slice. It will keep repeating that slice indefinitely… until you run the Devamp cue. Run the Devamp, and then when the playback reaches the end of the slice, it will no longer loop, and instead proceed onwards.
At the same moment that the original cue passes the slice marker and continues onwards, the Devamp cue will trigger the following cue to play. This can be very useful for starting another, unrelated cue on a musical downbeat, or for starting a second layer of video in perfect time.
Devamp, Start Next, and Stop Target
First, create an Audio or Video cue with at least one slice towards the beginning of the cue, and set that slice to loop infinitely by double clicking the green slice count in the bottom of the waveform view, and typing 0 or inf. For the purposes of this example, it’s a good idea for the slice to be longer than a few seconds.
Next, create a Devamp cue and target the Audio or Video cue with the looping slice. Look in the Settings tab of the inspector, and you’ll see two checkboxes. Check the box marked Start next cue when target reaches the end of the current slice. and the box marked Stop target when it reaches the end of the current slice.
Finally, create another Audio or Video cue directly after the Devamp cue.
Now, run the Audio or Video cue, and notice when it reaches the looping slice. It will keep repeating that slice indefinitely… until you run the Devamp cue. Run the Devamp, and then when the playback reaches the end of the slice, it will stop.
At the same moment that the original cue stops, the Devamp cue will trigger the following cue to play. This can be useful for starting a new section of music after a downbeat or for putting a visual button on the end of a looping video.
Thinking In Bars and Beats
The Devamp cue enables QLab to behave as though it’s aware of bars and beats by putting slice markers on each beat, and using Devamp cues to trigger actions that line up perfectly with those beats. As with all things, giving yourself plenty of time to experiment is the key to success.
Audio Signal Flow
Audio travels through QLab in this order:
- File (for Audio Cues) or Audio Interface input (for Mic Cues)
- Input controls
- Cue Audio Effects
- Crosspoint controls
- Cue Output controls
- Master Level control
- Cue Output Audio Effects
- Device Routing matrix
- Device Output Audio Effects
- Audio interface control software (if applicable)
- Audio interface
Broken Cues
Audio cues can become broken for the following reasons:
Invalid Audio File
Either the file is missing or damaged, or it’s not one of the supported audio file types.
No audio device. Select one in the “Device & Levels” tab.
You may also need to visit the Audio section of Settings and connect an audio device to the desired patch.
One or more audio effects in this cue are missing.
This typically happens when a workspace that uses audio effects is moved from one computer to another, and the new computer does not have the necessary AudioUnit installed. Either choose a different audio effect, or install the necessary AudioUnit.
One or more audio effects on the cue outputs are missing.
This typically happens when a workspace that uses audio effects is moved from one computer to another, and the new computer does not have the necessary AudioUnit installed. Either choose a different audio effect, or install the necessary AudioUnit.
One or more audio effects on the device outputs are missing.
This typically happens when a workspace that uses audio effects is moved from one computer to another, and the new computer does not have the necessary AudioUnit installed. Either choose a different audio effect, or install the necessary AudioUnit.
A pro license is required to use audio effects.
You’ll need to either install a Pro Audio or Pro Bundle license, or remove the audio effects from this cue.
Timecode triggers require a Pro license.
You’ll need to either install a Pro Audio or Pro Bundle license, or remove the timecode trigger from this cue.
Still have a question?
Our support team is always happy to help.


