Workspaces
Each document in QLab is called a workspace. A workspace is composed of a collection of cue lists, which are in turn composed of a collection of cues.

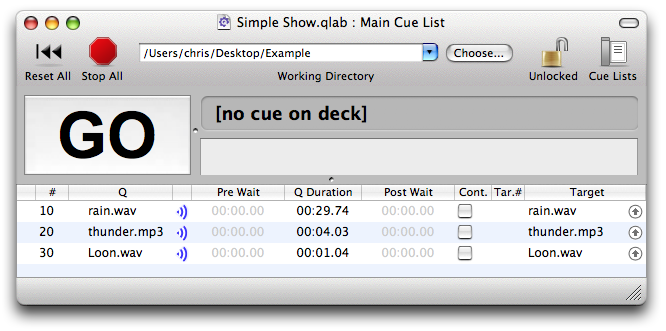
A workspace with three sound cues.
The currently selected cue list is displayed in the main outline of the workspace window. Each cue of the list is displayed in one row of the outline. The selected row represents the playback position of the cue list. Pressing the “GO” button fires the cue list, causing the currently selected cue to be triggered and the playback position to advance.
You may have more than one workspace open at a time. You may cut and paste (or drag and drop) cues from one workspace to another.
Adding cue lists
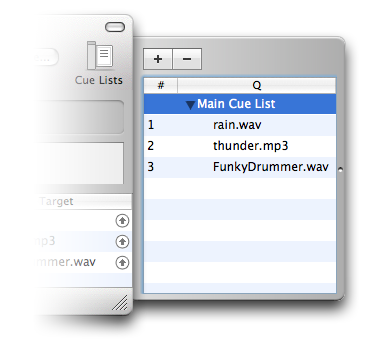
A workspace may have an unlimited number of cue lists. Cue lists may be viewed in the cue list drawer, which is accessed by pressing the drawer toolbar button. Cue lists may be added and removed by using the plus and minus buttons in the cue list drawer.
An alternate approach for creating cue lists is to convert a Group Cue into a cue list. Group Cues dragged from the Qbox into the cue list drawer will become new cue lists. Group Cues that already exist inside another cue list may be dragged to the drawer to be converted into a new cue list. All the cues that were in the group will become part of the new cue list. Similarly, cue lists dragged into other cue lists are converted into Group Cues. (Learn more about groups with the Group Cue.)

The cue list drawer.
Adding cues
New cues are added using the Qbox. See the Qbox documentation for how this is accomplished.
The components of a cue row
Each row of a workspace outline displays several pieces of information about a cue. This information includes the cue’s status, number, name, type, duration, wait information, autocontinue value, and target information.
The status of the cue may be one of four values:
| Status | Icon | Meaning |
|---|---|---|
| Running |  |
The cue is currently running or waiting. |
| On Deck |  |
The cue has been loaded and is ready to be fired. |
| Broken |  |
The cue has an invalid or incomplete setting and can not be played. |
| Blank | (no icon) | The cue is not running, loaded, or broken. |
The other cue properties displayed in a cue row are described in the Cue documentation.
Ordering cues
Cues may be reorganized within cue lists by dragging and dropping them to new locations. If a dragging operation is invalid, such as attempting to drag a Group Cue within itself, QLab will not allow the operation. You may select multiple cues to drag at once by holding down the shift key as you click each cue you want to drag.
Dragging operations, along with all other changes to a QLab workspace, are undoable.
Changing the time display mode
The three columns in the workspace that display time information can display it in one of three modes. Click on the column header to cycle through the available display modes for that column: total length, elapsed time, and remaining time.
Setting targets
Many cues in a workspace have targets. The exact meaning of the target depends upon the type of cue, but no cue may have more than one target. For cues that have targets, the target is either another cue or the path to a file. This target represents the object upon which the cue acts in some way. For example, a Start Cue will start its target and a Sound Cue will play the sound file located at its target.
You can set a target in several different ways. For cues that operate upon other cues, you can either drag the desired target cue onto the receiving cue, or you can enter the number of the target cue directly via the keyboard.
For cues that operate on files, drag the file from the Finder onto the receiving cue to set the target. Alternately, you can enter the path to the file directly by editing the target text. (The path is relative to the working directory for the workspace.) Another way to set file targets is to click on the arrow button in the cue row. This will bring up a dialog box through which you can pick the file you want to use for the cue.
By default, pressing ‘T’ on the keyboard will edit the target of the currently selected cue.
Cues will attempt to determine if they can accept the target you are dropping on them. In the case of a Sound Cue, for example, it will attempt to determine if the file you are dropping is a sound file of a type that the cue can play. If the Sound Cue can handle the file, a black rectangle is drawn around the row in the cue list indicating that the file will be accepted. If the file cannot be handled, no such rectangle will be drawn and the drop operation will not be permitted.
Navigating the cue list
Several key commands are available to make navigating the cue list easier:
| Key | Function |
|---|---|
| Up Arrow | Move to the previous cue. |
| Down Arrow | Move to the next cue. |
| - | Move to the top of the last sequence. |
| + | Move to the top of the next sequence. |
| Right Arrow | Expand the currently selected Group Cue. |
| Left Arrow | Collapse the currently selected Group Cue. |
| > | Expand all Group Cues. |
| < | Collapse all Group Cues. |
Bundling a Workspace
In the process of building your workspace, you may have used media files from a variety of locations on your computer. This can make it difficult to transfer your workspace to a new computer, or archive it for later use.
To address this problem, QLab offers a feature called “bundling”. You may bundle any workspace using the “File” → “Bundle Workspace…” menu item. When you bundle a workspace, QLab will first prompt you to enter a name and destination for your bundled workspace. This name is used to create a new folder for your workspace. Your workspace file and every media file referenced in your workspace are then copied to this new folder. The working directory of the workspace is set to this folder, and all target strings in the workspace are updated to use these new media files. The bundled workspace can then be easily transferred to a new machine.
The Toolbar
The workspace toolbar offers several handy controls for the workspace. You can customize the controls displayed in the toolbar by right-clicking or control-clicking on the toolbar and selecting “Customize Toolbar…”
Resetting the workspace

The “Reset All” toolbar button stops every cue in the workspace, resets the playback position of every cue list to their first cue, and loads the first sequence of every cue list.
Stopping all cues

The “Stop All” toolbar button stops every cue in the workspace but does not alter the cue list playback positions.
Pressing the escape key is equivalent to pressing the “Stop All” toolbar button in every open workspace.
Loading a sequence

The “Load Sequence” toolbar button causes the sequence of cues starting at the currently selected cue to be loaded. A loaded cue has been prepared in every way possible to be started immediately. A Sound Cue, for example, will load part of its sound file into a buffer to enable immediate audio playback.
When a cue list is fired and the playback position is advanced, the next cue sequence is loaded automatically.
Cues that are loaded and “on deck” display a yellow circle ( ) in their status column.
Refreshing targets

The “Refresh Targets” toolbar button causes all media files in the workspace to be reloaded. This can be helpful if you are editing your media files in external applications while building the workspace.
Showing/hiding group outlines

The “Show/Hide Group Outlines” toolbar button allows you to… you guessed it, show and hide the group cue outlines.
Locking the workspace

You can use the “Lock” toolbar button to lock or unlock a workspace. When locked, you cannot change the workspace.
Working Directory
For cues that use file targets, the file is stored as a relative path. When the cue needs to access the file, the workspace’s working directory is appended to the relative path.
For example, with the working directory:
/Users/hamlet/Desktop/
and the target string
Murder of Gonzago/music.wav
QLab will try to load the file
/Users/hamlet/Desktop/Murder of Gonzago/music.wav
By using working directories QLab provides an easy way to transfer your projects between computers. When you create a new workspace, set the working directory to the folder containing the files you plan to use in your project. (This folder may contain other folders as well. The important thing is that, to take advantage of the working directory, all the files used in your project should be stored somewhere within the hierarchy of your working directory.) If you wish to move your project to another computer, simply copy the folder containing your files to the other computer, open the workspace on the new computer, and enter the new path to the working directory on the new computer.
Still have a question?
Our support team is always happy to help.