Video Cue
Video Cues allow you to display movies and still images on any screen attached to your computer. Video Cues are built on Quicktime, allowing them to use any media supported by Quicktime. This includes MOV, AVI, MPEG, JPG, PNG, MIDI music files, etc.
A Pro Video license is required to reactivate Video Cues that have been saved to disk. In addition, the Video Cue requires a graphics card that supports Quartz Extreme and Core Image, and may require a relatively new CPU and graphics card to guarantee performance. When in doubt, try it out.
Basics
Video Cues are built on Quicktime, making them able to play back all file formats understood by Quicktime. When a Video Cue is fired, it will be placed on top of any previously fired Video Cues. Remember that even if you cannot see it, a previously fired cue may still be running. To achieve the best performance, you should use a Stop Cue to halt Video Cues that you no longer need.
Setting a Background
You will notice that no default “background color” is set on your attached displays. Thus, if a full screen video is stopped, you may see the desktop of your computer until another video begins to play. This behavior is intentional. You can use the Video Cue itself to create whatever background image you wish to see. If you simply wish to have a black background, then drag a black image into your workspace as your first Video Cue. Obviously, you can choose any color or image you like for your background.
Hiding the Cursor
When the workspace is locked the cursor will automatically be hidden whenever a Video Cue is displayed full screen on the main display. You can lock the workspace with the Lock toolbar button. (If you do not see the Lock toolbar button, Control-click or Right-click on the workspace toolbar and select “Customize Toolbar…“)
Settings

Playback Parameters
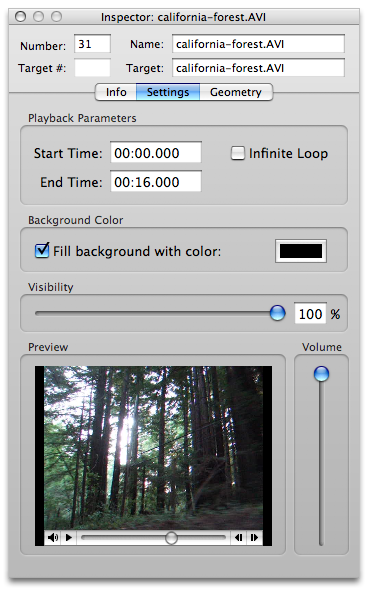
The playback parameters of a Video Cue include the start time, the end time, and the option for playing the video file in an infinite loop.
Background Color
With the background color parameter you can specify a fill color for the video’s background, or choose to have no fill color.
Visibility
The Visibility controls determine the opacity of the Video Cue. The Video Cue will be displayed initially at the visibility set here, and you can use a Video Fade Cue to adjust the visibility for fading effects.
Preview
The Preview panel of the Settings tab allows you to view the movie or still image file that will be displayed by the Video Cue.
Volume
Use the Volume control to set the initial volume level of a movie. The audio from the movie will play through the default output for your computer. You can use a Fade Cue to adjust that volume as you would with a normal Sound Cue (only the master channel of the Fade Cue will be used).
Geometry

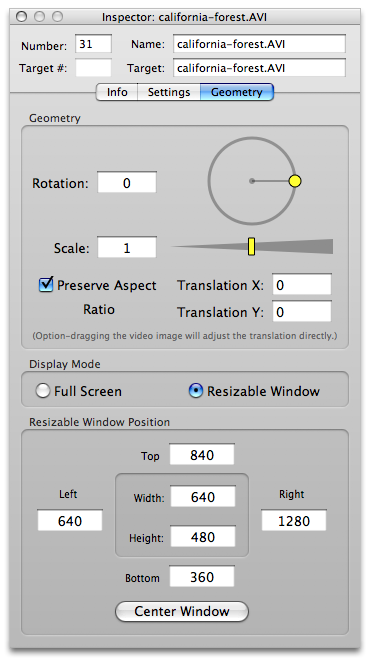
You may use the geometry settings to adjust the rotation, scale, translation, and aspect ratio of the video.
Option-clicking the rotation control will set the rotation to 0, 90, 180, or 270 degrees (in that order).
Option-clicking the scale control will set the scale to 1. The scale slider only goes up to 2, but you may enter an arbitrary scale value directly into the scale text field.
Option-dragging the video image itself will allow you to adjust the translation parameters directly.
Display Mode
Each Video Cue may be displayed either in full screen mode or in a resizable window. When a Video Cue is displayed in a resizable window you can adjust its position and location on screen. To do this, first fire the cue to make it appear. Then click and drag the video to relocate it, or click and drag the lower right corner of the video to resize it.
Display Patch
When the Video Cue is in full screen mode the Display Patch parameter will appear. This parameter allows you to assign the cue to an attached display. Each patch may be assigned to one of up to eight attached displays in the Video Cue preferences.
Resizable Window Position
When the Video Cue is in resizable window mode the Resizable Window Position box will appear. This box contains text fields where you can explicitly set the position of the top, left, right, and bottom sides of the window. You can also specify the width and height of the window. Finally, the “Center Window” button allows you to center the window on its current screen. If the window is located off screen, this button will allow you to center the window on the main screen. (QLab purposefully does not automatically relocate a video window on screen to allow you to open a workspace that was made on a different computer with different available displays without changing the location of the video windows.)
Preferences
The preferences panel for Video Cues allows you to map display patches to display devices.
To map a patch to a device, click on the output patch you wish to map and drag the patch connector to the desired display device.
Note that you may have more than one patch connect to the same display device.
Still have a question?
Our support team is always happy to help.