Sound Cue
Sound Cues play sound files, and thus accept sound files as their target. Sound Cues are built on CoreAudio, making them able to play all file formats understood by CoreAudio. These formats include WAVE, AIFF, MP3, and others. More than one Sound Cue may use the same sound file as a target. Note that compressed audio formats such as MP3 require significantly more processing power to play than uncompressed formats such as WAVE and AIFF. Therefore, when you need to play many sounds simultaneously you will benefit from using uncompressed formats.
When playing a sound file, Sound Cues buffer their audio data for increased performance and decreased latency during playback. When a Sound Cue is loaded this buffer is filled.
Settings
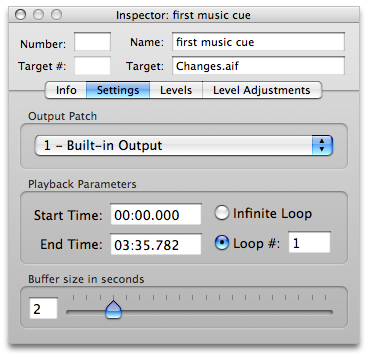
Output patch
The output patch determines which output device is used by the Sound Cue. The mapping of output patch to output device can be set in the Sound Cue preferences panel. The abstraction of the output patch makes it easy to build designs for which the final audio devices are unknown, or to adjust a workspace to accommodate changes in the available output devices on the current system.
Playback parameters
The playback parameters of a Sound Cue include the start time, the end time, and the looping parameters. Start and end times may be specified to millisecond accuracy. By default, a Sound Cue loops only once (i.e. plays through one time). You may loop the sound a finite number of times by selecting the “Loop #” button and setting the desired number in the text box, or an infinite number of times by selecting the “Infinite Loop” button.
Buffer size
You may specify that a Sound Cue should buffer between 0.5 and 10 seconds of audio data. You should rarely need to change the buffer size from the default value, but if you have a particularly demanding series of cues that require a great deal of disk access, you may benefit from increasing the buffer size. Note that a large buffer takes a longer time to fill, which is reflected in the amount of time it takes to load cue sequences.
Volume Knobs and Sliders
To adjust a volume knob or slider, click on it and drag the mouse up or down.
The volume knobs and sliders are colored according to whether they are “live” or “dead”. Yellow sliders and knobs are live, while gray ones are dead. This distinction indicates that not all channels will apply to all sound files or output devices. Most sound files, for example, provide only one or two channels of audio data. For these files only the first two rows of volume knobs will be live. Similarly, the number of available output channels determines how many columns of the mixer are live. Built-in audio, for example, provides two-channel playback, causing only the first two columns to be live.
Each slider of a Sound Cue can be assigned a gang using the gang buttons (found below the sliders). The gang of the slider is represented by a color. When the value of a master or output channel is adjusted, QLab will apply the same adjustment to all the channels in the same gang.
Levels
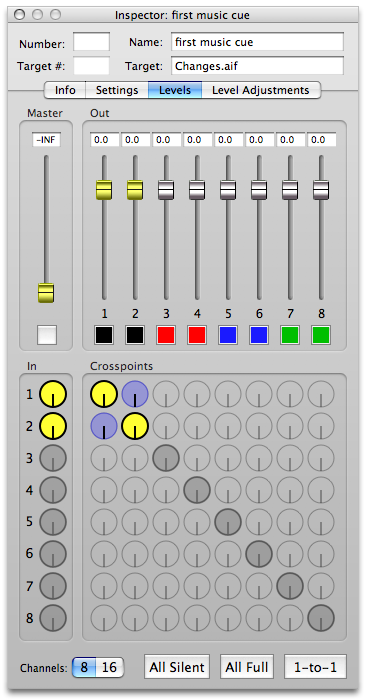
The Levels tab allows you to set the initial volume of the sound when it begins to play. These are the levels a Fade Cue will adjust. Most of the time, you should only need to set the Levels of a sound.
To give an example, consider fading a sound in from silence to full volume. First, set the master level for the Sound Cue to -infinite dB. This will force the Sound Cue to be silent when it first begins to play. Then create an absolute Fade Cue that adjusts the master level up to 0 dB. This will fade the sound to full volume.
If you have an Enhanced Audio License you can access up to 16 output channels with each Sound Cue.
Level Adjustments
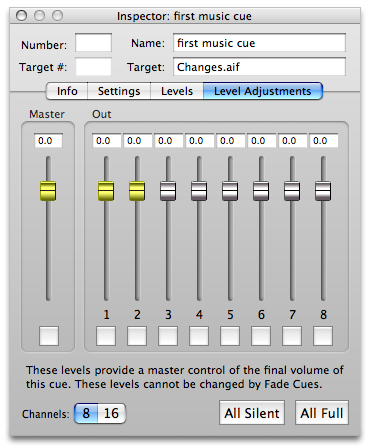
The Level Adjustments tab allows you to tweak the “global” level of each output channel. You may not change these parameters very often. An example of their use would be if you have a series of fades operating on a single Sound Cue: the series of fades may be just right except that you want to bump the whole thing up a little. Instead of having to adjust each separate end volume for each fade of the sound, you can simply go to the Level Adjustments of the cue and change the master volume up in one place.
The Level Adjustments can only be changed manually; they can not be changed by a Fade Cue.
If you have an Enhanced Audio License you can access up to 16 output channels with each Sound Cue.
Preferences
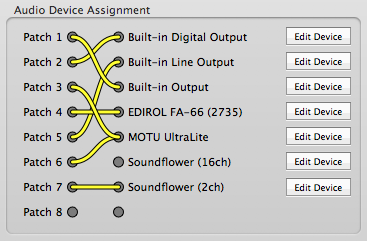
The preferences panel for Sound Cues allows you to map output patches to output devices.
To map a patch to a device, click on the output patch you wish to map and drag the patch connector to the desired output device.
Note that you may have more than one patch connected to the same output device.
If you have an Enhanced Audio License, you will see buttons that allow you to edit the settings of each audio device. Those settings are described below.
Aggregate Devices
Users with an Enhanced Audio License can assign Sound Cue patches to aggregate audio devices. Aggregate audio devices may be created using Apple’s Audio MIDI Setup utility. Note that aggregate audio devices can require significantly more processing power to use than normal audio devices, and older systems may not be able to handle the additional load.
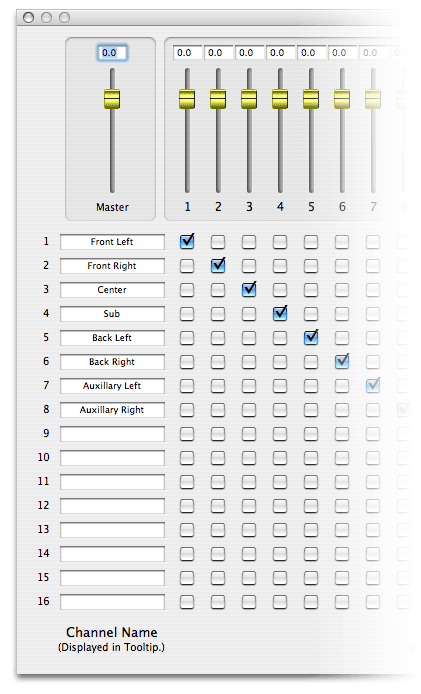
Device Volume Levels
With an Enhanced Audio License, you may adjust each sound device’s master volume level or individual output channel levels. These levels are global—the audio from every Sound Cue assigned to this output device will be affected by these level adjustments.
Device Channel Routing
The device editor also allows you to route each of the 16 output channels of the Sound Cue to one or more output channels of the physical device. You can assign the 16 output channels of the cues to up to 32 physical device outputs, in any combination.
Each row of the channel patch represents one Sound Cue output. Each column of the channel patch represents one physical device output. If the physical device has fewer than 32 outputs, some columns will be disabled.
Click on the checkboxes to route each of the sixteen cue outputs to one or more of the physical outputs. For example, if you wish to direct channel 1 of the every sound cue to channel 4 of the physical device, click the checkbox at row 1, column 4. C hannel routing changes are made immediately.
Device Channel Names
You may assign custom channel names to each of the sixteen Sound Cue output channels. QLab will display these names in a tooltip when you hold the mouse over the output slider in the Sound Cue inspector tab.
Still have a question?
Our support team is always happy to help.